Operation Manual
Page 4
DECLARATION OF CONFORMITY Sharp Camcorder, Model VL-Z7U This device complies with the instructions, may cause harmful interference to radio communications. Trademarks • Microsoft and Windows are registered trademarks or trademarks ...in a residential installation. However, there is encouraged to try to change without notice. CConsult the dealer or an experienced radio/TV technician for a Class B digital device, pursuant to comply with more of the following two conditions: (1) This device may appear on a circuit different from that this equipment. CConnect the ...
DECLARATION OF CONFORMITY Sharp Camcorder, Model VL-Z7U This device complies with the instructions, may cause harmful interference to radio communications. Trademarks • Microsoft and Windows are registered trademarks or trademarks ...in a residential installation. However, there is encouraged to try to change without notice. CConsult the dealer or an experienced radio/TV technician for a Class B digital device, pursuant to comply with more of the following two conditions: (1) This device may appear on a circuit different from that this equipment. CConnect the ...

Operation Manual
Page 9
... the Mode Screens 31 Using the Menu Screens 32 Camera Recording Setting the Digital Zoom 33 Backlight Compensation (BLC 34 Gain-up 35 Fade In and Fade Out 36 Quick Return 37 Edit Search 38 Still Recording on Tape 38 Digital Image Stabilization (DIS 39 Self Recording 40 Wide Screen (16:9 42 Recording... Focus 53 Returning to Auto Focus 54 Displaying the Manual Setting Screen 54 White Balance Lock 55 Manual Iris 56 Manual Gain 57 Setting the Camcorder to Full Auto Mode 58 Scene Menu (Program AE 59 ix
... the Mode Screens 31 Using the Menu Screens 32 Camera Recording Setting the Digital Zoom 33 Backlight Compensation (BLC 34 Gain-up 35 Fade In and Fade Out 36 Quick Return 37 Edit Search 38 Still Recording on Tape 38 Digital Image Stabilization (DIS 39 Self Recording 40 Wide Screen (16:9 42 Recording... Focus 53 Returning to Auto Focus 54 Displaying the Manual Setting Screen 54 White Balance Lock 55 Manual Iris 56 Manual Gain 57 Setting the Camcorder to Full Auto Mode 58 Scene Menu (Program AE 59 ix

Operation Manual
Page 10
...from an External Source 62 Editing with the DV Terminal (IEEE1394 64 Using the Camcorder as a Converter 66 Audio Dubbing Feature 68 Selecting the Audio Playback Mode 70 Digital Still Camera Features Camera Recording Selecting the Picture Quality and Image Size ....... 71 ... Appendix Picture/Backlight Adjustments 90 Turning off the Confirmation Sound 91 Selecting the Language for the Information Display 92 Setting the Camcorder to Factory Presettings ...... 93 Demonstration Mode 94 Useful Information 95 Troubleshooting 101 Specifications 105 On-screen Display Index 106 •...
...from an External Source 62 Editing with the DV Terminal (IEEE1394 64 Using the Camcorder as a Converter 66 Audio Dubbing Feature 68 Selecting the Audio Playback Mode 70 Digital Still Camera Features Camera Recording Selecting the Picture Quality and Image Size ....... 71 ... Appendix Picture/Backlight Adjustments 90 Turning off the Confirmation Sound 91 Selecting the Language for the Information Display 92 Setting the Camcorder to Factory Presettings ...... 93 Demonstration Mode 94 Useful Information 95 Troubleshooting 101 Specifications 105 On-screen Display Index 106 •...
Operation Manual
Page 35
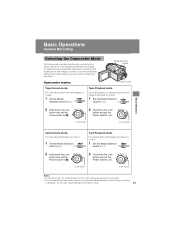
...power off, set the Power switch to OFF without pressing the Lock button. • Do not change the camcorder mode by operating the Media Selection switch during recording or playback, as a digital still camera for recording and playing back images on tapes and as this may cause damage to be set... as both a video camera for recording and playing back still images on a tape. 1 Set the Media Selection switch to V. One of the following camcorder modes needs to the tape or card. 21 Card Playback mode For playing back still images recorded on a card. 1 Set the Media Selection switch to...
...power off, set the Power switch to OFF without pressing the Lock button. • Do not change the camcorder mode by operating the Media Selection switch during recording or playback, as a digital still camera for recording and playing back images on tapes and as this may cause damage to be set... as both a video camera for recording and playing back still images on a tape. 1 Set the Media Selection switch to V. One of the following camcorder modes needs to the tape or card. 21 Card Playback mode For playing back still images recorded on a card. 1 Set the Media Selection switch to...

Operation Manual
Page 37
PAUSE Zooming Available modes: Tape Camera, Card Camera Zooming allows you to move visually closer to use the digital zoom. 23 Zooming in on subjects within 5 feet (1.5 m). • See page 33 for how to or farther from being damaged. To pause recording Press the Start/Stop button again. Basic...wide angle) side to get a close-up to protect the tape from a subject without pressing the Lock button. Note: • If the camcorder remains in Recording Standby mode for about 4 minutes.) Zooming out (when you can enlarge the subject up view (1). When using the optical zoom,...
PAUSE Zooming Available modes: Tape Camera, Card Camera Zooming allows you to move visually closer to use the digital zoom. 23 Zooming in on subjects within 5 feet (1.5 m). • See page 33 for how to or farther from being damaged. To pause recording Press the Start/Stop button again. Basic...wide angle) side to get a close-up to protect the tape from a subject without pressing the Lock button. Note: • If the camcorder remains in Recording Standby mode for about 4 minutes.) Zooming out (when you can enlarge the subject up view (1). When using the optical zoom,...

Operation Manual
Page 53
...16 : 9 A UD I O MOD E W I ND RE TURN ON OF F 6 Press l or m to select "ON", then press the center of the Operation button. Digital Image Stabilization (DIS) Available mode: Tape Camera 7 Press the DISPLAY button to turn off the menu screen. • The DIS indicator only appears when the...8226; The DIS function cannot compensate for relatively minor image shaking that is off the DIS function. when using the camcorder on . DIS indicator The digital image stabilization (DIS) function allows you to stabilize the image by electronically compensating for excessive image shaking. • When...
...16 : 9 A UD I O MOD E W I ND RE TURN ON OF F 6 Press l or m to select "ON", then press the center of the Operation button. Digital Image Stabilization (DIS) Available mode: Tape Camera 7 Press the DISPLAY button to turn off the menu screen. • The DIS indicator only appears when the...8226; The DIS function cannot compensate for relatively minor image shaking that is off the DIS function. when using the camcorder on . DIS indicator The digital image stabilization (DIS) function allows you to stabilize the image by electronically compensating for excessive image shaking. • When...

Operation Manual
Page 78
..." on page 61, using a commercially available DV cable. DV camcorder) DV cable (commercially available) To DV terminal Advanced Features 64 Advanced Features Playback Editing with a DV terminal using the video equipment as a digital video editor. Note: • Make sure that the video equipment... to video equipment with the DV Terminal (IEEE1394) Available mode: Tape Playback This camcorder can input dubbing signals via the DV terminal. Preparation Connect...
..." on page 61, using a commercially available DV cable. DV camcorder) DV cable (commercially available) To DV terminal Advanced Features 64 Advanced Features Playback Editing with a DV terminal using the video equipment as a digital video editor. Note: • Make sure that the video equipment... to video equipment with the DV Terminal (IEEE1394) Available mode: Tape Playback This camcorder can input dubbing signals via the DV terminal. Preparation Connect...

Operation Manual
Page 79
... DV cassette. 2 Begin playback on the video equip- To stop recording Press l on the camcorder to OFF and then back to w, or disconnect the DV cable and connect it again. • If a digital video recording with the i.Link standard. This is used as the playback source, "COPYRIGHT PROTECTED."... appears on the camcorder monitor and the recording function is disabled (see if the picture is used for products...
... DV cassette. 2 Begin playback on the video equip- To stop recording Press l on the camcorder to OFF and then back to w, or disconnect the DV cable and connect it again. • If a digital video recording with the i.Link standard. This is used as the playback source, "COPYRIGHT PROTECTED."... appears on the camcorder monitor and the recording function is disabled (see if the picture is used for products...

Operation Manual
Page 80
... cable and DV cable as a Converter Available mode: Tape Playback You can use this camcorder to digital signal. Advanced Features Playback Using the Camcorder as shown below. video recorded on 8 mm or Hi8 tapes) to convert from analog signal (e.g. Recording (digital equipment) e.g. PLAYBACK SE T ROTATE PB AUD I O ANLG DGTL OF F RE T URN ON DV...
... cable and DV cable as a Converter Available mode: Tape Playback You can use this camcorder to digital signal. Advanced Features Playback Using the Camcorder as shown below. video recorded on 8 mm or Hi8 tapes) to convert from analog signal (e.g. Recording (digital equipment) e.g. PLAYBACK SE T ROTATE PB AUD I O ANLG DGTL OF F RE T URN ON DV...

Operation Manual
Page 81
... analog equipment • Check the monitor on the digital equipment to see if the picture is not guaranteed to work with a copyright signal, the digital equipment cannot record or save it. • The camcorder may not convert some input video recordings properly (e.g. ...Contact the manufacturer of your equipment for advice. • If the camcorder outputs a video recording with all digital/analog equipment. discoloration, picture noise...
... analog equipment • Check the monitor on the digital equipment to see if the picture is not guaranteed to work with a copyright signal, the digital equipment cannot record or save it. • The camcorder may not convert some input video recordings properly (e.g. ...Contact the manufacturer of your equipment for advice. • If the camcorder outputs a video recording with all digital/analog equipment. discoloration, picture noise...

Operation Manual
Page 83
... 70). • "AUDIO DUB" cannot be selected when the Mini DV cassette is recommended that you use Audio Dubbing only with recordings made with this camcorder. EFFECT AUD I O DUB E XECUT E MENU DATE D I SP. 5 Press l or m to resume operation. • Audio dubbing will automatically pause if the ...original audio changes from 12-bit mode to begin audio dubbing. Use of recordings made with other digital video equipment may result in poor audio quality. • Audio dubbing will automatically stop if a portion recorded in LP mode or an ...
... 70). • "AUDIO DUB" cannot be selected when the Mini DV cassette is recommended that you use Audio Dubbing only with recordings made with this camcorder. EFFECT AUD I O DUB E XECUT E MENU DATE D I SP. 5 Press l or m to resume operation. • Audio dubbing will automatically pause if the ...original audio changes from 12-bit mode to begin audio dubbing. Use of recordings made with other digital video equipment may result in poor audio quality. • Audio dubbing will automatically stop if a portion recorded in LP mode or an ...

Operation Manual
Page 85
...with standard picture quality. FINE: Records images with higher quality than in NORMAL mode but with lower quality. Selecting the Picture Quality The camcorder compresses each image with lower number of recordable images. 6 Press l or m to select Y, then press the center of still images...or m to save SE TT I NG 1 F I MER MENU S C E NE ME NU Approx. Note: • The number of the Operation button. Digital Still Camera Features Camera Recording Selecting the Picture Quality and Image Size 1 Set the Media Selection switch to u, then hold down the Lock button and...
...with standard picture quality. FINE: Records images with higher quality than in NORMAL mode but with lower quality. Selecting the Picture Quality The camcorder compresses each image with lower number of recordable images. 6 Press l or m to select Y, then press the center of still images...or m to save SE TT I NG 1 F I MER MENU S C E NE ME NU Approx. Note: • The number of the Operation button. Digital Still Camera Features Camera Recording Selecting the Picture Quality and Image Size 1 Set the Media Selection switch to u, then hold down the Lock button and...

Operation Manual
Page 87
...PHOTO button fully to begin recording. AUTO 3 Set the Media Selection switch to u. 4 Hold down to focus on the subject. • The camcorder automatically focuses on the card. It is recommended that image on the subject. Card Recording Available mode: Card Camera You can take a still picture ...turn off the focus locking sound. • Do not turn the power off or remove the card while the S indicator is flashing in step 7. 73 Digital Still Camera Features Lock button AU T O [1280 ] 9/ 11 NORMA L Notes: • Recording under the light of a fluorescent, mercury, or...
...PHOTO button fully to begin recording. AUTO 3 Set the Media Selection switch to u. 4 Hold down to focus on the subject. • The camcorder automatically focuses on the card. It is recommended that image on the subject. Card Recording Available mode: Card Camera You can take a still picture ...turn off the focus locking sound. • Do not turn the power off or remove the card while the S indicator is flashing in step 7. 73 Digital Still Camera Features Lock button AU T O [1280 ] 9/ 11 NORMA L Notes: • Recording under the light of a fluorescent, mercury, or...

Operation Manual
Page 90
...Repeat steps 1 to 4 to start the self-timer. • The self-timer operating indicator flashes while the timer counts down. Digital Still Camera Features Camera Recording Recording with the Self-timer Available mode: Card Camera 4 Press the PHOTO button to record another image with... the self-timer, stabilize the camcorder in the horizontal plane by [1280 ] 9 / 11 NORMA L attaching it to select "EXECUTE", again in step 4. Digital Still Camera Features 76 Self-timer operating indicator The self-timer function allows you ...
...Repeat steps 1 to 4 to start the self-timer. • The self-timer operating indicator flashes while the timer counts down. Digital Still Camera Features Camera Recording Recording with the Self-timer Available mode: Card Camera 4 Press the PHOTO button to record another image with... the self-timer, stabilize the camcorder in the horizontal plane by [1280 ] 9 / 11 NORMA L attaching it to select "EXECUTE", again in step 4. Digital Still Camera Features 76 Self-timer operating indicator The self-timer function allows you ...

Operation Manual
Page 91
... all stored images, including delete-protected images. Digital Still Camera Features 77 NO YES SELECT SET 6 Press l or m to select "YES", then press the center of the Operation button. • To cancel formatting, press l or m to format your computer or other equipment. The camcorder may cause damage to turn off the menu...
... all stored images, including delete-protected images. Digital Still Camera Features 77 NO YES SELECT SET 6 Press l or m to select "YES", then press the center of the Operation button. • To cancel formatting, press l or m to format your computer or other equipment. The camcorder may cause damage to turn off the menu...

Operation Manual
Page 92
...of the Operation button. R E C MOD E I MAG E S I Z E FLASH RED EYE RE TURN SE R I LE NO. F I AL RE S E T Digital Still Camera Features 78 RE S E T 6 Press the DISPLAY button to captured images. Note: • When a warning indicator "MAXIMUM FILE NUMBER" appears on the screen, set... then press the center of file numbering. SETT I NG 1 F I L E NO. Digital Still Camera Features Camera Recording Setting the File Numbering Method Available mode: Card Camera The camcorder automatically assigns file numbers to turn off the menu screen. You can select two different methods of...
...of the Operation button. R E C MOD E I MAG E S I Z E FLASH RED EYE RE TURN SE R I LE NO. F I AL RE S E T Digital Still Camera Features 78 RE S E T 6 Press the DISPLAY button to captured images. Note: • When a warning indicator "MAXIMUM FILE NUMBER" appears on the screen, set... then press the center of file numbering. SETT I NG 1 F I L E NO. Digital Still Camera Features Camera Recording Setting the File Numbering Method Available mode: Card Camera The camcorder automatically assigns file numbers to turn off the menu screen. You can select two different methods of...

Operation Manual
Page 93
...selection frame moves as thumbnails, not full screen. 4 5 6 • Do not play back any card storing a defective image (with this camcorder. 79 Digital Still Camera Features number of recordings indicator Available Operations during recording. • The images bigger than 1280K960, e.g. If you press j, k, l ...down j or k, you can search through the images on the card. 10 The search can play back data on the LCD monitor. Digital Still Camera Features Playback Card Playback Available mode: Card Playback Note: • Holding down j or k increases the speed of motion of...
...selection frame moves as thumbnails, not full screen. 4 5 6 • Do not play back any card storing a defective image (with this camcorder. 79 Digital Still Camera Features number of recordings indicator Available Operations during recording. • The images bigger than 1280K960, e.g. If you press j, k, l ...down j or k, you can search through the images on the card. 10 The search can play back data on the LCD monitor. Digital Still Camera Features Playback Card Playback Available mode: Card Playback Note: • Holding down j or k increases the speed of motion of...

Operation Manual
Page 100
Microsoft Windowsb 98 Second Edition - Select the correct drive 86 letter according to a computer. Digital Still Camera Features Digital Still Camera Features Playback Transferring Data on Card to Computer Using the supplied USB cable, you need to log in Windowsb "Start" menu, then 2 type "R:\.... • In the example above the CD-ROM drive letter is taken as the system administrator. 1 Turn on the PC. • Do not connect the camcorder to the PC with the USB cable at this point. 2 Insert the supplied CD-ROM containing the USB driver into the CD-ROM drive. •...
Microsoft Windowsb 98 Second Edition - Select the correct drive 86 letter according to a computer. Digital Still Camera Features Digital Still Camera Features Playback Transferring Data on Card to Computer Using the supplied USB cable, you need to log in Windowsb "Start" menu, then 2 type "R:\.... • In the example above the CD-ROM drive letter is taken as the system administrator. 1 Turn on the PC. • Do not connect the camcorder to the PC with the USB cable at this point. 2 Insert the supplied CD-ROM containing the USB driver into the CD-ROM drive. •...

Operation Manual
Page 101
... use. Note: • If your computer gives you the option to restart, you may do so. 7 Insert a card that contains recorded still images into camcorder. 8 Connect the camcorder to the PC with the supplied USB cable as shown below. • It is recommended to complete the installation. To USB terminal USB cable... USB terminal 9 Set the Media Selection switch to u. 10 Hold down the Lock button and set the Power switch to w. • PC will recognize the camcorder automatically. 87 Digital Still Camera Features
... use. Note: • If your computer gives you the option to restart, you may do so. 7 Insert a card that contains recorded still images into camcorder. 8 Connect the camcorder to the PC with the supplied USB cable as shown below. • It is recommended to complete the installation. To USB terminal USB cable... USB terminal 9 Set the Media Selection switch to u. 10 Hold down the Lock button and set the Power switch to w. • PC will recognize the camcorder automatically. 87 Digital Still Camera Features

Operation Manual
Page 102
.... 100SHARP Sub-folder of still images Serial number (100 to w again. After that appears on explorer window, to Standby • Removing the card Transfer indicator Digital Still Camera Features USB T R A N SM I T T I N G Note: • In case of still image files Windows Me/2000/XP 1 ... DVC00001.JPG Still 1 Close Explorer or any data incompatible with this camcorder to the card, the camcorder will not (the indicator on LCD display stays still), right-click on your PC configuration). Digital Still Camera Features Playback Image Folders and File Names Disconnecting the USB ...
.... 100SHARP Sub-folder of still images Serial number (100 to w again. After that appears on explorer window, to Standby • Removing the card Transfer indicator Digital Still Camera Features USB T R A N SM I T T I N G Note: • In case of still image files Windows Me/2000/XP 1 ... DVC00001.JPG Still 1 Close Explorer or any data incompatible with this camcorder to the card, the camcorder will not (the indicator on LCD display stays still), right-click on your PC configuration). Digital Still Camera Features Playback Image Folders and File Names Disconnecting the USB ...


