
VLWD450U|VLWD650U Operation Manual
Page 1
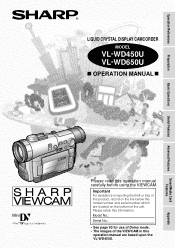
Operation References Preparation LIQUID CRYSTAL DISPLAY CAMCORDER MODEL VL-WD450U VL-WD650U OPERATION MANUAL Basic Operations Useful Features Advanced Features SmartMedia Card Features ;;;;;; Model No.: Serial No.: • See page 93 for use of Demo mode. • ... line below the model number and serial number which are located on the bottom of the VIEWCAM in this operation manual are based upon the VL-WD450U.
Operation References Preparation LIQUID CRYSTAL DISPLAY CAMCORDER MODEL VL-WD450U VL-WD650U OPERATION MANUAL Basic Operations Useful Features Advanced Features SmartMedia Card Features ;;;;;; Model No.: Serial No.: • See page 93 for use of Demo mode. • ... line below the model number and serial number which are located on the bottom of the VIEWCAM in this operation manual are based upon the VL-WD450U.
VLWD450U|VLWD650U Operation Manual
Page 2
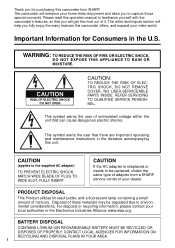
...environmental considerations. The video techniques section will help you fully enjoy the many features this operation manual to familiarize yourself with the camcorder's features, so that you will enhance your local authorities or the Electronics Industries Alliance: www.eiae.org. NO USER-SERVICEABLE ...APPLIANCE TO RAIN OR MOISTURE. CAUTION (applies to capture those special moments. Thank you for Consumers in the literature accompanying this camcorder from a SHARP service center of it. CAUTION RISK OF ELECTRIC SHOCK DO NOT OPEN CAUTION: TO REDUCE THE RISK OF ELECTRIC SHOCK, DO...
...environmental considerations. The video techniques section will help you fully enjoy the many features this operation manual to familiarize yourself with the camcorder's features, so that you will enhance your local authorities or the Electronics Industries Alliance: www.eiae.org. NO USER-SERVICEABLE ...APPLIANCE TO RAIN OR MOISTURE. CAUTION (applies to capture those special moments. Thank you for Consumers in the literature accompanying this camcorder from a SHARP service center of it. CAUTION RISK OF ELECTRIC SHOCK DO NOT OPEN CAUTION: TO REDUCE THE RISK OF ELECTRIC SHOCK, DO...
VLWD450U|VLWD650U Operation Manual
Page 3
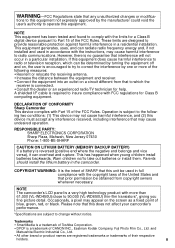
... to provide reasonable protection against harmful interference in a residential installation. DECLARATION OF CONFORMITY Sharp Camcorder This device complies with the instructions, may appear on the screen as a fixed point...camcorder's performance. *Specifications are designed to operate this unit be used in full compliance with FCC regulations for a Class B digital device pursuant to radio communications. Please note that prior permission be determined by turning the equipment off and on a circuit different from copyright owners whenever necessary. tions to 90,000 (VL-WD650U...
... to provide reasonable protection against harmful interference in a residential installation. DECLARATION OF CONFORMITY Sharp Camcorder This device complies with the instructions, may appear on the screen as a fixed point...camcorder's performance. *Specifications are designed to operate this unit be used in full compliance with FCC regulations for a Class B digital device pursuant to radio communications. Please note that prior permission be determined by turning the equipment off and on a circuit different from copyright owners whenever necessary. tions to 90,000 (VL-WD650U...
VLWD450U|VLWD650U Operation Manual
Page 6
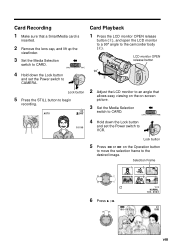
...AC adapter/ battery charger, and insert the AC plug into a power outlet. 2 Align the s mark on the battery pack with the q mark on the camcorder (1), and slide the battery pack down the Lock button and set the Power switch to OFF. 2 Lift up the viewfinder. 3 Align the - Pressing the ...on Media Selection switch Power switch To use a SmartMedia card for recording and playing back images, set to CAMERA. mark on the side of your camcorder. To use the camera recording functions, hold down completely until it locks into place. v Turning the Power off Set the Power switch to TAPE....
...AC adapter/ battery charger, and insert the AC plug into a power outlet. 2 Align the s mark on the battery pack with the q mark on the camcorder (1), and slide the battery pack down the Lock button and set the Power switch to OFF. 2 Lift up the viewfinder. 3 Align the - Pressing the ...on Media Selection switch Power switch To use a SmartMedia card for recording and playing back images, set to CAMERA. mark on the side of your camcorder. To use the camera recording functions, hold down completely until it locks into place. v Turning the Power off Set the Power switch to TAPE....
VLWD450U|VLWD650U Operation Manual
Page 7
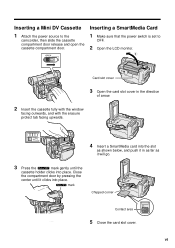
... window facing outwards, and with the erasure protect tab facing upwards. vi Inserting a SmartMedia Card 1 Make sure that the power switch is set to the camcorder, then slide the cassette compartment door release and open the cassette compartment door.
... window facing outwards, and with the erasure protect tab facing upwards. vi Inserting a SmartMedia Card 1 Make sure that the power switch is set to the camcorder, then slide the cassette compartment door release and open the cassette compartment door.

VLWD450U|VLWD650U Operation Manual
Page 8
... Media Selection switch to TAPE. 4 Hold down the Lock button and set the Power switch to CAMERA. Zooming Push the Power Zoom control to the camcorder body (2). Quick Operation Guide Easy Camera Recording on Tape 1 Make sure that allows easy viewing on the on the Operation button to rewind (or fast...
... Media Selection switch to TAPE. 4 Hold down the Lock button and set the Power switch to CAMERA. Zooming Push the Power Zoom control to the camcorder body (2). Quick Operation Guide Easy Camera Recording on Tape 1 Make sure that allows easy viewing on the on the Operation button to rewind (or fast...
VLWD450U|VLWD650U Operation Manual
Page 9
... and set the Power switch to CAMERA. 1 Press the LCD monitor OPEN release button (1), and open the LCD monitor to a 90° angle to the camcorder body (2). Lock button 5 Press e or r on -screen picture. 3 Set the Media Selection switch to CARD. 10 90 4 Hold down the Lock button and set the...
... and set the Power switch to CAMERA. 1 Press the LCD monitor OPEN release button (1), and open the LCD monitor to a 90° angle to the camcorder body (2). Lock button 5 Press e or r on -screen picture. 3 Set the Media Selection switch to CARD. 10 90 4 Hold down the Lock button and set the...
VLWD450U|VLWD650U Operation Manual
Page 10
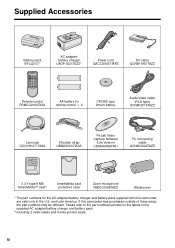
and Latin America. ix If this camcorder are valid only in the U.S. Please refer to the part numbers printed on the labels of these areas, the part numbers may be different. Supplied ...™ card*2 SmartMedia card protective case Zoom microphone RMICC0098TAZZ Windscreen *1 The part numbers for the AC adapter/battery charger and battery pack supplied with this camcorder was purchased outside of the supplied AC adapter/battery charger and battery pack. *2 Including 2 index labels and 4 write-protect seals.
and Latin America. ix If this camcorder are valid only in the U.S. Please refer to the part numbers printed on the labels of these areas, the part numbers may be different. Supplied ...™ card*2 SmartMedia card protective case Zoom microphone RMICC0098TAZZ Windscreen *1 The part numbers for the AC adapter/battery charger and battery pack supplied with this camcorder was purchased outside of the supplied AC adapter/battery charger and battery pack. *2 Including 2 index labels and 4 write-protect seals.
VLWD450U|VLWD650U Operation Manual
Page 12
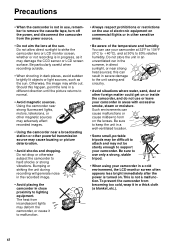
...car in the summer, in direct sunlight, or near a broadcasting station or other powerful transmission source may not be difficult to strike the camcorder lens or LCD monitor screen, whether or not recording is in progress, as the sun. Such environments can result in severe damage to... environment, the LCD monitor screen often appears less bright immediately after the power is not a malfunction. Do not drop or otherwise subject the camcorder to form on . This is turned on the lenses. Do not allow direct sunlight to attach and may cause buzzing or picture deterioration. ...
...car in the summer, in direct sunlight, or near a broadcasting station or other powerful transmission source may not be difficult to strike the camcorder lens or LCD monitor screen, whether or not recording is in progress, as the sun. Such environments can result in severe damage to... environment, the LCD monitor screen often appears less bright immediately after the power is not a malfunction. Do not drop or otherwise subject the camcorder to form on . This is turned on the lenses. Do not allow direct sunlight to attach and may cause buzzing or picture deterioration. ...
VLWD450U|VLWD650U Operation Manual
Page 13
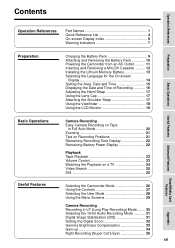
...Reference List 4 On-screen Display Index 5 Warning Indicators 7 Preparation Charging the Battery Pack 9 Attaching and Removing the Battery Pack 10 Powering the Camcorder from an AC Outlet 11 Inserting and Removing a Mini DV Cassette .......... 12 Installing the Lithium Memory Battery 13 Selecting the Language for the ...Display 22 Playback Tape Playback 23 Volume Control 23 Watching the Playback on a TV 24 Video Search 25 Still 25 Selecting the Camcorder Mode 26 Using the Controls 27 Selecting the User Mode 28 Using the Menu Screens 29 Camera Recording Recording in LP (Long ...
...Reference List 4 On-screen Display Index 5 Warning Indicators 7 Preparation Charging the Battery Pack 9 Attaching and Removing the Battery Pack 10 Powering the Camcorder from an AC Outlet 11 Inserting and Removing a Mini DV Cassette .......... 12 Installing the Lithium Memory Battery 13 Selecting the Language for the ...Display 22 Playback Tape Playback 23 Volume Control 23 Watching the Playback on a TV 24 Video Search 25 Still 25 Selecting the Camcorder Mode 26 Using the Controls 27 Selecting the User Mode 28 Using the Menu Screens 29 Camera Recording Recording in LP (Long ...

VLWD450U|VLWD650U Operation Manual
Page 19
...47 (Manual Focus) • To turn off -centered subject. - See page 56 (Setting the Confirmation Sounds) • To enlarge any part of camcorder's features. • To record the subject with higher-quality audio. - Operation References Quick Reference List Below are made when you operate the... camcorder. - See page 33 (Gamma Brightness Compensation) or page 51 (Manual Exposure) • To record subjects at night, e.g. See page 35 (Night ...
...47 (Manual Focus) • To turn off -centered subject. - See page 56 (Setting the Confirmation Sounds) • To enlarge any part of camcorder's features. • To record the subject with higher-quality audio. - Operation References Quick Reference List Below are made when you operate the... camcorder. - See page 33 (Gamma Brightness Compensation) or page 51 (Manual Exposure) • To record subjects at night, e.g. See page 35 (Night ...

VLWD450U|VLWD650U Operation Manual
Page 22
...CAS SE T T E . Wait for the first 3 seconds Displayed after this warning appears, the camcorder automatically turns off. To check the type of the viewfinder and the LCD screen. Insert a cassette ...the vertical rotation of the LCD monitor is defective and should be indicated by F displayed in the camcorder. E JECT THE CASSE TTE. TAPE END The tape has reached the end. Operation References Operation... it with a fully charged battery pack (see page 10). Dew has formed inside the camcorder. The video heads are clogged and should be removed (see page 12). The fluorescent lamp...
...CAS SE T T E . Wait for the first 3 seconds Displayed after this warning appears, the camcorder automatically turns off. To check the type of the viewfinder and the LCD screen. Insert a cassette ...the vertical rotation of the LCD monitor is defective and should be indicated by F displayed in the camcorder. E JECT THE CASSE TTE. TAPE END The tape has reached the end. Operation References Operation... it with a fully charged battery pack (see page 10). Dew has formed inside the camcorder. The video heads are clogged and should be removed (see page 12). The fluorescent lamp...
VLWD450U|VLWD650U Operation Manual
Page 23
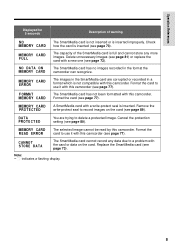
... card is inserted improperly. Check how the card is inserted (see page 73). Delete unnecessary images (see page 81) or replace the card with this camcorder (see page 73). Format the card to use it with the card or data on the card (see page 77). The SmartMedia card has not... use it with a new one (see page 77). The SmartMedia card has no images recorded in the SmartMedia card are trying to a problem with this camcorder. DATA PROT ECTED You are corrupted or recorded in a format which is inserted. MEMORY CARD READ ERROR The selected image cannot be read by this...
... card is inserted improperly. Check how the card is inserted (see page 73). Delete unnecessary images (see page 81) or replace the card with this camcorder (see page 73). Format the card to use it with the card or data on the card (see page 77). The SmartMedia card has not... use it with a new one (see page 77). The SmartMedia card has no images recorded in the SmartMedia card are trying to a problem with this camcorder. DATA PROT ECTED You are corrupted or recorded in a format which is inserted. MEMORY CARD READ ERROR The selected image cannot be read by this...
VLWD450U|VLWD650U Operation Manual
Page 24
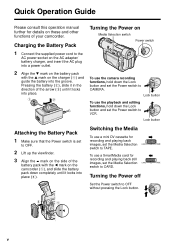
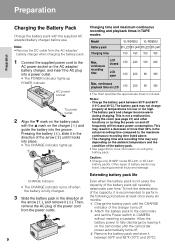
... 2 Align the s mark on LCD 100 200 90 180 • The chart specifies the approximate times in TAPE modes Model Battery pack Charging time VL-WD450U VL-WD650U BT-L221 BT-L441 BT-L221 BT-L441 100 160 100 160 Max. Pressing the battery (2), slide it between 50°F and 86°F (...functions or turning the power on using the battery pack. Caution: • Charge only SHARP model BT-L221 or BT-L441 battery packs. CHARGE indicator • The CHARGE indicator turns off . 2 Attach the battery pack to the camcorder, and set the Power switch to fully discharge by leaving it on the AC...
... 2 Align the s mark on LCD 100 200 90 180 • The chart specifies the approximate times in TAPE modes Model Battery pack Charging time VL-WD450U VL-WD650U BT-L221 BT-L441 BT-L221 BT-L441 100 160 100 160 Max. Pressing the battery (2), slide it between 50°F and 86°F (...functions or turning the power on using the battery pack. Caution: • Charge only SHARP model BT-L221 or BT-L441 battery packs. CHARGE indicator • The CHARGE indicator turns off . 2 Attach the battery pack to the camcorder, and set the Power switch to fully discharge by leaving it on the AC...
VLWD450U|VLWD650U Operation Manual
Page 25
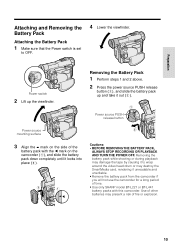
... damage the tape by causing it to OFF. 4 Lower the viewfinder. Use of other batteries may present a risk of the battery pack with this camcorder. Preparation Attaching and Removing the Battery Pack Attaching the Battery Pack 1 Make sure that the Power switch is set to wrap around the video head... may destroy the SmartMedia card, rendering it unreadable and unwritable. • Remove the battery pack from the camcorder if you will not use the camcorder for a long period of time. • Use only SHARP model BT-L221 or BT-L441 battery packs with the q mark on the side of fire or explosion...
... damage the tape by causing it to OFF. 4 Lower the viewfinder. Use of other batteries may present a risk of the battery pack with this camcorder. Preparation Attaching and Removing the Battery Pack Attaching the Battery Pack 1 Make sure that the Power switch is set to wrap around the video head... may destroy the SmartMedia card, rendering it unreadable and unwritable. • Remove the battery pack from the camcorder if you will not use the camcorder for a long period of time. • Use only SHARP model BT-L221 or BT-L441 battery packs with the q mark on the side of fire or explosion...
VLWD450U|VLWD650U Operation Manual
Page 26
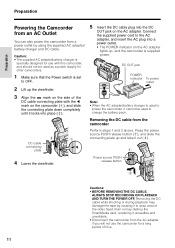
...3 Align the = mark on the AC adapter. Press the power source PUSH release button (1), and slide the connecting plate up , and the camcorder is set to the AC adapter, and insert the AC plug into place (2). Caution: • The supplied AC adapter/battery charger is specially designed... for use the camcorder for other camcorders. 1 Make sure that the Power switch is supplied power. Connect the supplied power cord to OFF. 2 Lift up the viewfinder. 5 Insert...
...3 Align the = mark on the AC adapter. Press the power source PUSH release button (1), and slide the connecting plate up , and the camcorder is set to the AC adapter, and insert the AC plug into place (2). Caution: • The supplied AC adapter/battery charger is specially designed... for use the camcorder for other camcorders. 1 Make sure that the Power switch is supplied power. Connect the supplied power cord to OFF. 2 Lift up the viewfinder. 5 Insert...
VLWD450U|VLWD650U Operation Manual
Page 27
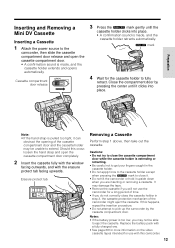
... one. • See page 88 for more information on the video cassette tapes intended for use the camcorder for the cassette holder to close it. • Do not tilt the camcorder or hold it upside down when you are inserting or removing a cassette. Close the compartment door by... the cassette compartment door. It may be able to pick up the camcorder by pressing the center until the cassette holder clicks into place. Preparation Inserting and Removing a Mini DV Cassette Inserting a Cassette 1 Attach the...
... one. • See page 88 for more information on the video cassette tapes intended for use the camcorder for the cassette holder to close it. • Do not tilt the camcorder or hold it upside down when you are inserting or removing a cassette. Close the compartment door by... the cassette compartment door. It may be able to pick up the camcorder by pressing the center until the cassette holder clicks into place. Preparation Inserting and Removing a Mini DV Cassette Inserting a Cassette 1 Attach the...
VLWD450U|VLWD650U Operation Manual
Page 28
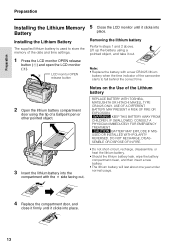
.... 4 Replace the compartment door, and close it firmly until it clicks into the compartment with a new CR2025 lithium battery when the time indicator of the camcorder starts to store the memory of the Lithium battery REPLACE BATTERY WITH TOSHIBA, MATSUSHITA OR HITACHI MAXELL TYPE CR2025 ONLY. Notes on the Use of...
.... 4 Replace the compartment door, and close it firmly until it clicks into the compartment with a new CR2025 lithium battery when the time indicator of the camcorder starts to store the memory of the Lithium battery REPLACE BATTERY WITH TOSHIBA, MATSUSHITA OR HITACHI MAXELL TYPE CR2025 ONLY. Notes on the Use of...
VLWD450U|VLWD650U Operation Manual
Page 29
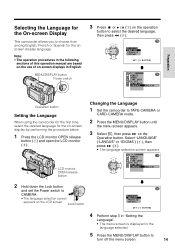
...language selected. 5 Press the MENU/DISPLAY button to turn off the menu screen. 14 LCD monitor OPEN release button Changing the Language 1 Set the camcorder to CAMERA. • The language selection screen appears on the Operation button. Select "LANGUAGE" ("LANGUE" or "IDIOMA") (1), then press r (2)..... 1 Press the LCD monitor OPEN release button (1) and open the LCD monitor (2). Preparation Selecting the Language for the On-screen Display This camcorder allows you to select the desired language, then press e (2). Lock button L ANGUAGE ENGL I SH FRANÇ A I SH Operation button...
...language selected. 5 Press the MENU/DISPLAY button to turn off the menu screen. 14 LCD monitor OPEN release button Changing the Language 1 Set the camcorder to CAMERA. • The language selection screen appears on the Operation button. Select "LANGUAGE" ("LANGUE" or "IDIOMA") (1), then press r (2)..... 1 Press the LCD monitor OPEN release button (1) and open the LCD monitor (2). Preparation Selecting the Language for the On-screen Display This camcorder allows you to select the desired language, then press e (2). Lock button L ANGUAGE ENGL I SH FRANÇ A I SH Operation button...
VLWD450U|VLWD650U Operation Manual
Page 32
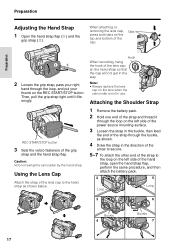
... lens cap to the hand strap as shown. 4 Draw the strap in use. Note: • Always replace the lens cap on the lens when the camcorder is not in the direction of the arrow to secure. 5-7 To attach the other end of the strap to the loop on the REC START.../STOP button. Caution: • Do not swing the camcorder by the hand strap. Tabs 2 Loosen the grip strap, pass your right hand through the loop on the top and bottom of the hand strap...
... lens cap to the hand strap as shown. 4 Draw the strap in use. Note: • Always replace the lens cap on the lens when the camcorder is not in the direction of the arrow to secure. 5-7 To attach the other end of the strap to the loop on the REC START.../STOP button. Caution: • Do not swing the camcorder by the hand strap. Tabs 2 Loosen the grip strap, pass your right hand through the loop on the top and bottom of the hand strap...


