
VLWD450U|VLWD650U Operation Manual
Page 3
... a Class B digital device pursuant to 90,000 (VL-WD650U) thin-film transistors*, giving you fine picture detail. ii A shielded I/F cable is reversed (positive end where the negative end belongs and vice versa), it can radiate radio frequency energy and, if not installed and used in a residential installation. This equipment generates, uses, and can overheat and rupture. NOTE The camcorder's LCD panel is...
... a Class B digital device pursuant to 90,000 (VL-WD650U) thin-film transistors*, giving you fine picture detail. ii A shielded I/F cable is reversed (positive end where the negative end belongs and vice versa), it can radiate radio frequency energy and, if not installed and used in a residential installation. This equipment generates, uses, and can overheat and rupture. NOTE The camcorder's LCD panel is...
VLWD450U|VLWD650U Operation Manual
Page 6
... the a mark on Media Selection switch Power switch To use the playback and editing functions, hold down the Lock button and set the Power switch to VCR. mark on the side of your camcorder. Quick Operation Guide Please consult this operation manual further for recording and playing back images, set the Media Selection switch to TAPE. Turning the Power on the charger (1) and guide the battery into place. Lock button Attaching the Battery Pack 1 Make sure that the Power switch is set to OFF without...
... the a mark on Media Selection switch Power switch To use the playback and editing functions, hold down the Lock button and set the Power switch to VCR. mark on the side of your camcorder. Quick Operation Guide Please consult this operation manual further for recording and playing back images, set the Media Selection switch to TAPE. Turning the Power on the charger (1) and guide the battery into place. Lock button Attaching the Battery Pack 1 Make sure that the Power switch is set to OFF without...
VLWD450U|VLWD650U Operation Manual
Page 13
... Camcorder from an AC Outlet 11 Inserting and Removing a Mini DV Cassette .......... 12 Installing the Lithium Memory Battery 13 Selecting the Language for the On-screen Display 14 Setting the Area, Date and Time 15 Displaying the Date and Time of Recording 16 Adjusting the Hand Strap 17 Using the Lens Cap 17 Attaching the Shoulder Strap 17 Using the Viewfinder 18 Using the LCD Monitor 19 Basic Operations Useful Features Camera Recording Easy Camera Recording on Tape in Full Auto Mode...
... Camcorder from an AC Outlet 11 Inserting and Removing a Mini DV Cassette .......... 12 Installing the Lithium Memory Battery 13 Selecting the Language for the On-screen Display 14 Setting the Area, Date and Time 15 Displaying the Date and Time of Recording 16 Adjusting the Hand Strap 17 Using the Lens Cap 17 Attaching the Shoulder Strap 17 Using the Viewfinder 18 Using the LCD Monitor 19 Basic Operations Useful Features Camera Recording Easy Camera Recording on Tape in Full Auto Mode...

VLWD450U|VLWD650U Operation Manual
Page 14
... 42 Auto Focus 43 Macro Shots 43 Using the Remote Control 43 Playback Playback Functions with the Remote Control ......... 45 Using the Time Code 46 Camera Recording Manual Focus 47 Setting the Shutter Speed 49 Manual Exposure 51 White Balance Lock 52 Digital Picture Effects 53 Scene Menu (Program AE 54 Using the Zoom Microphone 55 Windbreak 56 Setting the Confirmation Sounds 56 World Clock 57 Selecting Daylight Saving Time 59 Playback Playback Zoom 60 Gamma Playback 61 Multiple Strobe Playback 61 Playback Effects 62 Picture Effect Playback 63 Picture/Backlight Adjustments...
... 42 Auto Focus 43 Macro Shots 43 Using the Remote Control 43 Playback Playback Functions with the Remote Control ......... 45 Using the Time Code 46 Camera Recording Manual Focus 47 Setting the Shutter Speed 49 Manual Exposure 51 White Balance Lock 52 Digital Picture Effects 53 Scene Menu (Program AE 54 Using the Zoom Microphone 55 Windbreak 56 Setting the Confirmation Sounds 56 World Clock 57 Selecting Daylight Saving Time 59 Playback Playback Zoom 60 Gamma Playback 61 Multiple Strobe Playback 61 Playback Effects 62 Picture Effect Playback 63 Picture/Backlight Adjustments...
VLWD450U|VLWD650U Operation Manual
Page 24
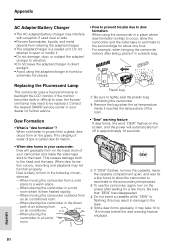
... increase power consumption. continuous playback time on LCD 100 200 90 180 • The chart specifies the approximate times in TAPE modes Model Battery pack Charging time VL-WD450U VL-WD650U BT-L221 BT-L441 BT-L221 BT-L441 100 160 100 160 Max. POWER indicator AC power socket To power outlet 2 Align the s mark on the battery pack with the supplied AC adapter/battery charger before use. Charging time and maximum continuous recording and playback times...
... increase power consumption. continuous playback time on LCD 100 200 90 180 • The chart specifies the approximate times in TAPE modes Model Battery pack Charging time VL-WD450U VL-WD650U BT-L221 BT-L441 BT-L221 BT-L441 100 160 100 160 Max. POWER indicator AC power socket To power outlet 2 Align the s mark on the battery pack with the supplied AC adapter/battery charger before use. Charging time and maximum continuous recording and playback times...
VLWD450U|VLWD650U Operation Manual
Page 29
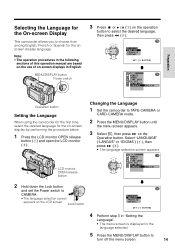
... button and set the Power switch to turn off the menu screen. 14 Select "LANGUAGE" ("LANGUE" or "IDIOMA") (1), then press r (2). • The language selection screen appears. MENU/DISPLAY button Power switch 3 Press d or y (1) on the Operation button. OTHERS REMOT E SOUND T I ME CODE T C OUT DEMO MODE L ANGUAGE ENGL I SH Operation button Setting the Language When using the camcorder for the first time, select the desired language for the onscreen display language. Note: • The operation procedures in the language selected. 5 Press the MENU/DISPLAY button to CAMERA...
... button and set the Power switch to turn off the menu screen. 14 Select "LANGUAGE" ("LANGUE" or "IDIOMA") (1), then press r (2). • The language selection screen appears. MENU/DISPLAY button Power switch 3 Press d or y (1) on the Operation button. OTHERS REMOT E SOUND T I ME CODE T C OUT DEMO MODE L ANGUAGE ENGL I SH Operation button Setting the Language When using the camcorder for the first time, select the desired language for the onscreen display language. Note: • The operation procedures in the language selected. 5 Press the MENU/DISPLAY button to CAMERA...
VLWD450U|VLWD650U Operation Manual
Page 31
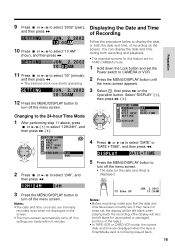
... for TAPE-CAMERA mode. 1 Hold down the Lock button and set . If they have been correctly set the Power switch to turn off the menu screen. SE TT I NG JUN. 2. 2002 1 0 : 0 0 AM 11 Press d or y to display the date, or both recording and playback. • The example screens for this feature are for unrecorded or damaged portions of the tape.) • In TAPE-VCR or CARD-VCR mode, the current date and time are...
... for TAPE-CAMERA mode. 1 Hold down the Lock button and set . If they have been correctly set the Power switch to turn off the menu screen. SE TT I NG JUN. 2. 2002 1 0 : 0 0 AM 11 Press d or y to display the date, or both recording and playback. • The example screens for this feature are for unrecorded or damaged portions of the tape.) • In TAPE-VCR or CARD-VCR mode, the current date and time are...
VLWD450U|VLWD650U Operation Manual
Page 35
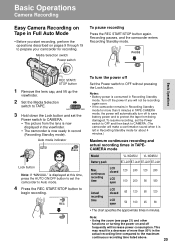
... minutes. PAUSE Basic Operations REC START/ STOP button 1 Remove the lens cap, and lift up the viewfinder. 2 Set the Media Selection switch to TAPE. 3 Hold down the Lock button and set the Power switch to prepare your camcorder for about 4 minutes.) Maximum continuous recording and actual recording times in TAPECAMERA mode Model VL-WD450U VL-WD650U Battery pack BT-L221 BT-L441 BT-L221 BT-L441 Max. Recording pauses, and the camcorder enters Recording Standby mode. Note: • Using the zoom (see...
... minutes. PAUSE Basic Operations REC START/ STOP button 1 Remove the lens cap, and lift up the viewfinder. 2 Set the Media Selection switch to TAPE. 3 Hold down the Lock button and set the Power switch to prepare your camcorder for about 4 minutes.) Maximum continuous recording and actual recording times in TAPECAMERA mode Model VL-WD450U VL-WD650U Battery pack BT-L221 BT-L441 BT-L221 BT-L441 Max. Recording pauses, and the camcorder enters Recording Standby mode. Note: • Using the zoom (see...
VLWD450U|VLWD650U Operation Manual
Page 41
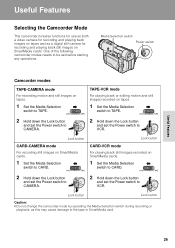
... images recorded on SmartMedia cards. Lock button Lock button Caution: • Do not change the camcorder mode by operating the Media Selection switch during recording or playback, as a digital still camera for recording and playing back still images on SmartMedia cards. 1 Set the Media Selection switch to CARD. 2 Hold down the Lock button and set the Power switch to CAMERA. 2 Hold down the Lock button and set before starting any operations. Useful Features Selecting the Camcorder Mode This camcorder includes functions for use as both a video camera for recording and playing...
... images recorded on SmartMedia cards. Lock button Lock button Caution: • Do not change the camcorder mode by operating the Media Selection switch during recording or playback, as a digital still camera for recording and playing back still images on SmartMedia cards. 1 Set the Media Selection switch to CARD. 2 Hold down the Lock button and set the Power switch to CAMERA. 2 Hold down the Lock button and set before starting any operations. Useful Features Selecting the Camcorder Mode This camcorder includes functions for use as both a video camera for recording and playing...
VLWD450U|VLWD650U Operation Manual
Page 43
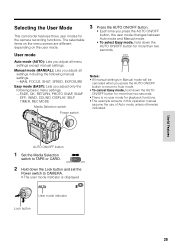
.... AUTO User mode indicator Lock button 28 RETURN, PHOTO SNAP, SNAP EFF., WIND, SOUND, DISPLAY, SELF TIMER, REC MODE Media Selection switch Power switch 3 Press the AUTO ON/OFF button. • Each time you press the AUTO ON/OFF button, the user mode changes between Auto mode and Manual mode. • To select Easy mode, hold down the AUTO ON/OFF button for the camera recording functions. Useful Features AUTO ON/OFF button 1 Set the Media Selection switch to TAPE or CARD. 2 Hold down the Lock button and set the Power switch to Auto mode...
.... AUTO User mode indicator Lock button 28 RETURN, PHOTO SNAP, SNAP EFF., WIND, SOUND, DISPLAY, SELF TIMER, REC MODE Media Selection switch Power switch 3 Press the AUTO ON/OFF button. • Each time you press the AUTO ON/OFF button, the user mode changes between Auto mode and Manual mode. • To select Easy mode, hold down the AUTO ON/OFF button for the camera recording functions. Useful Features AUTO ON/OFF button 1 Set the Media Selection switch to TAPE or CARD. 2 Hold down the Lock button and set the Power switch to Auto mode...
VLWD450U|VLWD650U Operation Manual
Page 45
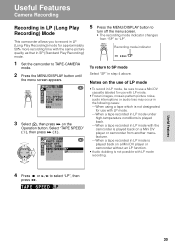
... T L ZOOM TAPE SPEED SP 16 : 9 LP 5 Press the MENU/DISPLAY button to turn off the menu screen. • The recording mode indicator changes from another manufacturer. -When a tape recorded in LP mode is played back on the Operation button. MANUAL SE T MAN. EFFECT SC E NE MENU FADE QK. RE TURN DIS 3 Select Y, then press r on a Mini DV player or camcorder without an LP function. • Audio dubbing is not designated for approximately 50% more recording time with...
... T L ZOOM TAPE SPEED SP 16 : 9 LP 5 Press the MENU/DISPLAY button to turn off the menu screen. • The recording mode indicator changes from another manufacturer. -When a tape recorded in LP mode is played back on the Operation button. MANUAL SE T MAN. EFFECT SC E NE MENU FADE QK. RE TURN DIS 3 Select Y, then press r on a Mini DV player or camcorder without an LP function. • Audio dubbing is not designated for approximately 50% more recording time with...
VLWD450U|VLWD650U Operation Manual
Page 46
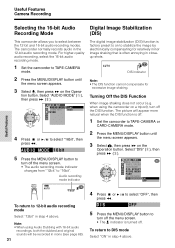
... camcorder allows you to "16bit". Audio recording mode indicator The digital image stabilization (DIS) function is factory preset to on the Operation button. MANUAL SE T MAN. FOCUS SHUT. Note: • When using the camcorder on the Opera- Turning Off the DIS Function When image shaking does not occur (e.g. EFFECT SCE NE MENU FADE QK. RE TURN DIS ON OFF AUTO 16 bit To return to TAPE-CAMERA or CARD-CAMERA mode. 2 Press the MENU/DISPLAY button until the menu screen...
... camcorder allows you to "16bit". Audio recording mode indicator The digital image stabilization (DIS) function is factory preset to on the Operation button. MANUAL SE T MAN. FOCUS SHUT. Note: • When using the camcorder on the Opera- Turning Off the DIS Function When image shaking does not occur (e.g. EFFECT SCE NE MENU FADE QK. RE TURN DIS ON OFF AUTO 16 bit To return to TAPE-CAMERA or CARD-CAMERA mode. 2 Press the MENU/DISPLAY button until the menu screen...
VLWD450U|VLWD650U Operation Manual
Page 47
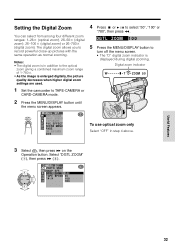
... y to record powerful close-up pictures with the same operation as normal zooming. Select "DGTL ZOOM" (1), then press r (2). Setting the Digital Zoom You can select from among four different zoom ranges: 1-26K (optical zoom), 26-50K (digital zoom), 26-100K (digital zoom) or 26-780K (digital zoom). MANUAL SE T MAN. SPE ED E XPOSURE P I C. ZOOM 5 0 To use optical zoom only Select "OFF" in addition to TAPE-CAMERA or CARD-CAMERA mode. 2 Press the MENU/DISPLAY button until the menu screen appears. DG T L ZOOM...
... y to record powerful close-up pictures with the same operation as normal zooming. Select "DGTL ZOOM" (1), then press r (2). Setting the Digital Zoom You can select from among four different zoom ranges: 1-26K (optical zoom), 26-50K (digital zoom), 26-100K (digital zoom) or 26-780K (digital zoom). MANUAL SE T MAN. SPE ED E XPOSURE P I C. ZOOM 5 0 To use optical zoom only Select "OFF" in addition to TAPE-CAMERA or CARD-CAMERA mode. 2 Press the MENU/DISPLAY button until the menu screen appears. DG T L ZOOM...
VLWD450U|VLWD650U Operation Manual
Page 67
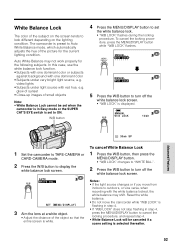
... the lighting condition. The camcorder is flashing in step 4. • If "W/B LOCK" does not stop flashing in Easy mode or the SUPER CAT'S EYE switch is white. Auto White Balance may shift. W/B button 4 Press the MENU/DISPLAY button to turn off the white balance lock screen. AUTO WH I SP L AY 3 Aim the lens at a white object. • Adjust the distance of small objects Note: • White Balance Lock cannot be canceled if a scene setting is displayed. video lights •...
... the lighting condition. The camcorder is flashing in step 4. • If "W/B LOCK" does not stop flashing in Easy mode or the SUPER CAT'S EYE switch is white. Auto White Balance may shift. W/B button 4 Press the MENU/DISPLAY button to turn off the white balance lock screen. AUTO WH I SP L AY 3 Aim the lens at a white object. • Adjust the distance of small objects Note: • White Balance Lock cannot be canceled if a scene setting is displayed. video lights •...
VLWD450U|VLWD650U Operation Manual
Page 70
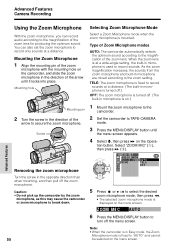
... zoom microphone to the magnification of the zoom lens for producing the optimum sound. Select "ZOOM MIC" (1), then press r (2). Removing the zoom microphone AUD I O SE T AUD I O MODE ZOOM M I C AUTO W I C AUTO 6 Press the MENU/DISPLAY button to TAPE-CAMERA mode. 3 Press the MENU/DISPLAY button until it locks into place. microphone, as this may cause the camcorder • The selected zoom microphone mode is on the menu screen. Z OOM M I ND TELE OFF Turn the screw in the direction of the arrow until the menu screen...
... zoom microphone to the magnification of the zoom lens for producing the optimum sound. Select "ZOOM MIC" (1), then press r (2). Removing the zoom microphone AUD I O SE T AUD I O MODE ZOOM M I C AUTO W I C AUTO 6 Press the MENU/DISPLAY button to TAPE-CAMERA mode. 3 Press the MENU/DISPLAY button until it locks into place. microphone, as this may cause the camcorder • The selected zoom microphone mode is on the menu screen. Z OOM M I ND TELE OFF Turn the screw in the direction of the arrow until the menu screen...
VLWD450U|VLWD650U Operation Manual
Page 82
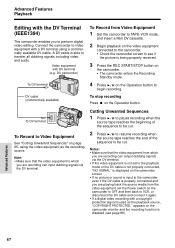
... the Operation button. To stop recording Press d on page 65, using a commercially available DV cable. To DV terminal To Record to transfer all dubbing signals including video and audio. DV camcorder) To DV terminal DV cable (commercially available) To Record from the video equipment, set to the playback mode or the DV cable is not properly connected, "NO SIGNAL" is displayed on the camcorder screen. • If no picture or sound is input to begin recording...
... the Operation button. To stop recording Press d on page 65, using a commercially available DV cable. To DV terminal To Record to transfer all dubbing signals including video and audio. DV camcorder) To DV terminal DV cable (commercially available) To Record from the video equipment, set to the playback mode or the DV cable is not properly connected, "NO SIGNAL" is displayed on the camcorder screen. • If no picture or sound is input to begin recording...
VLWD450U|VLWD650U Operation Manual
Page 86
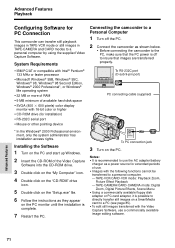
... "Setup.exe" file. 6 Follow the instructions as a power source for extended periods of the Video Capture Software into the CD-ROM drive. 3 Double click on the "My Computer" icon. 4 Double click on the "CD-ROM" drive icon. 5 Double click on the PC monitor until the installation is off to insure that images are transferred properly. Advanced Features Playback Configuring Software for PC Connection This camcorder can transfer still playback images in TAPE-VCR mode...
... "Setup.exe" file. 6 Follow the instructions as a power source for extended periods of the Video Capture Software into the CD-ROM drive. 3 Double click on the "My Computer" icon. 4 Double click on the "CD-ROM" drive icon. 5 Double click on the PC monitor until the installation is off to insure that images are transferred properly. Advanced Features Playback Configuring Software for PC Connection This camcorder can transfer still playback images in TAPE-VCR mode...
VLWD450U|VLWD650U Operation Manual
Page 106
... adapter/charger in direct sunlight. • Avoid using the camcorder in a place where dew formation is likely to occur, allow the camcorder to acclimate to a warm place. -When placing the camcorder in a cold room which is called dew formation. • "Dew" warning feature If dew forms, the word "DEW" flashes on the head drum of your camcorder and make the video tape stick to dew formation...
... adapter/charger in direct sunlight. • Avoid using the camcorder in a place where dew formation is likely to occur, allow the camcorder to acclimate to a warm place. -When placing the camcorder in a cold room which is called dew formation. • "Dew" warning feature If dew forms, the word "DEW" flashes on the head drum of your camcorder and make the video tape stick to dew formation...
VLWD450U|VLWD650U Operation Manual
Page 109
..., 11). REC START/STOP Erasure protect tab on subject. -- Set Power switch to the background. Close tab or use a new cassette (p. 88). Set DEMO MODE menu item to CAMERA. Set Power switch to OFF and then back to "OFF" (p. 93). Manual Focus mode is not selected properly. Set to widest angle before shooting (p. 21). Power suddenly turns off. automatically change. Zoom out from subject (p. 21). Direct lens to some subject, or set zoom to Auto Focus mode (p. 48). No subject in TAPE-CAMERA mode.
..., 11). REC START/STOP Erasure protect tab on subject. -- Set Power switch to the background. Close tab or use a new cassette (p. 88). Set DEMO MODE menu item to CAMERA. Set Power switch to OFF and then back to "OFF" (p. 93). Manual Focus mode is not selected properly. Set to widest angle before shooting (p. 21). Power suddenly turns off. automatically change. Zoom out from subject (p. 21). Direct lens to some subject, or set zoom to Auto Focus mode (p. 48). No subject in TAPE-CAMERA mode.
VLWD450U|VLWD650U Operation Manual
Page 110
.... Card mode Cannot delete image on camcorder remote sensor. Camcorder is not nected video equipment. If this should be adversely affected by external electrical noise or interference. Use a new cassette. Remove write-protect seal (p. 89). Cassette will not eject. Connect power source properly (pp. 10, 11). adjusted. Use remote control within operating range (p. 44). Set the date and time, then resume operation. 95 Appendix Call for service (p. 96), or use remote and camcorder remote sensor. Audio/video or DV cable is recording. Appendix...
.... Card mode Cannot delete image on camcorder remote sensor. Camcorder is not nected video equipment. If this should be adversely affected by external electrical noise or interference. Use a new cassette. Remove write-protect seal (p. 89). Cassette will not eject. Connect power source properly (pp. 10, 11). adjusted. Use remote control within operating range (p. 44). Set the date and time, then resume operation. 95 Appendix Call for service (p. 96), or use remote and camcorder remote sensor. Audio/video or DV cable is recording. Appendix...


