
VLWD450U|VLWD650U Operation Manual
Page 1
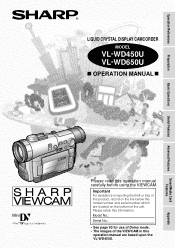
... For assistance in reporting the theft or loss of the VIEWCAM in this information. Operation References Preparation LIQUID CRYSTAL DISPLAY CAMCORDER MODEL VL-WD450U VL-WD650U OPERATION MANUAL Basic Operations Useful Features Advanced Features SmartMedia Card Features ;;;;;; Model No.: Serial No.: • See page 93 for use of Demo mode. • The images ...
... For assistance in reporting the theft or loss of the VIEWCAM in this information. Operation References Preparation LIQUID CRYSTAL DISPLAY CAMCORDER MODEL VL-WD450U VL-WD650U OPERATION MANUAL Basic Operations Useful Features Advanced Features SmartMedia Card Features ;;;;;; Model No.: Serial No.: • See page 93 for use of Demo mode. • The images ...
VLWD450U|VLWD650U Operation Manual
Page 2
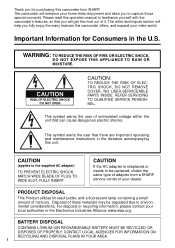
... lamp containing a small amount of adapter from SHARP. Thank you for Consumers in the literature accompanying this camcorder offers, and expand your dealer. Important Information for purchasing this operation manual to familiarize yourself with the camcorder's features, so that you will get the... most out of it. BATTERY DISPOSAL CONTAINS LITHIUM-ION RECHARGEABLE BATTERY. Please read this camcorder from a SHARP service center of uninsulated voltage ...
... lamp containing a small amount of adapter from SHARP. Thank you for Consumers in the literature accompanying this camcorder offers, and expand your dealer. Important Information for purchasing this operation manual to familiarize yourself with the camcorder's features, so that you will get the... most out of it. BATTERY DISPOSAL CONTAINS LITHIUM-ION RECHARGEABLE BATTERY. Please read this camcorder from a SHARP service center of uninsulated voltage ...
VLWD450U|VLWD650U Operation Manual
Page 6
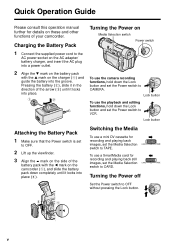
... the Power on Media Selection switch Power switch To use a mini DV cassette for details on these and other functions of your camcorder. Switching the Media To use the camera recording functions, hold down the Lock button and set to OFF without pressing the Lock button... slide it in the direction of the battery pack with the a mark on the camcorder (1), and slide the battery pack down completely until it locks into place (2). v Quick Operation Guide Please consult this operation manual further for recording and playing back images, set the Media Selection switch to TAPE. Lock...
... the Power on Media Selection switch Power switch To use a mini DV cassette for details on these and other functions of your camcorder. Switching the Media To use the camera recording functions, hold down the Lock button and set to OFF without pressing the Lock button... slide it in the direction of the battery pack with the a mark on the camcorder (1), and slide the battery pack down completely until it locks into place (2). v Quick Operation Guide Please consult this operation manual further for recording and playing back images, set the Media Selection switch to TAPE. Lock...

VLWD450U|VLWD650U Operation Manual
Page 19
... the bright portion. - See page 33 (Gamma Brightness Compensation) or page 51 (Manual Exposure) • To record subjects at night, e.g. Operation References Quick Reference List Below are made when you operate the camcorder. - See page 36 (Quick Return) • To record yourself in the scene... during playback. - See page 74 (Card Recording) 4 See page 35 (Night Recording) • To quickly return the tape to the end of camcorder's features. • To record the subject with higher-quality audio. - a nocturnal animal. - See page 31 (Selecting the 16-bit Audio Recording Mode...
... the bright portion. - See page 33 (Gamma Brightness Compensation) or page 51 (Manual Exposure) • To record subjects at night, e.g. Operation References Quick Reference List Below are made when you operate the camcorder. - See page 36 (Quick Return) • To record yourself in the scene... during playback. - See page 74 (Card Recording) 4 See page 35 (Night Recording) • To quickly return the tape to the end of camcorder's features. • To record the subject with higher-quality audio. - a nocturnal animal. - See page 31 (Selecting the 16-bit Audio Recording Mode...
VLWD450U|VLWD650U Operation Manual
Page 29
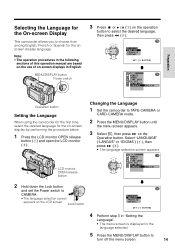
... L ANGUAGE ENGL I , then press r on the Operation button. Note: • The operation procedures in the following sections of this operation manual are based on the use of on the operation button to CAMERA. • The language selection screen appears on -screen display by performing the ...LANGUE" or "IDIOMA") (1), then press r (2). • The language selection screen appears. LCD monitor OPEN release button Changing the Language 1 Set the camcorder to TAPE-CAMERA or CARD-CAMERA mode. 2 Press the MENU/DISPLAY button until the menu screen appears. 3 Select I SH 2 Hold down the Lock...
... L ANGUAGE ENGL I , then press r on the Operation button. Note: • The operation procedures in the following sections of this operation manual are based on the use of on the operation button to CAMERA. • The language selection screen appears on -screen display by performing the ...LANGUE" or "IDIOMA") (1), then press r (2). • The language selection screen appears. LCD monitor OPEN release button Changing the Language 1 Set the camcorder to TAPE-CAMERA or CARD-CAMERA mode. 2 Press the MENU/DISPLAY button until the menu screen appears. 3 Select I SH 2 Hold down the Lock...
VLWD450U|VLWD650U Operation Manual
Page 35
... Recording Easy Camera Recording on Tape in Full Auto Mode • Before you will not be recording again soon. • If the camcorder remains in Recording Standby mode for more than 5 minutes in TAPE-CAMERA mode, the power will make a confirmation sound when it is ...indicator AUTO PAUSE Lock button Note: If "MANUAL" is consumed in Recording Standby mode. To resume recording, set the Power switch to prepare your camcorder for about 4 minutes.) Maximum continuous recording and actual recording times in TAPECAMERA mode Model VL-WD450U VL-WD650U Battery pack BT-L221 BT-L441 BT-...
... Recording Easy Camera Recording on Tape in Full Auto Mode • Before you will not be recording again soon. • If the camcorder remains in Recording Standby mode for more than 5 minutes in TAPE-CAMERA mode, the power will make a confirmation sound when it is ...indicator AUTO PAUSE Lock button Note: If "MANUAL" is consumed in Recording Standby mode. To resume recording, set the Power switch to prepare your camcorder for about 4 minutes.) Maximum continuous recording and actual recording times in TAPECAMERA mode Model VL-WD450U VL-WD650U Battery pack BT-L221 BT-L441 BT-...
VLWD450U|VLWD650U Operation Manual
Page 39
Jack cover 2 Connect the camcorder to your TV (or VCR) with the supplied audio/video cable, as you normally do to see the signal from the VCR. (See the operation manuals of your TV.) • When connecting to a TV via a VCR, turn the volume down (see page 23). Notes: • If your TV...) components of the components left turned on may flicker if the volume on the camcorder is set it to the "AV" or "VIDEO" channel. (See the operation manual of your TV and VCR.) 4 Set the Power switch on the camcorder to VCR, and begin playback (see page 23). • Close the jack cover...
Jack cover 2 Connect the camcorder to your TV (or VCR) with the supplied audio/video cable, as you normally do to see the signal from the VCR. (See the operation manuals of your TV.) • When connecting to a TV via a VCR, turn the volume down (see page 23). Notes: • If your TV...) components of the components left turned on may flicker if the volume on the camcorder is set it to the "AV" or "VIDEO" channel. (See the operation manual of your TV and VCR.) 4 Set the Power switch on the camcorder to VCR, and begin playback (see page 23). • Close the jack cover...
VLWD450U|VLWD650U Operation Manual
Page 42
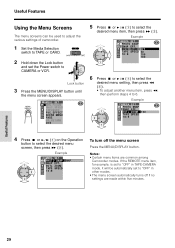
Example Indicators off . FOCUS SHUT. EFFECT SCE NE MENU FADE QK. Menu screen MANUAL SE T MAN. Useful Features 27 MENU/DISPLAY button Power switch MENU/DISPLAY button The MENU/DISPLAY button is used to CAMERA or VCR. SPE ED E ... the Power switch to select and operate the various functions, settings and on-screen displays. Useful Features Using the Controls The following controls on the camcorder can be turned off by pressing y (1), e (2), d (3) or r (4).
Example Indicators off . FOCUS SHUT. EFFECT SCE NE MENU FADE QK. Menu screen MANUAL SE T MAN. Useful Features 27 MENU/DISPLAY button Power switch MENU/DISPLAY button The MENU/DISPLAY button is used to CAMERA or VCR. SPE ED E ... the Power switch to select and operate the various functions, settings and on-screen displays. Useful Features Using the Controls The following controls on the camcorder can be turned off by pressing y (1), e (2), d (3) or r (4).
VLWD450U|VLWD650U Operation Manual
Page 43
...): Lets you adjust all settings including the following basic menu settings. -FADE, QK. Notes: • All manual settings in Manual mode will be canceled when you press the AUTO ON/OFF button to return to Auto mode. • To..., hold down the AUTO ON/OFF button for playback functions. • The example screens in this operation manual assume the use of Auto mode unless otherwise indicated. Useful Features AUTO ON/OFF button 1 Set the Media... two seconds. • There is displayed. Selecting the User Mode This camcorder features three user modes for more than two seconds.
...): Lets you adjust all settings including the following basic menu settings. -FADE, QK. Notes: • All manual settings in Manual mode will be canceled when you press the AUTO ON/OFF button to return to Auto mode. • To..., hold down the AUTO ON/OFF button for playback functions. • The example screens in this operation manual assume the use of Auto mode unless otherwise indicated. Useful Features AUTO ON/OFF button 1 Set the Media... two seconds. • There is displayed. Selecting the User Mode This camcorder features three user modes for more than two seconds.
VLWD450U|VLWD650U Operation Manual
Page 44
...: 9 4 Press d or y (1) on the Operation button to select the desired menu item, then press r (2). Notes: • Certain menu items are made within five minutes. MANUAL SE T MAN. RE TURN DIS 5 Press d or y (1) to select the desired menu screen, then press r (2). Lock button 3 Press the MENU/DISPLAY button until the menu.... If the REMOTE menu item, for example, is set to "OFF" in TAPE-CAMERA mode, it will be used to adjust the various settings of camcorder. 1 Set the Media Selection switch to TAPE or CARD. 2 Hold down the Lock button and set to "OFF" in other modes. • The ...
...: 9 4 Press d or y (1) on the Operation button to select the desired menu item, then press r (2). Notes: • Certain menu items are made within five minutes. MANUAL SE T MAN. RE TURN DIS 5 Press d or y (1) to select the desired menu screen, then press r (2). Lock button 3 Press the MENU/DISPLAY button until the menu.... If the REMOTE menu item, for example, is set to "OFF" in TAPE-CAMERA mode, it will be used to adjust the various settings of camcorder. 1 Set the Media Selection switch to TAPE or CARD. 2 Hold down the Lock button and set to "OFF" in other modes. • The ...
VLWD450U|VLWD650U Operation Manual
Page 45
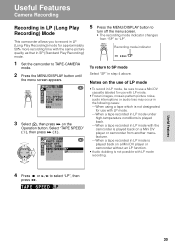
... played back on a Mini DV player or camcorder from "SP" to SP mode Select "SP" in step 4 above. TAPE SPEED LP Useful Features 30 SPE ED E XPOSURE P I C. CAMERA SE T PHOTO SNAP SNAP EFF. MANUAL SE T MAN. DG T L ZOOM TAPE SPEED SP 16 : 9 LP 5 Press the MENU/DISPLAY button to turn off ...the menu screen. • The recording mode indicator changes from another manufacturer. -When a tape recorded in LP mode is played back on a Mini DV player or camcorder without an LP ...
... played back on a Mini DV player or camcorder from "SP" to SP mode Select "SP" in step 4 above. TAPE SPEED LP Useful Features 30 SPE ED E XPOSURE P I C. CAMERA SE T PHOTO SNAP SNAP EFF. MANUAL SE T MAN. DG T L ZOOM TAPE SPEED SP 16 : 9 LP 5 Press the MENU/DISPLAY button to turn off ...the menu screen. • The recording mode indicator changes from another manufacturer. -When a tape recorded in LP mode is played back on a Mini DV player or camcorder without an LP ...
VLWD450U|VLWD650U Operation Manual
Page 46
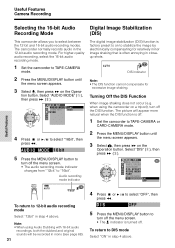
... mode Select "ON" in step 4 above . Turning Off the DIS Function When image shaking does not occur (e.g. MANUAL SE T MAN. Note: • When using the camcorder on the Operation button. The camcorder normally records audio in mono (see page 68). 31 4 Press d or y to 12-bit audio recording mode Select... with 16-bit audio recordings, both the dubbed and original sounds will appear more natural when the DIS function is turned off . 1 Set the camcorder to TAPE-CAMERA or CARD-CAMERA mode. 2 Press the MENU/DISPLAY button until the menu screen appears. 3 Select U, then press r on to...
... mode Select "ON" in step 4 above . Turning Off the DIS Function When image shaking does not occur (e.g. MANUAL SE T MAN. Note: • When using the camcorder on the Operation button. The camcorder normally records audio in mono (see page 68). 31 4 Press d or y to 12-bit audio recording mode Select... with 16-bit audio recordings, both the dubbed and original sounds will appear more natural when the DIS function is turned off . 1 Set the camcorder to TAPE-CAMERA or CARD-CAMERA mode. 2 Press the MENU/DISPLAY button until the menu screen appears. 3 Select U, then press r on to...
VLWD450U|VLWD650U Operation Manual
Page 47
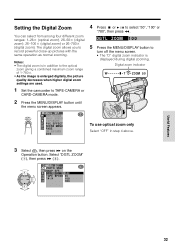
MANUAL SE T MAN. Digital zoom indicator W T D- DG T L ZOOM OF F TAPE SPEED 50 16 : 9 100 780 Useful Features 32 Select "DGTL ZOOM" (1), then press r (2). Setting the Digital ... off the menu screen. • The "D" digital zoom indicator is enlarged digitally, the picture quality decreases when higher digital zoom settings are used. 1 Set the camcorder to the optical zoom giving a combined maximum zoom range of 1-780K. • As the image is displayed during digital zooming. SPE ED E XPOSURE P I C.
MANUAL SE T MAN. Digital zoom indicator W T D- DG T L ZOOM OF F TAPE SPEED 50 16 : 9 100 780 Useful Features 32 Select "DGTL ZOOM" (1), then press r (2). Setting the Digital ... off the menu screen. • The "D" digital zoom indicator is enlarged digitally, the picture quality decreases when higher digital zoom settings are used. 1 Set the camcorder to the optical zoom giving a combined maximum zoom range of 1-780K. • As the image is displayed during digital zooming. SPE ED E XPOSURE P I C.
VLWD450U|VLWD650U Operation Manual
Page 50
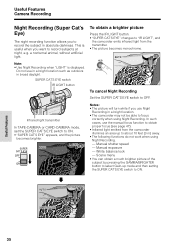
...select Gain-up to about 10 feet (3 m) away. • The following functions do not work when using Night Recording. Do not use the manual focus function to obtain proper focus (see page 47). • Infrared light emitted from the transmitter. • The picture becomes monochrome. Useful Features...e.g. To obtain a brighter picture Press the IR LIGHT button. • "SUPER CAT'S EYE" changes to "IR LIGHT", and the camcorder emits infrared light from the camcorder illumines an area up mode and then setting the SUPER CAT'S EYE switch to ON. In such cases, use in a bright location ...
...select Gain-up to about 10 feet (3 m) away. • The following functions do not work when using Night Recording. Do not use the manual focus function to obtain proper focus (see page 47). • Infrared light emitted from the transmitter. • The picture becomes monochrome. Useful Features...e.g. To obtain a brighter picture Press the IR LIGHT button. • "SUPER CAT'S EYE" changes to "IR LIGHT", and the camcorder emits infrared light from the camcorder illumines an area up mode and then setting the SUPER CAT'S EYE switch to ON. In such cases, use in a bright location ...
VLWD450U|VLWD650U Operation Manual
Page 51
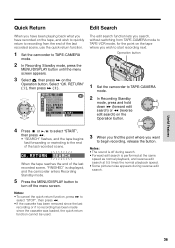
Select "QK. MANUAL SE T MAN. FOCUS SHUT. RE TURN S E A RCH When the tape reaches the ...the normal playback speed. • Some picture noise appears during search. • Forward edit search is displayed, and the camcorder enters Recording Standby mode. 5 Press the MENU/DISPLAY button to turn off the menu screen. Notes: • The sound... be used. 3 When you find the point where you wish to begin recording, release the button. Operation button 1 Set the camcorder to TAPE-CAMERA mode. 2 In Recording Standby mode, press and hold down r (forward edit search) or e (reverse edit search...
Select "QK. MANUAL SE T MAN. FOCUS SHUT. RE TURN S E A RCH When the tape reaches the ...the normal playback speed. • Some picture noise appears during search. • Forward edit search is displayed, and the camcorder enters Recording Standby mode. 5 Press the MENU/DISPLAY button to turn off the menu screen. Notes: • The sound... be used. 3 When you find the point where you wish to begin recording, release the button. Operation button 1 Set the camcorder to TAPE-CAMERA mode. 2 In Recording Standby mode, press and hold down r (forward edit search) or e (reverse edit search...
VLWD450U|VLWD650U Operation Manual
Page 52
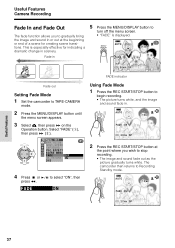
...function allows you wish to stop recording. • The image and sound fade out as the picture gradually turns white. the image and sound in . MANUAL SE T MAN. AUTO 12 bit FADE OUT 2 7min SP Useful Features 37 Select "FADE" (1), then press r (2). FADE ON 3 0min SP FADE... indicator Using Fade Mode 1 Press the REC START/STOP button to Recording Standby mode. The camcorder then returns to begin recording. • The picture turns white, and the image and sound fade in or out at the point where you to...
...function allows you wish to stop recording. • The image and sound fade out as the picture gradually turns white. the image and sound in . MANUAL SE T MAN. AUTO 12 bit FADE OUT 2 7min SP Useful Features 37 Select "FADE" (1), then press r (2). FADE ON 3 0min SP FADE... indicator Using Fade Mode 1 Press the REC START/STOP button to Recording Standby mode. The camcorder then returns to begin recording. • The picture turns white, and the image and sound fade in or out at the point where you to...
VLWD450U|VLWD650U Operation Manual
Page 58
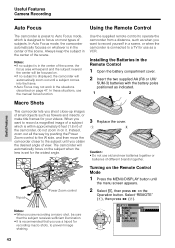
...sure that the subject receives sufficient illumination. • It is recommended that you obtain the desired angle of view. Caution: • Do not use the manual focus function. OTHERS REMOT E ON SOUND OFF T I , then press r on page 47. Select "REMOTE" (1), then press r (2). Installing the... macro shots, to record a magnified image of a subject which is designed to focus on it. In Auto Focus mode, the camcorder automatically focuses on the subject when the lens is set for your videos. Useful Features Camera Recording Useful Features Auto Focus Using the ...
...sure that the subject receives sufficient illumination. • It is recommended that you obtain the desired angle of view. Caution: • Do not use the manual focus function. OTHERS REMOT E ON SOUND OFF T I , then press r on page 47. Select "REMOTE" (1), then press r (2). Installing the... macro shots, to record a magnified image of a subject which is designed to focus on it. In Auto Focus mode, the camcorder automatically focuses on the subject when the lens is set for your videos. Useful Features Camera Recording Useful Features Auto Focus Using the ...
VLWD450U|VLWD650U Operation Manual
Page 62
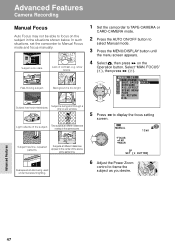
... the subject as you desire. Background is being used under fluorescent lighting. 1 Set the camcorder to TAPE-CAMERA or CARD-CAMERA mode. 2 Press the AUTO ON/OFF button to select Manual mode. 3 Press the MENU/DISPLAY button until the menu screen appears. 4 Select T, ... or wet window. Advanced Features 47 In such situations, set the camcorder to Manual Focus mode and focus manually. Fast-moving subject. Subject is too bright. Select "MAN. AAddvavncaednFceaetudresFeatures CCaammeeraraReRceocrdoinrdging Manual Focus Auto Focus may not be able to focus on the Operation button...
... the subject as you desire. Background is being used under fluorescent lighting. 1 Set the camcorder to TAPE-CAMERA or CARD-CAMERA mode. 2 Press the AUTO ON/OFF button to select Manual mode. 3 Press the MENU/DISPLAY button until the menu screen appears. 4 Select T, ... or wet window. Advanced Features 47 In such situations, set the camcorder to Manual Focus mode and focus manually. Fast-moving subject. Subject is too bright. Select "MAN. AAddvavncaednFceaetudresFeatures CCaammeeraraReRceocrdoinrdging Manual Focus Auto Focus may not be able to focus on the Operation button...
VLWD450U|VLWD650U Operation Manual
Page 63
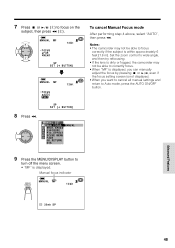
...zoom control to wide angle, and then try refocusing. • If the lens is dirty or fogged, the camcorder may not be able to correctly focus. • When "MF" is displayed, you can manually adjust the focus by pressing d or y, even if the focus setting screen is not displayed. • ... turn off the menu screen. • "MF" is within approximately 6 feet (1.8 m). MANUAL MF 12 bit F OCUS FAR NEAR SP SE T [ BUT TON] MANUAL MF 12 bit F OCUS AUTO SET SP SE T [ BUT TON] 8 Press e. Notes: • The camcorder may not be able to focus on the subject, then press e (2). EFFECT SCE...
...zoom control to wide angle, and then try refocusing. • If the lens is dirty or fogged, the camcorder may not be able to correctly focus. • When "MF" is displayed, you can manually adjust the focus by pressing d or y, even if the focus setting screen is not displayed. • ... turn off the menu screen. • "MF" is within approximately 6 feet (1.8 m). MANUAL MF 12 bit F OCUS FAR NEAR SP SE T [ BUT TON] MANUAL MF 12 bit F OCUS AUTO SET SP SE T [ BUT TON] 8 Press e. Notes: • The camcorder may not be able to focus on the subject, then press e (2). EFFECT SCE...
VLWD450U|VLWD650U Operation Manual
Page 64
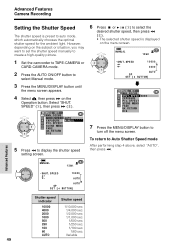
... to Auto Shutter Speed mode After performing step 4 above, select "AUTO", then press e. RE TURN DIS 7 Press the MENU/DISPLAY button to select Manual mode. 3 Press the MENU/DISPLAY button until the menu screen appears. 4 Select T, then press r on the Operation button. However, depending on the... subject or situation, you may want to set the shutter speed manually to create a high-quality picture. 1 Set the camcorder to TAPE-CAMERA or CARD-CAMERA mode. 2 Press the AUTO ON/OFF button to turn off the menu screen. Variable...
... to Auto Shutter Speed mode After performing step 4 above, select "AUTO", then press e. RE TURN DIS 7 Press the MENU/DISPLAY button to select Manual mode. 3 Press the MENU/DISPLAY button until the menu screen appears. 4 Select T, then press r on the Operation button. However, depending on the... subject or situation, you may want to set the shutter speed manually to create a high-quality picture. 1 Set the camcorder to TAPE-CAMERA or CARD-CAMERA mode. 2 Press the AUTO ON/OFF button to turn off the menu screen. Variable...


