
Operation Manual
Page 2
...;e? Common Features • EZ Set Up - VCR tuner channels and clock are all included with Full Loading Mechanism • 1-Year, 8-Event Programmable Timer • Simple Recording Timer • Unified Remote Control • Sharp Super Picture - Quickly locates the beginning of the tape. • Full Automatic Playback • Tamper Proof - Quickly operates a forward video search in 20 second intervals, then resumes playback. • Auto Zero Back - For easy connection of Recording and Playback (with Menu Screen Guidance - Accessories Be...
...;e? Common Features • EZ Set Up - VCR tuner channels and clock are all included with Full Loading Mechanism • 1-Year, 8-Event Programmable Timer • Simple Recording Timer • Unified Remote Control • Sharp Super Picture - Quickly locates the beginning of the tape. • Full Automatic Playback • Tamper Proof - Quickly operates a forward video search in 20 second intervals, then resumes playback. • Auto Zero Back - For easy connection of Recording and Playback (with Menu Screen Guidance - Accessories Be...

Operation Manual
Page 3
.... TIMER LED indicator This indicator lights up when the VCR is locked. 0 Remote Sensor Point Remote Control at this window. (VC-A410U, VC-A411U, VC-A420U) Connection terminals (see Connecting the VCR and Cable TV Connections) Connection terminals (see Tape Dubbing) 3 4-> 4 OUTPUT CHANNEL selector (see Setting the 3 4 Output Channel Selector) 8 8 3 4-> 4 OUTPUT CHANNEL selector (see Setting the 3 4 Output Channel Selector) 7 Major Components of Your VCR [Front] Cassette compartment (see Playback/Recording) SHARP (;) (VC-H820U) POWER button (When pressed to turn on the VCR, POWER LED...
.... TIMER LED indicator This indicator lights up when the VCR is locked. 0 Remote Sensor Point Remote Control at this window. (VC-A410U, VC-A411U, VC-A420U) Connection terminals (see Connecting the VCR and Cable TV Connections) Connection terminals (see Tape Dubbing) 3 4-> 4 OUTPUT CHANNEL selector (see Setting the 3 4 Output Channel Selector) 8 8 3 4-> 4 OUTPUT CHANNEL selector (see Setting the 3 4 Output Channel Selector) 7 Major Components of Your VCR [Front] Cassette compartment (see Playback/Recording) SHARP (;) (VC-H820U) POWER button (When pressed to turn on the VCR, POWER LED...

Operation Manual
Page 4
Then go to "After the Connection". From CATV system I ;;d = VCR Rear (Hi-Fi model) OUT OUTPUT CHANNEL a 3- -4 R AUDIO n00r VIDEO VHF/UHF CATV OUT Coaxial cable (Supplied) TV Rear ANT/CABLE • 10 PREPARATION DX Set the 3 4 OUTPUT CHANNEL selector on the rear of receiving the following non-scrambled channels. • Scrambled channels can be received with the VCR? •YES -> Go to Step 0 •NO...
Then go to "After the Connection". From CATV system I ;;d = VCR Rear (Hi-Fi model) OUT OUTPUT CHANNEL a 3- -4 R AUDIO n00r VIDEO VHF/UHF CATV OUT Coaxial cable (Supplied) TV Rear ANT/CABLE • 10 PREPARATION DX Set the 3 4 OUTPUT CHANNEL selector on the rear of receiving the following non-scrambled channels. • Scrambled channels can be received with the VCR? •YES -> Go to Step 0 •NO...

Operation Manual
Page 5
... possible to change channels using the VCR remote control. It is possible to the TV mode. 11 From CATV system VCR Rear (Hi-Fi model) .0U.T. Then go to "After the Connection". AUDIO OUTPUT CHANNEL a VIDEO 3- -4 VHF HF CATV OUT Cable Box IN OUT TV Rear ANT/CABLE III II Coaxial cable (Supplied) Coaxial cable (Not supplied) I NOTE > • With the above connections, it is not possible to record CATV programs which...
... possible to change channels using the VCR remote control. It is possible to the TV mode. 11 From CATV system VCR Rear (Hi-Fi model) .0U.T. Then go to "After the Connection". AUDIO OUTPUT CHANNEL a VIDEO 3- -4 VHF HF CATV OUT Cable Box IN OUT TV Rear ANT/CABLE III II Coaxial cable (Supplied) Coaxial cable (Not supplied) I NOTE > • With the above connections, it is not possible to record CATV programs which...

Operation Manual
Page 6
... being recorded with cable box, NB switch and splitter By using an A/B switch or splitter, it is turned off the cable box, you turn off . Set the A/B switch to the "B" position in the following situations. • To play back a cassette on the VCR. O To watch a program which is possible to switch between the cable box and the VCR output. Cable TV Connections ra Connection with the VCR tuner. • To watch a program using the VCR tuner. a -4 VIDEO...
... being recorded with cable box, NB switch and splitter By using an A/B switch or splitter, it is turned off the cable box, you turn off . Set the A/B switch to the "B" position in the following situations. • To play back a cassette on the VCR. O To watch a program which is possible to switch between the cable box and the VCR output. Cable TV Connections ra Connection with the VCR tuner. • To watch a program using the VCR tuner. a -4 VIDEO...

Operation Manual
Page 7
... turned off the cable box, you cannot record or view a CATV program. • If you have questions regarding any connection procedure, please contact your cable company or the nearest Sharp Authorized Service. The output channel of the TV and cable box. From Splitter CATV (Not supplied) system Coaxial cable (Not supplied) Cable Box 1 IN OUT 05 05 VCR Rear (Hi-Fi model) IN OUT AV 1 AUDIO OQ CHANNEL 3- -4 /UHF CATV OUT Cable Box...
... turned off the cable box, you cannot record or view a CATV program. • If you have questions regarding any connection procedure, please contact your cable company or the nearest Sharp Authorized Service. The output channel of the TV and cable box. From Splitter CATV (Not supplied) system Coaxial cable (Not supplied) Cable Box 1 IN OUT 05 05 VCR Rear (Hi-Fi model) IN OUT AV 1 AUDIO OQ CHANNEL 3- -4 /UHF CATV OUT Cable Box...

Operation Manual
Page 8
... Setting the 3 4 Output Channel Selector on the screen, it ). (See page 29.) SET UP VCR operating conditions are only for the MENU screen. (See page 16.) 0 Press A/V and then SET. Function status Sharp Super Picture Tape speed Simple Recording Timer Calendar display Clock display Display example STOP C) 123 S. PLAY FF REW Play Fast forward Rewind STOP Stop REC Rec PAUSE Rec pause Recorded Section Auto Repeat - Menu Screen MENU screen is also recorded on the tape.) 14 TIMER Setting a timer recording (and checking it is a home screen used...
... Setting the 3 4 Output Channel Selector on the screen, it ). (See page 29.) SET UP VCR operating conditions are only for the MENU screen. (See page 16.) 0 Press A/V and then SET. Function status Sharp Super Picture Tape speed Simple Recording Timer Calendar display Clock display Display example STOP C) 123 S. PLAY FF REW Play Fast forward Rewind STOP Stop REC Rec PAUSE Rec pause Recorded Section Auto Repeat - Menu Screen MENU screen is also recorded on the tape.) 14 TIMER Setting a timer recording (and checking it is a home screen used...

Operation Manual
Page 9
... monitor and use timer recording or know the channel of the VCR and the power plug is then connected to the VCR. EZ Set Up will not be able to use time-signals (EDS signals), which are in Auto Clock Setting or Manual Clock Setting. To watch a cable TV channel, select "CATV" on the VCR or remote control. • Do not insert a video cassette into memory. The POWER LED indicator will not be set into the AIR channel setting...
... monitor and use timer recording or know the channel of the VCR and the power plug is then connected to the VCR. EZ Set Up will not be able to use time-signals (EDS signals), which are in Auto Clock Setting or Manual Clock Setting. To watch a cable TV channel, select "CATV" on the VCR or remote control. • Do not insert a video cassette into memory. The POWER LED indicator will not be set into the AIR channel setting...

Operation Manual
Page 10
... "VCR". (VCR LED indicator will light up .) IMPORTANT: When using a cable box: • See Cable TV Connections. • Leave POWER on the cable box turned on your TV and select the video channel. (See Setting the 3 H 4 Output Channel Selector.) V • Press POWER (POWER LED indicator will light up) and then TVNCR to select "VCR". (VCR LED indicator will light up .) MENU LANGUAGE ESPAROL FRANCAIS SELECT ;A • ENTER ;BET EX A • :MENU • Press MENU. Setting the Clock Auto Clock Setting (If...
... "VCR". (VCR LED indicator will light up .) IMPORTANT: When using a cable box: • See Cable TV Connections. • Leave POWER on the cable box turned on your TV and select the video channel. (See Setting the 3 H 4 Output Channel Selector.) V • Press POWER (POWER LED indicator will light up) and then TVNCR to select "VCR". (VCR LED indicator will light up .) MENU LANGUAGE ESPAROL FRANCAIS SELECT ;A • ENTER ;BET EX A • :MENU • Press MENU. Setting the Clock Auto Clock Setting (If...

Operation Manual
Page 11
... the mode setting on your TV and select the video channel. (See Setting the 3 4.-> 4 Output Channel Selector.) •Press POWER (POWER LED indicator will light up .) MENU 0 • MENU A TIMER SET UP CHANNEL PRESET • LANGUAGE SET *0 SELECT :A V ENTER :SET EXIT .MENU Press MENU. Manual Clock Setting PREPARATION DI) •Turn on the CHANNEL PRESET screen. Setting the Clock EDS CH SET AUTO Magla EDS CH • Select a channel that carries EDS signals with A/V and then press SET. When using a cable box: Input the output channel (02...
... the mode setting on your TV and select the video channel. (See Setting the 3 4.-> 4 Output Channel Selector.) •Press POWER (POWER LED indicator will light up .) MENU 0 • MENU A TIMER SET UP CHANNEL PRESET • LANGUAGE SET *0 SELECT :A V ENTER :SET EXIT .MENU Press MENU. Manual Clock Setting PREPARATION DI) •Turn on the CHANNEL PRESET screen. Setting the Clock EDS CH SET AUTO Magla EDS CH • Select a channel that carries EDS signals with A/V and then press SET. When using a cable box: Input the output channel (02...
Operation Manual
Page 12
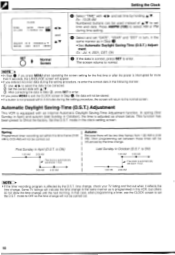
... 41/I - Setting the Clock CLOCK TIME 10:28H DATE YEAR DST mg 7/04WED 01 / 0. and set time and date. Set the D.S.T. Ex.: 10:28 AM Numbered buttons can be carried out. 18 In spring (first Sunday in April) and autumn (last Sunday in October (D.S.T. mode to set time by the time change . and SELECT :4 ► ENTER :SET CHANGE:A V EXIT :MENU A/V SET A 0 ar Normal Screen 6) Select "TIME" with an internal Automatic Daylight Saving-Time Adjustment function.
... 41/I - Setting the Clock CLOCK TIME 10:28H DATE YEAR DST mg 7/04WED 01 / 0. and set time and date. Set the D.S.T. Ex.: 10:28 AM Numbered buttons can be carried out. 18 In spring (first Sunday in April) and autumn (last Sunday in October (D.S.T. mode to set time by the time change . and SELECT :4 ► ENTER :SET CHANGE:A V EXIT :MENU A/V SET A 0 ar Normal Screen 6) Select "TIME" with an internal Automatic Daylight Saving-Time Adjustment function.

Operation Manual
Page 13
... press SET. CHANNEL PRESET 4 A/R/CATV OMMICATV 0'11 CH SET AUTO =EOM e Select "AIR" or "CATV" with Ai• and then press SET. MENU 0 ...o LA~aO , ♦A ' . The channel display will start unless the arrow is at "CH SET-AUTO" position. • If a button is not pressed within 3 minutes during the setting procedure, the screen will return to normal. • If the power is connected to...
... press SET. CHANNEL PRESET 4 A/R/CATV OMMICATV 0'11 CH SET AUTO =EOM e Select "AIR" or "CATV" with Ai• and then press SET. MENU 0 ...o LA~aO , ♦A ' . The channel display will start unless the arrow is at "CH SET-AUTO" position. • If a button is not pressed within 3 minutes during the setting procedure, the screen will return to normal. • If the power is connected to...

Operation Manual
Page 14
... to manually add or erase channels to/from the memory. 0 Select the channel to be added with the CH A/V or numbered buttons. NOTE > • If the power is not pressed within 3 minutes during the setting procedure, the screen will return to be erased with the numbered buttons and the channel to normal. 20 Setting the Channels Adding Channel Memory/Erasing Channel Memory Use this happens, reset the channels...
... to manually add or erase channels to/from the memory. 0 Select the channel to be added with the CH A/V or numbered buttons. NOTE > • If the power is not pressed within 3 minutes during the setting procedure, the screen will return to be erased with the numbered buttons and the channel to normal. 20 Setting the Channels Adding Channel Memory/Erasing Channel Memory Use this happens, reset the channels...

Operation Manual
Page 15
... used for basic features. Check your local broadcast station or cable company. 21 SELECT :A V CHANGE:/ $. Then press V. (See Recording MIS (Multi-channel TV sound) Broadcasts.) [AUDIO OUTPUT] .4 AUTO REPEAT ON rga BLUE SCREEN Inn OFF 00. Then press V. (See Recorded Section Auto Repeat.) •SAP and AUDIO OUTPUT are displayed only with -CIO,. PREPARATION IN • Turn on the TV and select the video channel. Mode Selection You can use the SET UP-selection screen to select "VCR" (VCR...
... used for basic features. Check your local broadcast station or cable company. 21 SELECT :A V CHANGE:/ $. Then press V. (See Recording MIS (Multi-channel TV sound) Broadcasts.) [AUDIO OUTPUT] .4 AUTO REPEAT ON rga BLUE SCREEN Inn OFF 00. Then press V. (See Recorded Section Auto Repeat.) •SAP and AUDIO OUTPUT are displayed only with -CIO,. PREPARATION IN • Turn on the TV and select the video channel. Mode Selection You can use the SET UP-selection screen to select "VCR" (VCR...

Operation Manual
Page 16
... select the video channel. (See Setting the 3 4 Output Channel Selector.) 0 POWER scpcH(±) EJECT 6'6 c7" SHARP (VC-H820U) EJECT POWER PLAY STOP PLAY STOP rqur C SHARP VI000 GAMMA RECORDER • Press POWER to manual tracking mode. R Playback Inserting a Video Cassette Gently insert the video cassette into the VCR. The VCR turns on the VCR. Do not force the cassette into the cassette compartment. To remove the cassette, press EJECT during playback in EP on another VCR that still have vertical jitter even after tracking adjustment has been...
... select the video channel. (See Setting the 3 4 Output Channel Selector.) 0 POWER scpcH(±) EJECT 6'6 c7" SHARP (VC-H820U) EJECT POWER PLAY STOP PLAY STOP rqur C SHARP VI000 GAMMA RECORDER • Press POWER to manual tracking mode. R Playback Inserting a Video Cassette Gently insert the video cassette into the VCR. The VCR turns on the VCR. Do not force the cassette into the cassette compartment. To remove the cassette, press EJECT during playback in EP on another VCR that still have vertical jitter even after tracking adjustment has been...