
UX-500 | UX-510 Operation Manual
Page 2
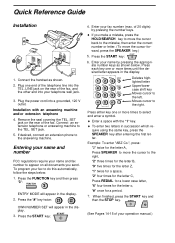
... an extension phone to the TEL. When finished, press the START key and then the STOP key. START STOP (See Pages 14-15 of the fax. Installation with the "1" key. ♦ To enter two letters in the display. Press the START key: 4. of 20 digits) by pressing the appropriate number ... the number keys. ♦ If you send. SET jack on the rear of the telephone line into a grounded, 120 V outlet. Enter your name and fax number to appear on all documents you make a mistake, press the HOLD/SEARCH key to move the cursor back to the mistake, then enter the...
... an extension phone to the TEL. When finished, press the START key and then the STOP key. START STOP (See Pages 14-15 of the fax. Installation with the "1" key. ♦ To enter two letters in the display. Press the START key: 4. of 20 digits) by pressing the appropriate number ... the number keys. ♦ If you send. SET jack on the rear of the telephone line into a grounded, 120 V outlet. Enter your name and fax number to appear on all documents you make a mistake, press the HOLD/SEARCH key to move the cursor back to the mistake, then enter the...

UX-500 | UX-510 Operation Manual
Page 3
...press the SHIFT key first). Press the START key: 7. Press your operation manual.) Press the SPEED DIAL key: SPEED DIAL 2. Enter the fax number by pressing the number keys. When finished, press the START key and then the STOP key: START STOP (See Page 17 of your ... press STOP to press their Start key). 4. Normal Dialing SPEAKER 1. START 4. Press: START Direct Keypad Dialing 1. Enter the name of keys: FUNCTION 3 FAX/TEL # MODE will begin. Quick Reference Guide Setting the date and time To set the date and time, press the following keys: FUNCTION 3 DATE & ...
...press the SHIFT key first). Press the START key: 7. Press your operation manual.) Press the SPEED DIAL key: SPEED DIAL 2. Enter the fax number by pressing the number keys. When finished, press the START key and then the STOP key: START STOP (See Page 17 of your ... press STOP to press their Start key). 4. Normal Dialing SPEAKER 1. START 4. Press: START Direct Keypad Dialing 1. Enter the name of keys: FUNCTION 3 FAX/TEL # MODE will begin. Quick Reference Guide Setting the date and time To set the date and time, press the following keys: FUNCTION 3 DATE & ...

UX-500 | UX-510 Operation Manual
Page 4
... fit into the slots on each side of the compartment. 4. MANUAL reception: Lift the handset when the fax rings. If you loaded legal size paper. Insert the paper tray into a single stack with the fax): FUNCTION 6 START (See Pages 2-5 of keys: FUNCTION 6 Press "1" if you loaded letter size paper..., or "2" if you hear a fax tone, wait until "AUTO" or "MANU" appears in the tray, take it out and...
... fit into the slots on each side of the compartment. 4. MANUAL reception: Lift the handset when the fax rings. If you loaded legal size paper. Insert the paper tray into a single stack with the fax): FUNCTION 6 START (See Pages 2-5 of keys: FUNCTION 6 Press "1" if you loaded letter size paper..., or "2" if you hear a fax tone, wait until "AUTO" or "MANU" appears in the tray, take it out and...

UX-500 | UX-510 Operation Manual
Page 5
... (80) Anti Junk Number List (81) Program and Group List (81) Caller ID List (82) Print Setup List (82) Fax/Tel Numbers for Polling (74) (65) Tel/Fax Re- Quick Reference Guide FUNCTION key menu The following chart shows the layout of Rings in the display. Daylight Saving tion Select...Junk Number (57) Transaction Report Print Select (74) Priority Call Number (55) Dial Mode (74) TAD Connected (46, 75) Fax Reception When TAD Fails (52, 75) Distinctive Ring (20, 75) Fax Signal Receive (75) Junk Number Check (76) Polling (76) Caller ID (76) Auto Cover Sheet (76) Activity Report Auto ...
... (80) Anti Junk Number List (81) Program and Group List (81) Caller ID List (82) Print Setup List (82) Fax/Tel Numbers for Polling (74) (65) Tel/Fax Re- Quick Reference Guide FUNCTION key menu The following chart shows the layout of Rings in the display. Daylight Saving tion Select...Junk Number (57) Transaction Report Print Select (74) Priority Call Number (55) Dial Mode (74) TAD Connected (46, 75) Fax Reception When TAD Fails (52, 75) Distinctive Ring (20, 75) Fax Signal Receive (75) Junk Number Check (76) Polling (76) Caller ID (76) Auto Cover Sheet (76) Activity Report Auto ...

UX-500 | UX-510 Operation Manual
Page 7
...UX-500. The number is not designed for installing and using each feature are located. Note: The illustrations in this manual, please contact Sharp's Customer Information Center. Important: • This facsimile machine is 1800-BE SHARP. This manual gives you easy-to-follow instructions for use the fax...first, we recommend you at least look them over briefly. In addition to providing you where instructions for choosing Sharp! If you attempt to the UX-500/510 and thank you may experience errors during transmission and reception of your telephone company. If you have any ...
...UX-500. The number is not designed for installing and using each feature are located. Note: The illustrations in this manual, please contact Sharp's Customer Information Center. Important: • This facsimile machine is 1800-BE SHARP. This manual gives you easy-to-follow instructions for use the fax...first, we recommend you at least look them over briefly. In addition to providing you where instructions for choosing Sharp! If you attempt to the UX-500/510 and thank you may experience errors during transmission and reception of your telephone company. If you have any ...

UX-500 | UX-510 Operation Manual
Page 9
... 1 Loading the Imaging Film 2 Connections 6 Attachments 8 Loading Printing Paper 9 2 Initial Settings 11 Setup Guide 11 A Look at the Operation Panel 12 Entering Your Name and Fax Number 14 Entering Letters for Names 15 Setting the Date and Time 17 Selecting the Reception Mode 19 Distinctive Ring 20 Storing Numbers for Automatic...
... 1 Loading the Imaging Film 2 Connections 6 Attachments 8 Loading Printing Paper 9 2 Initial Settings 11 Setup Guide 11 A Look at the Operation Panel 12 Entering Your Name and Fax Number 14 Entering Letters for Names 15 Setting the Date and Time 17 Selecting the Reception Mode 19 Distinctive Ring 20 Storing Numbers for Automatic...

UX-500 | UX-510 Operation Manual
Page 10
7 Answering Machine Hookup 45 Using the Hookup 45 Optional Hookup Settings 51 8 Special Functions 53 Caller ID 53 Blocking Reception of Unwanted Faxes 57 Memory 59 Broadcasting 61 Polling (Requesting a Fax Transmission 63 Timer Operations 66 Entering and Using Programs 68 9 Optional Settings 73 10 Printing Reports and Lists 77 11 Maintenance 83 12 Troubleshooting 85 Problems and Solutions 85 Messages and Signals 88 Clearing Paper Jams 90 Specifications 92 FCC Regulatory Information 96 Guia de Consulta Rapida 97 Index 100
7 Answering Machine Hookup 45 Using the Hookup 45 Optional Hookup Settings 51 8 Special Functions 53 Caller ID 53 Blocking Reception of Unwanted Faxes 57 Memory 59 Broadcasting 61 Polling (Requesting a Fax Transmission 63 Timer Operations 66 Entering and Using Programs 68 9 Optional Settings 73 10 Printing Reports and Lists 77 11 Maintenance 83 12 Troubleshooting 85 Problems and Solutions 85 Messages and Signals 88 Clearing Paper Jams 90 Specifications 92 FCC Regulatory Information 96 Guia de Consulta Rapida 97 Index 100
UX-500 | UX-510 Operation Manual
Page 11
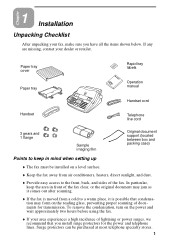
... a high incidence of lightning or power surges, we recommend that condensation may form on a level surface. ♦ Keep the fax away from a cold to the front, back, and sides of the fax clear, or the original document may jam as it comes out after scanning. ♦ If the...box and packing case) Points to keep the area in mind when setting up ♦ The fax must be purchased at most telephone specialty stores. 1 Chapter 1 Installation Unpacking Checklist After unpacking your fax, make sure you install surge protectors for transmission. If any are missing, contact your dealer or...
... a high incidence of lightning or power surges, we recommend that condensation may form on a level surface. ♦ Keep the fax away from a cold to the front, back, and sides of the fax clear, or the original document may jam as it comes out after scanning. ♦ If the...box and packing case) Points to keep the area in mind when setting up ♦ The fax must be purchased at most telephone specialty stores. 1 Chapter 1 Installation Unpacking Checklist After unpacking your fax, make sure you install surge protectors for transmission. If any are missing, contact your dealer or...

UX-500 | UX-510 Operation Manual
Page 12
... to the printing film. DO NOT DISCARD THE GREEN GEARS AND THE GREEN FLANGE! 2 Chapter 1 Installation Loading the Imaging Film The printer unit in your fax creates printed text and images by applying heat to the imaging film, which causes ink to be hot if a document has just been printed. 2 If...
... to the printing film. DO NOT DISCARD THE GREEN GEARS AND THE GREEN FLANGE! 2 Chapter 1 Installation Loading the Imaging Film The printer unit in your fax creates printed text and images by applying heat to the imaging film, which causes ink to be hot if a document has just been printed. 2 If...

UX-500 | UX-510 Operation Manual
Page 13
... with only one tab). Flange 1 tab 2 tabs Gear 3 3 Take the new film out of its package, and insert two of the gears provided with the fax into the front of the printing compartment. gether with film. Make sure the tabs on the gear and the flange fit into the slots in...
... with only one tab). Flange 1 tab 2 tabs Gear 3 3 Take the new film out of its package, and insert two of the gears provided with the fax into the front of the printing compartment. gether with film. Make sure the tabs on the gear and the flange fit into the slots in...
UX-500 | UX-510 Operation Manual
Page 15
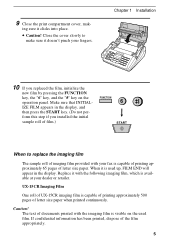
...film The sample roll of imaging film provided with your fax is available at your fingers. Chapter 1 Installation 10 If you installed the initial sample roll of letter size paper when printed continuously. Replace it is capable of printing approximately 500 pages of film.) FUNCTION 6 START When to make sure...with the imaging film is visible on the operation panel. If confidential information has been printed, dispose of letter size paper. UX-15CR Imaging Film One roll of UX-15CR imaging film is used up, FILM END will appear in the display, and then press the START key. (Do ...
...film The sample roll of imaging film provided with your fax is available at your fingers. Chapter 1 Installation 10 If you installed the initial sample roll of letter size paper when printed continuously. Replace it is capable of printing approximately 500 pages of film.) FUNCTION 6 START When to make sure...with the imaging film is visible on the operation panel. If confidential information has been printed, dispose of letter size paper. UX-15CR Imaging Film One roll of UX-15CR imaging film is used up, FILM END will appear in the display, and then press the START key. (Do ...
UX-500 | UX-510 Operation Manual
Page 16
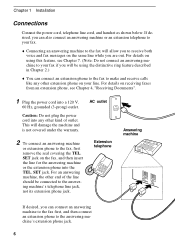
...TEL. If desired, you to the answering machine's extension phone jack. 6 SET jack on the same line while you will be connected to the fax, first remove the seal covering the TEL. AC outlet 2 To connect an answering machine or extension phone to the answering machine's telephone line jack... the distinctive ring feature described in Chapter 2.) ♦ You can connect an answering machine to the fax first, and then connect an extension phone to receive both voice and fax messages on the fax, and then insert the line for the answering machine or the extension phone into a 120 V, 60...
...TEL. If desired, you to the answering machine's extension phone jack. 6 SET jack on the same line while you will be connected to the fax, first remove the seal covering the TEL. AC outlet 2 To connect an answering machine or extension phone to the answering machine's telephone line jack... the distinctive ring feature described in Chapter 2.) ♦ You can connect an answering machine to the fax first, and then connect an extension phone to receive both voice and fax messages on the fax, and then insert the line for the answering machine or the extension phone into a 120 V, 60...
UX-500 | UX-510 Operation Manual
Page 17
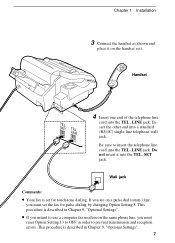
... (RJ11C) single-line telephone wall jack. TLIENLE. 4 Insert one end of the telephone line cord into the TEL. This procedure is set the fax for touch-tone dialing. Do not insert it on the same phone line, you must reset Option Setting 13 to OFF in Chapter 9, "Optional ...Settings". 7 Wall jack Comments: • Your fax is described in Chapter 9, "Optional Settings". • If you intend to use a computer fax modem on the handset rest. Insert the other end into the TEL. LINE jack.
... (RJ11C) single-line telephone wall jack. TLIENLE. 4 Insert one end of the telephone line cord into the TEL. This procedure is set the fax for touch-tone dialing. Do not insert it on the same phone line, you must reset Option Setting 13 to OFF in Chapter 9, "Optional ...Settings". 7 Wall jack Comments: • Your fax is described in Chapter 9, "Optional Settings". • If you intend to use a computer fax modem on the handset rest. Insert the other end into the TEL. LINE jack.

UX-500 | UX-510 Operation Manual
Page 18
If desired, attach the original document support by inserting the ends into the back of the fax as shown. Chapter 1 Installation Attachments Insert the paper tray into the holes in the bottom of the fax as shown. 8
If desired, attach the original document support by inserting the ends into the back of the fax as shown. Chapter 1 Installation Attachments Insert the paper tray into the holes in the bottom of the fax as shown. 8

UX-500 | UX-510 Operation Manual
Page 20
Chapter 1 Installation 4 Replace the paper cover on regular paper. LETTER LEGAL 5 Your fax has been set at the factory to scale the size of the printed image to letter size paper. Press the FUNCTION key, the "6" key, the "*" ... must change this setting to print on the paper tray and then push the paper release plate back down . FUNCTION 6 Letter 1 or Legal 2 STOP 6 Your fax has been set at the factory to legal. If you have FUNCTION 6 loaded high quality thermal transfer pa- STOP Be sure to change this setting...
Chapter 1 Installation 4 Replace the paper cover on regular paper. LETTER LEGAL 5 Your fax has been set at the factory to scale the size of the printed image to letter size paper. Press the FUNCTION key, the "6" key, the "*" ... must change this setting to print on the paper tray and then push the paper release plate back down . FUNCTION 6 Letter 1 or Legal 2 STOP 6 Your fax has been set at the factory to legal. If you have FUNCTION 6 loaded high quality thermal transfer pa- STOP Be sure to change this setting...

UX-500 | UX-510 Operation Manual
Page 21
... simply pressing a Rapid Key, or by pressing the SPEED DIAL key and entering a 2-digit number. pany, the fax will display and retain information which allows you to use the fax. To use of your telephone com- Chapter 2 Initial Settings Setup Guide Before you can begin using Caller ID, see... different devices, each call. Some of the settings are required for making the settings are some settings that must store the desired fax and phone numbers in Chapter 9, "Optional Settings". The procedures for basic use this chapter in Chapter 8. 11 For information on the operation ...
... simply pressing a Rapid Key, or by pressing the SPEED DIAL key and entering a 2-digit number. pany, the fax will display and retain information which allows you to use the fax. To use of your telephone com- Chapter 2 Initial Settings Setup Guide Before you can begin using Caller ID, see... different devices, each call. Some of the settings are required for making the settings are some settings that must store the desired fax and phone numbers in Chapter 9, "Optional Settings". The procedures for basic use this chapter in Chapter 8. 11 For information on the operation ...

UX-500 | UX-510 Operation Manual
Page 23
... 11 30 15/POLL 34 19/G2 38 MEMORY key Press this key to select various special functions. Rapid Dial Keys Press one of your fax. RESOLUTION key Press this key to make a copy. RECEPTION MODE key Press this key to select the mode of the ringer at all other time... and contrast before transmitting it. STOP key Press this key to send or receive a document. Chapter 2 Initial Settings VOLUME keys Press these keys to dial a fax or voice number automatically. FUNCTION key Press this key to stop operations before pressing the Rapid Key. (Note that you must attach the Rapid Key...
... 11 30 15/POLL 34 19/G2 38 MEMORY key Press this key to select various special functions. Rapid Dial Keys Press one of your fax. RESOLUTION key Press this key to make a copy. RECEPTION MODE key Press this key to select the mode of the ringer at all other time... and contrast before transmitting it. STOP key Press this key to send or receive a document. Chapter 2 Initial Settings VOLUME keys Press these keys to dial a fax or voice number automatically. FUNCTION key Press this key to stop operations before pressing the Rapid Key. (Note that you must attach the Rapid Key...
UX-500 | UX-510 Operation Manual
Page 24
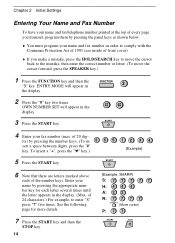
...the display. 3 Press the START key. To insert a "+", press the "*" key.) (Example) 5 Press the START key. START 4 Enter your fax number (max. Enter your name by pressing the appropriate number key for more details. 7 Press the START key and then the STOP key. 14 (...Example: SHARP) S: 7 7 7 7 7 H: 4 4 4 A: 2 2 R: 7 7 7 7 SPEAKER (Move cursor) P: 7 7 START STOP of 24 characters.) For example, to enter "S" press "7" five times. See the following ...
...the display. 3 Press the START key. To insert a "+", press the "*" key.) (Example) 5 Press the START key. START 4 Enter your fax number (max. Enter your name by pressing the appropriate number key for more details. 7 Press the START key and then the STOP key. 14 (...Example: SHARP) S: 7 7 7 7 7 H: 4 4 4 A: 2 2 R: 7 7 7 7 SPEAKER (Move cursor) P: 7 7 START STOP of 24 characters.) For example, to enter "S" press "7" five times. See the following ...

UX-500 | UX-510 Operation Manual
Page 28
... "2" to turn on this function, press the panel keys as follows: 1 Press the FUNCTION key and then the "3" key. DAYLIGHT SAVING will appear in your fax move forward and backward automatically at the beginning and end of Daylight Saving Time. STOP 18 START Daylight Saving Time If desired, you can have...
... "2" to turn on this function, press the panel keys as follows: 1 Press the FUNCTION key and then the "3" key. DAYLIGHT SAVING will appear in your fax move forward and backward automatically at the beginning and end of Daylight Saving Time. STOP 18 START Daylight Saving Time If desired, you can have...
UX-500 | UX-510 Operation Manual
Page 29
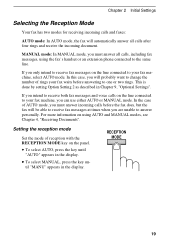
... using AUTO and MANUAL modes, see Chapter 4, "Receiving Documents". In this case, you must answer incoming calls before answering to your fax machine, select AUTO mode. Setting the reception mode Set the mode of AUTO mode, you must answer all calls after four rings and ...incoming document. Chapter 2 Initial Settings Selecting the Reception Mode Your fax has two modes for receiving incoming calls and faxes: AUTO mode: In AUTO mode, the fax will be able to receive fax messages at times when you only intend to receive fax messages on the panel. • To select AUTO, press ...
... using AUTO and MANUAL modes, see Chapter 4, "Receiving Documents". In this case, you must answer incoming calls before answering to your fax machine, select AUTO mode. Setting the reception mode Set the mode of AUTO mode, you must answer all calls after four rings and ...incoming document. Chapter 2 Initial Settings Selecting the Reception Mode Your fax has two modes for receiving incoming calls and faxes: AUTO mode: In AUTO mode, the fax will be able to receive fax messages at times when you only intend to receive fax messages on the panel. • To select AUTO, press ...


