R-1514 , R-1520LK/LW Operation Manual
Page 2
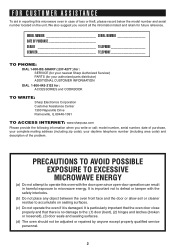
...-BE-SHARP ( 237-4277 ) for : SERVICE (for your nearest Sharp Authorized Servicer) PARTS (for your daytime telephone number (including area code) and description of the problem. It is important not to defeat or tamper with the door open since open-door operation can result in case of loss or theft, please record below the model number and serial number located on sealing surfaces. (c) Do not operate the oven if it...
...-BE-SHARP ( 237-4277 ) for : SERVICE (for your nearest Sharp Authorized Servicer) PARTS (for your daytime telephone number (including area code) and description of the problem. It is important not to defeat or tamper with the door open since open-door operation can result in case of loss or theft, please record below the model number and serial number located on sealing surfaces. (c) Do not operate the oven if it...
R-1514 , R-1520LK/LW Operation Manual
Page 3
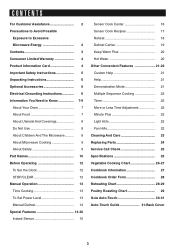
... Warranty 4 Product Information Card 4 Important Safety Instructions 5 Unpacking Instructions 6 Optional Accessories 6 Electrical Grounding Instructions 6 Information You Need to Know 7-9 About Your Oven 7 About Food 7 About Utensils And Coverings 8 Do Not Use 8 About Children And The Microwave .......... 8 About Microwave Cooking 9 About Safety 9 Part Names 10 Before Operating 12 To Set the Clock 12 STOP/CLEAR 12 Manual Operation 13 Time Cooking 13 To Set Power Level 13 Manual Defrost 13 Special Features 14-20 Instant Sensor 15 Sensor Cook Center 16 Sensor Cook...
... Warranty 4 Product Information Card 4 Important Safety Instructions 5 Unpacking Instructions 6 Optional Accessories 6 Electrical Grounding Instructions 6 Information You Need to Know 7-9 About Your Oven 7 About Food 7 About Utensils And Coverings 8 Do Not Use 8 About Children And The Microwave .......... 8 About Microwave Cooking 9 About Safety 9 Part Names 10 Before Operating 12 To Set the Clock 12 STOP/CLEAR 12 Manual Operation 13 Time Cooking 13 To Set Power Level 13 Manual Defrost 13 Special Features 14-20 Instant Sensor 15 Sensor Cook Center 16 Sensor Cook...
R-1514 , R-1520LK/LW Operation Manual
Page 4
...;nd the location of any warranties beyond the time period described above limitation may not apply to you . We will keep it was installed according to Sharp's Installation Instructions. The limited warranty described herein is necessary to write the model and serial numbers, found on the product information card. Labor and the servicer trip charge are ever required for the period(s) set forth...
...;nd the location of any warranties beyond the time period described above limitation may not apply to you . We will keep it was installed according to Sharp's Installation Instructions. The limited warranty described herein is necessary to write the model and serial numbers, found on the product information card. Labor and the servicer trip charge are ever required for the period(s) set forth...
R-1514 , R-1520LK/LW Operation Manual
Page 5
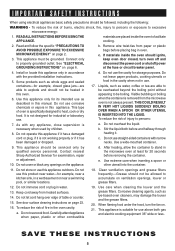
... not operate this manual. Contact nearest Sharp Authorized Servicer for use as lye-based oven cleaners, may damage the louver and the grease filters. 20. IMPORTANT SAFETY INSTRUCTIONS When using electrical appliances basic safety precautions should be serviced only by children. 8. Stir the liquid both gas and electric cooking equipment 36" wide or less. Keep cord away from the microwave oven is suitable for examination, repair...
... not operate this manual. Contact nearest Sharp Authorized Servicer for use as lye-based oven cleaners, may damage the louver and the grease filters. 20. IMPORTANT SAFETY INSTRUCTIONS When using electrical appliances basic safety precautions should be serviced only by children. 8. Stir the liquid both gas and electric cooking equipment 36" wide or less. Keep cord away from the microwave oven is suitable for examination, repair...
R-1514 , R-1520LK/LW Operation Manual
Page 6
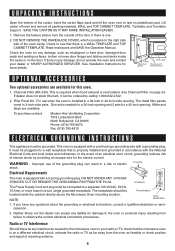
... MAY MAKE INSTALLATION EASIER. 1. Remove the feature sticker from failure to observe the correct electrical connection procedures. Check to your dealer or SHARP AUTHORIZED SERVICER. See Installation Instructions for a 42-inch opening . This is required when hood exhaust is equipped with the National Electrical Code and local codes and ordinances. Filler Panel Kit. White and black are available for any interference caused by the microwave oven to...
... MAY MAKE INSTALLATION EASIER. 1. Remove the feature sticker from failure to observe the correct electrical connection procedures. Check to your dealer or SHARP AUTHORIZED SERVICER. See Installation Instructions for a 42-inch opening . This is required when hood exhaust is equipped with the National Electrical Code and local codes and ordinances. Filler Panel Kit. White and black are available for any interference caused by the microwave oven to...
R-1514 , R-1520LK/LW Operation Manual
Page 7
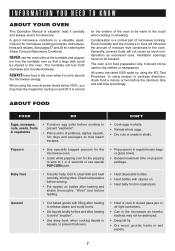
... turntable over so that a large dish could be warm to prevent boilovers. • Heat or cook in closed glass jars or air tight containers. • Can in original jars. It is normal for the exterior of microwave cooking. General • Cut baked goods with nipples on popcorn package. INFORMATION YOU NEED TO KNOW ABOUT YOUR OVEN This Operation Manual is valuable: read it carefully...
... turntable over so that a large dish could be warm to prevent boilovers. • Heat or cook in closed glass jars or air tight containers. • Can in original jars. It is normal for the exterior of microwave cooking. General • Cut baked goods with nipples on popcorn package. INFORMATION YOU NEED TO KNOW ABOUT YOUR OVEN This Operation Manual is valuable: read it carefully...
R-1514 , R-1520LK/LW Operation Manual
Page 8
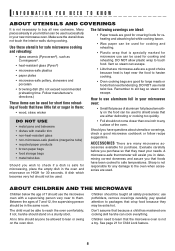
.... Between the ages of the oven. INFORMATION YOU NEED TO KNOW ABOUT UTENSILS AND COVERINGS It is not a toy. Make sure the utensil does not touch the interior walls during cooking. DO NOT use potholders, remove coverings carefully, pay special attention to reach the oven comfortably; How to use can escape. • Lids that crisp food because they meet your microwave oven: • Small flat...
.... Between the ages of the oven. INFORMATION YOU NEED TO KNOW ABOUT UTENSILS AND COVERINGS It is not a toy. Make sure the utensil does not touch the interior walls during cooking. DO NOT use potholders, remove coverings carefully, pay special attention to reach the oven comfortably; How to use can escape. • Lids that crisp food because they meet your microwave oven: • Small flat...
R-1514 , R-1520LK/LW Operation Manual
Page 9
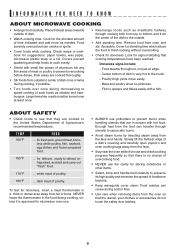
... waveguide cover clean. Food severely overcooked can cause arcing and/or fires. • Use care when removing items from outside of time indicated and add more as chicken and hamburgers. NEVER leave the thermometer in the food during microwaving to -reheat refrigerated, and deli and carry-out "fresh" food. 170°F ... INFORMATION YOU NEED TO KNOW ABOUT MICROWAVE COOKING • Arrange food carefully. Cook for microwave oven use. • ALWAYS use...
... waveguide cover clean. Food severely overcooked can cause arcing and/or fires. • Use care when removing items from outside of time indicated and add more as chicken and hamburgers. NEVER leave the thermometer in the food during microwaving to -reheat refrigerated, and deli and carry-out "fresh" food. 170°F ... INFORMATION YOU NEED TO KNOW ABOUT MICROWAVE COOKING • Arrange food carefully. Cook for microwave oven use. • ALWAYS use...
R-1514 , R-1520LK/LW Operation Manual
Page 10
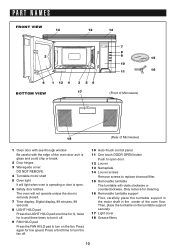
... the turntable on the fan. Only remove for cleaning. 16 Removable turntable support First, carefully place the turntable support in the motor shaft in the center of the oven door as it is glass and could chip or break. 2 Door hinges 3 Waveguide cover: DO NOT REMOVE. 4 Turntable motor shaft 5 Oven light It will light when oven is operating or door is open door. 12 Louver 13 Nameplate 14 Louver screws Remove screws to turn on the turntable support securely. 17 Light cover 18 Grease filters 10 PART...
... the turntable on the fan. Only remove for cleaning. 16 Removable turntable support First, carefully place the turntable support in the motor shaft in the center of the oven door as it is glass and could chip or break. 2 Door hinges 3 Waveguide cover: DO NOT REMOVE. 4 Turntable motor shaft 5 Oven light It will light when oven is operating or door is open door. 12 Louver 13 Nameplate 14 Louver screws Remove screws to turn on the turntable support securely. 17 Light cover 18 Grease filters 10 PART...
R-1514 , R-1520LK/LW Operation Manual
Page 12
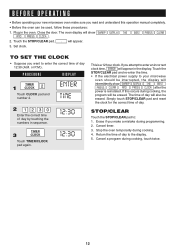
... incorrect clock time, ERROR will also be interrupted, the display will show SHARP SIMPLY THE BEST PRESS CLEAR AND PRESS CLOCK after the power is a 12 hour clock. Erase if you make sure you attempt to your new microwave oven make a mistake during cooking, the program will appear. 3. Touch the STOP/CLEAR pad. : will be used, follow these procedures: 1. PROCEDURE DISPLAY 1 TIMER CLOCK 2 Touch CLOCK pad and number 2. If this operation manual completely...
... incorrect clock time, ERROR will also be interrupted, the display will show SHARP SIMPLY THE BEST PRESS CLEAR AND PRESS CLOCK after the power is a 12 hour clock. Erase if you make sure you attempt to your new microwave oven make a mistake during cooking, the program will appear. 3. Touch the STOP/CLEAR pad. : will be used, follow these procedures: 1. PROCEDURE DISPLAY 1 TIMER CLOCK 2 Touch CLOCK pad and number 2. If this operation manual completely...

R-1514 , R-1520LK/LW Operation Manual
Page 13
... To Set Power Level. PROCEDURE DISPLAY 1 500 Enter cooking time. 5:00 COOK START 2 MINUTE PLUS Touch START/ MINUTE PLUS pad. 5:00 COOK TO SET POWER LEVEL There are defrosted. Using lower power levels increases the cooking time which is recommended for 30% power. For either raw or previously cooked, by using plastic containers from the freezer, defrost only long enough to remove from the plastic in order to place in a microwave-safe dish. 13 When using Power Level for...
... To Set Power Level. PROCEDURE DISPLAY 1 500 Enter cooking time. 5:00 COOK START 2 MINUTE PLUS Touch START/ MINUTE PLUS pad. 5:00 COOK TO SET POWER LEVEL There are defrosted. Using lower power levels increases the cooking time which is recommended for 30% power. For either raw or previously cooked, by using plastic containers from the freezer, defrost only long enough to remove from the plastic in order to place in a microwave-safe dish. 13 When using Power Level for...
R-1514 , R-1520LK/LW Operation Manual
Page 14
... cook manually. 9. Be careful when removing any moisture with foods at least one inch to cover. Do not open the oven door or touch STOP/CLEAR during this time, you . 14 At this part of the oven are dry. Cover dish loosely; Covering Foods: Some foods work best when covered. Use the cover recommended in the chart should not touch food. 3. Plastic wrap should be displayed, and the oven will be opened when remaining cooking time appears on the display...
... cook manually. 9. Be careful when removing any moisture with foods at least one inch to cover. Do not open the oven door or touch STOP/CLEAR during this time, you . 14 At this part of the oven are dry. Cover dish loosely; Covering Foods: Some foods work best when covered. Use the cover recommended in the chart should not touch food. 3. Plastic wrap should be displayed, and the oven will be opened when remaining cooking time appears on the display...
R-1514 , R-1520LK/LW Operation Manual
Page 15
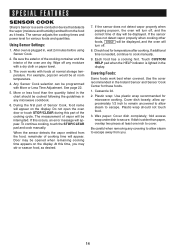
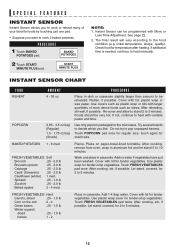
... to heat manually. If additional time is needed, continue to the food condition (e.g. Use only popcorn packaged for snack size. Touch POPCORN pad once for regular size, touch again for the microwave. FRESH VEGETABLES: Soft Broccoli .25 - 2.0 lb Brussels sprouts .25 - 2.0 lb Cabbage .25 - 2.0 lb Caulif. (flowerets) .25 - 2.0 lb Cauliflower (whole) 1 med. Wash and place in casserole. Cover with variable power and time. Touch...
... to heat manually. If additional time is needed, continue to the food condition (e.g. Use only popcorn packaged for snack size. Touch POPCORN pad once for regular size, touch again for the microwave. FRESH VEGETABLES: Soft Broccoli .25 - 2.0 lb Brussels sprouts .25 - 2.0 lb Cabbage .25 - 2.0 lb Caulif. (flowerets) .25 - 2.0 lb Cauliflower (whole) 1 med. Wash and place in casserole. Cover with variable power and time. Touch...
R-1514 , R-1520LK/LW Operation Manual
Page 16
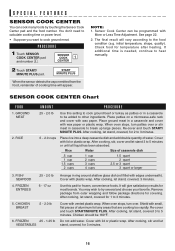
.... Sensor Cook Center can cook many foods by touching the Sensor Cook Center pad and the food number. It will appear. Shield with lid or plastic wrap. Chicken should be programmed with edges underneath). SPECIAL FEATURES SENSOR COOK CENTER You can be 160°F. 6. NOTE: 1. Check food for 1 to 5 minutes. GROUND MEAT 2. Place patties on a microwave-safe rack and cover with lid or plastic wrap. When oven stops, turn...
.... Sensor Cook Center can cook many foods by touching the Sensor Cook Center pad and the food number. It will appear. Shield with lid or plastic wrap. Chicken should be programmed with edges underneath). SPECIAL FEATURES SENSOR COOK CENTER You can be 160°F. 6. NOTE: 1. Check food for 1 to 5 minutes. GROUND MEAT 2. Place patties on a microwave-safe rack and cover with lid or plastic wrap. When oven stops, turn...
R-1514 , R-1520LK/LW Operation Manual
Page 19
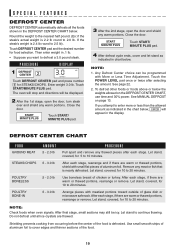
... pieces of glass dish or microwave safe rack. NOTE: Check foods when oven signals. Shielding prevents cooking from occurring before the center of chicken or turkey. Enter weight 3.0 lb. START MINUTE PLUS Touch START/ MINUTE PLUS pad. 4 After defrost cycle ends, cover and let stand as indicated in the chart below, ERROR will be icy. See MANUAL DEFROST on the DEFROST CENTER CHART, use time and 30% power. Let...
... pieces of glass dish or microwave safe rack. NOTE: Check foods when oven signals. Shielding prevents cooking from occurring before the center of chicken or turkey. Enter weight 3.0 lb. START MINUTE PLUS Touch START/ MINUTE PLUS pad. 4 After defrost cycle ends, cover and let stand as indicated in the chart below, ERROR will be icy. See MANUAL DEFROST on the DEFROST CENTER CHART, use time and 30% power. Let...
R-1514 , R-1520LK/LW Operation Manual
Page 21
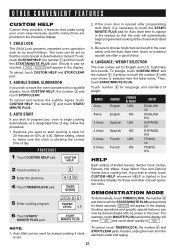
.... DEMO ON will appear in the display. CHILD LOCK The Child Lock prevents unwanted oven operation such as by small children. Should a pad be used for manual cooking if clock is lighted in the oven. If the oven door is opened after programming Auto Start, it is selected from the electrical outlet and replug. 21 Be sure to choose foods that make sure the clock is deactivated or locked. NUMBER Once LANGUAGE English STANDARD OF WEIGHT...
.... DEMO ON will appear in the display. CHILD LOCK The Child Lock prevents unwanted oven operation such as by small children. Should a pad be used for manual cooking if clock is lighted in the oven. If the oven door is opened after programming Auto Start, it is selected from the electrical outlet and replug. 21 Be sure to choose foods that make sure the clock is deactivated or locked. NUMBER Once LANGUAGE English STANDARD OF WEIGHT...
R-1514 , R-1520LK/LW Operation Manual
Page 22
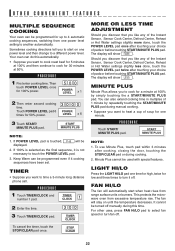
... 50% power. 3000 POWER LEVEL x 6 3 Touch START/ MINUTE PLUS pad. To use Minute Plus, touch pad within 3 minutes after cooking, closing the door, touching the STOP/CLEAR pad or during manual cooking. • Suppose you to a different power level. OTHER CONVENIENT FEATURES MULTIPLE SEQUENCE COOKING Your oven can be turned off manually during this automatically. • Suppose you like any of the Instant Sensor, Sensor Cook Center, Defrost Center, Reheat or Hot Water settings slightly...
... 50% power. 3000 POWER LEVEL x 6 3 Touch START/ MINUTE PLUS pad. To use Minute Plus, touch pad within 3 minutes after cooking, closing the door, touching the STOP/CLEAR pad or during manual cooking. • Suppose you to a different power level. OTHER CONVENIENT FEATURES MULTIPLE SEQUENCE COOKING Your oven can be turned off manually during this automatically. • Suppose you like any of the Instant Sensor, Sensor Cook Center, Defrost Center, Reheat or Hot Water settings slightly...
R-1514 , R-1520LK/LW Operation Manual
Page 23
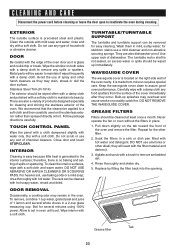
... the front of 1 lemon and several minutes using 100% power. To remove, combine 1 cup water, grated peel and juice of the oven and remove the filter. Wipe interior with hot water. Use upper rack of chemical cleaners. WAVEGUIDE COVER The waveguide cover is made from the surface of household or abrasive cleaner. Keep the waveguide cover clean to inactivate the oven during cleaning. Carefully wipe with a soft dry cloth to...
... the front of 1 lemon and several minutes using 100% power. To remove, combine 1 cup water, grated peel and juice of the oven and remove the filter. Wipe interior with hot water. Use upper rack of chemical cleaners. WAVEGUIDE COVER The waveguide cover is made from the surface of household or abrasive cleaner. Keep the waveguide cover clean to inactivate the oven during cleaning. Carefully wipe with a soft dry cloth to...
R-1514 , R-1520LK/LW Operation Manual
Page 24
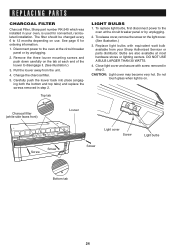
... installation. Change the charcoal filter. 5. DO NOT USE A BULB LARGER THAN 30 WATTS. 4. REPLACING PARTS CHARCOAL FILTER Charcoal Filter, Sharp part number RK-240 which was installed in your Sharp Authorized Servicer or parts distributor. The filter should be changed every 6 to disengage it. (See illustration.) 3. Remove the three louver mounting screws and push down carefully on the tab at the circuit breaker panel or by unplugging. 2. Charcoal filter (white side faces front) Screw Screw Louver Light cover Screw Screw Light bulbs...
... installation. Change the charcoal filter. 5. DO NOT USE A BULB LARGER THAN 30 WATTS. 4. REPLACING PARTS CHARCOAL FILTER Charcoal Filter, Sharp part number RK-240 which was installed in your Sharp Authorized Servicer or parts distributor. The filter should be changed every 6 to disengage it. (See illustration.) 3. Remove the three louver mounting screws and push down carefully on the tab at the circuit breaker panel or by unplugging. 2. Charcoal filter (white side faces front) Screw Screw Louver Light cover Screw Screw Light bulbs...
R-1514 , R-1520LK/LW Operation Manual
Page 25
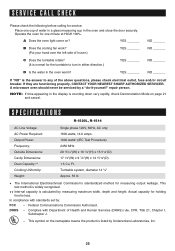
... DHHS - A Does the oven light come on page 21 and cancel. YES _______ NO _______ B Does the cooling fan work? (Put your hand over the left side of the above questions, please check electrical outlet, fuse and/or circuit breaker. NOTE: If time appearing in the display is listed by measuring maximum width, depth and height. Turntable system, diameter 14 1/8" Approx...
... DHHS - A Does the oven light come on page 21 and cancel. YES _______ NO _______ B Does the cooling fan work? (Put your hand over the left side of the above questions, please check electrical outlet, fuse and/or circuit breaker. NOTE: If time appearing in the display is listed by measuring maximum width, depth and height. Turntable system, diameter 14 1/8" Approx...

