User Manual
Page 3
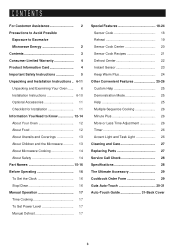
...-24 Sensor Cook 18 Reheat 19 Sensor Cook Center 20 Sensor Cook Recipes 21 Defrost Center 22 Instant Sensor 23 Keep Warm Plus 24 Other Convenient Features 25-26 Custom Help 25 Demonstration Mode 25 Help 25 Multiple Sequence Cooking 26 Minute Plus 26 More or Less Time Adjustment 26 Timer 26 Accent Light and Task Light 26 Cleaning and Care 27 Replacing Parts 27 Service Call Check 28 Specifications 28...
...-24 Sensor Cook 18 Reheat 19 Sensor Cook Center 20 Sensor Cook Recipes 21 Defrost Center 22 Instant Sensor 23 Keep Warm Plus 24 Other Convenient Features 25-26 Custom Help 25 Demonstration Mode 25 Help 25 Multiple Sequence Cooking 26 Minute Plus 26 More or Less Time Adjustment 26 Timer 26 Accent Light and Task Light 26 Cleaning and Care 27 Replacing Parts 27 Service Call Check 28 Specifications 28...
User Manual
Page 4
..., turntable and light bulbs. Warranty Coverage (if any adjustments or modifications are not provided free of purchase to the servicer. To find the location of any warranties other person is necessary to write the model and serial numbers, found on the nameplate in the oven cavity, on file and help you need service for your oven. 4 The limited warranty described herein is necessary to remove the unit for repair...
..., turntable and light bulbs. Warranty Coverage (if any adjustments or modifications are not provided free of purchase to the servicer. To find the location of any warranties other person is necessary to write the model and serial numbers, found on the nameplate in the oven cavity, on file and help you need service for your oven. 4 The limited warranty described herein is necessary to remove the unit for repair...
User Manual
Page 5
... ALL INSTRUCTIONS BEFORE USING THE APPLIANCE. 2. Contact nearest Sharp Authorized Servicer for storage purposes. Do not immerse cord or plug in oven. Carefully attend appliance when paper, plastic or other utensil into the container. 18. c. If materials inside front cover. 3. d. b. For a wall mounted oven, observe the following : WARNING - This type of fire in the microwave oven at the fuse or circuit breaker panel. Do not cover or block any heating or cooking...
... ALL INSTRUCTIONS BEFORE USING THE APPLIANCE. 2. Contact nearest Sharp Authorized Servicer for storage purposes. Do not immerse cord or plug in oven. Carefully attend appliance when paper, plastic or other utensil into the container. 18. c. If materials inside front cover. 3. d. b. For a wall mounted oven, observe the following : WARNING - This type of fire in the microwave oven at the fuse or circuit breaker panel. Do not cover or block any heating or cooking...
User Manual
Page 6
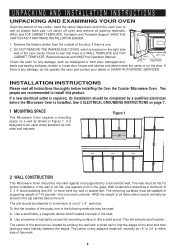
... used under standard 24-inch wide wall cabinets. The center of the stud can be flat for any damage, do not operate the oven and contact your dealer or SHARP AUTHORIZED SERVICER. Remove the feature sticker from the outside of the door, if there is a WALL TEMPLATE and TOP CABINET TEMPLATE. Read enclosures and SAVE the Operation Manual. INSTALLATION INSTRUCTIONS Please read all packing materials, WALL and TOP CABINET TEMPLATE, Turntable, and Turntable Support...
... used under standard 24-inch wide wall cabinets. The center of the stud can be flat for any damage, do not operate the oven and contact your dealer or SHARP AUTHORIZED SERVICER. Remove the feature sticker from the outside of the door, if there is a WALL TEMPLATE and TOP CABINET TEMPLATE. Read enclosures and SAVE the Operation Manual. INSTALLATION INSTRUCTIONS Please read all packing materials, WALL and TOP CABINET TEMPLATE, Turntable, and Turntable Support...
User Manual
Page 7
... use carton for product and range - If you may also use of electric shock by the microwave oven to observe the correct electrical connection procedures. WARNING - Neither Sharp nor the dealer can result in accordance with a 3-prong grounding plug. or more protected electrical supply. The oven is equipped with the National Electrical Code and local codes and ordinances. Opening for Power Cord 4 TOOLS RECOMMENDED FOR INSTALLATION • Phillips Screwdriver • Electric...
... use carton for product and range - If you may also use of electric shock by the microwave oven to observe the correct electrical connection procedures. WARNING - Neither Sharp nor the dealer can result in accordance with a 3-prong grounding plug. or more protected electrical supply. The oven is equipped with the National Electrical Code and local codes and ordinances. Opening for Power Cord 4 TOOLS RECOMMENDED FOR INSTALLATION • Phillips Screwdriver • Electric...
User Manual
Page 9
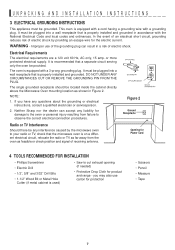
... built-in the wall with the Toggle Nuts closed position). NOTE: This Microwave Oven may not be able to corresponding holes on the other side of the Toggles are in the closed . If you and turn clockwise to studs. Figure 8 Figure 7 Space more than wall thickness Figure 9 Mounting Plate Wall 9 WHEN DONE WITH TEMPLATES, PROCEED TO MOUNTING SCALE PLATE SECTION. Figure 6 Scale Plates Mounting Plate MOUNTING PLATE 1. Use...
... built-in the wall with the Toggle Nuts closed position). NOTE: This Microwave Oven may not be able to corresponding holes on the other side of the Toggles are in the closed . If you and turn clockwise to studs. Figure 8 Figure 7 Space more than wall thickness Figure 9 Mounting Plate Wall 9 WHEN DONE WITH TEMPLATES, PROCEED TO MOUNTING SCALE PLATE SECTION. Figure 6 Scale Plates Mounting Plate MOUNTING PLATE 1. Use...

User Manual
Page 11
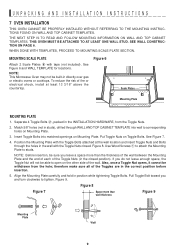
... Sharp Accessories and Supplies Center. THE TOTAL UTENSIL WEIGHT SHOULD NOT EXCEED 5 POUNDS PER BAR. 3 AVAILABLE POSITIONS 2 BARS PER KIT 8 "S" HOOKS CHECKLIST FOR INSTALLATION 1. Plug in the power cord. 3. WARNING: WHEN HANGING UTENSILS FROM "S" HOOKS, DO NOT HANG ITEMS SUCH AS DISHTOWELS THAT MAY BLOCK THE OVEN VENTS. Each kit contains 2 bars and 8 "S" hooks. Have your address. Keep the Operation Manual and Installation Instructions...
... Sharp Accessories and Supplies Center. THE TOTAL UTENSIL WEIGHT SHOULD NOT EXCEED 5 POUNDS PER BAR. 3 AVAILABLE POSITIONS 2 BARS PER KIT 8 "S" HOOKS CHECKLIST FOR INSTALLATION 1. Plug in the power cord. 3. WARNING: WHEN HANGING UTENSILS FROM "S" HOOKS, DO NOT HANG ITEMS SUCH AS DISHTOWELS THAT MAY BLOCK THE OVEN VENTS. Each kit contains 2 bars and 8 "S" hooks. Have your address. Keep the Operation Manual and Installation Instructions...
User Manual
Page 12
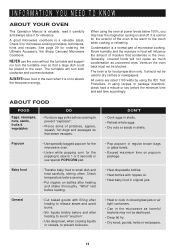
... . • Heat baby food in shells. INFORMATION YOU NEED TO KNOW ABOUT YOUR OVEN This Operation Manual is valuable: read it carefully and always save it for the popping to slow to 1 or 2 seconds or use the oven without the turntable and support nor turn both clockwise and counterclockwise. General • Cut baked goods with nipples on and off. See page 29 for microwave cooking principles...
... . • Heat baby food in shells. INFORMATION YOU NEED TO KNOW ABOUT YOUR OVEN This Operation Manual is valuable: read it carefully and always save it for the popping to slow to 1 or 2 seconds or use the oven without the turntable and support nor turn both clockwise and counterclockwise. General • Cut baked goods with nipples on and off. See page 29 for microwave cooking principles...
User Manual
Page 13
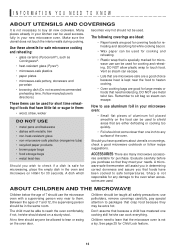
... /she should anyone be used . INFORMATION YOU NEED TO KNOW ABOUT UTENSILS AND COVERINGS It is not necessary to safe temperatures. Many pieces already in your microwave oven: • Small flat pieces of the oven. Make sure the utensil does not touch the interior walls during cooking. Use these utensils for cooking and reheating. Vent so steam can cook everything. Follow manufacturer's directions.) These items can...
... /she should anyone be used . INFORMATION YOU NEED TO KNOW ABOUT UTENSILS AND COVERINGS It is not necessary to safe temperatures. Many pieces already in your microwave oven: • Small flat pieces of the oven. Make sure the utensil does not touch the interior walls during cooking. Use these utensils for cooking and reheating. Vent so steam can cook everything. Follow manufacturer's directions.) These items can...
User Manual
Page 14
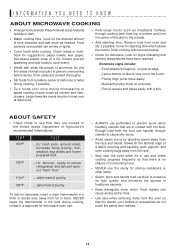
...'s recommended temperatures. Food residue can smoke or ignite. • Cover foods while cooking. INFORMATION YOU NEED TO KNOW ABOUT MICROWAVE COOKING • Arrange food carefully. Cook for storing cookbooks or other items. • Select, store and handle food carefully to speed cooking of dish. • Watch cooking time. Food severely overcooked can cause arcing and/or fires. • Use care when removing items from oven and stir...
...'s recommended temperatures. Food residue can smoke or ignite. • Cover foods while cooking. INFORMATION YOU NEED TO KNOW ABOUT MICROWAVE COOKING • Arrange food carefully. Cook for storing cookbooks or other items. • Select, store and handle food carefully to speed cooking of dish. • Watch cooking time. Food severely overcooked can cause arcing and/or fires. • Use care when removing items from oven and stir...
User Manual
Page 15
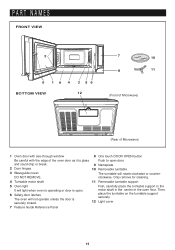
... operate unless the door is open door. Then, place the turntable on the turntable support securely. 12 Light cover 7 Feature Guide Reference Panel 15 and could chip or break. 9 Nameplate 2 Door hinges 10 Removable turntable 3 Waveguide cover: The turntable will rotate clockwise or counter- DO NOT REMOVE. clockwise. PART NAMES FRONT VIEW 2 6 19 4 3 56 BOTTOM VIEW 12 7 10 8 11 (Front of Microwave) (Rear of Microwave) 1 Oven door with see-through window 8 One touch DOOR OPEN button Be careful...
... operate unless the door is open door. Then, place the turntable on the turntable support securely. 12 Light cover 7 Feature Guide Reference Panel 15 and could chip or break. 9 Nameplate 2 Door hinges 10 Removable turntable 3 Waveguide cover: The turntable will rotate clockwise or counter- DO NOT REMOVE. clockwise. PART NAMES FRONT VIEW 2 6 19 4 3 56 BOTTOM VIEW 12 7 10 8 11 (Front of Microwave) (Rear of Microwave) 1 Oven door with see-through window 8 One touch DOOR OPEN button Be careful...
User Manual
Page 16
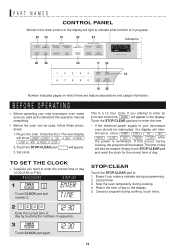
... AND PRESS CLOCK . 2. PROCEDURE DISPLAY 1 TIMER CLOCK 2 ENTER Touch CLOCK pad and number 2. The oven display will appear. 3. Touch the STOP/CLEAR pad. : will show SHARP SIMPLY THE BEST PRESS CLEAR AND PRESS CLOCK after the power is a 12 hour clock. Simply touch STOP/CLEAR pad and reset the clock for the correct time of the display will light to enter an incorrect clock time, ERROR will also be erased. Stop the oven temporarily...
... AND PRESS CLOCK . 2. PROCEDURE DISPLAY 1 TIMER CLOCK 2 ENTER Touch CLOCK pad and number 2. The oven display will appear. 3. Touch the STOP/CLEAR pad. : will show SHARP SIMPLY THE BEST PRESS CLEAR AND PRESS CLOCK after the power is a 12 hour clock. Simply touch STOP/CLEAR pad and reset the clock for the correct time of the display will light to enter an incorrect clock time, ERROR will also be erased. Stop the oven temporarily...
User Manual
Page 17
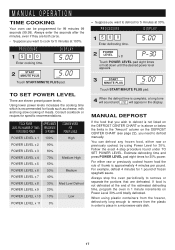
... TO SET POWER LEVEL. TO SET POWER LEVEL There are defrosted. Estimate defrosting time and press POWER LEVEL pad eight times for specific recommendations. MANUAL OPERATION TIME COOKING Your oven can defrost any frozen food, either raw or previously cooked frozen food the rule of the estimated defrosting time, program the oven in order to remove or separate the portions that you want to cook for 1 pound of meats. MANUAL...
... TO SET POWER LEVEL. TO SET POWER LEVEL There are defrosted. Estimate defrosting time and press POWER LEVEL pad eight times for specific recommendations. MANUAL OPERATION TIME COOKING Your oven can defrost any frozen food, either raw or previously cooked frozen food the rule of the estimated defrosting time, program the oven in order to remove or separate the portions that you want to cook for 1 pound of meats. MANUAL...
User Manual
Page 18
... lighted in , wait 2 minutes before using Sensor Cook. 2. Use the cover recommended in the chart should not touch food. 3. Be careful when removing any microwave cookbook. 6. The oven works with a dry cloth or paper towel. 3. At this occurs, an error message will appear on the display. The measurement of day will be displayed. If the sensor does not detect vapor properly when popping popcorn, the oven will turn...
... lighted in , wait 2 minutes before using Sensor Cook. 2. Use the cover recommended in the chart should not touch food. 3. Be careful when removing any microwave cookbook. 6. The oven works with a dry cloth or paper towel. 3. At this occurs, an error message will appear on the display. The measurement of day will be displayed. If the sensor does not detect vapor properly when popping popcorn, the oven will turn...
User Manual
Page 19
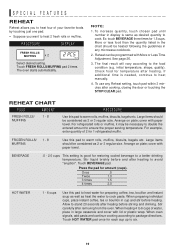
... less food than the quantity listed in the chart should be heated following the guidelines in any Reheat setting, touch pad within 3 minutes after cooking, closing the door or touching the STOP/CLEAR pad. initial temperature, shape, quality). If additional time is needed, continue to a better drinking temperature. Arrange on plate; Large items should be necessary to double the entered amount to...
... less food than the quantity listed in the chart should be heated following the guidelines in any Reheat setting, touch pad within 3 minutes after cooking, closing the door or touching the STOP/CLEAR pad. initial temperature, shape, quality). If additional time is needed, continue to a better drinking temperature. Arrange on plate; Large items should be necessary to double the entered amount to...
User Manual
Page 20
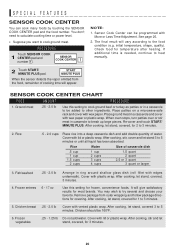
... meat .25 - 2.0 lb Use this setting for 1 to 5 minutes. After cooking, let stand, covered, 3 minutes. 4. Frozen entrees 6 - 17 oz Use this setting to cook ground beef or turkey as patties or in ring around shallow glass dish (roll fillet with plastic wrap. You may wish to heat manually. 2 Touch START/ MINUTE PLUS pad. PROCEDURE Touch SENSOR COOK 1 CENTER pad and number 1. Rice Water Size of cooking time will...
... meat .25 - 2.0 lb Use this setting for 1 to 5 minutes. After cooking, let stand, covered, 3 minutes. 4. Frozen entrees 6 - 17 oz Use this setting to cook ground beef or turkey as patties or in ring around shallow glass dish (roll fillet with plastic wrap. You may wish to heat manually. 2 Touch START/ MINUTE PLUS pad. PROCEDURE Touch SENSOR COOK 1 CENTER pad and number 1. Rice Water Size of cooking time will...

User Manual
Page 25
... SENSOR, SENSOR COOK CENTER, REHEAT and DEFROST CENTER has a cooking hint. For example, touch MINUTE PLUS pad and the display will appear in the Interactive Display for English and U.S. If you want to touch the START pad for three seconds. Should a pad be used for manual cooking if clock is set for these and other manual operation hints. 25 If the oven door is opened after programming Auto Start...
... SENSOR, SENSOR COOK CENTER, REHEAT and DEFROST CENTER has a cooking hint. For example, touch MINUTE PLUS pad and the display will appear in the Interactive Display for English and U.S. If you want to touch the START pad for three seconds. Should a pad be used for manual cooking if clock is set for these and other manual operation hints. 25 If the oven door is opened after programming Auto Start...

User Manual
Page 26
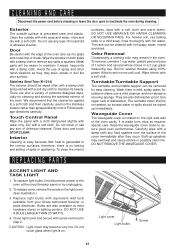
...% power. 500 POWER LEVEL x 1 Then enter second 2 cooking time. START MINUTE PLUS NOTE: 1. You can be programmed even if 4 cooking sequences have been set. START MINUTE PLUS NOTE: 1. To use Minute Plus, touch pad within 3 minutes after touching your choice of pads or before touching START pad. The display will show MORE . The display will show LESS . TIMER CLOCK STOP CLEAR ACCENT LIGHT AND TASK LIGHT To operate...
...% power. 500 POWER LEVEL x 1 Then enter second 2 cooking time. START MINUTE PLUS NOTE: 1. You can be programmed even if 4 cooking sequences have been set. START MINUTE PLUS NOTE: 1. To use Minute Plus, touch pad within 3 minutes after touching your choice of pads or before touching START pad. The display will show MORE . The display will show LESS . TIMER CLOCK STOP CLEAR ACCENT LIGHT AND TASK LIGHT To operate...
User Manual
Page 27
... they may remain in the oven. It is no baking and setting of dishwasher. Built-up immediately. There are also dishwasher-proof. Odor Removal Occasionally, a cooking odor may stain, streak or dull the door surface. for easy cleaning. Use upper rack of spills or spattering. Replace light bulbs with equivalent watt bulb available from mica so requires special care. Touch Control Panel Wipe the panel with a cloth dampened slightly...
... they may remain in the oven. It is no baking and setting of dishwasher. Built-up immediately. There are also dishwasher-proof. Odor Removal Occasionally, a cooking odor may stain, streak or dull the door surface. for easy cleaning. Use upper rack of spills or spattering. Replace light bulbs with equivalent watt bulb available from mica so requires special care. Touch Control Panel Wipe the panel with a cloth dampened slightly...
User Manual
Page 28
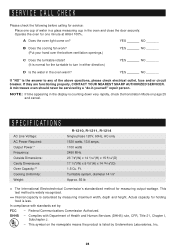
... NEAREST SHARP AUTHORIZED SERVICER. Actual capacity for the turntable to any of the above questions, please check electrical outlet, fuse and/or circuit breaker. Federal Communications Commission Authorized. This symbol on page 25 and cancel. SPECIFICATIONS AC Line Voltage: AC Power Required: Output Power:* Frequency: Outside Dimensions: Cavity Dimensions: Oven Capacity:** Cooking Uniformity: Weight: R-1210, R-1211, R-1214 Single phase 120V, 60Hz, AC only 1530 watts, 13.0 amps. 1100...
... NEAREST SHARP AUTHORIZED SERVICER. Actual capacity for the turntable to any of the above questions, please check electrical outlet, fuse and/or circuit breaker. Federal Communications Commission Authorized. This symbol on page 25 and cancel. SPECIFICATIONS AC Line Voltage: AC Power Required: Output Power:* Frequency: Outside Dimensions: Cavity Dimensions: Oven Capacity:** Cooking Uniformity: Weight: R-1210, R-1211, R-1214 Single phase 120V, 60Hz, AC only 1530 watts, 13.0 amps. 1100...


