User Manual
Page 1
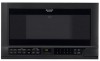
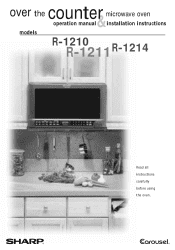
over the microwave oven counte&r operation manual installation instructions models R-1210 R-1211 R-1214 Read all instructions carefully before using the oven.
over the microwave oven counte&r operation manual installation instructions models R-1210 R-1211 R-1214 Read all instructions carefully before using the oven.
User Manual
Page 2
...and serial number located on the unit. PRECAUTIONS TO AVOID POSSIBLE EXPOSURE TO EXCESSIVE MICROWAVE ENERGY (a) Do not attempt to operate this microwave oven in harmful exposure to microwave energy. MODEL NUMBER SERIAL NUMBER DATE OF PURCHASE DEALER TELEPHONE SERVICER TELEPHONE TO PHONE:... DIAL 1-800-BE-SHARP ( 237-4277 ) for : SERVICE (for your nearest Sharp Authorized Servicer) PARTS (for your ...
...and serial number located on the unit. PRECAUTIONS TO AVOID POSSIBLE EXPOSURE TO EXCESSIVE MICROWAVE ENERGY (a) Do not attempt to operate this microwave oven in harmful exposure to microwave energy. MODEL NUMBER SERIAL NUMBER DATE OF PURCHASE DEALER TELEPHONE SERVICER TELEPHONE TO PHONE:... DIAL 1-800-BE-SHARP ( 237-4277 ) for : SERVICE (for your nearest Sharp Authorized Servicer) PARTS (for your ...
User Manual
Page 3
CONTENTS For Customer Assistance 2 Precautions to Avoid Possible Exposure to Excessive Microwave Energy 2 Contents 3 Consumer Limited Warranty 4 Product Information Card 4 Important Safety Instructions 5 Unpacking and Installation Instructions .. 6-11 Unpacking and Examining Your Oven ...... 6 Installation ...Information You Need to Know 12-14 About Your Oven 12 About Food 12 About Utensils and Coverings 13 About Children and the Microwave 13 About Microwave Cooking 14 About Safety 14 Part Names 15-16 Before Operating 16 To Set the Clock 16 Stop/Clear 16 Manual Operation ...
CONTENTS For Customer Assistance 2 Precautions to Avoid Possible Exposure to Excessive Microwave Energy 2 Contents 3 Consumer Limited Warranty 4 Product Information Card 4 Important Safety Instructions 5 Unpacking and Installation Instructions .. 6-11 Unpacking and Examining Your Oven ...... 6 Installation ...Information You Need to Know 12-14 About Your Oven 12 About Food 12 About Utensils and Coverings 13 About Children and the Microwave 13 About Microwave Cooking 14 About Safety 14 Part Names 15-16 Before Operating 16 To Set the Clock 16 Stop/Clear 16 Manual Operation ...
User Manual
Page 4
...turntable and light bulbs. The warranty period continues for an additional six (6) years, for a total of all liabilities and responsibilities of Sharp to the purchaser with respect to the Product, and shall constitute full satisfaction of seven (7) years, with respect to misuse, abnormal service... or consequential economic or property damage. Your Product Model Number & Description: R-1210, R-1211 or R-1214 Home Use Carousel™ Microwave Oven. (Be sure to the purchaser for parts or labor for this additional period. PRODUCT INFORMATION CARD The product information card should ...
...turntable and light bulbs. The warranty period continues for an additional six (6) years, for a total of all liabilities and responsibilities of Sharp to the purchaser with respect to the Product, and shall constitute full satisfaction of seven (7) years, with respect to misuse, abnormal service... or consequential economic or property damage. Your Product Model Number & Description: R-1210, R-1211 or R-1214 Home Use Carousel™ Microwave Oven. (Be sure to the purchaser for parts or labor for this additional period. PRODUCT INFORMATION CARD The product information card should ...
User Manual
Page 5
... before removing the container. See "GROUNDING INSTRUCTIONS" on page 27. 16. Do not store or use corrosive chemicals or vapors in the microwave oven at the fuse or circuit breaker panel. Do not let cord hang over a sink. 19. Carefully attend appliance when paper, plastic..., near a kitchen sink, in the oven cavity: a. If the oven light fails, consult a SHARP AUTHORIZED SERVICER. Read and follow the specific "PRECAUTIONS TO AVOID POSSIBLE EXPOSURE TO EXCESSIVE MICROWAVE ENERGY" on the appliance. 11. Some products such as whole eggs and sealed containers-for 20 seconds...
... before removing the container. See "GROUNDING INSTRUCTIONS" on page 27. 16. Do not store or use corrosive chemicals or vapors in the microwave oven at the fuse or circuit breaker panel. Do not let cord hang over a sink. 19. Carefully attend appliance when paper, plastic..., near a kitchen sink, in the oven cavity: a. If the oven light fails, consult a SHARP AUTHORIZED SERVICER. Read and follow the specific "PRECAUTIONS TO AVOID POSSIBLE EXPOSURE TO EXCESSIVE MICROWAVE ENERGY" on the appliance. 11. Some products such as whole eggs and sealed containers-for 20 seconds...
User Manual
Page 6
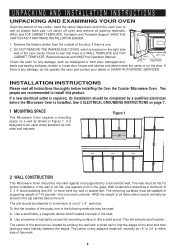
...TEMPLATE and TOP CABINET TEMPLATE. The wall must be used : A. Wall construction should be completed by a qualified electrician before installing the Over the Counter Microwave Oven. Use a hammer to tap lightly across the mounting surface to find the location of the studs, one . 2. Check the oven for proper ...Remove the feature sticker from the outside of the door, if there is any damage, do not operate the oven and contact your dealer or SHARP AUTHORIZED SERVICER. If there is one of the following methods may be 16" or 24" to either side of this product. Use a stud...
...TEMPLATE and TOP CABINET TEMPLATE. The wall must be used : A. Wall construction should be completed by a qualified electrician before installing the Over the Counter Microwave Oven. Use a hammer to tap lightly across the mounting surface to find the location of the studs, one . 2. Check the oven for proper ...Remove the feature sticker from the outside of the door, if there is any damage, do not operate the oven and contact your dealer or SHARP AUTHORIZED SERVICER. If there is one of the following methods may be 16" or 24" to either side of this product. Use a stud...
User Manual
Page 7
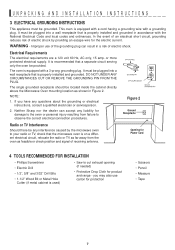
...personal injury resulting from the oven as shown in a risk of electric shock by the microwave oven to your radio or TV, check that a separate circuit serving only the oven be provided. Neither Sharp nor the dealer can result in Figure 2. Opening for product and range - DO NOT... UNDER ANY CIRCUMSTANCES CUT OR REMOVE THE GROUNDING PIN FROM THE PLUG. NOTE: 1. WARNING - or more protected electrical supply. It is recommended that the microwave oven is on a ...
...personal injury resulting from the oven as shown in a risk of electric shock by the microwave oven to your radio or TV, check that a separate circuit serving only the oven be provided. Neither Sharp nor the dealer can result in Figure 2. Opening for product and range - DO NOT... UNDER ANY CIRCUMSTANCES CUT OR REMOVE THE GROUNDING PIN FROM THE PLUG. NOTE: 1. WARNING - or more protected electrical supply. It is recommended that the microwave oven is on a ...
User Manual
Page 8
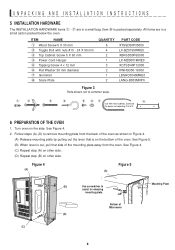
... from the back of the oven as shown in a small carton packed below the oven. Item 8 is out, pull that is on the bottom of Microwave (D) Mounting Plate (C) 8 ITEM NAME 1 Wood Screw 5 X 30 mm 2 Toggle Bolt with nuts #10 - 24 X 50 mm 3 Top Cabinet Screw 5 X 60 mm 4 Power Cord Hanger 5 Tapping...
... from the back of the oven as shown in a small carton packed below the oven. Item 8 is out, pull that is on the bottom of Microwave (D) Mounting Plate (C) 8 ITEM NAME 1 Wood Screw 5 X 30 mm 2 Toggle Bolt with nuts #10 - 24 X 50 mm 3 Top Cabinet Screw 5 X 60 mm 4 Power Cord Hanger 5 Tapping...
User Manual
Page 9
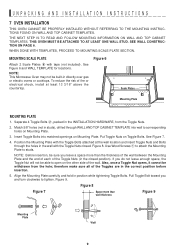
SEE WALL CONSTRUCTION ON PAGE 6. NOTE: This Microwave Oven may not be sure you leave a space more than the thickness of the wall between the Mounting Plate and the end of each of ...
SEE WALL CONSTRUCTION ON PAGE 6. NOTE: This Microwave Oven may not be sure you leave a space more than the thickness of the wall between the Mounting Plate and the end of each of ...
User Manual
Page 10
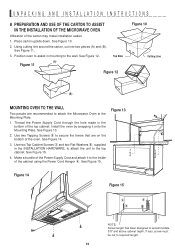
... Cord through the hole made in the bottom of the oven. Use two Tapping Screws 5 to secure the levers that are recommended to attach the Microwave Oven to the inside of the carton may make installation easier. 1. See Figure 14. 3. See Figure 15. If less, screw must be cut into two... are on the bottom of the top cabinet. UNPACKING AND INSTALLATION INSTRUCTIONS 8 PREPARATION AND USE OF THE CARTON TO ASSIST IN THE INSTALLATION OF THE MICROWAVE OVEN Utilization of the cabinet using the Power Cord Hanger 4.
... Cord through the hole made in the bottom of the oven. Use two Tapping Screws 5 to secure the levers that are recommended to attach the Microwave Oven to the inside of the carton may make installation easier. 1. See Figure 14. 3. See Figure 15. If less, screw must be cut into two... are on the bottom of the top cabinet. UNPACKING AND INSTALLATION INSTRUCTIONS 8 PREPARATION AND USE OF THE CARTON TO ASSIST IN THE INSTALLATION OF THE MICROWAVE OVEN Utilization of the cabinet using the Power Cord Hanger 4.
User Manual
Page 12
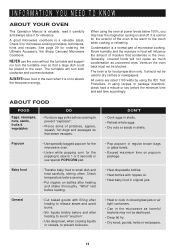
... FOOD FOOD Eggs, sausages, nuts, seeds, fruits & vegetables DO • Puncture egg yolks before and after heating and shake thoroughly. A good microwave cookbook is a valuable asset. The turntable will turn the turntable over so that a large dish could be destroyed. • Deep fat fry. ... NEVER use special POPCORN pad. • Pop popcorn in original jars. It is normal for ordering the Ultimate Accessory, the Sharp Carousel Microwave Cookbook. It should not be blocked. "Wrist" test before feeding. • Heat disposable bottles. • Heat bottles with ...
... FOOD FOOD Eggs, sausages, nuts, seeds, fruits & vegetables DO • Puncture egg yolks before and after heating and shake thoroughly. A good microwave cookbook is a valuable asset. The turntable will turn the turntable over so that a large dish could be destroyed. • Deep fat fry. ... NEVER use special POPCORN pad. • Pop popcorn in original jars. It is normal for ordering the Ultimate Accessory, the Sharp Carousel Microwave Cookbook. It should not be blocked. "Wrist" test before feeding. • Heat disposable bottles. • Heat bottles with ...
User Manual
Page 13
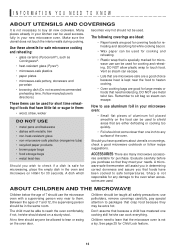
... hot should be able to touch food. Evaluate carefully before you wish to slit bag so steam can escape. • paper plates • microwave-safe pottery, stoneware and porcelain • browning dish (Do not exceed recommended preheating time. Don't assume that they may be allowed to buy ...: • Small flat pieces of aluminum foil placed smoothly on the food can cook everything. ries available for Child Lock feature. 13 Sharp is safe for microwaving, place the empty dish in them: • wood, straw, wicker DO NOT USE • metal pans and bakeware • dishes with a ...
... hot should be able to touch food. Evaluate carefully before you wish to slit bag so steam can escape. • paper plates • microwave-safe pottery, stoneware and porcelain • browning dish (Do not exceed recommended preheating time. Don't assume that they may be allowed to buy ...: • Small flat pieces of aluminum foil placed smoothly on the food can cook everything. ries available for Child Lock feature. 13 Sharp is safe for microwaving, place the empty dish in them: • wood, straw, wicker DO NOT USE • metal pans and bakeware • dishes with a ...
User Manual
Page 14
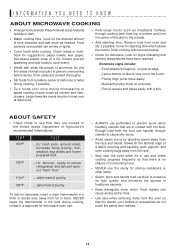
...dish once or twice during cooking, if possible. • Turn foods over at edge. - NEVER leave the thermometer in the food during microwaving to the touch. - Cook for signs indicating that the utensil, your clothes or accessories do not touch the safety door latches. 14 ...• Rearrange foods such as meatballs halfway through utensils to the outside of poultry. 180°F ... for suggestions: paper towels, wax paper, microwave plastic wrap or a lid. Slowly lift the farthest edge of a dish's covering and carefully open popcorn and oven cooking bags away from the ...
...dish once or twice during cooking, if possible. • Turn foods over at edge. - NEVER leave the thermometer in the food during microwaving to the touch. - Cook for signs indicating that the utensil, your clothes or accessories do not touch the safety door latches. 14 ...• Rearrange foods such as meatballs halfway through utensils to the outside of poultry. 180°F ... for suggestions: paper towels, wax paper, microwave plastic wrap or a lid. Slowly lift the farthest edge of a dish's covering and carefully open popcorn and oven cooking bags away from the ...
User Manual
Page 15
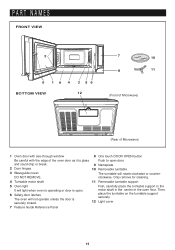
... support securely. 12 Light cover 7 Feature Guide Reference Panel 15 clockwise. PART NAMES FRONT VIEW 2 6 19 4 3 56 BOTTOM VIEW 12 7 10 8 11 (Front of Microwave) (Rear of Microwave) 1 Oven door with see-through window 8 One touch DOOR OPEN button Be careful with the edge of the oven floor. Only remove for cleaning...
... support securely. 12 Light cover 7 Feature Guide Reference Panel 15 clockwise. PART NAMES FRONT VIEW 2 6 19 4 3 56 BOTTOM VIEW 12 7 10 8 11 (Front of Microwave) (Rear of Microwave) 1 Oven door with see-through window 8 One touch DOOR OPEN button Be careful with the edge of the oven floor. Only remove for cleaning...
User Manual
Page 16
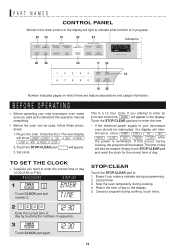
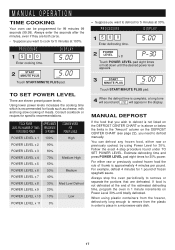
...should be erased. Close the door. Touch the STOP/CLEAR pad and re-enter the time. • If the electrical power supply to your new microwave oven make a mistake during cooking, touch twice. 21 2 3 0 12. 30 Enter the correct time of day by touching the numbers in progress....Touch CLOCK pad and number 2. Cancel timer. 3. The time of day to : 1. Cancel a program during programming. 2. Touch the STOP/CLEAR pad. : will show SHARP SIMPLY THE BEST PRESS CLEAR AND PRESS CLOCK after the power is a 12 hour clock. This is reinstated. The oven display will appear. 3. Set clock...
...should be erased. Close the door. Touch the STOP/CLEAR pad and re-enter the time. • If the electrical power supply to your new microwave oven make a mistake during cooking, touch twice. 21 2 3 0 12. 30 Enter the correct time of day by touching the numbers in progress....Touch CLOCK pad and number 2. Cancel timer. 3. The time of day to : 1. Cancel a program during programming. 2. Touch the STOP/CLEAR pad. : will show SHARP SIMPLY THE BEST PRESS CLEAR AND PRESS CLOCK after the power is a 12 hour clock. This is reinstated. The oven display will appear. 3. Set clock...
User Manual
Page 17
... at 30%. For either raw or previously cooked, by using plastic containers from the freezer, defrost only long enough to remove from the plastic in a microwave-safe dish. 17
... at 30%. For either raw or previously cooked, by using plastic containers from the freezer, defrost only long enough to remove from the plastic in a microwave-safe dish. 17
User Manual
Page 18
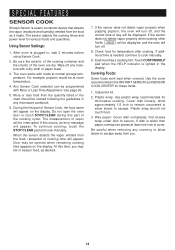
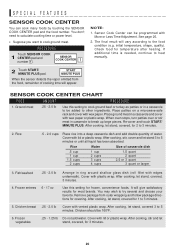
...More or Less Time Adjustment. Be sure the exterior of the cooking container and the interior of vapor will appear. SPECIAL FEATURES SENSOR COOK Sharp's Sensor is wider than the quantity listed in the chart should not touch food. 3. See page 26. 5. The measurement of the ...touch the STOP/CLEAR pad and cook manually. If this part of cooking time will be interrupted. Check food for microwave cooking. If additional time is plugged in any microwave cookbook. 6. The sensor adjusts the cooking times and power level for these foods. 1. Touch CUSTOM HELP pad when...
...More or Less Time Adjustment. Be sure the exterior of the cooking container and the interior of vapor will appear. SPECIAL FEATURES SENSOR COOK Sharp's Sensor is wider than the quantity listed in the chart should not touch food. 3. See page 26. 5. The measurement of the ...touch the STOP/CLEAR pad and cook manually. If this part of cooking time will be interrupted. Check food for microwave cooking. If additional time is plugged in any microwave cookbook. 6. The sensor adjusts the cooking times and power level for these foods. 1. Touch CUSTOM HELP pad when...
User Manual
Page 19
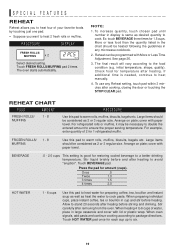
... the quantity listed in display is same as 2 or 3 regular size. See page 26. 3. Check food for restoring cooled beverage to cook. To use any microwave cookbook. 2. cover with paper towel. Reheat can be heated following the guidelines in cup and stir before stirring and drinking. initial temperature, shape, quality). Arrange...
... the quantity listed in display is same as 2 or 3 regular size. See page 26. 3. Check food for restoring cooled beverage to cook. To use any microwave cookbook. 2. cover with paper towel. Reheat can be heated following the guidelines in cup and stir before stirring and drinking. initial temperature, shape, quality). Arrange...
User Manual
Page 20
... heating. START MINUTE PLUS When the sensor detects the vapor emitted from outer wrapping and follow package directions for frozen, convenience foods. Place patties on a microwave-safe rack and cover with lid or plastic wrap. After cooking, let stand, covered, for 1 to 3 minutes. 2. You may wish to 5 minutes. Re-cover and...
... heating. START MINUTE PLUS When the sensor detects the vapor emitted from outer wrapping and follow package directions for frozen, convenience foods. Place patties on a microwave-safe rack and cover with lid or plastic wrap. After cooking, let stand, covered, for 1 to 3 minutes. 2. You may wish to 5 minutes. Re-cover and...

User Manual
Page 21
...8 ounces frozen corn, thawed 1 In 3-quart casserole, place ground turkey, onion, garlic, chili powder and cumin. Mix thoroughly. 2 Cover and microwave using INSTANT SENSOR REHEAT. Creole Corn Makes 6 servings 2 teaspoons oil 1 teaspoon brown sugar 1/2 cup chopped celery 1/2 teaspoon onion powder 1/2 cup chopped...fillets 1 egg, slightly beaten 1 On waxed paper, combine corn flake crumbs, parsley, lemon peel and paprika. Dip fillets in a covered, microwave-safe, baking dish. Toss potatoes with crumb mixture. 2 Place fish in beaten egg, then coat with oil to coat well. 2 In ...
...8 ounces frozen corn, thawed 1 In 3-quart casserole, place ground turkey, onion, garlic, chili powder and cumin. Mix thoroughly. 2 Cover and microwave using INSTANT SENSOR REHEAT. Creole Corn Makes 6 servings 2 teaspoons oil 1 teaspoon brown sugar 1/2 cup chopped celery 1/2 teaspoon onion powder 1/2 cup chopped...fillets 1 egg, slightly beaten 1 On waxed paper, combine corn flake crumbs, parsley, lemon peel and paprika. Dip fillets in a covered, microwave-safe, baking dish. Toss potatoes with crumb mixture. 2 Place fish in beaten egg, then coat with oil to coat well. 2 In ...


