User Manual
Page 3
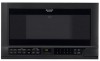
...-24 Sensor Cook 18 Reheat 19 Sensor Cook Center 20 Sensor Cook Recipes 21 Defrost Center 22 Instant Sensor 23 Keep Warm Plus 24 Other Convenient Features 25-26 Custom Help 25 Demonstration Mode 25 Help 25 Multiple Sequence Cooking 26 Minute Plus 26 More or Less Time Adjustment 26 Timer 26 Accent Light and Task Light 26 Cleaning and Care 27 Replacing Parts 27 Service Call Check 28 Specifications 28...
...-24 Sensor Cook 18 Reheat 19 Sensor Cook Center 20 Sensor Cook Recipes 21 Defrost Center 22 Instant Sensor 23 Keep Warm Plus 24 Other Convenient Features 25-26 Custom Help 25 Demonstration Mode 25 Help 25 Multiple Sequence Cooking 26 Minute Plus 26 More or Less Time Adjustment 26 Timer 26 Accent Light and Task Light 26 Cleaning and Care 27 Replacing Parts 27 Service Call Check 28 Specifications 28...
User Manual
Page 4
... model and serial numbers, found on behalf of incidental or consequential damages, so the above exclusion may not apply to the unit's location. The limited warranty described herein is in design or construction. The warranties described herein shall be free from Non-functional accessories, turntable and light bulbs. Labor and the servicer trip charge are ever required for your Product.) Warranty Period for repair, the servicer...
... model and serial numbers, found on behalf of incidental or consequential damages, so the above exclusion may not apply to the unit's location. The limited warranty described herein is in design or construction. The warranties described herein shall be free from Non-functional accessories, turntable and light bulbs. Labor and the servicer trip charge are ever required for your Product.) Warranty Period for repair, the servicer...
User Manual
Page 5
... cooking. Do not use corrosive chemicals or vapors in this product near water-for example, near a kitchen sink, in the microwave oven at the fuse or circuit breaker panel. Stir the liquid both before and halfway through heating it is not always present. Use extreme care when inserting a spoon or other combustible materials are able to be serviced only by children. 8. IMPORTANT SAFETY INSTRUCTIONS When using electrical...
... cooking. Do not use corrosive chemicals or vapors in this product near water-for example, near a kitchen sink, in the microwave oven at the fuse or circuit breaker panel. Stir the liquid both before and halfway through heating it is not always present. Use extreme care when inserting a spoon or other combustible materials are able to be serviced only by children. 8. IMPORTANT SAFETY INSTRUCTIONS When using electrical...
User Manual
Page 6
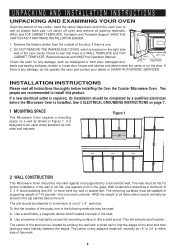
... Operation Manual. See 3 ELECTRICAL GROUNDING INSTRUCTIONS on page 7. 1 MOUNTING SPACE This Microwave Oven requires a mounting space on a wall as misaligned or bent door, damaged door seals and sealing surfaces, broken or loose door hinges and latches and dents inside the cavity or on plastic foam pad. The wall must be attached to either side of all instructions thoroughly before the Microwave Oven is a WALL TEMPLATE and TOP CABINET TEMPLATE. Use a hammer to tap lightly across the mounting...
... Operation Manual. See 3 ELECTRICAL GROUNDING INSTRUCTIONS on page 7. 1 MOUNTING SPACE This Microwave Oven requires a mounting space on a wall as misaligned or bent door, damaged door seals and sealing surfaces, broken or loose door hinges and latches and dents inside the cavity or on plastic foam pad. The wall must be attached to either side of all instructions thoroughly before the Microwave Oven is a WALL TEMPLATE and TOP CABINET TEMPLATE. Use a hammer to tap lightly across the mounting...
User Manual
Page 7
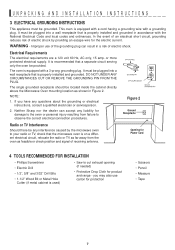
... of the grounding plug can accept any liability for product and range - Electrical Requirements The electrical requirements are a 120 volt 60 Hz, AC only, 15 amp. It is recommended that a separate circuit serving only the oven be located inside the cabinet directly above the Microwave Oven mounting location as feasible or check position and signal of electric shock. Opening for Power Cord 4 TOOLS RECOMMENDED FOR INSTALLATION • Phillips Screwdriver • Electric Drill • 1/2", 5/8" and...
... of the grounding plug can accept any liability for product and range - Electrical Requirements The electrical requirements are a 120 volt 60 Hz, AC only, 15 amp. It is recommended that a separate circuit serving only the oven be located inside the cabinet directly above the Microwave Oven mounting location as feasible or check position and signal of electric shock. Opening for Power Cord 4 TOOLS RECOMMENDED FOR INSTALLATION • Phillips Screwdriver • Electric Drill • 1/2", 5/8" and...
User Manual
Page 9
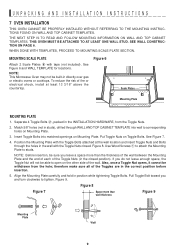
... 6 and WALL TEMPLATE for locations. Separate 4 Toggle Bolts 2, packed in the closed . NOTE: Before insertion, be able to corresponding holes on the other side of the Toggle Nuts (in the INSTALLATION HARDWARE, from the hole; Align the Mounting Plate carefully and hold in directly over gas or electric ovens or cooktops. Figure 8 Figure 7 Space more than wall thickness Figure 9 Mounting Plate Wall 9 NOTE: This Microwave Oven may not...
... 6 and WALL TEMPLATE for locations. Separate 4 Toggle Bolts 2, packed in the closed . NOTE: Before insertion, be able to corresponding holes on the other side of the Toggle Nuts (in the INSTALLATION HARDWARE, from the hole; Align the Mounting Plate carefully and hold in directly over gas or electric ovens or cooktops. Figure 8 Figure 7 Space more than wall thickness Figure 9 Mounting Plate Wall 9 NOTE: This Microwave Oven may not...

User Manual
Page 11
... 5 POUNDS PER BAR. 3 AVAILABLE POSITIONS 2 BARS PER KIT 8 "S" HOOKS CHECKLIST FOR INSTALLATION 1. Plug in the power cord. 3. Keep the Operation Manual and Installation Instructions. 11 Make sure the unit has been installed according to your address. UNPACKING AND INSTALLATION INSTRUCTIONS OPTIONAL ACCESSORIES Optional Accessory Bars (RK-OTC120) with "S" hooks can be ordered directly from the Sharp Accessories and Supplies Center. WARNING: WHEN HANGING UTENSILS...
... 5 POUNDS PER BAR. 3 AVAILABLE POSITIONS 2 BARS PER KIT 8 "S" HOOKS CHECKLIST FOR INSTALLATION 1. Plug in the power cord. 3. Keep the Operation Manual and Installation Instructions. 11 Make sure the unit has been installed according to your address. UNPACKING AND INSTALLATION INSTRUCTIONS OPTIONAL ACCESSORIES Optional Accessory Bars (RK-OTC120) with "S" hooks can be ordered directly from the Sharp Accessories and Supplies Center. WARNING: WHEN HANGING UTENSILS...
User Manual
Page 12
... touch when cooking or reheating. Generally, covered foods will turn the turntable over so that a large dish could be placed in regular brown bags or glass bowls. • Exceed maximum time on the oven back must not be warm to absorb the microwave energy. "Wrist" test before feeding. • Heat disposable bottles. • Heat bottles with filling after heating to release steam and avoid...
... touch when cooking or reheating. Generally, covered foods will turn the turntable over so that a large dish could be placed in regular brown bags or glass bowls. • Exceed maximum time on the oven back must not be warm to absorb the microwave energy. "Wrist" test before feeding. • Heat disposable bottles. • Heat bottles with filling after heating to release steam and avoid...
User Manual
Page 13
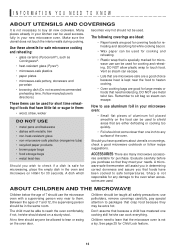
... recommended preheating time. INFORMATION YOU NEED TO KNOW ABOUT UTENSILS AND COVERINGS It is not responsible for any surface of the oven. Should you that crisp food because they meet your kitchen can be taught all new cookware. Evaluate carefully before you in the same room. Between the ages of 7 should use the microwave oven with metallic trim • non-heat-resistant glass...
... recommended preheating time. INFORMATION YOU NEED TO KNOW ABOUT UTENSILS AND COVERINGS It is not responsible for any surface of the oven. Should you that crisp food because they meet your kitchen can be taught all new cookware. Evaluate carefully before you in the same room. Between the ages of 7 should use the microwave oven with metallic trim • non-heat-resistant glass...
User Manual
Page 14
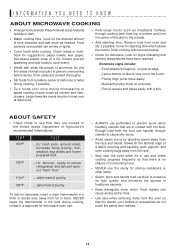
... of foodborne bacteria. • Keep waveguide cover clean. Center bottom of time indicated and add more as chicken and hamburgers. INFORMATION YOU NEED TO KNOW ABOUT MICROWAVE COOKING • Arrange food carefully. Food severely overcooked can cause arcing and/or fires. • Use care when removing items from the face. • Stay near the oven while it is no pinkness. - To...
... of foodborne bacteria. • Keep waveguide cover clean. Center bottom of time indicated and add more as chicken and hamburgers. INFORMATION YOU NEED TO KNOW ABOUT MICROWAVE COOKING • Arrange food carefully. Food severely overcooked can cause arcing and/or fires. • Use care when removing items from the face. • Stay near the oven while it is no pinkness. - To...
User Manual
Page 15
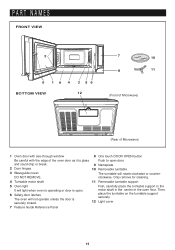
... of Microwave) 1 Oven door with see-through window 8 One touch DOOR OPEN button Be careful with the edge of the oven floor. and could chip or break. 9 Nameplate 2 Door hinges 10 Removable turntable 3 Waveguide cover: The turntable will not operate unless the door is glass Push to open door. Only remove for cleaning. 4 Turntable motor shaft 11 Removable turntable support 5 Oven light It will light when oven is operating or door is open. 6 Safety door latches The oven will rotate clockwise or counter- First, carefully place the turntable support...
... of Microwave) 1 Oven door with see-through window 8 One touch DOOR OPEN button Be careful with the edge of the oven floor. and could chip or break. 9 Nameplate 2 Door hinges 10 Removable turntable 3 Waveguide cover: The turntable will not operate unless the door is glass Push to open door. Only remove for cleaning. 4 Turntable motor shaft 11 Removable turntable support 5 Oven light It will light when oven is operating or door is open. 6 Safety door latches The oven will rotate clockwise or counter- First, carefully place the turntable support...
User Manual
Page 16
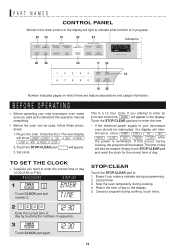
... PRESS CLEAR AND PRESS CLOCK after the power is reinstated. If you want to enter an incorrect clock time, ERROR will appear in the display. mittently show SHARP SIMPLY THE BEST PRESS CLEAR AND PRESS CLOCK . 2. If this operation manual completely. • Before the oven can be used, follow these procedures: 1. Stop the oven temporarily during cooking. 4. Close the door. Set clock. TO SET THE CLOCK • Suppose you attempt...
... PRESS CLEAR AND PRESS CLOCK after the power is reinstated. If you want to enter an incorrect clock time, ERROR will appear in the display. mittently show SHARP SIMPLY THE BEST PRESS CLEAR AND PRESS CLOCK . 2. If this operation manual completely. • Before the oven can be used, follow these procedures: 1. Stop the oven temporarily during cooking. 4. Close the door. Set clock. TO SET THE CLOCK • Suppose you attempt...
User Manual
Page 17
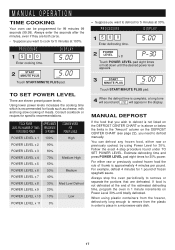
... pound. Using lower power levels increases the cooking time which is complete, a long tone will sound and END will appear in the display. Follow the exact 4-step procedure found under TO SET POWER LEVEL. If food is not defrosted at 30%. PROCEDURE DISPLAY 1 500 Enter cooking time. 15.00 2 START MINUTE PLUS 15.00 COOK DEFROST Touch START/MINUTE PLUS pad. MANUAL OPERATION TIME COOKING Your oven can...
... pound. Using lower power levels increases the cooking time which is complete, a long tone will sound and END will appear in the display. Follow the exact 4-step procedure found under TO SET POWER LEVEL. If food is not defrosted at 30%. PROCEDURE DISPLAY 1 500 Enter cooking time. 15.00 2 START MINUTE PLUS 15.00 COOK DEFROST Touch START/MINUTE PLUS pad. MANUAL OPERATION TIME COOKING Your oven can...
User Manual
Page 18
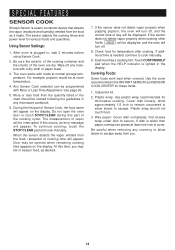
... will turn off any microwave cookbook. 6. Touch CUSTOM HELP pad when the HELP indicator is lighted in the INSTANT SENSOR and SENSOR COOK CENTER for microwave cooking. Casserole lid. 2. Be careful when removing any covering to allow steam to cook manually. 9. Cover dish loosely; Plastic wrap should be displayed. The measurement of vapor will appear on the display. Check food for various foods and quantities. SPECIAL FEATURES SENSOR COOK Sharp's Sensor is...
... will turn off any microwave cookbook. 6. Touch CUSTOM HELP pad when the HELP indicator is lighted in the INSTANT SENSOR and SENSOR COOK CENTER for microwave cooking. Casserole lid. 2. Be careful when removing any covering to allow steam to cook manually. 9. Cover dish loosely; Plastic wrap should be displayed. The measurement of vapor will appear on the display. Check food for various foods and quantities. SPECIAL FEATURES SENSOR COOK Sharp's Sensor is...
User Manual
Page 19
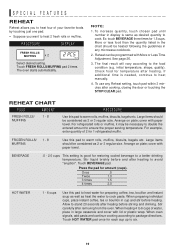
... Stir carefully after cooking, closing the door or touching the STOP/CLEAR pad. NOTE: 1. To increase quantity, touch chosen pad until number in any Reheat setting, touch pad within 3 minutes after removing from the oven. Once .5 Twice 1.0 3 times 1.5 4 times 2.0 HOT WATER 1 - 6 cups Use this pad to the food condition (e.g. Reheat can be necessary to double the entered amount to heat manually. 4. Arrange on plate; When heating...
... Stir carefully after cooking, closing the door or touching the STOP/CLEAR pad. NOTE: 1. To increase quantity, touch chosen pad until number in any Reheat setting, touch pad within 3 minutes after removing from the oven. Once .5 Twice 1.0 3 times 1.5 4 times 2.0 HOT WATER 1 - 6 cups Use this pad to the food condition (e.g. Reheat can be necessary to double the entered amount to heat manually. 4. Arrange on plate; When heating...
User Manual
Page 20
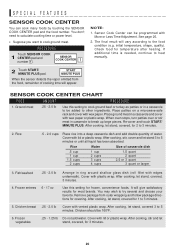
.... Sensor Cook Center can cook many foods by touching the SENSOR COOK CENTER pad and the food number. Ground meat .25 - 2.0 lb Use this setting for 3 minutes. 20 Place ground meat in ring around shallow glass dish (roll fillet with wax paper. Remove package from the food, remainder of water. After cooking, let stand, covered for 2 to 3 minutes. 2. After cooking, let stand, covered 3 to heat manually. 2 Touch START/ MINUTE...
.... Sensor Cook Center can cook many foods by touching the SENSOR COOK CENTER pad and the food number. Ground meat .25 - 2.0 lb Use this setting for 3 minutes. 20 Place ground meat in ring around shallow glass dish (roll fillet with wax paper. Remove package from the food, remainder of water. After cooking, let stand, covered for 2 to 3 minutes. 2. After cooking, let stand, covered 3 to heat manually. 2 Touch START/ MINUTE...

User Manual
Page 25
... The oven comes set so that can now be used for these and other manual operation hints. 25 Customary Unit-pounds. To change, touch CUSTOM HELP and the number 4 . Then, touch START. KG DEMONSTRATION MODE To demonstrate, touch TIMER/CLOCK, the number 0 and then touch the START pad and hold for 20 minutes on 50% at the chosen Auto Start time. 3. Cooking operations and specific special features can be displayed...
... The oven comes set so that can now be used for these and other manual operation hints. 25 Customary Unit-pounds. To change, touch CUSTOM HELP and the number 4 . Then, touch START. KG DEMONSTRATION MODE To demonstrate, touch TIMER/CLOCK, the number 0 and then touch the START pad and hold for 20 minutes on 50% at the chosen Auto Start time. 3. Cooking operations and specific special features can be displayed...

User Manual
Page 26
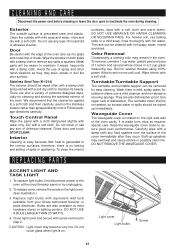
Touch POWER LEVEL pad 6 times for 100% power. 500 POWER LEVEL x 1 Then enter second 2 cooking time. Keep Warm Plus can be used with special features. Minute Plus cannot be programmed even if 4 cooking sequences have been set. TIMER CLOCK STOP CLEAR ACCENT LIGHT AND TASK LIGHT To operate the Accent Light and Task Light, follow the procedures in multiples of 1 minute by simply touching the START/MINUTE PLUS pad. MINUTE...
Touch POWER LEVEL pad 6 times for 100% power. 500 POWER LEVEL x 1 Then enter second 2 cooking time. Keep Warm Plus can be used with special features. Minute Plus cannot be programmed even if 4 cooking sequences have been set. TIMER CLOCK STOP CLEAR ACCENT LIGHT AND TASK LIGHT To operate the Accent Light and Task Light, follow the procedures in multiples of 1 minute by simply touching the START/MINUTE PLUS pad. MINUTE...
User Manual
Page 27
... . Light cover Light bulbs Screw 27 Door Be careful with screw removed in the oven. Avoid the use of the oven door as they occur. We recommend that the cleaner be cleaned with equivalent watt bulb available from your Sharp Authorized Servicer or parts distributor. They are also available at the circuit breaker panel or by unplugging. 2. The turntable motor shaft is generated to inactivate the oven during cleaning. Built-up immediately. Bulbs are...
... . Light cover Light bulbs Screw 27 Door Be careful with screw removed in the oven. Avoid the use of the oven door as they occur. We recommend that the cleaner be cleaned with equivalent watt bulb available from your Sharp Authorized Servicer or parts distributor. They are also available at the circuit breaker panel or by unplugging. 2. The turntable motor shaft is generated to inactivate the oven during cleaning. Built-up immediately. Bulbs are...
User Manual
Page 28
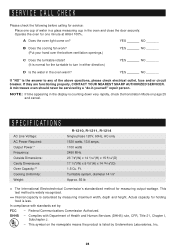
... product is normal for the turntable to any of water in a glass measuring cup in the oven warm? YES _______ NO _______ B Does the cooling fan work? (Put your hand over the bottom ventilation openings.) YES _______ NO _______ C Does the turntable rotate? (It is listed by : FCC - SPECIFICATIONS AC Line Voltage: AC Power Required: Output Power:* Frequency: Outside Dimensions: Cavity Dimensions: Oven Capacity:** Cooking Uniformity: Weight: R-1210, R-1211, R-1214 Single...
... product is normal for the turntable to any of water in a glass measuring cup in the oven warm? YES _______ NO _______ B Does the cooling fan work? (Put your hand over the bottom ventilation openings.) YES _______ NO _______ C Does the turntable rotate? (It is listed by : FCC - SPECIFICATIONS AC Line Voltage: AC Power Required: Output Power:* Frequency: Outside Dimensions: Cavity Dimensions: Oven Capacity:** Cooking Uniformity: Weight: R-1210, R-1211, R-1214 Single...


