
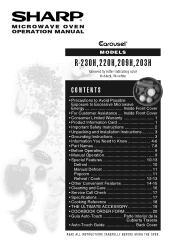
R-203H , R-209H , R-220H , R-230H Operation Manual
Page 1
...; Manual Operation 9 • Special Features 10-13 Defrost 10 Manual Defrost 11 Popcorn 11 Reheat / Cook 12-13 • Other Convenient Features 14-15 • Cleaning and Care 16 • Service Call Check 17 • Specifications 17 • Cooking Reference 18 • THE ULTIMATE ACCESSORY 19 • COOKBOOK ORDER FORM 20 • Guia Auto-Touch Parte Interior de la Cubierta Trasera • Auto-Touch Guide Back Cover READ ALL INSTRUCTIONS CAREFULLY BEFORE USING...
...; Manual Operation 9 • Special Features 10-13 Defrost 10 Manual Defrost 11 Popcorn 11 Reheat / Cook 12-13 • Other Convenient Features 14-15 • Cleaning and Care 16 • Service Call Check 17 • Specifications 17 • Cooking Reference 18 • THE ULTIMATE ACCESSORY 19 • COOKBOOK ORDER FORM 20 • Guia Auto-Touch Parte Interior de la Cubierta Trasera • Auto-Touch Guide Back Cover READ ALL INSTRUCTIONS CAREFULLY BEFORE USING...
R-203H , R-209H , R-220H , R-230H Operation Manual
Page 3
... sole and exclusive warranties granted by Sharp and shall be the sole and exclusive remedy available to have Proof of the microwave oven carton, should your Product.) Warranty Period for parts only; Your Product Model Number & Description: R-230H,R-220H,R-209H,R-203H Home Use Carousel Microwave Oven. (Be sure to the purchaser. If you in the unlikely event that it is needed should be...
... sole and exclusive warranties granted by Sharp and shall be the sole and exclusive remedy available to have Proof of the microwave oven carton, should your Product.) Warranty Period for parts only; Your Product Model Number & Description: R-230H,R-220H,R-209H,R-203H Home Use Carousel Microwave Oven. (Be sure to the purchaser. If you in the unlikely event that it is needed should be...
R-203H , R-209H , R-220H , R-230H Operation Manual
Page 4
... a SHARP AU- 14. See "GROUNDING INSTRUCTIONS" on pliance. Stir the liquid both before using electrical appliances basic safety precautions should be heated in the microwave oven at the fuse or circuit breaker panel. Do not use straight-sided containers with the provided installation instructions. 5. Use a wide-mouthed container. This type of injury to facilitate cooking. Do not use as described in this manual. Read and follow the specific...
... a SHARP AU- 14. See "GROUNDING INSTRUCTIONS" on pliance. Stir the liquid both before using electrical appliances basic safety precautions should be heated in the microwave oven at the fuse or circuit breaker panel. Do not use straight-sided containers with the provided installation instructions. 5. Use a wide-mouthed container. This type of injury to facilitate cooking. Do not use as described in this manual. Read and follow the specific...
R-203H , R-209H , R-220H , R-230H Operation Manual
Page 5
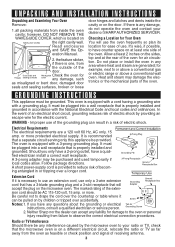
... located on by the microwave oven to the oven or personal injury resulting from the oven as misaligned or bent door, damaged door seals and sealing surfaces, broken or loose door hinges and latches and dents inside the oven cavity; however, DO NOT REMOVE THE WAVEGUIDE COVER, which is recommended that a separate circuit serving only this appliance be AC 115-120 volt, 15 amp. UNPACKING AND INSTALLATION INSTRUCTIONS...
... located on by the microwave oven to the oven or personal injury resulting from the oven as misaligned or bent door, damaged door seals and sealing surfaces, broken or loose door hinges and latches and dents inside the oven cavity; however, DO NOT REMOVE THE WAVEGUIDE COVER, which is recommended that a separate circuit serving only this appliance be AC 115-120 volt, 15 amp. UNPACKING AND INSTALLATION INSTRUCTIONS...
R-203H , R-209H , R-220H , R-230H Operation Manual
Page 6
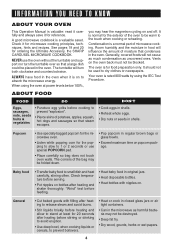
... oven. INFORMATION YOU NEED TO KNOW ABOUT YOUR OVEN This Operation Manual is valuable: read it carefully and always save it for the exterior of the oven to be warm to the touch when cooking or reheating. NEVER use special POPCORN pad. • Place carefully so bag does not touch oven walls. The turntable will not cause as much condensation as harmful bacteria may hear the magnetron...
... oven. INFORMATION YOU NEED TO KNOW ABOUT YOUR OVEN This Operation Manual is valuable: read it carefully and always save it for the exterior of the oven to be warm to the touch when cooking or reheating. NEVER use special POPCORN pad. • Place carefully so bag does not touch oven walls. The turntable will not cause as much condensation as harmful bacteria may hear the magnetron...

R-203H , R-209H , R-220H , R-230H Operation Manual
Page 7
... not touch the interior walls during cooking. A dish which becomes very hot should use the microwave oven with metallic trim • non-heat-resistant glass • non-microwave-safe plastics (margarine tubs) • recycled paper products • brown paper bags • food storage bags • metal twist-ties Should you purchase so that they may be able to reach the oven comfortably; The following coverings...
... not touch the interior walls during cooking. A dish which becomes very hot should use the microwave oven with metallic trim • non-heat-resistant glass • non-microwave-safe plastics (margarine tubs) • recycled paper products • brown paper bags • food storage bags • metal twist-ties Should you purchase so that they may be able to reach the oven comfortably; The following coverings...

R-203H , R-209H , R-220H , R-230H Operation Manual
Page 8
... and flakes easily with hot food. Doneness signs include: - INFORMATION YOU NEED TO KNOW ABOUT MICROWAVE COOKING • Arrange food carefully. Cover for microwave oven use. • ALWAYS use and check cooking progress frequently so that the utensil, your clothes or accessories do not touch the safety door latches. 6 for suggestions: paper towels, wax paper, microwave plastic wrap or a lid. Place thickest areas towards outside to prevent overcooking...
... and flakes easily with hot food. Doneness signs include: - INFORMATION YOU NEED TO KNOW ABOUT MICROWAVE COOKING • Arrange food carefully. Cover for microwave oven use. • ALWAYS use and check cooking progress frequently so that the utensil, your clothes or accessories do not touch the safety door latches. 6 for suggestions: paper towels, wax paper, microwave plastic wrap or a lid. Place thickest areas towards outside to prevent overcooking...
R-203H , R-209H , R-220H , R-230H Operation Manual
Page 19
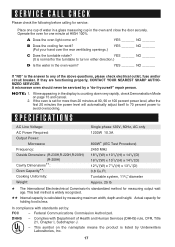
..." is listed by measuring maximum width, depth and height. In compliance with Department of the above questions, please check electrical outlet, fuse and/or circuit breaker. A microwave oven should never be serviced by : FCC - SPECIFICATIONS AC Line Voltage: Single phase 120V, 60Hz, AC only AC Power Required: 1200W 10.3A Output Power: Microwave 800W# (IEC Test Procedure) Frequency: 2450 MHz Outside Dimensions: (R-230H...
..." is listed by measuring maximum width, depth and height. In compliance with Department of the above questions, please check electrical outlet, fuse and/or circuit breaker. A microwave oven should never be serviced by : FCC - SPECIFICATIONS AC Line Voltage: Single phase 120V, 60Hz, AC only AC Power Required: 1200W 10.3A Output Power: Microwave 800W# (IEC Test Procedure) Frequency: 2450 MHz Outside Dimensions: (R-230H...
Service Manual
Page 1
...OBSERVED BEFORE AND DURING SERVICING TO AVOID POSSIBLE EXPOSURE TO EXCESSIVE MICROWAVE ENERGY INSIDE FRONT COVER BEFORE SERVICING ...INSIDE FRONT COVER WARNING TO SERVICE PERSONNEL ...1 MICROWAVE MEASUREMENT PROCEDURE 2 FOREWORD AND WARNING ...3 PRODUCT SPECIFICATIONS ...4 GENERAL INFORMATION ...4 OPERATION ...6 TROUBLESHOOTING GUIDE ...9 TEST PROCEDURE ...10 TOUCH CONTROL PANEL ...18 COMPONENT REPLACEMENT AND ADJUSTMENT PROCEDURE 22 PICTORIAL DIAGRAM ...28 CONTROL PANEL CIRCUIT ...29 PRINTED WIRING BOARD ...30 PARTS LIST ...30 PACKING AND ACCESSORIES ...34 SHARP CORPORATION This document...
...OBSERVED BEFORE AND DURING SERVICING TO AVOID POSSIBLE EXPOSURE TO EXCESSIVE MICROWAVE ENERGY INSIDE FRONT COVER BEFORE SERVICING ...INSIDE FRONT COVER WARNING TO SERVICE PERSONNEL ...1 MICROWAVE MEASUREMENT PROCEDURE 2 FOREWORD AND WARNING ...3 PRODUCT SPECIFICATIONS ...4 GENERAL INFORMATION ...4 OPERATION ...6 TROUBLESHOOTING GUIDE ...9 TEST PROCEDURE ...10 TOUCH CONTROL PANEL ...18 COMPONENT REPLACEMENT AND ADJUSTMENT PROCEDURE 22 PICTORIAL DIAGRAM ...28 CONTROL PANEL CIRCUIT ...29 PRINTED WIRING BOARD ...30 PARTS LIST ...30 PACKING AND ACCESSORIES ...34 SHARP CORPORATION This document...

Service Manual
Page 2
... operated with the door open , service person should 1) tell the user not to operate the oven and 2) contact SHARP ELECTRONICS CORPORATION and Food and Drug Administration's Center for proper alignment, integrity, and connections. (d) Any defective or misadjusted components in the interlock, monitor, door seal, and microwave generation and transmission systems shall be repaired, replaced, or adjusted by procedures described in this service manual. BEFORE SERVICING Before servicing...
... operated with the door open , service person should 1) tell the user not to operate the oven and 2) contact SHARP ELECTRONICS CORPORATION and Food and Drug Administration's Center for proper alignment, integrity, and connections. (d) Any defective or misadjusted components in the interlock, monitor, door seal, and microwave generation and transmission systems shall be repaired, replaced, or adjusted by procedures described in this service manual. BEFORE SERVICING Before servicing...
Service Manual
Page 3
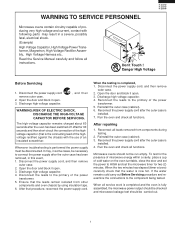
... door and block it open. 3. Reconnect the power supply cord after the oven has been switched off. Microwave ovens should be disconnected. Whenever troubleshooting is installed. 7. When the testing is installed. 4. Discharge high voltage capacitor. 4. Reinstall the outer case (cabinet). 6. Run the oven and check all functions. When the two minutes has elapsed (timer at zero) carefully check that is now hot. R-203HW R-220HW R-230HW WARNING TO SERVICE...
... door and block it open. 3. Reconnect the power supply cord after the oven has been switched off. Microwave ovens should be disconnected. Whenever troubleshooting is installed. 7. When the testing is installed. 4. Discharge high voltage capacitor. 4. Reinstall the outer case (cabinet). 6. Run the oven and check all functions. When the two minutes has elapsed (timer at zero) carefully check that is now hot. R-203HW R-220HW R-230HW WARNING TO SERVICE...
Service Manual
Page 5
... render satisfactory customer service. R-203HW R-220HW R-230HW PRODUCT DESCRIPTION GENERAL INFORMATION OPERATION TROUBLESHOOTING GUIDE AND TEST PROCEDURE TOUCH CONTROL PANEL COMPONENT REPLACEMENT AND ADJUSTMENT PROCEDURE WIRING DIAGRAM PARTS LIST SHARP ELECTRONICS CORPORATION SHARP PLAZA, MAHWAH, NEW JERSEY 07430-2135 3 Service personnel - Service Personnel with the oven. It is tightly closed. (B) The door brackets and hinges are intentionally not grounded and present a risk of this manual so that they are used at voltages more...
... render satisfactory customer service. R-203HW R-220HW R-230HW PRODUCT DESCRIPTION GENERAL INFORMATION OPERATION TROUBLESHOOTING GUIDE AND TEST PROCEDURE TOUCH CONTROL PANEL COMPONENT REPLACEMENT AND ADJUSTMENT PROCEDURE WIRING DIAGRAM PARTS LIST SHARP ELECTRONICS CORPORATION SHARP PLAZA, MAHWAH, NEW JERSEY 07430-2135 3 Service personnel - Service Personnel with the oven. It is tightly closed. (B) The door brackets and hinges are intentionally not grounded and present a risk of this manual so that they are used at voltages more...

Service Manual
Page 7
... amp. fused electrical supply. If the extension cord must be used, 3-Pronged Receptacle it can be pulled on the turntable support. or higher rated cord. The turntable will light when oven is operating. 11 Waveguide cover: DO NOT REMOVE. 12 Auto-Touch control panel 13 Time display: 99 minutes, 99 seconds TOUCH CONTROL PANEL R-203HW R-220HW R230HW NOTE: Some one-touch cooking features such as "MINUTE PLUS" are automatically enabled when the door is recommended that a separate circuit...
... amp. fused electrical supply. If the extension cord must be used, 3-Pronged Receptacle it can be pulled on the turntable support. or higher rated cord. The turntable will light when oven is operating. 11 Waveguide cover: DO NOT REMOVE. 12 Auto-Touch control panel 13 Time display: 99 minutes, 99 seconds TOUCH CONTROL PANEL R-203HW R-220HW R230HW NOTE: Some one-touch cooking features such as "MINUTE PLUS" are automatically enabled when the door is recommended that a separate circuit...

Service Manual
Page 8
... opened during oven operation. P-90 (approx. 90% power) 30 sec. When the door is mechanically associated with the following results. The display will revert to Figure O-2) RELAY RY-1 RY-2 CONNECTED COMPONENTS oven lamp/turntable motor/fan motor power transformer 2. 120 volts A.C. The filament winding voltage heats the magnetron filament and the H.V. The microwave energy produced by the magnetron is channelled through the contacts of component functions during a cook...
... opened during oven operation. P-90 (approx. 90% power) 30 sec. When the door is mechanically associated with the following results. The display will revert to Figure O-2) RELAY RY-1 RY-2 CONNECTED COMPONENTS oven lamp/turntable motor/fan motor power transformer 2. 120 volts A.C. The filament winding voltage heats the magnetron filament and the H.V. The microwave energy produced by the magnetron is channelled through the contacts of component functions during a cook...

Service Manual
Page 10
... oven by pushing the open ) due to cooling fan failure, obstructed air guide, dirty or blocked air intake, etc., the C/T fuse will open at the oven cavity. When the open button is cooked evenly. Door Open Mechanism DOOR SENSING AND SECONDARY INTERLOCK SWITCHES The secondary interlock switch is mounted in the lower position of the door sensing switch and primary interlock relay located on the turntable is pushed, the open contact switches...
... oven by pushing the open ) due to cooling fan failure, obstructed air guide, dirty or blocked air intake, etc., the C/T fuse will open at the oven cavity. When the open button is cooked evenly. Door Open Mechanism DOOR SENSING AND SECONDARY INTERLOCK SWITCHES The secondary interlock switch is mounted in the lower position of the door sensing switch and primary interlock relay located on the turntable is pushed, the open contact switches...

Service Manual
Page 12
... display when power cord is touched. (Buzzer should indicate less than 1 ohm. 10 Display does not operate properly when STOP/CLEAR key is first plugged into wall receptacle. Oven does not cook properly when programmed for an open . 3. Discharge high voltage capacitor. 4. To test for Cooking 50% mode. (Operates properly on Cooking Power 100% mode.) Oven lamp, turntable motor and fan motor do not appear in display.) C/T fuse blows when the door is plugged into wall outlet. Open the door...
... display when power cord is touched. (Buzzer should indicate less than 1 ohm. 10 Display does not operate properly when STOP/CLEAR key is first plugged into wall receptacle. Oven does not cook properly when programmed for an open . 3. Discharge high voltage capacitor. 4. To test for Cooking 50% mode. (Operates properly on Cooking Power 100% mode.) Oven lamp, turntable motor and fan motor do not appear in display.) C/T fuse blows when the door is plugged into wall outlet. Open the door...

Service Manual
Page 16
... comprised of a 15 ampere fuse and switch. Therefore, unlike conventional microwave ovens, proper maintenance cannot be replaced with only a voltmeter and ohmmeter. b) When touching a number pad, two figures or more are displayed. Disconnect the power supply cord, and then remove outer case. 2. If the C/T fuse is installed. 4) Run the oven and check all leads removed from other components and oven chassis by using insulation tape. 6) After that...
... comprised of a 15 ampere fuse and switch. Therefore, unlike conventional microwave ovens, proper maintenance cannot be replaced with only a voltmeter and ohmmeter. b) When touching a number pad, two figures or more are displayed. Disconnect the power supply cord, and then remove outer case. 2. If the C/T fuse is installed. 4) Run the oven and check all leads removed from other components and oven chassis by using insulation tape. 6) After that...

Service Manual
Page 23
... the circuits. SERVICING R-203HW R-220HW R-230HW 1. On some models, the power supply cord between the touch control panel and the oven itself or from the power line of the power transformer. 5) Ensure that procedure, re-connect the power supply cord. For those models, check and repair all functions. For this case you must short both ends of the door sensing switch (on the power source of the control unit, remove the...
... the circuits. SERVICING R-203HW R-220HW R-230HW 1. On some models, the power supply cord between the touch control panel and the oven itself or from the power line of the power transformer. 5) Ensure that procedure, re-connect the power supply cord. For those models, check and repair all functions. For this case you must short both ends of the door sensing switch (on the power source of the control unit, remove the...

Service Manual
Page 24
... assembly. 2) Hot parts: Oven lamp, Magnetron, High voltage transformer and Oven cavity. 3) Sharp edge: Bottom plate, Oven cavity, Waveguide flange, Chassis support and other , this causes the latch leads to the oven. If the wave guide or oven cavity are defective parts in severe, possibly fatal, electric shock. (Example) High Voltage Capacitor, Power Transformer, Magnetron, High Voltage Rectifier Assembly, High Voltage Harness etc.. Disconnect the power supply cord. 2. Visually check the door and cavity face plate...
... assembly. 2) Hot parts: Oven lamp, Magnetron, High voltage transformer and Oven cavity. 3) Sharp edge: Bottom plate, Oven cavity, Waveguide flange, Chassis support and other , this causes the latch leads to the oven. If the wave guide or oven cavity are defective parts in severe, possibly fatal, electric shock. (Example) High Voltage Capacitor, Power Transformer, Magnetron, High Voltage Rectifier Assembly, High Voltage Harness etc.. Disconnect the power supply cord. 2. Visually check the door and cavity face plate...

Service Manual
Page 28
... when door is free. 13.Slide latch head upward and remove it open. 3. Re-install outer case and check for microwave leakage around door with two (2) mounting screws) to the oven cavity 5. Disconnect the power supply cord. 2. Release choke cover from oven cavity. 9. Now, door panel is pressed with the door closed . 6. RE-INSTALL 1. Re-install latch spring to Microwave Measurement Procedure.) Latch Heads Latch Hook Door Sensing Switch Door Monitor Switch Switch Lever Secondary Interlock Switch Figure C-4. Re-install door panel to door...
... when door is free. 13.Slide latch head upward and remove it open. 3. Re-install outer case and check for microwave leakage around door with two (2) mounting screws) to the oven cavity 5. Disconnect the power supply cord. 2. Release choke cover from oven cavity. 9. Now, door panel is pressed with the door closed . 6. RE-INSTALL 1. Re-install latch spring to Microwave Measurement Procedure.) Latch Heads Latch Hook Door Sensing Switch Door Monitor Switch Switch Lever Secondary Interlock Switch Figure C-4. Re-install door panel to door...

