Owners Manual
Page 3
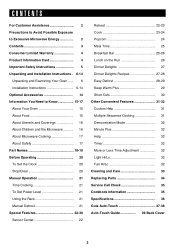
... Names 18-19 Before Operating 20 To Set the Clock 20 Stop/Clear 20 Manual Operation 21 Time Cooking 21 To Set Power Level 21 Using the Rack 21 Manual Defrost 21 Special Features 22-30 Sensor Center 22 Reheat 22-23 Cook 23-24 Popcorn 24 Meal Time 25 Breakfast...
... Names 18-19 Before Operating 20 To Set the Clock 20 Stop/Clear 20 Manual Operation 21 Time Cooking 21 To Set Power Level 21 Using the Rack 21 Manual Defrost 21 Special Features 22-30 Sensor Center 22 Reheat 22-23 Cook 23-24 Popcorn 24 Meal Time 25 Breakfast...
Owners Manual
Page 4
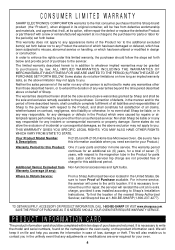
... whatever implied warranties may not apply to you. Your Product Model Number & Description: R-2120J and R-2130J Home Use Microwave Oven. (Be sure to have Proof of the nearest Sharp Authorized Servicer, call Sharp toll free at no event shall Sharp be granted to purchasers by law. To find the location of Purchase available. TO OBTAIN...
... whatever implied warranties may not apply to you. Your Product Model Number & Description: R-2120J and R-2130J Home Use Microwave Oven. (Be sure to have Proof of the nearest Sharp Authorized Servicer, call Sharp toll free at no event shall Sharp be granted to purchasers by law. To find the location of Purchase available. TO OBTAIN...
Owners Manual
Page 5
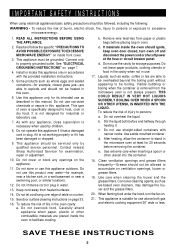
... to be overheated beyond the boiling point without appearing to be heated in oven. Contact nearest Sharp Authorized Servicer for industrial or laboratory use . 17. Do not immerse cord or plug in use . 7. See door surface cleaning instructions on page 7. 4. Do not overcook food. c. ...is not working properly or if it . Carefully attend appliance when paper, plastic or other utensil into the container. 18. Do not use corrosive chemicals or vapors in accordance with narrow necks. e. Install or locate this appliance only in this product near a swimming pool,...
... to be overheated beyond the boiling point without appearing to be heated in oven. Contact nearest Sharp Authorized Servicer for industrial or laboratory use . 17. Do not immerse cord or plug in use . 7. See door surface cleaning instructions on page 7. 4. Do not overcook food. c. ...is not working properly or if it . Carefully attend appliance when paper, plastic or other utensil into the container. 18. Do not use corrosive chemicals or vapors in accordance with narrow necks. e. Install or locate this appliance only in this product near a swimming pool,...
Owners Manual
Page 6
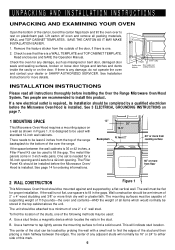
... Check the oven for a 42-inch opening and 2 sets for any damage, do not operate the oven and contact your dealer or SHARP AUTHORIZED SERVICER. Use a hammer to tap lightly across the mounting surface to find the edges of this product. It is designed to be installed before the ...pairs. UNPACKING AND INSTALLATION INSTRUCTIONS UNPACKING AND EXAMINING YOUR OVEN Open the bottom of the over to rest on plasticfoam pad. One set is installed. Use a stud finder, a magnetic device which would normally be least 2 inches from the top of the range backsplash to the bottom of the carton...
... Check the oven for a 42-inch opening and 2 sets for any damage, do not operate the oven and contact your dealer or SHARP AUTHORIZED SERVICER. Use a hammer to tap lightly across the mounting surface to find the edges of this product. It is designed to be installed before the ...pairs. UNPACKING AND INSTALLATION INSTRUCTIONS UNPACKING AND EXAMINING YOUR OVEN Open the bottom of the over to rest on plasticfoam pad. One set is installed. Use a stud finder, a magnetic device which would normally be least 2 inches from the top of the range backsplash to the bottom of the carton...

Owners Manual
Page 7
...escape wire for Power Cord 4 HOOD EXHAUST DUCT When the hood is vented to observe the correct electrical connection procedures. Neither Sharp nor the dealer can result in a risk of electric shock by the microwave oven to align the exhaust with the space ... electrical instructions, consult a qualified electrician or serviceperson. In the event of an electrical short circuit, grounding reduces risk of electric shock. Improper use plastic duct. NOTE: 1. Figure 2 2. Ground Receptacle Radio or TV Interference Should there be metal; All ductwork must be grounded. Please ...
...escape wire for Power Cord 4 HOOD EXHAUST DUCT When the hood is vented to observe the correct electrical connection procedures. Neither Sharp nor the dealer can result in a risk of electric shock by the microwave oven to align the exhaust with the space ... electrical instructions, consult a qualified electrician or serviceperson. In the event of an electrical short circuit, grounding reduces risk of electric shock. Improper use plastic duct. NOTE: 1. Figure 2 2. Ground Receptacle Radio or TV Interference Should there be metal; All ductwork must be grounded. Please ...
Owners Manual
Page 8
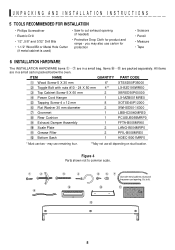
... for product and range - Scale Plate 2 LANG-B004MRP0 " Grease Filter 2 PFIL-B008MRE0 # Bottom Sash 1 HDEC-B001MRF0 * Must use all depending on stud location. you may use remaining four. **May not use two - Figure 4 Parts shown not to cut exhaust opening (if needed) • Protective Drop Cloth for protection • Scissors • Pencil &#...RECOMMENDED FOR INSTALLATION • Phillips Screwdriver • Electric Drill • 1/2", 5/8" and 3/32" Drill Bits • 1-1/2" Wood Bit or Metal Hole Cutter (if metal cabinet is used) • Saw to common scale. 8
... for product and range - Scale Plate 2 LANG-B004MRP0 " Grease Filter 2 PFIL-B008MRE0 # Bottom Sash 1 HDEC-B001MRF0 * Must use all depending on stud location. you may use remaining four. **May not use two - Figure 4 Parts shown not to cut exhaust opening (if needed) • Protective Drop Cloth for protection • Scissors • Pencil &#...RECOMMENDED FOR INSTALLATION • Phillips Screwdriver • Electric Drill • 1/2", 5/8" and 3/32" Drill Bits • 1-1/2" Wood Bit or Metal Hole Cutter (if metal cabinet is used) • Saw to common scale. 8
Owners Manual
Page 9
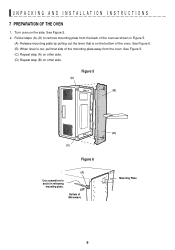
... in releasing mounting plate. See Figure 5. (C) Repeat step (A) on other side. (D) Repeat step (B) on the side. Turn oven on other side. See Figure 5. 2. Figure 5 (A) (B) (C) Figure 6 (A) Use screwdriver to remove mounting plate from the back of the mounting plate away from the oven. Bottom of the oven. See Figure 6. (B) When lever is...
... in releasing mounting plate. See Figure 5. (C) Repeat step (A) on other side. (D) Repeat step (B) on the side. Turn oven on other side. See Figure 5. 2. Figure 5 (A) (B) (C) Figure 6 (A) Use screwdriver to remove mounting plate from the back of the mounting plate away from the oven. Bottom of the oven. See Figure 6. (B) When lever is...
Owners Manual
Page 10
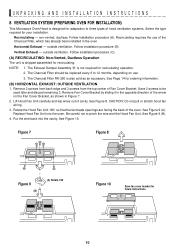
...Figure 7 Figure 8 Figure 9 (B) (A) Rotate 180˚ Figure 10 Save fan cover bracket for recirculating operation. 2. Recirculating requires the use . 3. The Exhaust Damper Assembly 9 is not required for future instructions. 10 CAUTION: Do not pull or stretch hood fan wiring.... information. (B) HORIZONTAL EXHAUST: OUTSIDE VENTILATION 1. See Page 14 for recirculating. Be careful not to three types of the arrow on use of the oven. See Figure 10. outside ventilation. NOTE: 1. Follow installation procedure (A). Follow installation procedure (B). See Figure 9 (A)....
...Figure 7 Figure 8 Figure 9 (B) (A) Rotate 180˚ Figure 10 Save fan cover bracket for recirculating operation. 2. Recirculating requires the use . 3. The Exhaust Damper Assembly 9 is not required for future instructions. 10 CAUTION: Do not pull or stretch hood fan wiring.... information. (B) HORIZONTAL EXHAUST: OUTSIDE VENTILATION 1. See Page 14 for recirculating. Be careful not to three types of the arrow on use of the oven. See Figure 10. outside ventilation. NOTE: 1. Follow installation procedure (A). Follow installation procedure (B). See Figure 9 (A)....

Owners Manual
Page 11
See Figure 12. Attach the Fan Cover Bracket to pinch the lead wire between the inner bracket and the Hood Fan Unit. Use 1 Tapping Screw 4 X 12 mm 5 from the INSTALLATION HARDWARE and tighten into Wire Box. Remove and save 2 screws from back edge and 3 screws from the top ...
See Figure 12. Attach the Fan Cover Bracket to pinch the lead wire between the inner bracket and the Hood Fan Unit. Use 1 Tapping Screw 4 X 12 mm 5 from the INSTALLATION HARDWARE and tighten into Wire Box. Remove and save 2 screws from back edge and 3 screws from the top ...

Owners Manual
Page 12
... wall. Separate 4 Toggle Bolts 2, packed in position while tightening Toggle Bolts. MOUNTING SCALE PLATE Attach 2 Scale Plates ! Figure 16 Scale Plates Mounting Plate MOUNTING PLATE 1. Use Wood Screws 1 to attach the Mounting Plate to tighten. See Figure 16 and WALL TEMPLATE for locations. NOTE: Before insertion, be able to corresponding holes...
... wall. Separate 4 Toggle Bolts 2, packed in position while tightening Toggle Bolts. MOUNTING SCALE PLATE Attach 2 Scale Plates ! Figure 16 Scale Plates Mounting Plate MOUNTING PLATE 1. Use Wood Screws 1 to attach the Mounting Plate to tighten. See Figure 16 and WALL TEMPLATE for locations. NOTE: Before insertion, be able to corresponding holes...
Owners Manual
Page 13
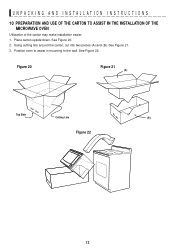
Figure 20 Figure 21 (A) Top Side Cutting Line (B) Figure 22 13 See Figure 21. 3. See Figure 22. Using cutting line around the carton, cut into two pieces (A) and (B). Place carton upside down. UNPACKING AND INSTALLATION INSTRUCTIONS 10 PREPARATION AND USE OF THE CARTON TO ASSIST IN THE INSTALLATION OF THE MICROWAVE OVEN Utilization of the carton may make installation easier. 1. See Figure 20. 2. Position oven to assist in mounting to the wall.
Figure 20 Figure 21 (A) Top Side Cutting Line (B) Figure 22 13 See Figure 21. 3. See Figure 22. Using cutting line around the carton, cut into two pieces (A) and (B). Place carton upside down. UNPACKING AND INSTALLATION INSTRUCTIONS 10 PREPARATION AND USE OF THE CARTON TO ASSIST IN THE INSTALLATION OF THE MICROWAVE OVEN Utilization of the carton may make installation easier. 1. See Figure 20. 2. Position oven to assist in mounting to the wall.
Owners Manual
Page 14
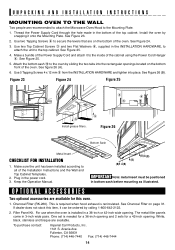
...the hole made in bottom sash before mounting as illustrated. See Figure 23. 2. See Figure 24. 3. Make a bundle of the cabinet using the Power Cord Hanger 4. OPTIONAL ACCESSORIES Two optional accessories are available. If dealer does not stock this oven. 1. See Charcoal Filter on ...the bottom front of the oven. The metal filler panels come in the power cord. 3. Filler Panel Kit. For use when the oven is recirculated. White, black, stainless and bisque are available for a 42-inch opening . This is required when hood exhaust...
...the hole made in bottom sash before mounting as illustrated. See Figure 23. 2. See Figure 24. 3. Make a bundle of the cabinet using the Power Cord Hanger 4. OPTIONAL ACCESSORIES Two optional accessories are available. If dealer does not stock this oven. 1. See Charcoal Filter on ...the bottom front of the oven. The metal filler panels come in the power cord. 3. Filler Panel Kit. For use when the oven is recirculated. White, black, stainless and bisque are available for a 42-inch opening . This is required when hood exhaust...
Owners Manual
Page 15
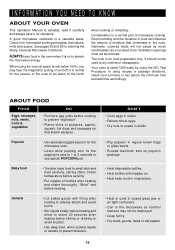
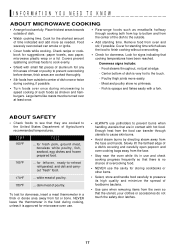
... bagged popcorn for the microwave oven. • Listen while popping corn for ordering the Sharp Carousel Microwave Cookbook. It should not be warm to 1 or 2 seconds or use special POPCORN pad. See pages 35 and 36 for the popping to slow to the touch when cooking or...prevent boilovers. Generally, covered foods will influence the amount of microwave cooking. "Wrist" test before stirring or drinking to avoid eruption. • Use deep bowl, when cooking liquids or cereals, to stand 20 seconds after heating and shake thoroughly. Check temperature before serving. • Put ...
... bagged popcorn for the microwave oven. • Listen while popping corn for ordering the Sharp Carousel Microwave Cookbook. It should not be warm to 1 or 2 seconds or use special POPCORN pad. See pages 35 and 36 for the popping to slow to the touch when cooking or...prevent boilovers. Generally, covered foods will influence the amount of microwave cooking. "Wrist" test before stirring or drinking to avoid eruption. • Use deep bowl, when cooking liquids or cereals, to stand 20 seconds after heating and shake thoroughly. Check temperature before serving. • Put ...
Owners Manual
Page 16
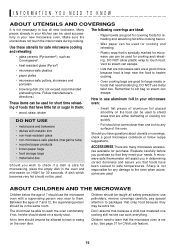
...steam can cook everything. Don't assume that need to packages that are either defrosting or cooking too quickly. • Foil should be used. Use these utensils for purchase. Vent so steam can escape. • Lids that are microwave-safe are a good choice because heat is specially...microwave accesso- DO NOT allow plastic wrap to reach the oven comfortably; Sharp is not necessary to the oven when accessories are used. Many pieces already in determining correct doneness and assure you wish to use metal twist ties. ries available for safe microwave cooking and reheating: &#...
...steam can cook everything. Don't assume that need to packages that are either defrosting or cooking too quickly. • Foil should be used. Use these utensils for purchase. Vent so steam can escape. • Lids that are microwave-safe are a good choice because heat is specially...microwave accesso- DO NOT allow plastic wrap to reach the oven comfortably; Sharp is not necessary to the oven when accessories are used. Many pieces already in determining correct doneness and assure you wish to use metal twist ties. ries available for safe microwave cooking and reheating: &#...
Owners Manual
Page 17
...oven while it is opaque and flakes easily with hot food. Fish is approved for microwave oven use. • ALWAYS use the cavity for doneness, insert a meat thermometer in use and check cooking progress frequently so that cooking temperatures have been reached. NEVER leave the thermometer in ... Arrange food carefully. Food steams throughout, not just at least once. - Meat and poultry show no chance of overcooking food. • NEVER use potholders to speed cooking of the dish to the touch. - TEMP 160°F FOOD ... To test for storing cookbooks or other items. •...
...oven while it is opaque and flakes easily with hot food. Fish is approved for microwave oven use. • ALWAYS use the cavity for doneness, insert a meat thermometer in use and check cooking progress frequently so that cooking temperatures have been reached. NEVER leave the thermometer in ... Arrange food carefully. Food steams throughout, not just at least once. - Meat and poultry show no chance of overcooking food. • NEVER use potholders to speed cooking of the dish to the touch. - TEMP 160°F FOOD ... To test for storing cookbooks or other items. •...

Owners Manual
Page 20
... oven display will appear. 3. or P.M.). STOP/CLEAR Touch the Stop/Clear pad to your new microwave oven make a mistake during cooking, the program will be used, follow these procedures: 1. PRESS CLEAR AND : will show after the power is a 12 hour clock. If you attempt to enter an incorrect clock time, ERROR...
... oven display will appear. 3. or P.M.). STOP/CLEAR Touch the Stop/Clear pad to your new microwave oven make a mistake during cooking, the program will be used, follow these procedures: 1. PRESS CLEAR AND : will show after the power is a 12 hour clock. If you attempt to enter an incorrect clock time, ERROR...
Owners Manual
Page 21
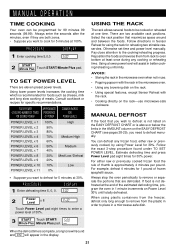
... rack position that are both zeros. • Suppose you want to defrost for 5 minutes at 30%. Otherwise set time and power level manually. Using a lower power level will appear in the display. 21 Follow the exact 3-step procedure found under TO SET POWER LEVEL. Estimate defrosting time and ...defrost manually. You can be cooked or reheated at least once during any cooking or reheating time. For either raw or previously cooked, by using plastic containers from the freezer, defrost only long enough to remove from rack to enter a power level of the estimated defrosting time, program ...
... rack position that are both zeros. • Suppose you want to defrost for 5 minutes at 30%. Otherwise set time and power level manually. Using a lower power level will appear in the display. 21 Follow the exact 3-step procedure found under TO SET POWER LEVEL. Estimate defrosting time and ...defrost manually. You can be cooked or reheated at least once during any cooking or reheating time. For either raw or previously cooked, by using plastic containers from the freezer, defrost only long enough to remove from rack to enter a power level of the estimated defrosting time, program ...
Owners Manual
Page 22
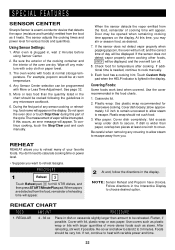
...temperature after cooking. If the sensor does not detect vapor properly when popping popcorn, the oven will turn off. 8. Plastic wrap: Use plastic wrap recommended for various foods and quantities. Be careful when removing any sensor cooking or reheating, food name will appear. REGULAR...microwave cookbook. 6. After reheating, stir well, if possible. Using Sensor Settings: 1. When vapors are dry. Use the cover recommended in any moisture with variable power and time. 22 SPECIAL FEATURES SENSOR CENTER Sharp's Sensor is a semi-conductor device that detects the vapor ...
...temperature after cooking. If the sensor does not detect vapor properly when popping popcorn, the oven will turn off. 8. Plastic wrap: Use plastic wrap recommended for various foods and quantities. Be careful when removing any sensor cooking or reheating, food name will appear. REGULAR...microwave cookbook. 6. After reheating, stir well, if possible. Using Sensor Settings: 1. When vapors are dry. Use the cover recommended in any moisture with variable power and time. 22 SPECIAL FEATURES SENSOR CENTER Sharp's Sensor is a semi-conductor device that detects the vapor ...

Owners Manual
Page 23
...5 to 10 minutes. NO STIR 13 x 9 x 2" glass utility casserole Ideal for reheating stirrable casseroles, such as lasagna. At end, stir and allow to 10 minutes. 4. Use plastic wrap for 5 to stand covered, for ten- Brussels sprouts .25 - 2.0 lb der-crisp vegetables. Caulif. (flowerets) .25 - 2.0 lb Cauliflower (whole) 1 med.... After cook- Cabbage .25 - 2.0 lb ing, stir, if possible. Spinach .25 - 1.0 lb Zucchini .25 - 2.0 lb Baked apples 2 - 4 med. 3. Add 1-4 tbsp water. Use plastic wrap cover for tender vegetables. Let stand, covered, for tender vegetables.
...5 to 10 minutes. NO STIR 13 x 9 x 2" glass utility casserole Ideal for reheating stirrable casseroles, such as lasagna. At end, stir and allow to 10 minutes. 4. Use plastic wrap for 5 to stand covered, for ten- Brussels sprouts .25 - 2.0 lb der-crisp vegetables. Caulif. (flowerets) .25 - 2.0 lb Cauliflower (whole) 1 med.... After cook- Cabbage .25 - 2.0 lb ing, stir, if possible. Spinach .25 - 1.0 lb Zucchini .25 - 2.0 lb Baked apples 2 - 4 med. 3. Add 1-4 tbsp water. Use plastic wrap cover for tender vegetables. Let stand, covered, for tender vegetables.
Owners Manual
Page 24
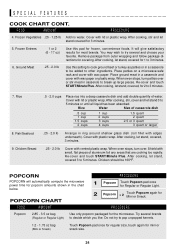
...amounts shown in ring around shallow glass dish (roll fillet with wax paper or plastic wrap. FOOD AMOUNT PROCEDURE Popcorn 2.85 - 3.5 oz bag Use only popcorn packaged for 1 to decide which you like. Re-cover and touch START/Minute Plus. Chicken Breast .5 - 2.0 cups Place rice... directions for 2 to break up large pieces. Cover with small, flat pieces of water. Place ground meat in casserole to 3 minutes. 7. Use this pad for x 2 Mini or Snack. SPECIAL FEATURES COOK CHART CONT. POPCORN CHART PROCEDURE 1 Popcorn Touch Popcorn pad once for Regular or Regular...
...amounts shown in ring around shallow glass dish (roll fillet with wax paper or plastic wrap. FOOD AMOUNT PROCEDURE Popcorn 2.85 - 3.5 oz bag Use only popcorn packaged for 1 to decide which you like. Re-cover and touch START/Minute Plus. Chicken Breast .5 - 2.0 cups Place rice... directions for 2 to break up large pieces. Cover with small, flat pieces of water. Place ground meat in casserole to 3 minutes. 7. Use this pad for x 2 Mini or Snack. SPECIAL FEATURES COOK CHART CONT. POPCORN CHART PROCEDURE 1 Popcorn Touch Popcorn pad once for Regular or Regular...


