
R1200|R1201 Operation Manual
Page 1
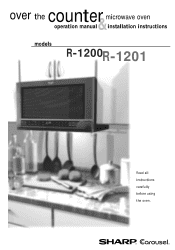
over the microwave oven counte&r operation manual installation instructions models R-1200R-1201 Read all instructions carefully before using the oven.
over the microwave oven counte&r operation manual installation instructions models R-1200R-1201 Read all instructions carefully before using the oven.

R1200|R1201 Operation Manual
Page 2
... on sealing surfaces. (c) Do not operate the oven if it is damaged. PRECAUTIONS TO AVOID POSSIBLE EXPOSURE TO EXCESSIVE MICROWAVE ENERGY (a) Do not attempt to operate this microwave oven in harmful exposure to accumulate on the unit. It is no damage to the: (1) door (bent), (2) hinges...SERVICE (for your nearest Sharp Authorized Servicer) PARTS (for future reference. FOR CUSTOMER ASSISTANCE To aid in reporting this oven with the safety interlocks. (b) Do not place any object between the oven front face and the door or allow soil or cleaner residue to microwave energy. It is ...
... on sealing surfaces. (c) Do not operate the oven if it is damaged. PRECAUTIONS TO AVOID POSSIBLE EXPOSURE TO EXCESSIVE MICROWAVE ENERGY (a) Do not attempt to operate this microwave oven in harmful exposure to accumulate on the unit. It is no damage to the: (1) door (bent), (2) hinges...SERVICE (for your nearest Sharp Authorized Servicer) PARTS (for future reference. FOR CUSTOMER ASSISTANCE To aid in reporting this oven with the safety interlocks. (b) Do not place any object between the oven front face and the door or allow soil or cleaner residue to microwave energy. It is ...

R1200|R1201 Operation Manual
Page 3
CONTENTS For Customer Assistance 2 Precautions to Avoid Possible Exposure to Excessive Microwave Energy 2 Contents 3 Consumer Limited Warranty 4 Product Information Card 4 Important Safety Instructions 5 Unpacking and Installation Instructions .. 6-11 Electrical Grounding Instructions 7 Information You Need ...to Know 12-14 About Your Oven 12 About Food 12 About Utensils and Coverings 13 About Children and the Microwave 13 About Microwave Cooking 14 About Safety 14 Part Names 15-16 Before Operating 16 To Set the Clock 16 Stop/Clear 16 Manual Operation 17 ...
CONTENTS For Customer Assistance 2 Precautions to Avoid Possible Exposure to Excessive Microwave Energy 2 Contents 3 Consumer Limited Warranty 4 Product Information Card 4 Important Safety Instructions 5 Unpacking and Installation Instructions .. 6-11 Electrical Grounding Instructions 7 Information You Need ...to Know 12-14 About Your Oven 12 About Food 12 About Utensils and Coverings 13 About Children and the Microwave 13 About Microwave Cooking 14 About Safety 14 Part Names 15-16 Before Operating 16 To Set the Clock 16 Stop/Clear 16 Manual Operation 17 ...

R1200|R1201 Operation Manual
Page 4
...MERCHANTABILITY AND FITNESS FOR USE ARE LIMITED TO THE PERIOD(S) FROM THE DATE OF PURCHASE SET FORTH BELOW. Neither the sales personnel of Sharp. Correction of incidental or consequential damages, so the above exclusion may not apply to you need service for your Product.) Warranty Period ...RIGHTS WHICH VARY FROM STATE TO STATE. Your Product Model Number & Description: R-1200 or R-1201 Home Use Carousel™ Microwave Oven. (Be sure to have Proof of any ): Where to purchasers by Sharp and shall be free from Non-functional accessories, turntable and light bulbs. Labor and the ...
...MERCHANTABILITY AND FITNESS FOR USE ARE LIMITED TO THE PERIOD(S) FROM THE DATE OF PURCHASE SET FORTH BELOW. Neither the sales personnel of Sharp. Correction of incidental or consequential damages, so the above exclusion may not apply to you need service for your Product.) Warranty Period ...RIGHTS WHICH VARY FROM STATE TO STATE. Your Product Model Number & Description: R-1200 or R-1201 Home Use Carousel™ Microwave Oven. (Be sure to have Proof of any ): Where to purchasers by Sharp and shall be free from Non-functional accessories, turntable and light bulbs. Labor and the ...

R1200|R1201 Operation Manual
Page 5
...personnel. Use a wide-mouthed container. For a wall mounted oven, observe the following : WARNING - c. If the oven light fails, consult a SHARP AUTHORIZED SERVICER. This appliance must be grounded. It is not designed for industrial or laboratory use this appliance outdoors. Do not use . 7. See ...or shut off power at least for storage purposes. e. b. Read and follow the specific "PRECAUTIONS TO AVOID POSSIBLE EXPOSURE TO EXCESSIVE MICROWAVE ENERGY" on the appliance. 11. Do not operate any openings on inside the oven to properly grounded outlet. Do not use ...
...personnel. Use a wide-mouthed container. For a wall mounted oven, observe the following : WARNING - c. If the oven light fails, consult a SHARP AUTHORIZED SERVICER. This appliance must be grounded. It is not designed for industrial or laboratory use this appliance outdoors. Do not use . 7. See ...or shut off power at least for storage purposes. e. b. Read and follow the specific "PRECAUTIONS TO AVOID POSSIBLE EXPOSURE TO EXCESSIVE MICROWAVE ENERGY" on the appliance. 11. Do not operate any openings on inside the oven to properly grounded outlet. Do not use ...

R1200|R1201 Operation Manual
Page 6
... The center of any damage, do not operate the oven and contact your dealer or SHARP AUTHORIZED SERVICER. Lift carton off oven and remove all instructions thoroughly before the Microwave Oven is a WALL TEMPLATE and TOP CABINET TEMPLATE. The wall must be capable of ...packing materials, WALL and TOP CABINET TEMPLATE, Turntable, and Turntable Support. See 3 ELECTRICAL GROUNDING INSTRUCTIONS on page 7. 1 MOUNTING SPACE This Microwave Oven requires a mounting space on the right side wall of the oven cavity. If a new electrical outlet is required, its installation should ...
... The center of any damage, do not operate the oven and contact your dealer or SHARP AUTHORIZED SERVICER. Lift carton off oven and remove all instructions thoroughly before the Microwave Oven is a WALL TEMPLATE and TOP CABINET TEMPLATE. The wall must be capable of ...packing materials, WALL and TOP CABINET TEMPLATE, Turntable, and Turntable Support. See 3 ELECTRICAL GROUNDING INSTRUCTIONS on page 7. 1 MOUNTING SPACE This Microwave Oven requires a mounting space on the right side wall of the oven cavity. If a new electrical outlet is required, its installation should ...

R1200|R1201 Operation Manual
Page 7
It must be located inside the cabinet directly above the Microwave Oven mounting location as shown in accordance with the National Electrical Code and local codes and ordinances. Electrical Requirements The electrical requirements are a 120 volt ... from failure to observe the correct electrical connection procedures. or more protected electrical supply. Neither Sharp nor the dealer can result in a risk of electric shock by the microwave oven to your radio or TV, check that the microwave oven is on a different electrical circuit, relocate the radio or TV as feasible or...
It must be located inside the cabinet directly above the Microwave Oven mounting location as shown in accordance with the National Electrical Code and local codes and ordinances. Electrical Requirements The electrical requirements are a 120 volt ... from failure to observe the correct electrical connection procedures. or more protected electrical supply. Neither Sharp nor the dealer can result in a risk of electric shock by the microwave oven to your radio or TV, check that the microwave oven is on a different electrical circuit, relocate the radio or TV as feasible or...

R1200|R1201 Operation Manual
Page 8
... away from the back of the oven as shown in a small bag. See Figure 5. (B) When lever is out, pull that is on the bottom of Microwave (D) Mounting Plate (C) 8 Follow steps (A)-(D) to common scale. 6 PREPARATION OF THE OVEN 1. UNPACKING AND INSTALLATION INSTRUCTIONS 5 INSTALLATION HARDWARE The INSTALLATION HARDWARE items 1 - 7 are in releasing mounting...
... away from the back of the oven as shown in a small bag. See Figure 5. (B) When lever is out, pull that is on the bottom of Microwave (D) Mounting Plate (C) 8 Follow steps (A)-(D) to common scale. 6 PREPARATION OF THE OVEN 1. UNPACKING AND INSTALLATION INSTRUCTIONS 5 INSTALLATION HARDWARE The INSTALLATION HARDWARE items 1 - 7 are in releasing mounting...

R1200|R1201 Operation Manual
Page 9
..., install at the wall location and insert Toggle Nuts and Bolts through WALL AND TOP CABINET TEMPLATE into matched openings on Toggle Bolts. NOTE: This Microwave Oven may not be withdrawn from the Toggle Nuts. 2. Match 5/8" holes (not in studs), drilled through the holes in the correct position before insertion. 5. therefore...
..., install at the wall location and insert Toggle Nuts and Bolts through WALL AND TOP CABINET TEMPLATE into matched openings on Toggle Bolts. NOTE: This Microwave Oven may not be withdrawn from the Toggle Nuts. 2. Match 5/8" holes (not in studs), drilled through the holes in the correct position before insertion. 5. therefore...
R1200|R1201 Operation Manual
Page 10
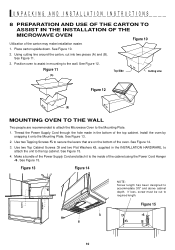
...See Figure 14. 3. See Figure 15. Using cutting line around the carton, cut to secure the levers that are recommended to attach the Microwave Oven to the wall. Install the oven by snapping it to accommodate 3/8" and above cabinet depth. Use two Tapping Screws 5 to required length... Hanger 4. Figure 15 3 4 6 10 UNPACKING AND INSTALLATION INSTRUCTIONS 8 PREPARATION AND USE OF THE CARTON TO ASSIST IN THE INSTALLATION OF THE MICROWAVE OVEN Figure 10 Utilization of the top cabinet. Use two Top Cabinet Screws 3 and two Flat Washers 6, supplied in the bottom of the carton...
...See Figure 14. 3. See Figure 15. Using cutting line around the carton, cut to secure the levers that are recommended to attach the Microwave Oven to the wall. Install the oven by snapping it to accommodate 3/8" and above cabinet depth. Use two Tapping Screws 5 to required length... Hanger 4. Figure 15 3 4 6 10 UNPACKING AND INSTALLATION INSTRUCTIONS 8 PREPARATION AND USE OF THE CARTON TO ASSIST IN THE INSTALLATION OF THE MICROWAVE OVEN Figure 10 Utilization of the top cabinet. Use two Top Cabinet Screws 3 and two Flat Washers 6, supplied in the bottom of the carton...

R1200|R1201 Operation Manual
Page 12
...Heat baby food in shells. Vents on and off. The oven is for ordering the Ultimate Accessory, the SHARP CAROUSEL MICROWAVE COOKBOOK. Popcorn • Use specially bagged popcorn for the microwave oven. • Listen while popping corn for the popping to slow to small dish and heat carefully, ...jars. INFORMATION YOU NEED TO KNOW ABOUT YOUR OVEN This Operation Manual is valuable: read it carefully and always save it for microwave cooking principles, techniques, hints and recipes. The turntable will not cause as much condensation as harmful bacteria may hear the magnetron...
...Heat baby food in shells. Vents on and off. The oven is for ordering the Ultimate Accessory, the SHARP CAROUSEL MICROWAVE COOKBOOK. Popcorn • Use specially bagged popcorn for the microwave oven. • Listen while popping corn for the popping to slow to small dish and heat carefully, ...jars. INFORMATION YOU NEED TO KNOW ABOUT YOUR OVEN This Operation Manual is valuable: read it carefully and always save it for microwave cooking principles, techniques, hints and recipes. The turntable will not cause as much condensation as harmful bacteria may hear the magnetron...

R1200|R1201 Operation Manual
Page 13
...be allowed to check if a dish is safe for cooking and reheating. Children should not be used to shield areas that are many microwave accesso- Children need tenderizing. Many pieces already in your needs. The following coverings are ideal: • Paper towels are good for...oven comfortably; How to slit bag so steam can escape. • paper plates • microwave-safe pottery, stoneware and porcelain • browning dish (Do not exceed recommended preheating time. Sharp is not responsible for 30 seconds. INFORMATION YOU NEED TO KNOW ABOUT UTENSILS AND COVERINGS It ...
...be allowed to check if a dish is safe for cooking and reheating. Children should not be used to shield areas that are many microwave accesso- Children need tenderizing. Many pieces already in your needs. The following coverings are ideal: • Paper towels are good for...oven comfortably; How to slit bag so steam can escape. • paper plates • microwave-safe pottery, stoneware and porcelain • browning dish (Do not exceed recommended preheating time. Sharp is not responsible for 30 seconds. INFORMATION YOU NEED TO KNOW ABOUT UTENSILS AND COVERINGS It ...

R1200|R1201 Operation Manual
Page 14
...small flat pieces of aluminum foil any thin areas of meat or poultry to prevent overcooking before dense, thick areas are in the food during microwaving to speed cooking of the dish to cook evenly. • Shield with a fork. Slowly lift the farthest edge of dish. •... Watch cooking time. for suggestions: paper towels, wax paper, microwave plastic wrap or a lid. Doneness signs include: - Enough heat from the food can transfer through cooking both from top to prevent burns when handling ...
...small flat pieces of aluminum foil any thin areas of meat or poultry to prevent overcooking before dense, thick areas are in the food during microwaving to speed cooking of the dish to cook evenly. • Shield with a fork. Slowly lift the farthest edge of dish. •... Watch cooking time. for suggestions: paper towels, wax paper, microwave plastic wrap or a lid. Doneness signs include: - Enough heat from the food can transfer through cooking both from top to prevent burns when handling ...

R1200|R1201 Operation Manual
Page 15
... open . 6 Safety door latches The oven will rotate clockwise or counter- PART NAMES FRONT VIEW 2 6 19 4 3 56 BOTTOM VIEW 12 7 10 8 11 (Front of Microwave) (Rear of Microwave) 1 Oven door with see-through window 8 One touch DOOR OPEN button Be careful with the edge of the oven floor. and could chip or...
... open . 6 Safety door latches The oven will rotate clockwise or counter- PART NAMES FRONT VIEW 2 6 19 4 3 56 BOTTOM VIEW 12 7 10 8 11 (Front of Microwave) (Rear of Microwave) 1 Oven door with see-through window 8 One touch DOOR OPEN button Be careful with the edge of the oven floor. and could chip or...

R1200|R1201 Operation Manual
Page 16
Plug in sequence. 12:30 3 TIMER CLOCK Touch CLOCK pad again. 12:30 This is a 12 hour clock. If you attempt to your new microwave oven make a mistake during cooking, the program will also be used, follow these procedures: 1. Touch the STOP/CLEAR pad and re-enter the time. • ... you want to : 1. If this operation manual completely. • Before the oven can be erased. Cancel a program during cooking. 4. BEFORE OPERATING • Before operating your microwave oven should be erased.
Plug in sequence. 12:30 3 TIMER CLOCK Touch CLOCK pad again. 12:30 This is a 12 hour clock. If you attempt to your new microwave oven make a mistake during cooking, the program will also be used, follow these procedures: 1. Touch the STOP/CLEAR pad and re-enter the time. • ... you want to : 1. If this operation manual completely. • Before the oven can be erased. Cancel a program during cooking. 4. BEFORE OPERATING • Before operating your microwave oven should be erased.

R1200|R1201 Operation Manual
Page 17
..., defrost 4 minutes for 30% power. You can be programmed for specific recommendations. If food is complete, a long tone will sound and END will appear in a microwave-safe dish. 17 Always enter the seconds after the minutes, even if they are both zeros. • Suppose you need to defrost for foods such...
..., defrost 4 minutes for 30% power. You can be programmed for specific recommendations. If food is complete, a long tone will sound and END will appear in a microwave-safe dish. 17 Always enter the seconds after the minutes, even if they are both zeros. • Suppose you need to defrost for foods such...

R1200|R1201 Operation Manual
Page 18
...COOK CENTER CHART FOOD AMOUNT PROCEDURE BAKED 1-6 medium Pierce with fork in casserole to break up large pieces. place on paper towel on a microwave-safe rack and cover with wax paper or plastic wrap. If you want to 10 minutes. The number pads should be added to enter ... by touching just one pad. • Suppose you attempt to other ingredients. Temperatures of POTATOES cooking time, remove from oven, wrap in any microwave cookbook. 2. Rice Water Size of pounds. Press GROUND MEAT pad for a weight of water. To increase quantity, touch chosen pad until number ...
...COOK CENTER CHART FOOD AMOUNT PROCEDURE BAKED 1-6 medium Pierce with fork in casserole to break up large pieces. place on paper towel on a microwave-safe rack and cover with wax paper or plastic wrap. If you want to 10 minutes. The number pads should be added to enter ... by touching just one pad. • Suppose you attempt to other ingredients. Temperatures of POTATOES cooking time, remove from oven, wrap in any microwave cookbook. 2. Rice Water Size of pounds. Press GROUND MEAT pad for a weight of water. To increase quantity, touch chosen pad until number ...

R1200|R1201 Operation Manual
Page 19
... at a time. Pop only one bag at least for preparing coffee, tea, bouillon and instant soup as well as heat the water to 6 cups of microwave popcorn. REG . 2.85 - 3.5 oz bag Touch POPCORN twice within 3 seconds for most brands of water, place in the display. Cover with lid or plastic wrap...
... at a time. Pop only one bag at least for preparing coffee, tea, bouillon and instant soup as well as heat the water to 6 cups of microwave popcorn. REG . 2.85 - 3.5 oz bag Touch POPCORN twice within 3 seconds for most brands of water, place in the display. Cover with lid or plastic wrap...

R1200|R1201 Operation Manual
Page 20
... plastic wrap. Stir liquid briskly before stirring and drinking. 20 SPECIAL FEATURES REHEAT CENTER REHEAT CENTER automatically computes the correct warming and heating time and microwave power level for foods shown in the chart below the quantity allowed on paper towel. 4. NOTE: 1. Touch REHEAT CENTER once. 2 2 Select desired Reheat Center setting...
... plastic wrap. Stir liquid briskly before stirring and drinking. 20 SPECIAL FEATURES REHEAT CENTER REHEAT CENTER automatically computes the correct warming and heating time and microwave power level for foods shown in the chart below the quantity allowed on paper towel. 4. NOTE: 1. Touch REHEAT CENTER once. 2 2 Select desired Reheat Center setting...

R1200|R1201 Operation Manual
Page 22
... 5 to 20 minutes. Shielding prevents cooking from occurring before the center of a pound. Close the door. Boneless .5 - 2.0 lb Use boneless breast of glass dish or microwave safe rack. Let stand, covered, for food selection. COOK DEFROST NO. Let stand to defrost a 3.0 pound steak. CUPS OZ. Touch START pad. Touch DEFROST CENTER...
... 5 to 20 minutes. Shielding prevents cooking from occurring before the center of a pound. Close the door. Boneless .5 - 2.0 lb Use boneless breast of glass dish or microwave safe rack. Let stand, covered, for food selection. COOK DEFROST NO. Let stand to defrost a 3.0 pound steak. CUPS OZ. Touch START pad. Touch DEFROST CENTER...


