PN-655RU Operation Manual
Page 3
... "dangerous voltage" within an equilateral triangle, is intended to alert the user to persons. Model No.: Serial No.: U.S.A. REFER SERVICING TO QUALIFIED SERVICE PERSONNEL. ENGLISH PN-655RU LCD MONITOR ENGLISH IMPORTANT: To aid reporting in case of the product. The numbers are located in the rear of loss or theft, please record the product...
... "dangerous voltage" within an equilateral triangle, is intended to alert the user to persons. Model No.: Serial No.: U.S.A. REFER SERVICING TO QUALIFIED SERVICE PERSONNEL. ENGLISH PN-655RU LCD MONITOR ENGLISH IMPORTANT: To aid reporting in case of the product. The numbers are located in the rear of loss or theft, please record the product...
PN-655RU Operation Manual
Page 6
...could lead directly to take adequate measures. This stand is in which case the user may cause injury. Upon completion of the monitor must not be accompanied by fatal risks or dangers that the product is for temporary use the factory-installed temporary stand when installing ...the LCD monitor. The temporary stand does not support the LCD monitor securely. Using the temporary stand may be sure to install the product according to rain or moisture. Safety checks ...
...could lead directly to take adequate measures. This stand is in which case the user may cause injury. Upon completion of the monitor must not be accompanied by fatal risks or dangers that the product is for temporary use the factory-installed temporary stand when installing ...the LCD monitor. The temporary stand does not support the LCD monitor securely. Using the temporary stand may be sure to install the product according to rain or moisture. Safety checks ...
PN-655RU Operation Manual
Page 7
... TFT color LCD panel used . - Please note that the monitor does not come into the AC outlet. The quality of high precision technology. Please understand that no need to distinguish between programs, the term "Windows" will be referred to the minimum setting, it . Ensure that Sharp Corporation bears no...fire as this may come into contact with the application of the video signal may in this could cause a residual image. - The monitor cannot rotate display images for a long time. - Do not use . The Power Cord - Do not remove or insert the power plug with oil or...
... TFT color LCD panel used . - Please note that the monitor does not come into the AC outlet. The quality of high precision technology. Please understand that no need to distinguish between programs, the term "Windows" will be referred to the minimum setting, it . Ensure that Sharp Corporation bears no...fire as this may come into contact with the application of the video signal may in this could cause a residual image. - The monitor cannot rotate display images for a long time. - Do not use . The Power Cord - Do not remove or insert the power plug with oil or...
PN-655RU Operation Manual
Page 8
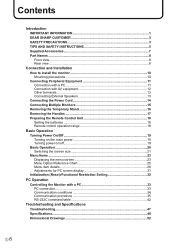
Contents Introduction IMPORTANT INFORMATION 1 DEAR SHARP CUSTOMER 3 SAFETY PRECAUTIONS 3 TIPS AND SAFETY INSTRUCTIONS 5 Supplied Accessories 7 Part Names ...8 Front view...8 Rear view ...8 Connection and Installation How to install the monitor 10 Mounting precautions 10 Connecting Peripheral Equipment 11 Connection ...Menu Option Reference Chart 25 Menu item details 26 Adjustments for PC screen display 31 Initialization (Reset)/Functional Restriction Setting 32 PC Operation Controlling the Monitor with a PC 33 PC connection ...33 Communication conditions 34 Communication procedure ...
Contents Introduction IMPORTANT INFORMATION 1 DEAR SHARP CUSTOMER 3 SAFETY PRECAUTIONS 3 TIPS AND SAFETY INSTRUCTIONS 5 Supplied Accessories 7 Part Names ...8 Front view...8 Rear view ...8 Connection and Installation How to install the monitor 10 Mounting precautions 10 Connecting Peripheral Equipment 11 Connection ...Menu Option Reference Chart 25 Menu item details 26 Adjustments for PC screen display 31 Initialization (Reset)/Functional Restriction Setting 32 PC Operation Controlling the Monitor with a PC 33 PC connection ...33 Communication conditions 34 Communication procedure ...
PN-655RU Operation Manual
Page 10
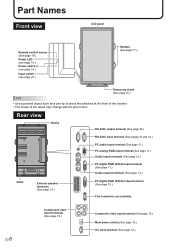
... view LCD panel Remote control sensor (See page 18.) Power LED (see page 19.) Power switch INPUT (see page 19.) Input switch (see page 20.) Handles (See page 17.) Temporary stand (See page 16.) TIPS • Use a pointed object such as a pen tip to press the switches at the front of the monitor...
... view LCD panel Remote control sensor (See page 18.) Power LED (see page 19.) Power switch INPUT (see page 19.) Input switch (see page 20.) Handles (See page 17.) Temporary stand (See page 16.) TIPS • Use a pointed object such as a pen tip to press the switches at the front of the monitor...

PN-655RU Operation Manual
Page 12
... wall requires special expertise and the work must be installed in a horizontal orientation. • Do not block any of the monitor. Secure the monitor by an authorized SHARP dealer. Please note that this could lead to a malfunction. • After mounting, it is difficult to provide ...keep the ambient temperature between 0 and 20 degrees downward. • Mounting the monitor on a concrete wall or pillar. Install by three or more people. • Do not hold the LCD panel when moving the monitor must be used at least 4 times or more the weight of this work might...
... wall requires special expertise and the work must be installed in a horizontal orientation. • Do not block any of the monitor. Secure the monitor by an authorized SHARP dealer. Please note that this could lead to a malfunction. • After mounting, it is difficult to provide ...keep the ambient temperature between 0 and 20 degrees downward. • Mounting the monitor on a concrete wall or pillar. Install by three or more people. • Do not hold the LCD panel when moving the monitor must be used at least 4 times or more the weight of this work might...
PN-655RU Operation Manual
Page 15
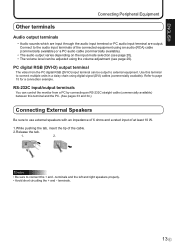
... audio cable (commercially available). • The audio output varies depending on the input mode selection (see page 20). • The volume level can control the monitor from the PC digital RGB (DVI-D) input terminal can be adjusted using digital signal (DVI) cables (commercially available). RS-232C input/output terminals You can...
... audio cable (commercially available). • The audio output varies depending on the input mode selection (see page 20). • The volume level can control the monitor from the PC digital RGB (DVI-D) input terminal can be adjusted using digital signal (DVI) cables (commercially available). RS-232C input/output terminals You can...
PN-655RU Operation Manual
Page 16
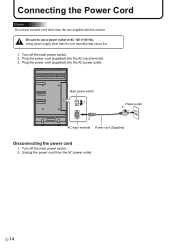
Using power supply other than the one supplied with the monitor. Main power switch 1 Power outlet 3 2 AC input terminal Power cord (Supplied) Disconnecting the power cord 1. Plug the power cord (supplied) into the AC power outlet. ...
Using power supply other than the one supplied with the monitor. Main power switch 1 Power outlet 3 2 AC input terminal Power cord (Supplied) Disconnecting the power cord 1. Plug the power cord (supplied) into the AC power outlet. ...
PN-655RU Operation Manual
Page 17
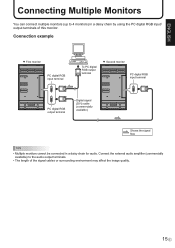
...input terminal PC digital RGB output terminal Digital signal (DVI) cable (commercially available) Shows the signal flow TIPS • Multiple monitors cannot be connected in a daisy chain by using the PC digital RGB input/ output terminals of the signal cables or surrounding ...environment may affect the image quality. 15 E Connect the external audio amplifier (commercially available) to 4 monitors) in a daisy chain for audio. ENGLISH Connecting Multiple Monitors You can connect multiple monitors (up to the audio output terminals. • The length of this...
...input terminal PC digital RGB output terminal Digital signal (DVI) cable (commercially available) Shows the signal flow TIPS • Multiple monitors cannot be connected in a daisy chain by using the PC digital RGB input/ output terminals of the signal cables or surrounding ...environment may affect the image quality. 15 E Connect the external audio amplifier (commercially available) to 4 monitors) in a daisy chain for audio. ENGLISH Connecting Multiple Monitors You can connect multiple monitors (up to the audio output terminals. • The length of this...
PN-655RU Operation Manual
Page 18
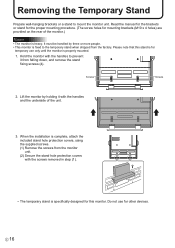
...covers, using the supplied screws. (1) Remove the screws from falling down, and remove the stand fixing screws (4). Please note that this monitor. When the installation is properly mounted. 1. Removing the Temporary Stand Prepare wall-hanging brackets or a stand to prevent it with the screws ...fically designed for mounting brackets (M10 x 4 holes) are provided on the rear of the unit. 3. Hold the monitor with the handles to mount the monitor unit. Screws Screws 2. Read the manual for the brackets or stand for the proper mounting procedure. (The screw holes for...
...covers, using the supplied screws. (1) Remove the screws from falling down, and remove the stand fixing screws (4). Please note that this monitor. When the installation is properly mounted. 1. Removing the Temporary Stand Prepare wall-hanging brackets or a stand to prevent it with the screws ...fically designed for mounting brackets (M10 x 4 holes) are provided on the rear of the unit. 3. Hold the monitor with the handles to mount the monitor unit. Screws Screws 2. Read the manual for the brackets or stand for the proper mounting procedure. (The screw holes for...
PN-655RU Operation Manual
Page 21
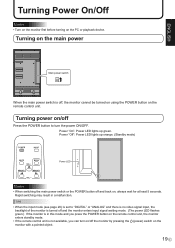
... the main power switch is off Press the POWER button to "DIGITAL" or "ANALOG" and there is no video signal input, the backlight of the monitor is not available, you can turn the power ON/OFF. ENGLISH Turning Power On/Off Caution • Turn on the... turning on the remote control unit. Rapid switching may result in this mode and you press the POWER button on the remote control unit, the monitor enters standby mode. • If the remote control unit is turned off and back on, always wait for at least 5 seconds. Turning power on the...
... the main power switch is off Press the POWER button to "DIGITAL" or "ANALOG" and there is no video signal input, the backlight of the monitor is not available, you can turn the power ON/OFF. ENGLISH Turning Power On/Off Caution • Turn on the... turning on the remote control unit. Rapid switching may result in this mode and you press the POWER button on the remote control unit, the monitor enters standby mode. • If the remote control unit is turned off and back on, always wait for at least 5 seconds. Turning power on the...
PN-655RU Operation Manual
Page 22
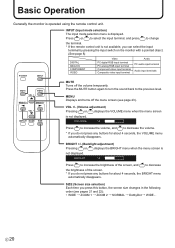
... remote control unit is operated using the remote control unit. Basic Operation Generally the monitor is not available, you can select the input terminal by pressing the input switch on the monitor with a pointed object. (See page 8) DIGITAL ANALOG COMPONENT VIDEO Video PC digital...not press any buttons for about 4 seconds, the BRIGHT menu automatically disappears. BRIGHT +/- (Backlight adjustment) Pressing or displays the BRIGHT menu when the menu screen is not displayed. E 20 VOLUME 15 Press to increase the volume, and to the previous level. VOL +/- (Volume adjustment) ...
... remote control unit is operated using the remote control unit. Basic Operation Generally the monitor is not available, you can select the input terminal by pressing the input switch on the monitor with a pointed object. (See page 8) DIGITAL ANALOG COMPONENT VIDEO Video PC digital...not press any buttons for about 4 seconds, the BRIGHT menu automatically disappears. BRIGHT +/- (Backlight adjustment) Pressing or displays the BRIGHT menu when the menu screen is not displayed. E 20 VOLUME 15 Press to increase the volume, and to the previous level. VOL +/- (Volume adjustment) ...
PN-655RU Operation Manual
Page 23
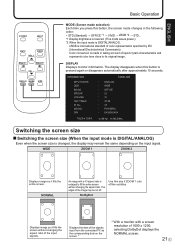
...this button is international standard of color representation specified by IEC (International Electrotechnical Commission). DISPLAY Displays monitor information. WIDE ZOOM 1 ZOOM 2 Displays image so it fills the screen without changing the aspect ratio. DotbyDot Use this size if... *1 → VIVID → sRGB *2 → STD... *1 Display brightness is lowered. (This mode saves power.) *2 When the input mode is DIGITAL/ANALOG. MODEL S/N 1920x1080 ANALOG : ANALOG : WIDE : OFFICE : 23 : 15 : 10:38 : 18 : PN-655RU : XXXXXXXXX V: 60 Hz H: 66.3 kHz Switching the screen size ...
...this button is international standard of color representation specified by IEC (International Electrotechnical Commission). DISPLAY Displays monitor information. WIDE ZOOM 1 ZOOM 2 Displays image so it fills the screen without changing the aspect ratio. DotbyDot Use this size if... *1 → VIVID → sRGB *2 → STD... *1 Display brightness is lowered. (This mode saves power.) *2 When the input mode is DIGITAL/ANALOG. MODEL S/N 1920x1080 ANALOG : ANALOG : WIDE : OFFICE : 23 : 15 : 10:38 : 18 : PN-655RU : XXXXXXXXX V: 60 Hz H: 66.3 kHz Switching the screen size ...
PN-655RU Operation Manual
Page 24
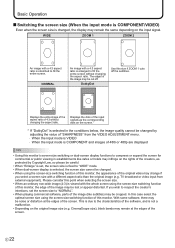
...off the subtitles. In this case select the optimal screen size using the screen-size switching function of this monitor's screen-size switching or dual-screen display functions to compress or expand the screen for commercial or public viewing in establishments like subtitles) may be ... ratio. NORMAL An image with the whole screen using the screen-size switching function of 480i or 480p are displayed TIPS • Using this monitor, the edge of "SHARPNESS" from external equipment). E 22 Basic Operation Switching the screen size (When the input mode is COMPONENT/VIDEO)...
...off the subtitles. In this case select the optimal screen size using the screen-size switching function of this monitor's screen-size switching or dual-screen display functions to compress or expand the screen for commercial or public viewing in establishments like subtitles) may be ... ratio. NORMAL An image with the whole screen using the screen-size switching function of 480i or 480p are displayed TIPS • Using this monitor, the edge of "SHARPNESS" from external equipment). E 22 Basic Operation Switching the screen size (When the input mode is COMPONENT/VIDEO)...
PN-655RU Operation Manual
Page 29
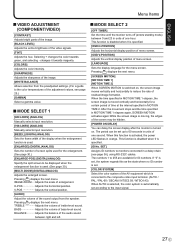
... of treble-level sound. The period can be set according to be hidden. [POWER ON DELAY] You can delay the screen display after the monitor is switched on . SET] Assigns ID numbers to 255 are available for the menu screen. Selecting + changes the color towards ...magenta. [COLORS] Adjusts the color intensity. [SHARPNESS] Adjusts the sharpness of the display when the enlargement function is specified. [ID No. Pressing displays the next menu. ...
... of treble-level sound. The period can be set according to be hidden. [POWER ON DELAY] You can delay the screen display after the monitor is switched on . SET] Assigns ID numbers to 255 are available for the menu screen. Selecting + changes the color towards ...magenta. [COLORS] Adjusts the color intensity. [SHARPNESS] Adjusts the sharpness of the display when the enlargement function is specified. [ID No. Pressing displays the next menu. ...
PN-655RU Operation Manual
Page 32
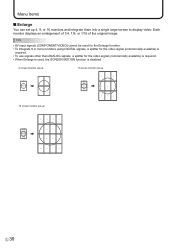
... than ANALOG signals, a splitter for the video signal (commercially available) is required. • When Enlarge is used, the SCREEN MOTION function is disabled. 4 screen monitor set-up 9 screen monitor set-up 2 0 6 3 0 7 4 1 3 1 8 5 2 16 screen monitor set up 12 8 4 0 13 9 5 1 14 10 6 2 15 11 7 3 E 30 Each monitor displays an enlargement of 1/4, 1/9, or 1/16 of the original image.
... than ANALOG signals, a splitter for the video signal (commercially available) is required. • When Enlarge is used, the SCREEN MOTION function is disabled. 4 screen monitor set-up 9 screen monitor set-up 2 0 6 3 0 7 4 1 3 1 8 5 2 16 screen monitor set up 12 8 4 0 13 9 5 1 14 10 6 2 15 11 7 3 E 30 Each monitor displays an enlargement of 1/4, 1/9, or 1/16 of the original image.
PN-655RU Operation Manual
Page 33
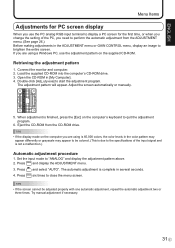
.... 5. TIPS • If the display mode on the computer you are using is 65,000 colors, the color levels in the ADJUSTMENT menu or GAIN CONTROL menu, display an image to brighten the entire screen...drive. 3. Set the input mode to close the menu screen. Press MENU six times to "ANALOG" and display the adjustment pattern above. 2. TIPS • If the screen cannot be colored. (This is not a...you are using a Windows PC, use the PC analog RGB input terminal to display a PC screen for PC screen display When you use the adjustment pattern on the computer's keyboard to start the adjustment...
.... 5. TIPS • If the display mode on the computer you are using is 65,000 colors, the color levels in the ADJUSTMENT menu or GAIN CONTROL menu, display an image to brighten the entire screen...drive. 3. Set the input mode to close the menu screen. Press MENU six times to "ANALOG" and display the adjustment pattern above. 2. TIPS • If the screen cannot be colored. (This is not a...you are using a Windows PC, use the PC analog RGB input terminal to display a PC screen for PC screen display When you use the adjustment pattern on the computer's keyboard to start the adjustment...
PN-655RU Operation Manual
Page 34
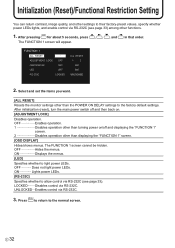
...pressing SIZE for about 5 seconds, press , , , and The FUNCTION 1 screen will appear. Select and set the items you want. [ALL RESET] Resets the monitor settings other than the POWER ON DELAY settings to the normal screen. OFF Hides the menus. LOCKED Disables control via RS-232C. 3. Press MENU to... return to the factory default settings. in that order. The FUNCTION 1 screen cannot be hidden. ON Displays the menus. [LED] Specifies whether to light power LEDs. E 32 OFF Does not light power LEDs. UNLOCKED···Enables ...
...pressing SIZE for about 5 seconds, press , , , and The FUNCTION 1 screen will appear. Select and set the items you want. [ALL RESET] Resets the monitor settings other than the POWER ON DELAY settings to the normal screen. OFF Hides the menus. LOCKED Disables control via RS-232C. 3. Press MENU to... return to the factory default settings. in that order. The FUNCTION 1 screen cannot be hidden. ON Displays the menus. [LED] Specifies whether to light power LEDs. E 32 OFF Does not light power LEDs. UNLOCKED···Enables ...
PN-655RU Operation Manual
Page 35
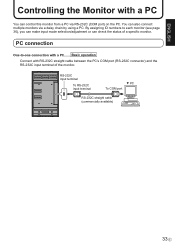
...port) on the PC. By assigning ID numbers to -one connection with a PC You can control this monitor from a PC via a daisy chain by using a PC. You can check the status of the monitor. RS-232C input terminal To RS-232C input terminal ▼ PC To COM port RS-232C straight ...cable (commercially available) 33 E ENGLISH Controlling the Monitor with a PC...... Basic operation Connect with RS-232C straight cable between the PC's COM port (RS-232C connector) and the RS-232C input terminal of ...
...port) on the PC. By assigning ID numbers to -one connection with a PC You can control this monitor from a PC via a daisy chain by using a PC. You can check the status of the monitor. RS-232C input terminal To RS-232C input terminal ▼ PC To COM port RS-232C straight ...cable (commercially available) 33 E ENGLISH Controlling the Monitor with a PC...... Basic operation Connect with RS-232C straight cable between the PC's COM port (RS-232C connector) and the RS-232C input terminal of ...
PN-655RU Operation Manual
Page 36
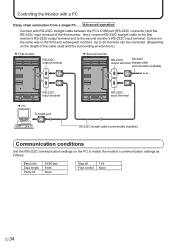
...port (RS-232C connector) and the RS-232C input terminal of the cable used and the surrounding environment.) ▼ First monitor RS-232C output terminal ▼ Second monitor RS-232C RS-232C output terminal straight cable (commercially available) RS-232C input terminal ▼ PC To COM port RS-...terminal RS-232C straight cable (commercially available) Communication conditions Set the RS-232C communication settings on the PC to match the monitor's communication settings as follows: Baud rate Data length Parity bit 9,600 bps 8 bits None Stop bit 1 bit Flow control None E 34
...port (RS-232C connector) and the RS-232C input terminal of the cable used and the surrounding environment.) ▼ First monitor RS-232C output terminal ▼ Second monitor RS-232C RS-232C output terminal straight cable (commercially available) RS-232C input terminal ▼ PC To COM port RS-...terminal RS-232C straight cable (commercially available) Communication conditions Set the RS-232C communication settings on the PC to match the monitor's communication settings as follows: Baud rate Data length Parity bit 9,600 bps 8 bits None Stop bit 1 bit Flow control None E 34


