
Operation Guide
Page 43
... MAINTENANCE REPLACING THE TONER CARTRIDGES 1-49 REPLACING THE TONER COLLECTION CONTAINER 1-52 REPLACING THE DEVELOPER CARTRIDGE / DRUM CARTRIDGE 1-55 • REPLACING THE DEVELOPER CARTRIDGE 1-55 • REPLACING THE DRUM CARTRIDGE. . . . . . 1-59 • REPLACING THE STAPLE CARTRIDGE IN THE FINISHER 1-61...1-63 • CLEANING THE DOCUMENT GLASS AND AUTOMATIC DOCUMENT FEEDER . . . 1-64 • CLEANING THE MAIN CHARGER OF THE PHOTOCONDUCTIVE DRUM 1-65 • CLEANING THE BYPASS TRAY ROLLERS 1-68 • CLEANING THE AUTOMATIC DOCUMENT FEEDER ROLLERS 1-70 • CLEANING THE LASER ...
... MAINTENANCE REPLACING THE TONER CARTRIDGES 1-49 REPLACING THE TONER COLLECTION CONTAINER 1-52 REPLACING THE DEVELOPER CARTRIDGE / DRUM CARTRIDGE 1-55 • REPLACING THE DEVELOPER CARTRIDGE 1-55 • REPLACING THE DRUM CARTRIDGE. . . . . . 1-59 • REPLACING THE STAPLE CARTRIDGE IN THE FINISHER 1-61...1-63 • CLEANING THE DOCUMENT GLASS AND AUTOMATIC DOCUMENT FEEDER . . . 1-64 • CLEANING THE MAIN CHARGER OF THE PHOTOCONDUCTIVE DRUM 1-65 • CLEANING THE BYPASS TRAY ROLLERS 1-68 • CLEANING THE AUTOMATIC DOCUMENT FEEDER ROLLERS 1-70 • CLEANING THE LASER ...
Operation Guide
Page 46
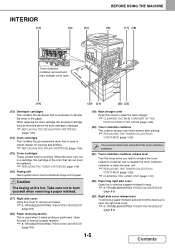
... THE TONER CARTRIDGES (page 1-49) (16) Fusing unit Heat is applied here to create images for copying and printing. ☞ REPLACING THE DRUM CARTRIDGE (page 1-59) (15) Toner cartridges These contain toner for printing. TROUBLESHOOTING "REMOVING MISFEEDS" (page 8-9) (18) Paper reversing section This..." (page 8-9) (19) Main charger cover Open this cover to clean the main charger. ☞ CLEANING THE MAIN CHARGER OF THE PHOTOCONDUCTIVE DRUM (page 1-65) (20) Toner collection container This collects excess toner that remains after printing. ☞ REPLACING THE TONER COLLECTION CONTAINER (page...
... THE TONER CARTRIDGES (page 1-49) (16) Fusing unit Heat is applied here to create images for copying and printing. ☞ REPLACING THE DRUM CARTRIDGE (page 1-59) (15) Toner cartridges These contain toner for printing. TROUBLESHOOTING "REMOVING MISFEEDS" (page 8-9) (18) Paper reversing section This..." (page 8-9) (19) Main charger cover Open this cover to clean the main charger. ☞ CLEANING THE MAIN CHARGER OF THE PHOTOCONDUCTIVE DRUM (page 1-65) (20) Toner collection container This collects excess toner that remains after printing. ☞ REPLACING THE TONER COLLECTION CONTAINER (page...
Operation Guide
Page 96
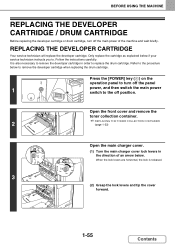
...the main power switch to remove the developer cartridge when replacing the drum cartridge. Only replace the cartridge as explained below . BEFORE USING THE MACHINE REPLACING THE DEVELOPER CARTRIDGE / DRUM CARTRIDGE Before replacing the developer cartridge or drum cartridge, turn off the main power of an arrow below if... your service technician instructs you to replace the drum cartridge. Open the front cover and remove the toner collection container. 2 ☞ REPLACING THE TONER COLLECTION CONTAINER (page 1-52) Open the main ...
...the main power switch to remove the developer cartridge when replacing the drum cartridge. Only replace the cartridge as explained below . BEFORE USING THE MACHINE REPLACING THE DEVELOPER CARTRIDGE / DRUM CARTRIDGE Before replacing the developer cartridge or drum cartridge, turn off the main power of an arrow below if... your service technician instructs you to replace the drum cartridge. Open the front cover and remove the toner collection container. 2 ☞ REPLACING THE TONER COLLECTION CONTAINER (page 1-52) Open the main ...

Operation Guide
Page 98
... belt) is a mark (red belt) on the machine. If the seal has been cut out of the machine. This may damage the developer cartridge or drum cartridge and cause failure. • When inserting the developer cartridge, grasp it with the attachment tab while peeling it in the wrong direction or orientation...
... belt) is a mark (red belt) on the machine. If the seal has been cut out of the machine. This may damage the developer cartridge or drum cartridge and cause failure. • When inserting the developer cartridge, grasp it with the attachment tab while peeling it in the wrong direction or orientation...
Operation Guide
Page 100
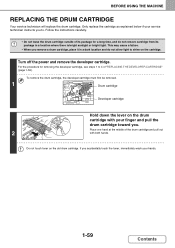
... replace the cartridge as explained below if your service technician instructs you accidentally touch the toner, immediately wash your finger and pull the drum cartridge toward you remove a drum cartridge, place it in a dark location and do not remove cartridge from its package in a location where there is bright sunlight or bright...
... replace the cartridge as explained below if your service technician instructs you accidentally touch the toner, immediately wash your finger and pull the drum cartridge toward you remove a drum cartridge, place it in a dark location and do not remove cartridge from its package in a location where there is bright sunlight or bright...
Operation Guide
Page 101
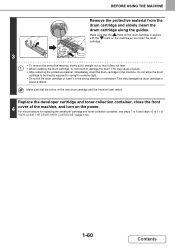
...10 to sunlight or electric light. • Do not tilt the drum cartridge or insert it does not tear. • When installing the drum cartridge, do not touch or damage the drum. This may damage the drum cartridge or cause a failure. Drum 3 • To remove the protective material, slowly pull it straight... out so that it in the machine. Make sure that the mark on the drum cartridge is aligned with the mark on the machine as you insert the drum cartridge. Replace the developer cartridge and toner collection container, close the front 4 cover of "REPLACING THE ...
...10 to sunlight or electric light. • Do not tilt the drum cartridge or insert it does not tear. • When installing the drum cartridge, do not touch or damage the drum. This may damage the drum cartridge or cause a failure. Drum 3 • To remove the protective material, slowly pull it straight... out so that it in the machine. Make sure that the mark on the drum cartridge is aligned with the mark on the machine as you insert the drum cartridge. Replace the developer cartridge and toner collection container, close the front 4 cover of "REPLACING THE ...

Operation Guide
Page 106
BEFORE USING THE MACHINE CLEANING THE MAIN CHARGER OF THE PHOTOCONDUCTIVE DRUM If black lines or colored lines appear even after you have cleaned the document glass and automatic document feeder, use the charger cleaner to the ...
BEFORE USING THE MACHINE CLEANING THE MAIN CHARGER OF THE PHOTOCONDUCTIVE DRUM If black lines or colored lines appear even after you have cleaned the document glass and automatic document feeder, use the charger cleaner to the ...
Operation Guide
Page 157
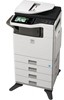
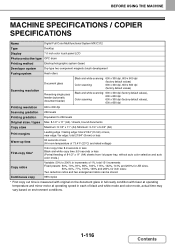
... on environment conditions. 1-116 Contents BEFORE USING THE MACHINE MACHINE SPECIFICATIONS / COPIER SPECIFICATIONS Name Digital Full Color Multifunctional System MX-C312 Type Desktop Display 7.0 inch color touch panel LCD Photoconductive type OPC drum Printing method Electrophotographic system (laser) Developer system Dry-type two-component magnetic brush development Fusing system Heat rollers Scanning resolution...
... on environment conditions. 1-116 Contents BEFORE USING THE MACHINE MACHINE SPECIFICATIONS / COPIER SPECIFICATIONS Name Digital Full Color Multifunctional System MX-C312 Type Desktop Display 7.0 inch color touch panel LCD Photoconductive type OPC drum Printing method Electrophotographic system (laser) Developer system Dry-type two-component magnetic brush development Fusing system Heat rollers Scanning resolution...


