
Operation Guide
Page 125
... Size Input 2 COPIER (1), (2) (3) OK Cancel OK X 11 (1~14) inch Y 8 1/2 (1~8 1/2) inch Enter the original size. (1) Enter the X (horizontal) dimension of the original with the keys. When the automatic document feeder is used , a number from 1" to 8-1/2" (25 mm to 356 mm) can be entered. Make... sure that you frequently use the document glass. (2) Enter the Y (vertical) dimension of copy mode and then follow the steps below. When the document glass is used , a number from 5-1/2" to 14" (140 mm to 216...
... Size Input 2 COPIER (1), (2) (3) OK Cancel OK X 11 (1~14) inch Y 8 1/2 (1~8 1/2) inch Enter the original size. (1) Enter the X (horizontal) dimension of the original with the keys. When the automatic document feeder is used , a number from 1" to 8-1/2" (25 mm to 356 mm) can be entered. Make... sure that you frequently use the document glass. (2) Enter the Y (vertical) dimension of copy mode and then follow the steps below. When the document glass is used , a number from 5-1/2" to 14" (140 mm to 216...

Operation Guide
Page 126
...) can be retained even if the main power is turned off. Touch the [Y] key and enter the Y (vertical) dimension of the original. The following screen will be entered. (2) Enter the Y (vertical) dimension of the original with the keys. Original 3 (1), (2) (3) Cancel OK X 11 (1~14) inch Y 8 1/2 ... COPIER Original Custom Size X15½ Y 8½ Store the original size. Recall Store/Delete (2) (1) 2 If you want to edit or clear. A dimension from 1" to 8-1/2" (25 mm to the next step. • To clear the key, touch the [Delete] key. OK OK (1) Touch the [Store...
...) can be retained even if the main power is turned off. Touch the [Y] key and enter the Y (vertical) dimension of the original. The following screen will be entered. (2) Enter the Y (vertical) dimension of the original with the keys. Original 3 (1), (2) (3) Cancel OK X 11 (1~14) inch Y 8 1/2 ... COPIER Original Custom Size X15½ Y 8½ Store the original size. Recall Store/Delete (2) (1) 2 If you want to edit or clear. A dimension from 1" to 8-1/2" (25 mm to the next step. • To clear the key, touch the [Delete] key. OK OK (1) Touch the [Store...

Operation Guide
Page 132
... X11 Y8½ X11 Y8½ X11 Y8½ X 17 (5 1/2~14) inch Y 11 (3 5/8~8 1/2) inch OK OK AB Inch Touch the [X] key and enter the horizontal dimension of the screen. For details, see "Paper Tray Settings" (page 7-13) in the document feeder tray, the originals are stored in the keys on the.... • If you placed the originals on the left side of the paper with the keys, and then touch the [Y] key and enter the vertical dimension. Enter the paper size of the bypass tray. (2) Touch the [OK] key. To cancel scanning of the original and copying...
... X11 Y8½ X11 Y8½ X11 Y8½ X 17 (5 1/2~14) inch Y 11 (3 5/8~8 1/2) inch OK OK AB Inch Touch the [X] key and enter the horizontal dimension of the screen. For details, see "Paper Tray Settings" (page 7-13) in the document feeder tray, the originals are stored in the keys on the.... • If you placed the originals on the left side of the paper with the keys, and then touch the [Y] key and enter the vertical dimension. Enter the paper size of the bypass tray. (2) Touch the [OK] key. To cancel scanning of the original and copying...

Operation Guide
Page 150
... values set in "Card Shot Settings" in the [Original] key. When finished, press [Read-End]. Touch the [Y] key and enter the Y (vertical) dimension of the original with the keys. (A) To enlarge or reduce the images to fit the paper based on the entered original size, touch the [Fit... to Page] key. (B) The [Size Reset] key can be pressed to return the horizontal and vertical dimensions to scan the front side of the card. 6 Use the same [START] key that the entered dimensions appear in the system settings (administrator). (2) Touch the [OK] key. Place next original. With the ...
... values set in "Card Shot Settings" in the [Original] key. When finished, press [Read-End]. Touch the [Y] key and enter the Y (vertical) dimension of the original with the keys. (A) To enlarge or reduce the images to fit the paper based on the entered original size, touch the [Fit... to Page] key. (B) The [Size Reset] key can be pressed to return the horizontal and vertical dimensions to scan the front side of the card. 6 Use the same [START] key that the entered dimensions appear in the system settings (administrator). (2) Touch the [OK] key. Place next original. With the ...

Operation Guide
Page 151
...] key in the screen of step 4. The factory default settings are 3-3/8" (86 mm) for X (the width) and 2-1/8" (54 mm) for both the horizontal and vertical dimensions. COPIER • The original must be placed on the document glass. • Copying is pressed. 25 mm to 210 mm (1" to which the size returns...
...] key in the screen of step 4. The factory default settings are 3-3/8" (86 mm) for X (the width) and 2-1/8" (54 mm) for both the horizontal and vertical dimensions. COPIER • The original must be placed on the document glass. • Copying is pressed. 25 mm to 210 mm (1" to which the size returns...

Operation Guide
Page 333
... Size Input 4 (1), (2) (3) OK Cancel OK X 11 (1 14) inch Y 8 1/2 (1 8 1/2) inch Enter the scan size. (1) Touch the [X] key and enter the X (horizontal) dimension with the keys. (2) Touch the [Y] key and enter the Y (vertical) dimension with the keys. (3) Touch the [OK] key. To complete the setting and return to the screen of step 3, touch the...
... Size Input 4 (1), (2) (3) OK Cancel OK X 11 (1 14) inch Y 8 1/2 (1 8 1/2) inch Enter the scan size. (1) Touch the [X] key and enter the X (horizontal) dimension with the keys. (2) Touch the [Y] key and enter the Y (vertical) dimension with the keys. (3) Touch the [OK] key. To complete the setting and return to the screen of step 3, touch the...

Operation Guide
Page 367
... Size Size Reset 4 Y X Specify the original size. (1) Enter the original size. • Touch the [X] key and enter the horizontal dimension (X) of the original with the keys. • Touch the [Y] key and enter the vertical dimension (Y) of the card, you can touch the [Configure] key in the base screen to change the exposure.
... Size Size Reset 4 Y X Specify the original size. (1) Enter the original size. • Touch the [X] key and enter the horizontal dimension (X) of the original with the keys. • Touch the [Y] key and enter the vertical dimension (Y) of the card, you can touch the [Configure] key in the base screen to change the exposure.

Operation Guide
Page 468
... 4 (1), (2) (3) OK Cancel OK X 11 (1 14) inch Y 8 1/2 (1 8 1/2) inch Enter the scan size (original size). (1) Touch the [X] key and enter the X (horizontal) dimension with the keys. (2) Touch the [Y] key and enter the Y (vertical) dimension with the keys. (3) Touch the [OK] key. Touch the [OK] key next to the [Cancel] key to complete the setting...
... 4 (1), (2) (3) OK Cancel OK X 11 (1 14) inch Y 8 1/2 (1 8 1/2) inch Enter the scan size (original size). (1) Touch the [X] key and enter the X (horizontal) dimension with the keys. (2) Touch the [Y] key and enter the Y (vertical) dimension with the keys. (3) Touch the [OK] key. Touch the [OK] key next to the [Cancel] key to complete the setting...

Operation Guide
Page 501
... Size Reset 4 Y X Specify the original size. (1) Enter the original size. • Touch the [X] key and enter the horizontal dimension (X) of the original with the keys. • Touch the [Y] key and enter the vertical dimension (Y) of the original with the keys. (A) To return the original size to the default size, touch the [Size...
... Size Reset 4 Y X Specify the original size. (1) Enter the original size. • Touch the [X] key and enter the horizontal dimension (X) of the original with the keys. • Touch the [Y] key and enter the vertical dimension (Y) of the original with the keys. (A) To return the original size to the default size, touch the [Size...
Operation Guide
Page 602
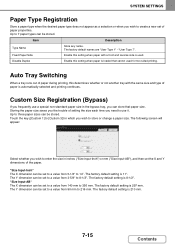
... the bypass tray, you can be set to a value from 5-1/2" to 14". The factory default setting is used for two-sided printing. The Y dimension can be set to a value from 3-5/8" to 8-1/2". Auto Tray Switching When a tray runs out of paper during printing, this setting when paper with ...you the trouble of paper properties. Touch the key ([Custom 1] to [Custom 3]) in which you wish to store or change a paper size. The Y dimension can be set to a value from 90 mm to 216 mm. "User Type 7". SYSTEM SETTINGS Paper Type Registration Store a paper type when the desired ...
... the bypass tray, you can be set to a value from 5-1/2" to 14". The factory default setting is used for two-sided printing. The Y dimension can be set to a value from 3-5/8" to 8-1/2". Auto Tray Switching When a tray runs out of paper during printing, this setting when paper with ...you the trouble of paper properties. Touch the key ([Custom 1] to [Custom 3]) in which you wish to store or change a paper size. The Y dimension can be set to a value from 90 mm to 216 mm. "User Type 7". SYSTEM SETTINGS Paper Type Registration Store a paper type when the desired ...

Operation Guide
Page 658
... is used to set the copy exposure level in the card shot screen. An added preset ratio can be changed . Both the X (horizontal) and Y (vertical) dimensions of continuous copies). Specify a value from 0" (0 mm) to 1" (20 mm) in increments of 1/8" (1 mm) for edge erase. 7-71 Contents Specify a value from 0" (0 mm) to 1" (20...
... is used to set the copy exposure level in the card shot screen. An added preset ratio can be changed . Both the X (horizontal) and Y (vertical) dimensions of continuous copies). Specify a value from 0" (0 mm) to 1" (20 mm) in increments of 1/8" (1 mm) for edge erase. 7-71 Contents Specify a value from 0" (0 mm) to 1" (20...

Operation Guide
Page 678
... Store Size Enable this setting is used to 8-1/2" (210 mm) in the user selection screen. Disable Stamp for erase function. Both the X (horizontal) and Y (vertical) dimensions of 1/8" (1 mm). Specify a value from 1" (25 mm) to set the default original size for edge erase. 7-91 Contents SYSTEM SETTINGS Color Data Compression Ratio Setting...
... Store Size Enable this setting is used to 8-1/2" (210 mm) in the user selection screen. Disable Stamp for erase function. Both the X (horizontal) and Y (vertical) dimensions of 1/8" (1 mm). Specify a value from 1" (25 mm) to set the default original size for edge erase. 7-91 Contents SYSTEM SETTINGS Color Data Compression Ratio Setting...

Operation Guide
Page 708
... FREQUENTLY ASKED QUESTIONS Making a copy of a non-standard size original The procedure for making a copy of the document is less than 5-1/2" (140 mm) or the Y dimension (height) is less than 5-1/2" (140 mm), place the original on the document glass. 2 Enter the original size. If the... X dimension (width) of a payment slip or other non-standard size original is not loaded in the bypass tray. From the base screen of copy mode, touch [...
... FREQUENTLY ASKED QUESTIONS Making a copy of a non-standard size original The procedure for making a copy of the document is less than 5-1/2" (140 mm) or the Y dimension (height) is less than 5-1/2" (140 mm), place the original on the document glass. 2 Enter the original size. If the... X dimension (width) of a payment slip or other non-standard size original is not loaded in the bypass tray. From the base screen of copy mode, touch [...