Sharp MX-7500N Support and Manuals
Get Help and Manuals for this Sharp item
View All Support Options Below
Free Sharp MX-7500N manuals!
Problems with Sharp MX-7500N?
Ask a Question
Free Sharp MX-7500N manuals!
Problems with Sharp MX-7500N?
Ask a Question
Sharp MX-7500N Videos

Sharp MFP MX-6500N MX-7500N
Duration: 1:23
Total Views: 234
Duration: 1:23
Total Views: 234
Popular Sharp MX-7500N Manual Pages
Adjustment Guide - Page 1
MX-6500N MX-7500N Administrator Machine Adjustment Guide
Please keep the manual in a safe place where it will not be lost.
Adjustment Guide - Page 5
... job or between jobs.
Grey balance adjustment Manual adjustment for gradation density This adjustment is performed by...is the gradation (half tone) process, including error diffusion and dithering.
Calibration Automatic adjustment for explaining...to MX-LC13.
5 Purpose of Document This document is for gradation density This adjustment is performed by setting specific adjustment...
Adjustment Guide - Page 6
... appears, tap the [OK] key.
When auto adjustment is performed the value set in manual adjustment will be performed for each colour, use [Densitometer Adjustment] or [Visual ...Auto Adjustment)
This performs density smoothing adjustment for this adjustment. comes up when you do not see a problem. Please check if the test patch is recommended. If you do not want to change the density,...
Adjustment Guide - Page 9
....
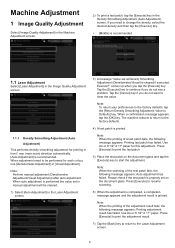
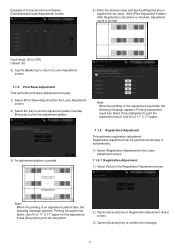
1.1.6 Registration Adjustment
This performs registration adjustment. Registration adjustment can be performed manually or automatically.
1) Select [Registration Adjustment] in the Laser Adjustment screen.
... Select [Auto] in the Laser Adjustment screen.
2) Select the tray to set the adjustment pattern and tap [Execute] to register the set value. Input range: [0] to [100] Default: 50
3) Tap the ...
Adjustment Guide - Page 10
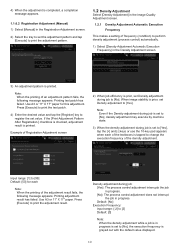
... stability is prior, set to [Yes], tap...When job efficiency is prior, set to [No], the execution ...set to [No], density adjustment may execute by machine state.
3) When the density adjustment during job is set...while a job is in progress is set Density adjustment during job: [Yes]: The...Register] key to register the set the adjustment pattern and tap ...Frequency
This makes a setting of an adjustment ...
Adjustment Guide - Page 11
...5) Tap the [OK] key to perform Colour Calibration in the system settings.
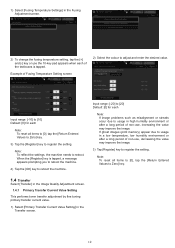
1.3.1 Fusing Temperature Setting
This performs setting of the textboxes is tapped.
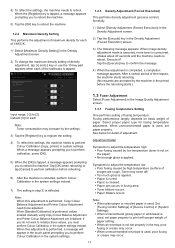
1.2.3 Density Adjustment (Forced Execution)
This ... [-2] to confirm the message.
4) When the adjustment is performed, values entered manually using Copy Colour Balance Adjustment and Printer Colour Balance Adjustment are rough, Toner may ...
Adjustment Guide - Page 12
... a long period of non-use the 10-key pad appears when each
Note: If image problems such as misalignment or streaks occur due to usage in high humidity environment or after a long period of Fusing Temperature Setting screen
2) Select the colour to reboot the machine.
Note: To reset all items to [0], tap...
Adjustment Guide - Page 13
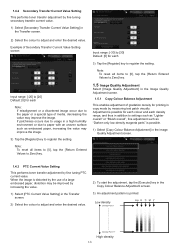
...Select [Copy Colour Balance Adjustment] in the Image Quality Adjustment screen.
1.4.3 PTC Current Value Setting
This performs toner transfer adjustment by fine tuning PTC current value. Input range: [-30] to...only low-density magenta parts" is distorted by the use of a large embossed paper, distortion may be improved by increasing the value.
1) Select [PTC Current Value Setting] in the Transfer ...
Adjustment Guide - Page 17
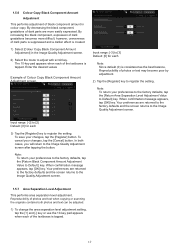
... key. In both photos and text can be adjusted.
1) To change the area separation level adjustment setting, tap the [+] and [-] key or use the 10-key pad appears when each of photos or ...Component Amount Adjustment Value to register the setting. Note: To return your changes, tap the [Register] button. The 10-key pad appears when each of dark parts are returned to the factory defaults and...
Adjustment Guide - Page 20

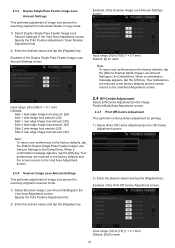
...Input range: [0] to [99] (1 = 0.1 mm) Defaults:
Edge image loss amount setting: [40] Side image loss amount setting: [20] Note:
To return your preferences to the factory defaults, tap the [Return Original...Adjustment] in the Image Position/Ratio/Area Adjustment screen.
2.3.1 Copy Image Loss Amount Settings
This performs adjustment of print void amount for each
Note: To return your preferences ...
Adjustment Guide - Page 21
...
Note: To return your preferences to the factory defaults, tap the [Return Scanner Mode Image Loss Amount Settings to the Void Area Adjustment screen.
When a confirmation message appears, tap the [OK] key. When ...your preferences to the factory defaults, tap the [Return Duplex Single Pass Feeder Image Loss Amount Settings to [70] (1 = 0.1 mm) Default: [50] for each
21 Your preferences ...
Adjustment Guide - Page 22
...Tray 3, LCT Tray 4,
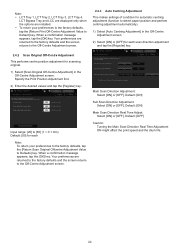
LCT Bypass Tray and LCC are displayed only when the options are installed. To return your preferences to the factory defaults, tap the [Return Scan Original ...and the screen returns to the Off-Centre Adjustment screen.
2.4.3 Auto Centring Adjustment
This makes settings of condition for scanning original. 1) Select [Scan Original Off-Centre Adjustment] in the Off-...
Adjustment Guide - Page 23

... width.
Functional restriction For 2 staples, the staple positions that can be adjusted: The installed options are displayed as the following table shows:
Paper size
A4R/Letter R or smaller Larger than A4R/Letter R
Number of sheets included in a set 20 sheets or less More than 20 sheets
- The 10-key pad appears when...
Adjustment Guide - Page 24

... for Saddle Stitch/Saddle Fold] in the Saddle Finisher screen.
2) Adjust the distance between the alignment plates in the direction of the textboxes is tapped.
Set this adjustment when the stapled stuck of paper is not aligned.
1) Select [Paper Alignment Width Adjustment for saddle stitching/saddle folding. Enter the desired value...
Adjustment Guide - Page 25

... positions that can be adjusted vary depending on the paper size and the number of sheets included in a set to be adjusted.
Input range: [80] to [150] (1 = 0.1 mm) Default: [100]... amount from the amount set with the trimming setting.
1) Select [Trimming Original Point Adjustment] in the Trimming Module screen.
3.3 Finisher (When the 100-sheet finisher is
installed) Select [Finisher] in...
Sharp MX-7500N Reviews
We have not received any reviews for Sharp yet.