

Operating Guide
Page 36
MAINTAIN THE MACHINE Clean the machine Replace a toner cartridge Replace the staple cartridge Replace the stamp cartridge Replace the waste toner box Dispose of punch waste
MAINTAIN THE MACHINE Clean the machine Replace a toner cartridge Replace the staple cartridge Replace the stamp cartridge Replace the waste toner box Dispose of punch waste

Operating Guide
Page 43
MAINTENANCE REGULAR MAINTENANCE 1-49 • CLEANING THE DOCUMENT GLASS AND AUTOMATIC DOCUMENT FEEDER . . . 1-49 • CLEANING THE MAIN CHARGER OF THE PHOTOCONDUCTIVE DRUM 1-51 • CLEANING THE PT CHARGER OF THE PRIMARY TRANSFER BELT 1-54 • CLEANING THE BYPASS FEED ROLLER . . . 1-56 • CLEANING THE ORIGINAL FEED ROLLER 1-56 • CLEANING THE LASER UNIT 1-57 REPLACING THE TONER CARTRIDGES 1-61 REPLACING THE WASTE TONER BOX 1-64 REPLACING THE STAMP CARTRIDGE 1-66 ENTERING TEXT FUNCTIONS OF THE MAIN KEYS 1-67 • KEYBOARD 1-68 BEFORE USING THE MACHINE 1-2
MAINTENANCE REGULAR MAINTENANCE 1-49 • CLEANING THE DOCUMENT GLASS AND AUTOMATIC DOCUMENT FEEDER . . . 1-49 • CLEANING THE MAIN CHARGER OF THE PHOTOCONDUCTIVE DRUM 1-51 • CLEANING THE PT CHARGER OF THE PRIMARY TRANSFER BELT 1-54 • CLEANING THE BYPASS FEED ROLLER . . . 1-56 • CLEANING THE ORIGINAL FEED ROLLER 1-56 • CLEANING THE LASER UNIT 1-57 REPLACING THE TONER CARTRIDGES 1-61 REPLACING THE WASTE TONER BOX 1-64 REPLACING THE STAMP CARTRIDGE 1-66 ENTERING TEXT FUNCTIONS OF THE MAIN KEYS 1-67 • KEYBOARD 1-68 BEFORE USING THE MACHINE 1-2

Operating Guide
Page 44
... 1-35) (2) Front cover Open this cover to switch the main power switch to "On" or "Off" or to replace a toner cartridge. ☞ TURNING THE POWER ON AND OFF (page 1-15) ☞ REPLACING THE TONER CARTRIDGES (page 1-61) (3) Output tray (center tray) Output is delivered to this tray. * Peripheral device. (4) Operation panel This...
... 1-35) (2) Front cover Open this cover to switch the main power switch to "On" or "Off" or to replace a toner cartridge. ☞ TURNING THE POWER ON AND OFF (page 1-15) ☞ REPLACING THE TONER CARTRIDGES (page 1-61) (3) Output tray (center tray) Output is delivered to this tray. * Peripheral device. (4) Operation panel This...

Operating Guide
Page 46
... image. (16) Right side cover Open this out and grasp it when moving the machine. (23) Right cover of paper, be replaced. ☞ REPLACING THE TONER CARTRIDGES (page 1-61) (14) Fusing unit Heat is installed) Open this to remove a paper misfeed in tray 2, tray 3 or tray 4. (24) Paper tray..., the cartridge of the photoconductive drums are combined together on " position. ☞ TURNING THE POWER ON AND OFF (page 1-15) (20) Waste toner box This collects excess toner that ran out must be sure to feed paper manually. Do not touch or damage the transfer belt. Open this cover to remove...
... image. (16) Right side cover Open this out and grasp it when moving the machine. (23) Right cover of paper, be replaced. ☞ REPLACING THE TONER CARTRIDGES (page 1-61) (14) Fusing unit Heat is installed) Open this to remove a paper misfeed in tray 2, tray 3 or tray 4. (24) Paper tray..., the cartridge of the photoconductive drums are combined together on " position. ☞ TURNING THE POWER ON AND OFF (page 1-15) (20) Waste toner box This collects excess toner that ran out must be sure to feed paper manually. Do not touch or damage the transfer belt. Open this cover to remove...
Operating Guide
Page 70
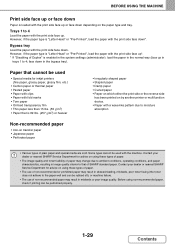
...-on using these types of paper. • The use of non-recommended or prohibited paper may result in skewed feeding, misfeeds, poor toner fusing (the toner does not adhere to the paper well and can be used • Special media for advice on transfer paper • Japanese paper •...are sold. Paper that is "Letter Head" or "Pre-Printed", load the paper with the print side face down *. Contact your dealer or nearest SHARP Service Department for inkjet printers (fine paper, glossy paper, glossy film, etc.) • Carbon paper or thermal paper • Pasted paper •...
...-on using these types of paper. • The use of non-recommended or prohibited paper may result in skewed feeding, misfeeds, poor toner fusing (the toner does not adhere to the paper well and can be used • Special media for advice on transfer paper • Japanese paper •...are sold. Paper that is "Letter Head" or "Pre-Printed", load the paper with the print side face down *. Contact your dealer or nearest SHARP Service Department for inkjet printers (fine paper, glossy paper, glossy film, etc.) • Carbon paper or thermal paper • Pasted paper •...

Operating Guide
Page 75
... envelopes, envelopes with metal clasps, plastic hooks, or ribbon hooks; Only the front side of thickness, such as creasing may cause creasing, smudging, misfeeds, poor toner fusing, or machine failure. • Do not use the following envelopes: Envelopes with an adhesive for sealing the Can be used 1-34 Contents BEFORE USING...
... envelopes, envelopes with metal clasps, plastic hooks, or ribbon hooks; Only the front side of thickness, such as creasing may cause creasing, smudging, misfeeds, poor toner fusing, or machine failure. • Do not use the following envelopes: Envelopes with an adhesive for sealing the Can be used 1-34 Contents BEFORE USING...

Operating Guide
Page 79
... side of the automatic document feeder will be closed correctly in this state. The automatic document feeder cannot be copied black, causing excessive use of toner. 3 Placing a thick book When scanning a thick book or other thick original, follow the steps below to close the automatic document feeder. BEFORE USING THE MACHINE...
... side of the automatic document feeder will be closed correctly in this state. The automatic document feeder cannot be copied black, causing excessive use of toner. 3 Placing a thick book When scanning a thick book or other thick original, follow the steps below to close the automatic document feeder. BEFORE USING THE MACHINE...

Operating Guide
Page 90
... hard, the surface may result. • Do not use the glass cleaner that the machine continues to clean the machine and replace the toner cartridges and the waste toner box. Always keep these parts clean. If you use a flammable spray to the document glass). Wipe the parts with hot electrical components or...
... hard, the surface may result. • Do not use the glass cleaner that the machine continues to clean the machine and replace the toner cartridges and the waste toner box. Always keep these parts clean. If you use a flammable spray to the document glass). Wipe the parts with hot electrical components or...

Operating Guide
Page 92
... to the release position. 2 Release the lock of about 30 degrees.) 1-51 Contents Remove the waste toner box. If the waste toner box falls too far forward, it will go as it will not be possible 3 to clean the main charger that charges the drum. Hold the ... document glass and automatic document feeder, use the charger cleaner to remove it. (Remove the box when it is at an angle of the waste toner box and let it fall forward as far as shown in the figure. Open the front cover. 1 Release the waste...
... to the release position. 2 Release the lock of about 30 degrees.) 1-51 Contents Remove the waste toner box. If the waste toner box falls too far forward, it will go as it will not be possible 3 to clean the main charger that charges the drum. Hold the ... document glass and automatic document feeder, use the charger cleaner to remove it. (Remove the box when it is at an angle of the waste toner box and let it fall forward as far as shown in the figure. Open the front cover. 1 Release the waste...

Operating Guide
Page 94
... USING THE MACHINE Replace the charger cleaner in its edge (the side that at the time of mounting it.) Push the waste toner box into place. Push the waste toner box firmly in 3 more times. • When pulling and pushing the knob to clean the charger, pull and push the knob slowly... original position. (1) Rotate the charger cleaner after putting it on the inner side, spread across the top of the waste toner box to the claw. Mount the waste toner box. Lock the waste toner box. Close the front cover. • If this does not solve the problem, pull the knob out and push...
... USING THE MACHINE Replace the charger cleaner in its edge (the side that at the time of mounting it.) Push the waste toner box into place. Push the waste toner box firmly in 3 more times. • When pulling and pushing the knob to clean the charger, pull and push the knob slowly... original position. (1) Rotate the charger cleaner after putting it on the inner side, spread across the top of the waste toner box to the claw. Mount the waste toner box. Lock the waste toner box. Close the front cover. • If this does not solve the problem, pull the knob out and push...

Operating Guide
Page 95
... by both hands and lift it will not be possible 3 to clean the PT charger. Open the front cover. 1 Release the lock of the waste toner box and let it fall forward as far as shown in the figure. BEFORE USING THE MACHINE CLEANING THE PT CHARGER OF THE PRIMARY TRANSFER... charger cleaner back till the end. (3) Repeat the steps (1) and (2) three times. 1-54 Contents Move the lock of the waste toner box to the release position. 2 Release the lock of the waste toner box. If the waste toner box falls too far forward, it will go as it up slowly. Remove the waste...
... by both hands and lift it will not be possible 3 to clean the PT charger. Open the front cover. 1 Release the lock of the waste toner box and let it fall forward as far as shown in the figure. BEFORE USING THE MACHINE CLEANING THE PT CHARGER OF THE PRIMARY TRANSFER... charger cleaner back till the end. (3) Repeat the steps (1) and (2) three times. 1-54 Contents Move the lock of the waste toner box to the release position. 2 Release the lock of the waste toner box. If the waste toner box falls too far forward, it will go as it up slowly. Remove the waste...

Operating Guide
Page 96
BEFORE USING THE MACHINE Mount the waste toner box. Lock the waste toner box. Move the lock of mounting it.) 5 Push the waste toner box in till the innermost point. 6 Push it in until it clicks into place. Insert it in a direction slanting from the top towards the bottom. (A direction opposite to that at the time of the waste toner box to the lock position. 7 Close the front cover. 8 1-55 Contents
BEFORE USING THE MACHINE Mount the waste toner box. Lock the waste toner box. Move the lock of mounting it.) 5 Push the waste toner box in till the innermost point. 6 Push it in until it clicks into place. Insert it in a direction slanting from the top towards the bottom. (A direction opposite to that at the time of the waste toner box to the lock position. 7 Close the front cover. 8 1-55 Contents
Operating Guide
Page 102
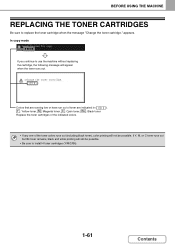
... running low or have run out of the toner colors runs out (including black toner), color printing will appear when the toner runs out. If Y, M, or C toner runs out but Bk toner remains, black and white printing will still be possible. Y : Yellow toner, M : Magenta toner, C : Cyan toner, Bk : Black toner Replace the toner cartridges of the indicated colors. • If...
... running low or have run out of the toner colors runs out (including black toner), color printing will appear when the toner runs out. If Y, M, or C toner runs out but Bk toner remains, black and white printing will still be possible. Y : Yellow toner, M : Magenta toner, C : Cyan toner, Bk : Black toner Replace the toner cartridges of the indicated colors. • If...

Operating Guide
Page 103
... shown and pull it out of the same color. 1-62 Contents Gently pull the toner cartridge horizontally toward you . Be sure to install a toner cartridge of the machine. Locations of a different color cannot be installed. Remove a new toner cartridge from its package and shake it out gently. If the cartridge is pulled out...
... shown and pull it out of the same color. 1-62 Contents Gently pull the toner cartridge horizontally toward you . Be sure to install a toner cartridge of the machine. Locations of a different color cannot be installed. Remove a new toner cartridge from its package and shake it out gently. If the cartridge is pulled out...

Operating Guide
Page 104
...the cartridge firmly in until it ). Close the front cover. Be sure to the machine. Always store toner cartridges on their side. • If a toner cartridge other than a SHARP-recommended toner cartridge is used, the machine may not attain full quality and performance and there is a risk of ...use a SHARP-recommended toner cartridge. • Keep the used toner cartridge. • To view the approximate amount of toner remaining will appear in a plastic bag (do not discard it clicks into a fire. When...
...the cartridge firmly in until it ). Close the front cover. Be sure to the machine. Always store toner cartridges on their side. • If a toner cartridge other than a SHARP-recommended toner cartridge is used, the machine may not attain full quality and performance and there is a risk of ...use a SHARP-recommended toner cartridge. • Keep the used toner cartridge. • To view the approximate amount of toner remaining will appear in a plastic bag (do not discard it clicks into a fire. When...

Operating Guide
Page 105
...will appear. BEFORE USING THE MACHINE REPLACING THE WASTE TONER BOX The waste toner box collects excess toner that has not been used. Open the front cover. 1 Release the used toner container." Move the lock of the waste toner box to replace the waste toner box. Store it will go as shown in the...is produced during printing. Follow the procedure below to the release position. Remove the waste toner box. When the waste toner box becomes full, "Replace used waste toner box. Release the lock of the waste toner box and let it fall forward as far as it on the left of about 30 ...
...will appear. BEFORE USING THE MACHINE REPLACING THE WASTE TONER BOX The waste toner box collects excess toner that has not been used. Open the front cover. 1 Release the used toner container." Move the lock of the waste toner box to replace the waste toner box. Store it will go as shown in the...is produced during printing. Follow the procedure below to the release position. Remove the waste toner box. When the waste toner box becomes full, "Replace used waste toner box. Release the lock of the waste toner box and let it fall forward as far as it on the left of about 30 ...

Operating Guide
Page 106
.... BEFORE USING THE MACHINE Place the box on the surface before placing the box. 4 • Do not point the holes down as used toner will spill out. • Do not discard the removed waste toner box. Toner may soil your clothes or the immediate surroundings. 1-65 Contents Place a sheet of the waste... toner box to when you removed it.) 5 Push the waste toner box into the machine. 6 Push the box in until it for maintenance. Move the lock of newspaper on a flat surface. Insert the box ...
.... BEFORE USING THE MACHINE Place the box on the surface before placing the box. 4 • Do not point the holes down as used toner will spill out. • Do not discard the removed waste toner box. Toner may soil your clothes or the immediate surroundings. 1-65 Contents Place a sheet of the waste... toner box to when you removed it.) 5 Push the waste toner box into the machine. 6 Push the box in until it for maintenance. Move the lock of newspaper on a flat surface. Insert the box ...

Operating Guide
Page 123
... cases where the same size of paper as shown above. • After placing the original, be sure to be copied black, causing excessive use of toner. Auto 2. 8½x11R 3. 8½x14 4. 11x17 File • To change the paper size manually. 2-14 Contents
... cases where the same size of paper as shown above. • After placing the original, be sure to be copied black, causing excessive use of toner. Auto 2. 8½x11R 3. 8½x14 4. 11x17 File • To change the paper size manually. 2-14 Contents

Operating Guide
Page 127
... 2-SIDED COPYING USING THE DOCUMENT GLASS Originals Copies COPIER Automatic 2-sided copying of the document size. Closing the automatic document feeder with the tip of toner. If left open, parts outside of the original will be copied black, causing excessive use of the arrow mark on the document glass, and then...
... 2-SIDED COPYING USING THE DOCUMENT GLASS Originals Copies COPIER Automatic 2-sided copying of the document size. Closing the automatic document feeder with the tip of toner. If left open, parts outside of the original will be copied black, causing excessive use of the arrow mark on the document glass, and then...
Operating Guide
Page 147
... "Pre-Printed", load the paper with print side face down in trays 1 to 5; Pull the bypass tray extension all the way out, the size of toner.
... "Pre-Printed", load the paper with print side face down in trays 1 to 5; Pull the bypass tray extension all the way out, the size of toner.


