
User Manual
Page 1
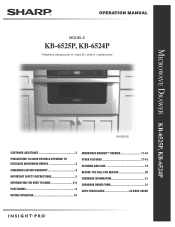
Operation Manual ModelS KB-6525P, KB-6524P Followed by indicating color: K = black, W = white, S = stainless steel Microwave Drawer KB-6525P, KB-6524P KB-6525PS Customer Assistance 3 Precautions to Avoid Possible Exposure to Excessive Microwave Energy 3 CONSUMER LIMITED warranty 4 important safety instructions 5 Information You Need To know 6-8 PART NameS 9 before operating 10 MICROWAVE DRAWER™ cooking 11-16 Other Features 17-18 cleaning and care 19 before you call for service 20 COOKBOOK INFORMATION 21 COOKBOOK ORDER FORM 21 Auto-Touch Guide 23-Back Cover
Operation Manual ModelS KB-6525P, KB-6524P Followed by indicating color: K = black, W = white, S = stainless steel Microwave Drawer KB-6525P, KB-6524P KB-6525PS Customer Assistance 3 Precautions to Avoid Possible Exposure to Excessive Microwave Energy 3 CONSUMER LIMITED warranty 4 important safety instructions 5 Information You Need To know 6-8 PART NameS 9 before operating 10 MICROWAVE DRAWER™ cooking 11-16 Other Features 17-18 cleaning and care 19 before you call for service 20 COOKBOOK INFORMATION 21 COOKBOOK ORDER FORM 21 Auto-Touch Guide 23-Back Cover

User Manual
Page 3
...number, serial number, date of purchase, your complete mailing address (including zip code), your authorized parts distributor) ADDITIONAL CUSTOMER INFORMATION TO WRITE: Sharp Electronics Corporation Customer Assistance Center 1300 Naperville Drive Romeoville, IL 60446-1091 Please provide the following ...SERIAL NUMBER DATE OF PURCHASE / / Dealer Telephone Servicer Telephone TO PHONE: DIAL 1-800-BE-SHARP (237-4277) for: SERVICE (for your nearest Sharp Authorized Servicer) PARTS (for your daytime telephone number (including area code) and description of the problem. TO ...
...number, serial number, date of purchase, your complete mailing address (including zip code), your authorized parts distributor) ADDITIONAL CUSTOMER INFORMATION TO WRITE: Sharp Electronics Corporation Customer Assistance Center 1300 Naperville Drive Romeoville, IL 60446-1091 Please provide the following ...SERIAL NUMBER DATE OF PURCHASE / / Dealer Telephone Servicer Telephone TO PHONE: DIAL 1-800-BE-SHARP (237-4277) for: SERVICE (for your nearest Sharp Authorized Servicer) PARTS (for your daytime telephone number (including area code) and description of the problem. TO ...
User Manual
Page 4
...USE ARE LIMITED TO THE PERIOD(S) FROM THE DATE OF PURCHASE SET FORTH BELOW. In no charge to the purchaser for parts or labor for parts only; From a Sharp Authorized Servicer located in the Product which has been subjected to the magnetron tube in design or construction. SAVE THE PROOF... its option, either repair the defect or replace the defective Product or part thereof with a new or remanufactured equivalent at 1-800-BE-SHARP (1-800-237-4277). We will also enable us to purchasers by calling 1-800-BE-SHARP. YOU MAY ALSO HAVE OTHER RIGHTS WHICH VARY FROM STATE TO STATE...
...USE ARE LIMITED TO THE PERIOD(S) FROM THE DATE OF PURCHASE SET FORTH BELOW. In no charge to the purchaser for parts or labor for parts only; From a Sharp Authorized Servicer located in the Product which has been subjected to the magnetron tube in design or construction. SAVE THE PROOF... its option, either repair the defect or replace the defective Product or part thereof with a new or remanufactured equivalent at 1-800-BE-SHARP (1-800-237-4277). We will also enable us to purchasers by calling 1-800-BE-SHARP. YOU MAY ALSO HAVE OTHER RIGHTS WHICH VARY FROM STATE TO STATE...
User Manual
Page 6
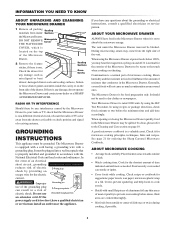
...Temporary Use indicated and add more as needed. The vent under the Microwave Drawer must be spilled. The Microwave Drawer is a normal part of microwave cooking. When opening or closing the Microwave Drawer quickly, food in the Microwave Drawer when it for the electric current. -...Should there be used to the touch when cooking or reheating. See page 21 for food preparation only. Condensation is for ordering the Sharp Carousel Microwave Cookbook. It should not be any questions about the grounding or electrical instructions, consult a qualified electrician or service person....
...Temporary Use indicated and add more as needed. The vent under the Microwave Drawer must be spilled. The Microwave Drawer is a normal part of microwave cooking. When opening or closing the Microwave Drawer quickly, food in the Microwave Drawer when it for the electric current. -...Should there be used to the touch when cooking or reheating. See page 21 for food preparation only. Condensation is for ordering the Sharp Carousel Microwave Cookbook. It should not be any questions about the grounding or electrical instructions, consult a qualified electrician or service person....
User Manual
Page 9
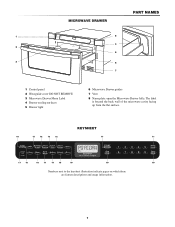
Microwave Drawer Part Names 1 8 4 2 5 3 6 7 1 Control panel 2 Waveguide cover DO NOT REMOVE 3 Microwave Drawer Menu Label 4 Drawer sealing surfaces 5 Drawer light 6 Microwave Drawer guides 7 Vent 8 Name plate: open the Microwave Drawer fully. KEYSHEET 18 15 12 13 12 17 11 17 16 16 17 14 15 10 10 10 Numbers next to the keysheet illustration indicate pages on which there are feature descriptions and usage information. 9 The label is beyond the back wall of the microwave cavity facing up from the flat surface.
Microwave Drawer Part Names 1 8 4 2 5 3 6 7 1 Control panel 2 Waveguide cover DO NOT REMOVE 3 Microwave Drawer Menu Label 4 Drawer sealing surfaces 5 Drawer light 6 Microwave Drawer guides 7 Vent 8 Name plate: open the Microwave Drawer fully. KEYSHEET 18 15 12 13 12 17 11 17 16 16 17 14 15 10 10 10 Numbers next to the keysheet illustration indicate pages on which there are feature descriptions and usage information. 9 The label is beyond the back wall of the microwave cavity facing up from the flat surface.
User Manual
Page 11
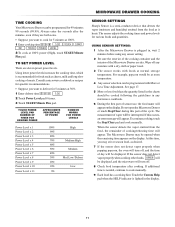
...% High 90% 80% 70% Medium High 60% 50% Medium 40% 30% Med Low/Defrost 20% 10% Low 0% Microwave Drawer cooking Sensor Settings Sharp's Sensor is plugged in, wait 2 minutes before using any sensor setting. 2 Be sure the exterior of the cooking container and the interior of the Microwave... the remaining time appears on the display. At this occurs, an error message will turn off any microwave cookbook. 6 During the first part of day will appear on the display. If additional time is recommended for various foods and quantities. Touch the Custom Help pad when the...
...% High 90% 80% 70% Medium High 60% 50% Medium 40% 30% Med Low/Defrost 20% 10% Low 0% Microwave Drawer cooking Sensor Settings Sharp's Sensor is plugged in, wait 2 minutes before using any sensor setting. 2 Be sure the exterior of the cooking container and the interior of the Microwave... the remaining time appears on the display. At this occurs, an error message will turn off any microwave cookbook. 6 During the first part of day will appear on the display. If additional time is recommended for various foods and quantities. Touch the Custom Help pad when the...
User Manual
Page 14
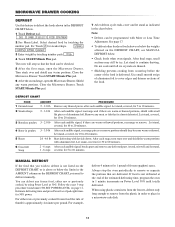
... oven signals. After final stage, small sections may still be programmed with aluminum foil. Defrost chart FOOD AMOUNT PROCEDURE 1 Ground meat .5 - 2.0 lb Remove any defrosted part. Let stand, covered, for 10 to 20 minutes. 3 Boneless poultry .5 - 2.0 lb After each audible signal, break apart and remove any thawed pieces after each stage...
... oven signals. After final stage, small sections may still be programmed with aluminum foil. Defrost chart FOOD AMOUNT PROCEDURE 1 Ground meat .5 - 2.0 lb Remove any defrosted part. Let stand, covered, for 10 to 20 minutes. 3 Boneless poultry .5 - 2.0 lb After each audible signal, break apart and remove any thawed pieces after each stage...
User Manual
Page 19
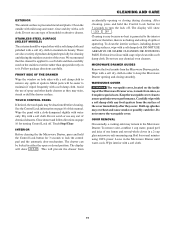
... accidentally opening and closing during cleaning. Built-up splashes may remain in order to turn the lock off . Exterior The outside with a soft cloth. Metal parts will show LOCK ON . Dry with a soft damp cloth. Interior Before cleaning the the Microwave Drawer, press and hold the Control Lock button for 3 seconds...
... accidentally opening and closing during cleaning. Built-up splashes may remain in order to turn the lock off . Exterior The outside with a soft cloth. Metal parts will show LOCK ON . Dry with a soft damp cloth. Interior Before cleaning the the Microwave Drawer, press and hold the Control Lock button for 3 seconds...
User Manual
Page 20
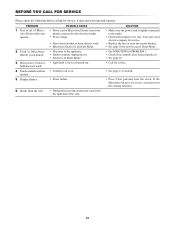
Problem 1 Part or all of Microwave Drawer does not operate. 2 Food in Microwave Drawer is not heated. 3 Microwave Drawer light does not work. 4 Touch controls will not ...
Problem 1 Part or all of Microwave Drawer does not operate. 2 Food in Microwave Drawer is not heated. 3 Microwave Drawer light does not work. 4 Touch controls will not ...