
CV-10NH Operation Manual
Page 3
...; CONSUMER LIMITED WARRANTY E-3 • PRECAUTIONS E-4 • LOCATION E-7 • INCLUDED E-7 • PART NAMES E-8 • INSTALL WINDOW PANEL E-10 • INSTALLATION AND REMOVAL OF EXHAUST HOSE .........E-14 • PRE-OPERATION CHECKS E-16 • COOL MODE E-18 • DEHUMIDIFICATION MODE E-19 ...OPERATION E-25 • DRAINAGE E-26 • MAINTENANCE E-27 • BEFORE CALLING FOR SERVICE E-28 E-1 This manual should be kept in a safe place for handy reference. ENGLISH ENGLISH This manual explains the proper use of your new air conditioner. Please read this manual...
...; CONSUMER LIMITED WARRANTY E-3 • PRECAUTIONS E-4 • LOCATION E-7 • INCLUDED E-7 • PART NAMES E-8 • INSTALL WINDOW PANEL E-10 • INSTALLATION AND REMOVAL OF EXHAUST HOSE .........E-14 • PRE-OPERATION CHECKS E-16 • COOL MODE E-18 • DEHUMIDIFICATION MODE E-19 ...OPERATION E-25 • DRAINAGE E-26 • MAINTENANCE E-27 • BEFORE CALLING FOR SERVICE E-28 E-1 This manual should be kept in a safe place for handy reference. ENGLISH ENGLISH This manual explains the proper use of your new air conditioner. Please read this manual...
CV-10NH Operation Manual
Page 7
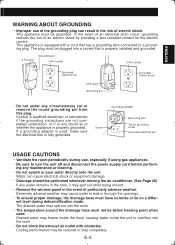
...- Cooling performance may spill out while being moved. • Remove the window panel in through the openings. • To ensure proper drainage, the drainage hose must not be reduced or stop completely. E-5 Drained water may cause water to whether the appliance is fully grounded. Consult a quali...causing water inside the unit to overflow into the room. • The temperature around the drainage hose must have no kinks or be performed whenever moving the air conditioner. (See Page 26) If any circumstances cut or remove the round grounding pin from this plug. ...
...- Cooling performance may spill out while being moved. • Remove the window panel in through the openings. • To ensure proper drainage, the drainage hose must not be reduced or stop completely. E-5 Drained water may cause water to whether the appliance is fully grounded. Consult a quali...causing water inside the unit to overflow into the room. • The temperature around the drainage hose must have no kinks or be performed whenever moving the air conditioner. (See Page 26) If any circumstances cut or remove the round grounding pin from this plug. ...
CV-10NH Operation Manual
Page 8
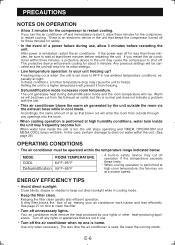
..., but this case, perform drainage to drain out water within three minutes, a protective device in use , allow three minutes for the compressor to restart cooling. The less time the air conditioner is reinstated, restart the air conditioner. If you restart the air conditioner within the unit. (See page 26) OPERATING CONDITIONS • The air conditioner must remove the heat...
..., but this case, perform drainage to drain out water within three minutes, a protective device in use , allow three minutes for the compressor to restart cooling. The less time the air conditioner is reinstated, restart the air conditioner. If you restart the air conditioner within the unit. (See page 26) OPERATING CONDITIONS • The air conditioner must remove the heat...
CV-10NH Operation Manual
Page 10
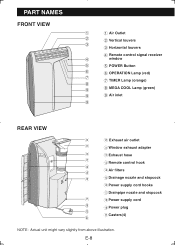
... 4 Remote control signal receiver 4 window 5 5 POWER Button 6 6 OPERATION Lamp (red) 7 7 TIMER Lamp (orange) 8 9 8 MEGA COOL Lamp (green) 9 9 Air inlet 9 REAR VIEW 0 0 Exhaust air outlet q q Window exhaust adapter w w Exhaust hose e e Remote control hook r t r Air filters y t Drainage nozzle and stopcock y Power supply cord hooks u Drainpipe nozzle and stopcock u i Power supply cord i o Power plug o p p Casters(4) NOTE...
... 4 Remote control signal receiver 4 window 5 5 POWER Button 6 6 OPERATION Lamp (red) 7 7 TIMER Lamp (orange) 8 9 8 MEGA COOL Lamp (green) 9 9 Air inlet 9 REAR VIEW 0 0 Exhaust air outlet q q Window exhaust adapter w w Exhaust hose e e Remote control hook r t r Air filters y t Drainage nozzle and stopcock y Power supply cord hooks u Drainpipe nozzle and stopcock u i Power supply cord i o Power plug o p p Casters(4) NOTE...
CV-10NH Operation Manual
Page 20
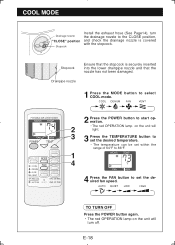
... LOW HIGH TO TURN OFF Press the POWER button again. • The red OPERATION lamp on the unit will turn the drainage nozzle to the CLOSE position, and check the drainage nozzle is securely inserted into the lower drainpipe nozzle and that the nozzle has not been damaged. 1 Press the MODE button...;F to 86°F. 1 4 4 Press the FAN button to select COOL mode. Stopcock Drainpipe nozzle Ensure that the stopcock is covered with the stopcock. COOL MODE Drainage nozzle "CLOSE" position Stopcock Install the exhaust hose (See Page14), turn off.
... LOW HIGH TO TURN OFF Press the POWER button again. • The red OPERATION lamp on the unit will turn the drainage nozzle to the CLOSE position, and check the drainage nozzle is securely inserted into the lower drainpipe nozzle and that the nozzle has not been damaged. 1 Press the MODE button...;F to 86°F. 1 4 4 Press the FAN button to select COOL mode. Stopcock Drainpipe nozzle Ensure that the stopcock is covered with the stopcock. COOL MODE Drainage nozzle "CLOSE" position Stopcock Install the exhaust hose (See Page14), turn off.
CV-10NH Operation Manual
Page 21
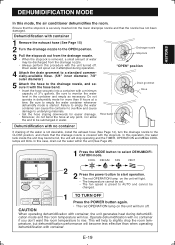
...than 8 hours at any point, nor allow the end to the CLOSE position, and check that the nozzle has not been damaged. Drainage nozzle Stopcock "OPEN" position 4 Attach the drain grommet to a standard commercially-available hose. (5/8" inner diameter, 7/8" outer diameter) ...drainage nozzle to rise. E-19 Do not operate in water. Moreover, do not bend the hose at a time. CAUTION When operating dehumidification with the unit turned off . Be sure to slightly drop the room temperature, but dehumidification performance will blink. In this mode, the air conditioner...
...than 8 hours at any point, nor allow the end to the CLOSE position, and check that the nozzle has not been damaged. Drainage nozzle Stopcock "OPEN" position 4 Attach the drain grommet to a standard commercially-available hose. (5/8" inner diameter, 7/8" outer diameter) ...drainage nozzle to rise. E-19 Do not operate in water. Moreover, do not bend the hose at a time. CAUTION When operating dehumidification with the unit turned off . Be sure to slightly drop the room temperature, but dehumidification performance will blink. In this mode, the air conditioner...
CV-10NH Operation Manual
Page 22
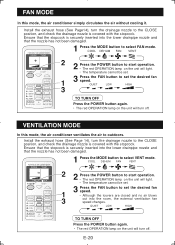
...HIGH 3 TO TURN OFF Press the POWER button again. • The red OPERATION lamp on the unit will turn the drainage nozzle to the CLOSE position, and check the drainage nozzle is covered with the stopcock. COOL DEHUM FAN VENT 2 2 Press the POWER button to start operation. •... hose (See Page 14), turn off . Install the exhaust hose (See Page14), turn off . FAN MODE In this mode, the air conditioner ventilates the air to outdoors. Ensure that the stopcock is securely inserted into the room, the external ventilation fan speed changes. QUIET LOW HIGH TO TURN OFF...
...HIGH 3 TO TURN OFF Press the POWER button again. • The red OPERATION lamp on the unit will turn the drainage nozzle to the CLOSE position, and check the drainage nozzle is covered with the stopcock. COOL DEHUM FAN VENT 2 2 Press the POWER button to start operation. •... hose (See Page 14), turn off . Install the exhaust hose (See Page14), turn off . FAN MODE In this mode, the air conditioner ventilates the air to outdoors. Ensure that the stopcock is securely inserted into the room, the external ventilation fan speed changes. QUIET LOW HIGH TO TURN OFF...
CV-10NH Operation Manual
Page 27
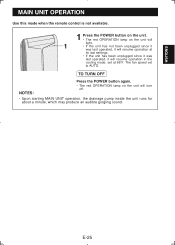
... last settings. • If the unit has been unplugged since it was last operated, it will turn off. • Upon starting MAIN UNIT operation, the drainage pump inside the unit runs for about a minute, which may produce an audible gurgling sound. E-25
... last settings. • If the unit has been unplugged since it was last operated, it will turn off. • Upon starting MAIN UNIT operation, the drainage pump inside the unit runs for about a minute, which may produce an audible gurgling sound. E-25
CV-10NH Operation Manual
Page 28
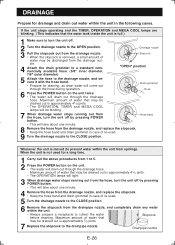
... commercially available hose. (5/8" inner diameter, 7/8" outer diameter) Stopcock "OPEN" position 5 Attach the hose to the drainage nozzle, and secure it with the hose band. • Prepare for drainage and drain out water within the unit. • Always prepare a receptacle to the OPEN position. If the unit... stops operating and the TIMER, OPERATION and MEGA COOL lamps are blinking. (This indicates that may be blinking. 7 When drainage water stops running out from the hose, turn the unit off by pressing POWER button. Hose band • This will take about one ...
... commercially available hose. (5/8" inner diameter, 7/8" outer diameter) Stopcock "OPEN" position 5 Attach the hose to the drainage nozzle, and secure it with the hose band. • Prepare for drainage and drain out water within the unit. • Always prepare a receptacle to the OPEN position. If the unit... stops operating and the TIMER, OPERATION and MEGA COOL lamps are blinking. (This indicates that may be blinking. 7 When drainage water stops running out from the hose, turn the unit off by pressing POWER button. Hose band • This will take about one ...
CV-10NH Operation Manual
Page 29
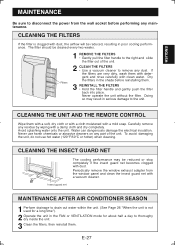
... unit, do not use harsh chemicals or abrasive cleaners on any residue by wiping with a damp cloth and dry completely. Insect guard net MAINTENANCE AFTER AIR CONDITIONER SEASON 1 Perform drainage to drain out water within the unit. (See Page 26 "When the unit is clogged with dust, the... airflow will be cleaned every two weeks. CLEANING THE INSECT GUARD NET The cooling performance may result in poor cooling performance. Avoid splashing water ...
... unit, do not use harsh chemicals or abrasive cleaners on any residue by wiping with a damp cloth and dry completely. Insect guard net MAINTENANCE AFTER AIR CONDITIONER SEASON 1 Perform drainage to drain out water within the unit. (See Page 26 "When the unit is clogged with dust, the... airflow will be cleaned every two weeks. CLEANING THE INSECT GUARD NET The cooling performance may result in poor cooling performance. Avoid splashing water ...
CV-10NH Operation Manual
Page 30
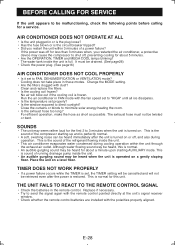
...the power plug. (See page16) AIR CONDITIONER DOES NOT COOL PROPERLY • Is it set to direct sunlight? This is the sound of the compressor starting AUXILIARY mode. Place the unit on or off, and also during cooling operation within 3 minutes of running drainage pump inside the unit. •...2 to 3 minutes when the unit is turned on a gently sloping floor. E-28 The water tank inside the unit. • This air conditioner evaporates water condensed during operation. SOUNDS • The unit may cause the compressor to shut off for less than 3 minutes when, you restart the...
...the power plug. (See page16) AIR CONDITIONER DOES NOT COOL PROPERLY • Is it set to direct sunlight? This is the sound of the compressor starting AUXILIARY mode. Place the unit on or off, and also during cooling operation within 3 minutes of running drainage pump inside the unit. •...2 to 3 minutes when the unit is turned on a gently sloping floor. E-28 The water tank inside the unit. • This air conditioner evaporates water condensed during operation. SOUNDS • The unit may cause the compressor to shut off for less than 3 minutes when, you restart the...


