
CV-P10NC Operation Manual
Page 3
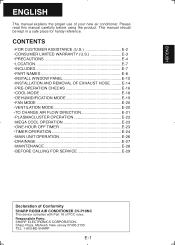
...• PRECAUTIONS E-4 • LOCATION E-7 • INCLUDED E-7 • PART NAMES E-8 • INSTALL WINDOW PANEL E-10 • INSTALLATION AND REMOVAL OF EXHAUST HOSE .........E-14 • PRE-OPERATION CHECKS E-16 • COOL MODE E-18 • DEHUMIDIFICATION MODE E-19 • FAN MODE E-20 • VENTILATION MODE E-...• DRAINAGE E-27 • MAINTENANCE E-28 • BEFORE CALLING FOR SERVICE E-29 Declaration of Conformity SHARP ROOM AIR CONDITIONER CV-P10NC This device complies with Part 18 of your new air conditioner. Please read this manual carefully before using ...
...• PRECAUTIONS E-4 • LOCATION E-7 • INCLUDED E-7 • PART NAMES E-8 • INSTALL WINDOW PANEL E-10 • INSTALLATION AND REMOVAL OF EXHAUST HOSE .........E-14 • PRE-OPERATION CHECKS E-16 • COOL MODE E-18 • DEHUMIDIFICATION MODE E-19 • FAN MODE E-20 • VENTILATION MODE E-...• DRAINAGE E-27 • MAINTENANCE E-28 • BEFORE CALLING FOR SERVICE E-29 Declaration of Conformity SHARP ROOM AIR CONDITIONER CV-P10NC This device complies with Part 18 of your new air conditioner. Please read this manual carefully before using ...
CV-P10NC Operation Manual
Page 7
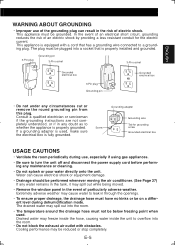
... This appliance is equipped with obstacles. Screw Grounding adapter Grounding wire Tab for the electric current. Extremely adverse weather may freeze inside the hose, causing water inside the unit to overflow into a socket that has a grounding wire connected to a grounding plug. The ...Remove the window panel in the risk of electric shock. This appliance must not be plugged into the room. • Do not block the exhaust air outlet with a cord that is properly grounded. ENGLISH WARNING ABOUT GROUNDING • Improper use , especially if using gas appliances. •...
... This appliance is equipped with obstacles. Screw Grounding adapter Grounding wire Tab for the electric current. Extremely adverse weather may freeze inside the hose, causing water inside the unit to overflow into a socket that has a grounding wire connected to a grounding plug. The ...Remove the window panel in the risk of electric shock. This appliance must not be plugged into the room. • Do not block the exhaust air outlet with a cord that is properly grounded. ENGLISH WARNING ABOUT GROUNDING • Improper use , especially if using gas appliances. •...
CV-P10NC Operation Manual
Page 8
There is an electronic device in the unit that blown out will enter the room from outside the room via the exhaust hose while in cooling mode. • Keep the filter clean. After power is used, the lower the running costs. Any previous settings will be canceled ...and the unit will rise. Accordingly, the same amount of air as that keeps the compressor turned off and immediately restart it from the Exhaust air outlet, but this case, perform drainage to drain out water within the unit. (See page 27) OPERATING CONDITIONS • The air conditioner must remove...
There is an electronic device in the unit that blown out will enter the room from outside the room via the exhaust hose while in cooling mode. • Keep the filter clean. After power is used, the lower the running costs. Any previous settings will be canceled ...and the unit will rise. Accordingly, the same amount of air as that keeps the compressor turned off and immediately restart it from the Exhaust air outlet, but this case, perform drainage to drain out water within the unit. (See page 27) OPERATING CONDITIONS • The air conditioner must remove...
CV-P10NC Operation Manual
Page 10
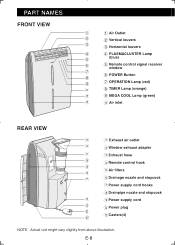
... Lamp 5 (blue) 6 5 Remote control signal receiver window 7 6 POWER Button 8 9 7 OPERATION Lamp (red) 0 8 TIMER Lamp (orange) 0 9 MEGA COOL Lamp (green) 0 0 Air inlet REAR VIEW q q Exhaust air outlet w w Window exhaust adapter e e Exhaust hose r r Remote control hook t t Air filters y u y Drainage nozzle and stopcock u Power supply cord hooks i Drainpipe nozzle and stopcock i o Power supply cord o p Power plug...
... Lamp 5 (blue) 6 5 Remote control signal receiver window 7 6 POWER Button 8 9 7 OPERATION Lamp (red) 0 8 TIMER Lamp (orange) 0 9 MEGA COOL Lamp (green) 0 0 Air inlet REAR VIEW q q Exhaust air outlet w w Window exhaust adapter e e Exhaust hose r r Remote control hook t t Air filters y u y Drainage nozzle and stopcock u Power supply cord hooks i Drainpipe nozzle and stopcock i o Power supply cord o p Power plug...
CV-P10NC Operation Manual
Page 16
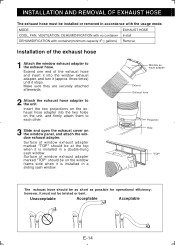
... on the window panel, and attach the window exhaust adapter. Window exhaust adapter Extend Exhaust hose Projection Hole "TOP" The exhaust hose should be twisted or bent. Extend one end of the exhaust hose 1 Attach the window exhaust adapter to the exhaust hose. Insert the two projections on the exhaust hose adapter into the window exhaust adapter, and turn it (approx. MODE COOL, FAN...
... on the window panel, and attach the window exhaust adapter. Window exhaust adapter Extend Exhaust hose Projection Hole "TOP" The exhaust hose should be twisted or bent. Extend one end of the exhaust hose 1 Attach the window exhaust adapter to the exhaust hose. Insert the two projections on the exhaust hose adapter into the window exhaust adapter, and turn it (approx. MODE COOL, FAN...
CV-P10NC Operation Manual
Page 17
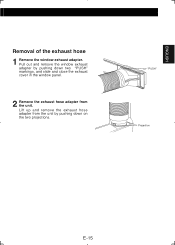
Lift up and remove the exhaust hose adapter from the unit. Pull out and remove the window exhaust adapter by pushing down two "PUSH" markings, and slide and close the exhaust cover in the window panel. 2 Remove the exhaust hose adapter from the unit by pushing down on the two projections. "PUSH" Projection E-15 ENGLISH Removal of the exhaust hose 1 Remove the window exhaust adapter.
Lift up and remove the exhaust hose adapter from the unit. Pull out and remove the window exhaust adapter by pushing down two "PUSH" markings, and slide and close the exhaust cover in the window panel. 2 Remove the exhaust hose adapter from the unit by pushing down on the two projections. "PUSH" Projection E-15 ENGLISH Removal of the exhaust hose 1 Remove the window exhaust adapter.
CV-P10NC Operation Manual
Page 20
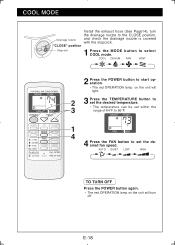
... again. • The red OPERATION lamp on the unit will turn the drainage nozzle to set the desired fan speed. E-18 COOL MODE Install the exhaust hose (See Page14), turn off. COOL DEHUM FAN VENT 2 Press the POWER button to start operation. • The red OPERATION lamp on the unit will light...
... again. • The red OPERATION lamp on the unit will turn the drainage nozzle to set the desired fan speed. E-18 COOL MODE Install the exhaust hose (See Page14), turn off. COOL DEHUM FAN VENT 2 Press the POWER button to start operation. • The red OPERATION lamp on the unit will light...
CV-P10NC Operation Manual
Page 21
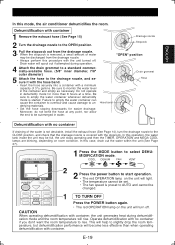
... into a container with no container If draining of the water is not desirable, install the exhaust hose (See Page 14), turn off . Operate dehumidification with a minimum capacity of water may be set. • The fan speed is started. Be sure ... you don't want the room temperature to rise. Do not operate in the container and empty as necessary. Dehumidification with container 1 Remove the exhaust hose (See Page 15) 2 Turn the drainage nozzle to the OPEN position. This will help to slightly drop the room temperature, but dehumidification performance...
... into a container with no container If draining of the water is not desirable, install the exhaust hose (See Page 14), turn off . Operate dehumidification with a minimum capacity of water may be set. • The fan speed is started. Be sure ... you don't want the room temperature to rise. Do not operate in the container and empty as necessary. Dehumidification with container 1 Remove the exhaust hose (See Page 15) 2 Turn the drainage nozzle to the OPEN position. This will help to slightly drop the room temperature, but dehumidification performance...
CV-P10NC Operation Manual
Page 22
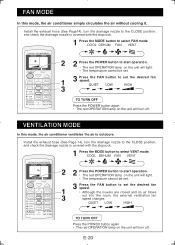
FAN MODE In this mode, the air conditioner ventilates the air to outdoors. Install the exhaust hose (See Page14), turn off . COOL DEHUM FAN VENT 2 2 Press the POWER button to start operation. • The red OPERATION lamp on the unit will light. &#... the CLOSE position, and check the drainage nozzle is covered with the stopcock. 1 Press the MODE button to set the desired fan speed. Install the exhaust hose (See Page 14), turn off . COOL DEHUM FAN VENT 2 2 Press the POWER button to start operation. • The red OPERATION lamp on the unit will...
FAN MODE In this mode, the air conditioner ventilates the air to outdoors. Install the exhaust hose (See Page14), turn off . COOL DEHUM FAN VENT 2 2 Press the POWER button to start operation. • The red OPERATION lamp on the unit will light. &#... the CLOSE position, and check the drainage nozzle is covered with the stopcock. 1 Press the MODE button to set the desired fan speed. Install the exhaust hose (See Page 14), turn off . COOL DEHUM FAN VENT 2 2 Press the POWER button to start operation. • The red OPERATION lamp on the unit will...
CV-P10NC Operation Manual
Page 31
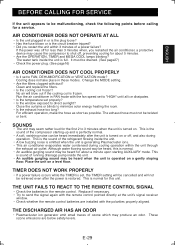
...condensed during operation. THE DISCHARGED AIR HAS AN ODOR • Plasmacluster ion generator emit small traces of the compressor starting AUXILIARY mode. The exhaust hose must be retrieved even after the unit is the sound of ozone which may seem rather loud for a service. These ozone emissions are... malfunctioning, check the following points before calling for the first 2 to minimize solar energy heating the room. • Is the exhaust hose too long? THE UNIT FAILS TO REACT TO THE REMOTE CONTROL SIGNAL • Check the batteries in these modes. This is frozen.
...condensed during operation. THE DISCHARGED AIR HAS AN ODOR • Plasmacluster ion generator emit small traces of the compressor starting AUXILIARY mode. The exhaust hose must be retrieved even after the unit is the sound of ozone which may seem rather loud for a service. These ozone emissions are... malfunctioning, check the following points before calling for the first 2 to minimize solar energy heating the room. • Is the exhaust hose too long? THE UNIT FAILS TO REACT TO THE REMOTE CONTROL SIGNAL • Check the batteries in these modes. This is frozen.


