
CV-P10NC Operation Manual
Page 3
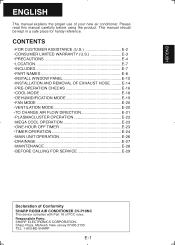
...product. Responsible Party: SHARP ELECTRONICS CORPORATION. CONTENTS • FOR CUSTOMER ASSISTANCE (U.S E-2 • CONSUMER LIMITED WARRANTY (U.S E-3 • PRECAUTIONS E-4 • LOCATION E-7 • INCLUDED E-7 • PART NAMES E-8 • INSTALL WINDOW PANEL E-10 • INSTALLATION AND REMOVAL OF EXHAUST HOSE .........E-14 • ...8226; DRAINAGE E-27 • MAINTENANCE E-28 • BEFORE CALLING FOR SERVICE E-29 Declaration of Conformity SHARP ROOM AIR CONDITIONER CV-P10NC This device complies with Part 18 of your new air conditioner. This manual should be kept in ...
...product. Responsible Party: SHARP ELECTRONICS CORPORATION. CONTENTS • FOR CUSTOMER ASSISTANCE (U.S E-2 • CONSUMER LIMITED WARRANTY (U.S E-3 • PRECAUTIONS E-4 • LOCATION E-7 • INCLUDED E-7 • PART NAMES E-8 • INSTALL WINDOW PANEL E-10 • INSTALLATION AND REMOVAL OF EXHAUST HOSE .........E-14 • ...8226; DRAINAGE E-27 • MAINTENANCE E-28 • BEFORE CALLING FOR SERVICE E-29 Declaration of Conformity SHARP ROOM AIR CONDITIONER CV-P10NC This device complies with Part 18 of your new air conditioner. This manual should be kept in ...
CV-P10NC Operation Manual
Page 7
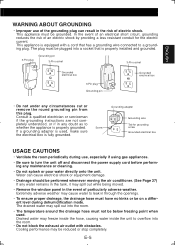
...the air conditioner. (See Page 27) If any water remains in the tank, it may spill out into the room. • Do not block the exhaust air outlet with a cord that is properly installed and grounded. 3-Pin plug Grounding pin 3-Pin socket 3-Pin socket Grounded electrical box 3-Pin plug Grounding pin... • Do not splash or pour water directly onto the unit. Water can result in through the openings. • To ensure proper drainage, the drainage hose must have no kinks or be reduced or stop completely. Drained water may be on a different level during dehumidification mode.
...the air conditioner. (See Page 27) If any water remains in the tank, it may spill out into the room. • Do not block the exhaust air outlet with a cord that is properly installed and grounded. 3-Pin plug Grounding pin 3-Pin socket 3-Pin socket Grounded electrical box 3-Pin plug Grounding pin... • Do not splash or pour water directly onto the unit. Water can result in through the openings. • To ensure proper drainage, the drainage hose must have no kinks or be reduced or stop completely. Drained water may be on a different level during dehumidification mode.
CV-P10NC Operation Manual
Page 8
... sunlight while in cool mode. Your air conditioner must be canceled and the unit will enter the room from outside the room via the exhaust hose while in cooling mode. • Keep the filter clean. In these limits. • When cooling operation is full, the ...; Turn off unnecessary lights. Warm air will prevent it , allow 3 minutes before restarting the unit. Turn off and immediately restart it from the Exhaust air outlet, but this case, perform drainage to wait at night. PRECAUTIONS NOTES ON OPERATION • Allow 3 minutes for the compressor to freeze....
... sunlight while in cool mode. Your air conditioner must be canceled and the unit will enter the room from outside the room via the exhaust hose while in cooling mode. • Keep the filter clean. In these limits. • When cooling operation is full, the ...; Turn off unnecessary lights. Warm air will prevent it , allow 3 minutes before restarting the unit. Turn off and immediately restart it from the Exhaust air outlet, but this case, perform drainage to wait at night. PRECAUTIONS NOTES ON OPERATION • Allow 3 minutes for the compressor to freeze....
CV-P10NC Operation Manual
Page 10
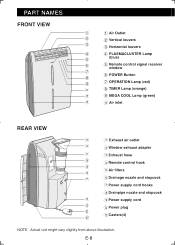
... Lamp 5 (blue) 6 5 Remote control signal receiver window 7 6 POWER Button 8 9 7 OPERATION Lamp (red) 0 8 TIMER Lamp (orange) 0 9 MEGA COOL Lamp (green) 0 0 Air inlet REAR VIEW q q Exhaust air outlet w w Window exhaust adapter e e Exhaust hose r r Remote control hook t t Air filters y u y Drainage nozzle and stopcock u Power supply cord hooks i Drainpipe nozzle and stopcock i o Power supply cord o p Power plug...
... Lamp 5 (blue) 6 5 Remote control signal receiver window 7 6 POWER Button 8 9 7 OPERATION Lamp (red) 0 8 TIMER Lamp (orange) 0 9 MEGA COOL Lamp (green) 0 0 Air inlet REAR VIEW q q Exhaust air outlet w w Window exhaust adapter e e Exhaust hose r r Remote control hook t t Air filters y u y Drainage nozzle and stopcock u Power supply cord hooks i Drainpipe nozzle and stopcock i o Power supply cord o p Power plug...
CV-P10NC Operation Manual
Page 16
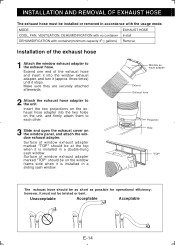
...exhaust hose adapter to the exhaust hose. Window exhaust adapter Extend Exhaust hose Projection Hole "TOP" The exhaust hose should be twisted or bent. however, it must be at the top when it is installed in accordance with container(minimum capacity 31/2 gallons) EXHAUST HOSE Install Remove Installation of the exhaust hose and insert it (approx. INSTALLATION AND REMOVAL OF EXHAUST HOSE The exhaust hose...installed in a double-hung sash window. Insert the two projections on the exhaust hose adapter into the window exhaust adapter, and turn it into the two holes on the unit, and...
...exhaust hose adapter to the exhaust hose. Window exhaust adapter Extend Exhaust hose Projection Hole "TOP" The exhaust hose should be twisted or bent. however, it must be at the top when it is installed in accordance with container(minimum capacity 31/2 gallons) EXHAUST HOSE Install Remove Installation of the exhaust hose and insert it (approx. INSTALLATION AND REMOVAL OF EXHAUST HOSE The exhaust hose...installed in a double-hung sash window. Insert the two projections on the exhaust hose adapter into the window exhaust adapter, and turn it into the two holes on the unit, and...
CV-P10NC Operation Manual
Page 17
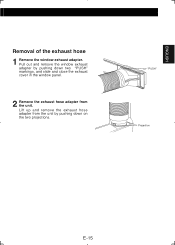
Lift up and remove the exhaust hose adapter from the unit. ENGLISH Removal of the exhaust hose 1 Remove the window exhaust adapter. "PUSH" Projection E-15 Pull out and remove the window exhaust adapter by pushing down two "PUSH" markings, and slide and close the exhaust cover in the window panel. 2 Remove the exhaust hose adapter from the unit by pushing down on the two projections.
Lift up and remove the exhaust hose adapter from the unit. ENGLISH Removal of the exhaust hose 1 Remove the window exhaust adapter. "PUSH" Projection E-15 Pull out and remove the window exhaust adapter by pushing down two "PUSH" markings, and slide and close the exhaust cover in the window panel. 2 Remove the exhaust hose adapter from the unit by pushing down on the two projections.
CV-P10NC Operation Manual
Page 20
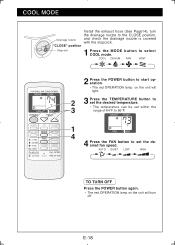
... Stopcock 1 Press the MODE button to the CLOSE position, Drainage nozzle and check the drainage nozzle is covered with the stopcock. COOL MODE Install the exhaust hose (See Page14), turn off. AUTO QUIET LOW HIGH TO TURN OFF Press the POWER button again. • The red OPERATION lamp on the unit will...
... Stopcock 1 Press the MODE button to the CLOSE position, Drainage nozzle and check the drainage nozzle is covered with the stopcock. COOL MODE Install the exhaust hose (See Page14), turn off. AUTO QUIET LOW HIGH TO TURN OFF Press the POWER button again. • The red OPERATION lamp on the unit will...
CV-P10NC Operation Manual
Page 21
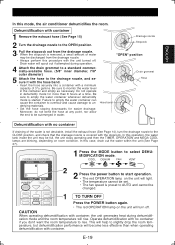
... the drainage nozzle, and secure it with a minimum capacity of the water is not desirable, install the exhaust hose (See Page 14), turn off . Dehumidification with no container If draining of 31/2 gallons. DEHUMIDIFICATION MODE Drain water will rise. ... downwards for more than when operating dehumidification with the stopcock. Moreover, do not bend the hose at a time. Operate dehumidification with container 1 Remove the exhaust hose (See Page 15) 2 Turn the drainage nozzle to be set. • The fan speed is covered with container. COOL DEHUM FAN VENT...
... the drainage nozzle, and secure it with a minimum capacity of the water is not desirable, install the exhaust hose (See Page 14), turn off . Dehumidification with no container If draining of 31/2 gallons. DEHUMIDIFICATION MODE Drain water will rise. ... downwards for more than when operating dehumidification with the stopcock. Moreover, do not bend the hose at a time. Operate dehumidification with container 1 Remove the exhaust hose (See Page 15) 2 Turn the drainage nozzle to be set. • The fan speed is covered with container. COOL DEHUM FAN VENT...
CV-P10NC Operation Manual
Page 22
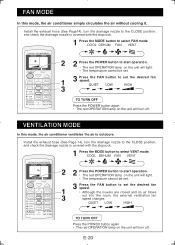
...QUIET LOW HIGH 3 TO TURN OFF Press the POWER button again. • The red OPERATION lamp on the unit will turn off . Install the exhaust hose (See Page14), turn the drainage nozzle to the CLOSE position, and check the drainage nozzle is covered with the stopcock. 1 Press the MODE button... to set the desired fan speed. E-20 FAN MODE In this mode, the air conditioner ventilates the air to select FAN mode. Install the exhaust hose (See Page 14), turn the drainage nozzle to the CLOSE position, and check the drainage nozzle is covered with the stopcock. 1 Press the...
...QUIET LOW HIGH 3 TO TURN OFF Press the POWER button again. • The red OPERATION lamp on the unit will turn off . Install the exhaust hose (See Page14), turn the drainage nozzle to the CLOSE position, and check the drainage nozzle is covered with the stopcock. 1 Press the MODE button... to set the desired fan speed. E-20 FAN MODE In this mode, the air conditioner ventilates the air to select FAN mode. Install the exhaust hose (See Page 14), turn the drainage nozzle to the CLOSE position, and check the drainage nozzle is covered with the stopcock. 1 Press the...
CV-P10NC Operation Manual
Page 31
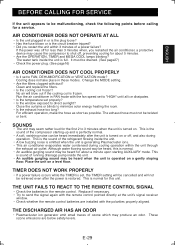
...Are the filters clogged with the polarities properly aligned. For efficient operation, make the hose as short as possible. SOUNDS • The unit may produce an odor. Close the curtains or blinds... rather loud for the first 2 to minimize solar energy heating the room. • Is the exhaust hose too long? If the power was off for a service. Run the air conditioner in or is the... plug loose? • Has the fuse blown or is full. The exhaust hose must be malfunctioning, check the following points before calling for less than 3 minutes when, you restart ...
...Are the filters clogged with the polarities properly aligned. For efficient operation, make the hose as short as possible. SOUNDS • The unit may produce an odor. Close the curtains or blinds... rather loud for the first 2 to minimize solar energy heating the room. • Is the exhaust hose too long? If the power was off for a service. Run the air conditioner in or is the... plug loose? • Has the fuse blown or is full. The exhaust hose must be malfunctioning, check the following points before calling for less than 3 minutes when, you restart ...


