
Instructions for Use
Page 48
... series ew 300 G2 4 The channel bank system ...4 Safety instructions 5 System variants ...5 Overview of operating controls 6 EM 300 G2 rack-mount receiver 6 SK 300 G2 bodypack transmitter 7 SKM 300 G2 radiomicrophone 8 Indications and displays on the receiver 9 Indications and displays on the transmitters 10 Preparing the components for use 12 EM 300 G2 rack-mount receiver 12 SK 300 G2 bodypack transmitter 15 SKM 300 G2 radiomicrophone...
... series ew 300 G2 4 The channel bank system ...4 Safety instructions 5 System variants ...5 Overview of operating controls 6 EM 300 G2 rack-mount receiver 6 SK 300 G2 bodypack transmitter 7 SKM 300 G2 radiomicrophone 8 Indications and displays on the receiver 9 Indications and displays on the transmitters 10 Preparing the components for use 12 EM 300 G2 rack-mount receiver 12 SK 300 G2 bodypack transmitter 15 SKM 300 G2 radiomicrophone...

Instructions for Use
Page 50
...345 / w 365 / XX X XXX X XX X XXX X XX X xXX X XX XXX XX X X XXXX X X X XXXX X X X XXXX X 5 System variants Areas of application EM 300 G2 SKM 300 G2 SK 300 G2 ME 4 ME 3 headmic ME 2 System w 312 / w 322 / w 352 / w 372 / w 335 / w 345 / w 365 / Areas of this instruction, the warranty becomes null and...) Vocals, presentation (high feedback rejection) Delivery includes EM 300 G2 SK 300 G2 SKM 300 G2 with MD 835 mic head (dynamic, cardioid) SKM 300 G2 with MD 845 mic head (dynamic, super-cardioid) SKM 300 G2 with ME 865 mic head (condenser, super-cardioid)...
...345 / w 365 / XX X XXX X XX X XXX X XX X xXX X XX XXX XX X X XXXX X X X XXXX X X X XXXX X 5 System variants Areas of application EM 300 G2 SKM 300 G2 SK 300 G2 ME 4 ME 3 headmic ME 2 System w 312 / w 322 / w 352 / w 372 / w 335 / w 345 / w 365 / Areas of this instruction, the warranty becomes null and...) Vocals, presentation (high feedback rejection) Delivery includes EM 300 G2 SK 300 G2 SKM 300 G2 with MD 835 mic head (dynamic, cardioid) SKM 300 G2 with MD 845 mic head (dynamic, super-cardioid) SKM 300 G2 with ME 865 mic head (condenser, super-cardioid)...
Instructions for Use
Page 51
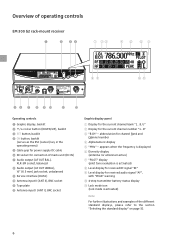
Overview of operating controls EM 300 G2 rack-mount receiver ³ · »¿ ቨ ቩቪ ቫቭ ¸ ¹ Operating controls ³ Graphic display, backlit · ̄/̆ rocker button (...
Overview of operating controls EM 300 G2 rack-mount receiver ³ · »¿ ቨ ቩቪ ቫቭ ¸ ¹ Operating controls ³ Graphic display, backlit · ̄/̆ rocker button (...
Instructions for Use
Page 55
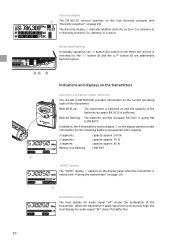
... /the accupack BA 2015 is muted (see "Diversity reception" on and the capacity of the batteries/accupack BA 2015 is sufficient. Diversity display ቧ The EM 300 G2 receiver operates on the true diversity principle (see "Muting the transmitters" on page 19). ቨ Modulation display The level display for audio signal "AF" shows...
... /the accupack BA 2015 is muted (see "Diversity reception" on and the capacity of the batteries/accupack BA 2015 is sufficient. Diversity display ቧ The EM 300 G2 receiver operates on the true diversity principle (see "Muting the transmitters" on page 19). ቨ Modulation display The level display for audio signal "AF" shows...
Instructions for Use
Page 57
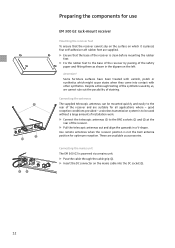
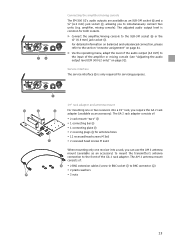
... in the digram on which might cause stains when they come into the DC socket ². 12 Attention! These are suitable for use EM 300 G2 rack-mount receiver Mounting the receiver feet To ensure that the base of the receiver is to the BNC sockets µ and ¹...a wireless transmission system is clean before mounting the rubber feet. ̈ Fix the rubber feet to the rear of staining. Connecting the mains unit The EM 300 G2 is not the best antenna position for optimum reception. Ƹ ¹ µ ᕥᕦ Preparing the components for all applications where - Use ...
... in the digram on which might cause stains when they come into the DC socket ². 12 Attention! These are suitable for use EM 300 G2 rack-mount receiver Mounting the receiver feet To ensure that the base of the receiver is to the BNC sockets µ and ¹...a wireless transmission system is clean before mounting the rubber feet. ̈ Fix the rubber feet to the rear of staining. Connecting the mains unit The EM 300 G2 is not the best antenna position for optimum reception. Ƹ ¹ µ ᕥᕦ Preparing the components for all applications where - Use ...
Instructions for Use
Page 58
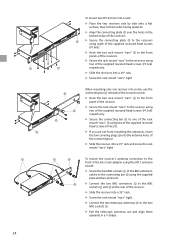
... console to simultaneously connect two units (e.g. The AM 2 antenna mount consists of the amplifier or mixing console (see "Adjusting the audio output level (EM 300 G2 only)" on page 41. ̈ Via the operating menu, adapt the level of the audio output (AF OUT) to the input of : ... the transmitter's antenna connection to BNC connector ƾ) y 2 plains washers ƾ y 2 nuts 13 ᕧᕨ Connecting the amplifier/mixing console The EM 300 G2's audio outputs are available as an XLR-3M socket ¶ and a ¼" (6.3 mm) jack socket º, allowing you to the XLR-3M socket...
... console to simultaneously connect two units (e.g. The AM 2 antenna mount consists of the amplifier or mixing console (see "Adjusting the audio output level (EM 300 G2 only)" on page 41. ̈ Via the operating menu, adapt the level of the audio output (AF OUT) to the input of : ... the transmitter's antenna connection to BNC connector ƾ) y 2 plains washers ƾ y 2 nuts 13 ᕧᕨ Connecting the amplifier/mixing console The EM 300 G2's audio outputs are available as an XLR-3M socket ¶ and a ¼" (6.3 mm) jack socket º, allowing you to the XLR-3M socket...
Instructions for Use
Page 59
ƹ ƹ ƾ To mount two EM 300 G2 into a rack: ̈ Place the two receivers side by side onto a flat surface, their bottom sides facing upwards. ̈ Align the connecting plate ƻ over ...
ƹ ƹ ƾ To mount two EM 300 G2 into a rack: ̈ Place the two receivers side by side onto a flat surface, their bottom sides facing upwards. ̈ Align the connecting plate ƻ over ...
Instructions for Use
Page 65
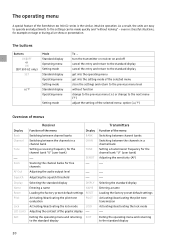
...deactivating the lock mode ⎯ Exiting the operating menu and returning to the standard display 20 The buttons Buttons ON/OFF or ON (EM 300 G2 only) SET ̆/̄ Mode Standard display Operating menu Setting mode Standard display Operating menu Setting mode Standard display Operating menu Setting ... standard display cancel the entry and return to the standard display get into the operating menu get into the setting mode of the Sennheiser ew 300 G2 series is the similar, intuitive operation. The operating menu A special feature of the selected menu store the settings and return to...
...deactivating the lock mode ⎯ Exiting the operating menu and returning to the standard display 20 The buttons Buttons ON/OFF or ON (EM 300 G2 only) SET ̆/̄ Mode Standard display Operating menu Setting mode Standard display Operating menu Setting mode Standard display Operating menu Setting ... standard display cancel the entry and return to the standard display get into the operating menu get into the setting mode of the Sennheiser ew 300 G2 series is the similar, intuitive operation. The operating menu A special feature of the selected menu store the settings and return to...
Instructions for Use
Page 66
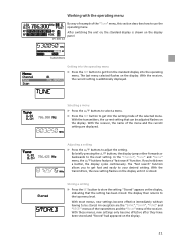
... the "Tune" menu, this section describes how to your desired setting. "Stored" appears on the display. The last menu selected flashes on the display panel. EM 300 G2 Transmitters Getting into the setting mode of the receiver. If you to be adjusted flashes on the display, indicating that can be stored. An exception...
... the "Tune" menu, this section describes how to your desired setting. "Stored" appears on the display. The last menu selected flashes on the display panel. EM 300 G2 Transmitters Getting into the setting mode of the receiver. If you to be adjusted flashes on the display, indicating that can be stored. An exception...

Instructions for Use
Page 67
Exiting the operating menu ̈ Select the "Exit" menu to exit the operating menu and to return to the standard display. 22 by briefly pressing the ON/OFF or POWER button, you have entered the operating menu, the ON/OFF button or the ON button (EM 300 G2 receiver only) serves as the ESC (cancel) key, i.e. When you cancel your entry and return to the standard display.
Exiting the operating menu ̈ Select the "Exit" menu to exit the operating menu and to return to the standard display. 22 by briefly pressing the ON/OFF or POWER button, you have entered the operating menu, the ON/OFF button or the ON button (EM 300 G2 receiver only) serves as the ESC (cancel) key, i.e. When you cancel your entry and return to the standard display.
Instructions for Use
Page 73
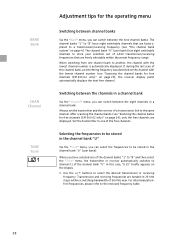
..."Tune" menu, the transmitter or receiver automatically switches to a transmission/receiving frequency (see "Scanning the channel banks for free channels (EM 300 G2 only)" on page 29), only the free channels are displayed. Always set the transmitter and the receiver of 1440 transmission/receiving frequencies ... frequencies, please refer to another, the channel with the lowest channel number (see "Scanning the channel banks for free channels (EM 300 G2 only)" on page 29), the receiver display panel automatically displays the next free channel. The channel banks "1" to "8" have selected...
..."Tune" menu, the transmitter or receiver automatically switches to a transmission/receiving frequency (see "Scanning the channel banks for free channels (EM 300 G2 only)" on page 29), only the free channels are displayed. Always set the transmitter and the receiver of 1440 transmission/receiving frequencies ... frequencies, please refer to another, the channel with the lowest channel number (see "Scanning the channel banks for free channels (EM 300 G2 only)" on page 29), the receiver display panel automatically displays the next free channel. The channel banks "1" to "8" have selected...
Instructions for Use
Page 74
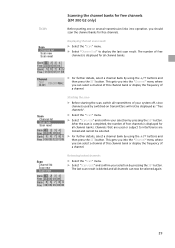
... of this channel bank or display the frequency of free channels is displayed for free channels. Scan Scanning the channel banks for free channels (EM 300 G2 only) Before putting one or several transmission links into operation, you should scan the channel banks for all channel banks. This gets you into... and cannot be selected again. 29 Bank 1 2 3 4 Free 08 08 03 04 Bank 5 6 7 8 U Free 06 08 02 01 08 Channel 1.01 786.300 MHz B.CH ̈ For further details, select a channel bank by pressing the SET button. Scan Channel list Scan new Scan reset Displaying the last scan...
... of this channel bank or display the frequency of free channels is displayed for free channels. Scan Scanning the channel banks for free channels (EM 300 G2 only) Before putting one or several transmission links into operation, you should scan the channel banks for all channel banks. This gets you into... and cannot be selected again. 29 Bank 1 2 3 4 Free 08 08 03 04 Bank 5 6 7 8 U Free 06 08 02 01 08 Channel 1.01 786.300 MHz B.CH ̈ For further details, select a channel bank by pressing the SET button. Scan Channel list Scan new Scan reset Displaying the last scan...
Instructions for Use
Page 76
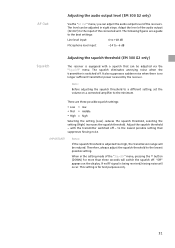
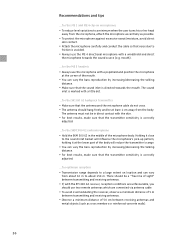
...is adjusted too high, the transmission range will switch the squelch off. Adjust the squelch threshold - to -6 dB Squelch Adjusting the squelch threshold (EM 300 G2 only) The receiver is for more than three seconds will be adjusted in the setting mode of the "Squelch" menu, pressing the ̄ ...for test purposes only. 31 Notes: If the squelch threshold is no RF signal is switched off - AF Out Adjusting the audio output level (EM 300 G2 only) Via the "AF Out" menu, you can adjust the audio output level of the connected unit. When in eight steps. This setting...
...is adjusted too high, the transmission range will switch the squelch off. Adjust the squelch threshold - to -6 dB Squelch Adjusting the squelch threshold (EM 300 G2 only) The receiver is for more than three seconds will be adjusted in the setting mode of the "Squelch" menu, pressing the ̄ ...for test purposes only. 31 Notes: If the squelch threshold is no RF signal is switched off - AF Out Adjusting the audio output level (EM 300 G2 only) Via the "AF Out" menu, you can adjust the audio output level of the connected unit. When in eight steps. This setting...

Instructions for Use
Page 77
DISPLY Display Selecting the standard display Via the "Display" menu, you can select the standard display: EM 300 G2 rack-mount receiver Selectable standard display "Main" (standard display) Contents of standard display "Frequency" (display of the frequency) "Bank/Channel" (display of the channel bank... freely selectable name) "AF meter" (graphic display of the AF level) "Second RF" (display of the RF levels of the two diversity sections) SK 300 G2 body pack transmitter and SKM 300 G2 radiomicrophone Selectable standard display "FREQ" Contents of standard display "NAME" "CHAN" 32
DISPLY Display Selecting the standard display Via the "Display" menu, you can select the standard display: EM 300 G2 rack-mount receiver Selectable standard display "Main" (standard display) Contents of standard display "Frequency" (display of the frequency) "Bank/Channel" (display of the channel bank... freely selectable name) "AF meter" (graphic display of the AF level) "Second RF" (display of the RF levels of the two diversity sections) SK 300 G2 body pack transmitter and SKM 300 G2 radiomicrophone Selectable standard display "FREQ" Contents of standard display "NAME" "CHAN" 32

Instructions for Use
Page 79
To deactivate the lock mode, first press the SET button and then press the ̆/ EM 300 G2 ̄ buttons to the standard display. 34 Transmitters LCD-Contr Adjusting the contrast of the graphic display in 16 steps. The lock mode prevents that ... the operating menu Via the "Exit" menu, you can activate or deactiveate the lock mode. If you can adjust the contrast of the graphic display (EM 300 G2 only) Via the "LCD Contr" menu, you confirm your selection by pressing the SET button, the buttons can be operated as usual. Activating/deactivating the...
To deactivate the lock mode, first press the SET button and then press the ̆/ EM 300 G2 ̄ buttons to the standard display. 34 Transmitters LCD-Contr Adjusting the contrast of the graphic display in 16 steps. The lock mode prevents that ... the operating menu Via the "Exit" menu, you can activate or deactiveate the lock mode. If you can adjust the contrast of the graphic display (EM 300 G2 only) Via the "LCD Contr" menu, you confirm your selection by pressing the SET button, the buttons can be operated as usual. Activating/deactivating the...
Instructions for Use
Page 80
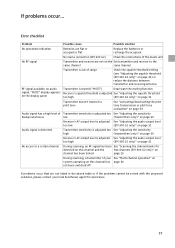
..." display appears Receiver's squelch threshold is adjusted See "Adjusting the squelch threshold on the display panel too high (EM 300 G2 only)" on page 31 Transmitter doesn't transmit a pilot tone See "Activating/deactivating the pilot tone transmission or pilot...)" on page 30 Receiver's AF output level is adjusted See "Adjusting the audio output level too low (EM 300 G2 only)" on page 31 Audio signal is distorted Transmitter sensitivity is adjusted too See "Adjusting the sensitivity high ... with the proposed solutions, please contact your local Sennheiser agent for assistance. 35
..." display appears Receiver's squelch threshold is adjusted See "Adjusting the squelch threshold on the display panel too high (EM 300 G2 only)" on page 31 Transmitter doesn't transmit a pilot tone See "Activating/deactivating the pilot tone transmission or pilot...)" on page 30 Receiver's AF output level is adjusted See "Adjusting the audio output level too low (EM 300 G2 only)" on page 31 Audio signal is distorted Transmitter sensitivity is adjusted too See "Adjusting the sensitivity high ... with the proposed solutions, please contact your local Sennheiser agent for assistance. 35
Instructions for Use
Page 81
... the transmitter sensitivity is marked with a windshield and direct the microphone towards the mouth. for the SKM 300 G2 radiomicrophone y Hold the SKM 300 G2 in direct contact with the EM 300 G2 receiver, reception conditions are unfavourable, you should use two remote antennas which are connected via antenna cable. ... y Attach the microphone carefully and conduct the cable so that the antenna and the microphone cable do not cross. for the SK 300 G2 bodypack transmitter y Make sure that noise due to a minimum when the user turns his or her head away from about 150 m. ...
... the transmitter sensitivity is marked with a windshield and direct the microphone towards the mouth. for the SKM 300 G2 radiomicrophone y Hold the SKM 300 G2 in direct contact with the EM 300 G2 receiver, reception conditions are unfavourable, you should use two remote antennas which are connected via antenna cable. ... y Attach the microphone carefully and conduct the cable so that the antenna and the microphone cable do not cross. for the SK 300 G2 bodypack transmitter y Make sure that noise due to a minimum when the user turns his or her head away from about 150 m. ...
Instructions for Use
Page 84
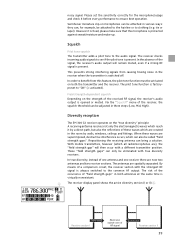
Sennheiser miniature clip-on the "true diversity" principle: A receiving antenna receives not only the electromagnetic waves which reach it by walls, windows, ceilings and fittings. The .... This prevents strong interfering signals from this feature, the pilot tone function must be attached in both the transmitter and the receiver. Diversity reception The EM 300 G2 receiver operates on microphones can , for the microphone/usage and check it is fixed, please make sure that the microphone is present. tie or lapel...
Sennheiser miniature clip-on the "true diversity" principle: A receiving antenna receives not only the electromagnetic waves which reach it by walls, windows, ceilings and fittings. The .... This prevents strong interfering signals from this feature, the pilot tone function must be attached in both the transmitter and the receiver. Diversity reception The EM 300 G2 receiver operates on microphones can , for the microphone/usage and check it is fixed, please make sure that the microphone is present. tie or lapel...
Instructions for Use
Page 85
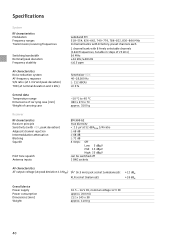
...AF characteristics Noise reduction system AF frequency response S/N ratio (at 1 mV and peak deviation) THD (at nominal deviation and 1 kHz) Sennheiser HDX 40-18,000 Hz ≥ 112 dB(A) ≤0.9 % General data Temperature range Dimensions of carrying case [mm] Weight of ...approx. 3100 g Receiver RF characteristics Receiver principle Sensitivity (with HDX, peak deviation) Adjacent channel rejection Intermodulation attenuation Blocking Squelch Pilot tone squelch Antenna inputs EM 300 G2 true diversity < 2.5 μV at 52 dBArms S/N ratio ≥ 68 dB ≥ 68 dB ≥ 72 dB 4 steps: Off...
...AF characteristics Noise reduction system AF frequency response S/N ratio (at 1 mV and peak deviation) THD (at nominal deviation and 1 kHz) Sennheiser HDX 40-18,000 Hz ≥ 112 dB(A) ≤0.9 % General data Temperature range Dimensions of carrying case [mm] Weight of ...approx. 3100 g Receiver RF characteristics Receiver principle Sensitivity (with HDX, peak deviation) Adjacent channel rejection Intermodulation attenuation Blocking Squelch Pilot tone squelch Antenna inputs EM 300 G2 true diversity < 2.5 μV at 52 dBArms S/N ratio ≥ 68 dB ≥ 68 dB ≥ 72 dB 4 steps: Off...
Instructions for Use
Page 86
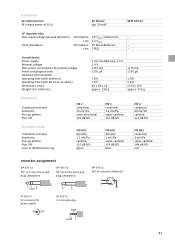
... 144 dB SPL red onnector assignment EM 300 G2: ¼'' (6.3 mm) stereo jack plug, unbalanced EM 300 G2: ¼'' (6.3 mm) mono jack plug, unbalanced NC/GN D M 300 G2: DC connector for power supply SK 300 G2: 3.5 mm jack plug NC/GND EM 300 G2: XLR-3F connector, balanced + ...450 g Microphones Transducer principle Sensitivity Pick-up pattern Max. Line 1 MΩ - power consumption at 50 Ω SK 300 G2 typ. 30 mW SKM 300 G2 AF characteristics Max. Line 2.4 Vrms - Input impedance Microphone 10 kΩ, unbalanced - Transmitters RF characteristics RF output power at...
... 144 dB SPL red onnector assignment EM 300 G2: ¼'' (6.3 mm) stereo jack plug, unbalanced EM 300 G2: ¼'' (6.3 mm) mono jack plug, unbalanced NC/GN D M 300 G2: DC connector for power supply SK 300 G2: 3.5 mm jack plug NC/GND EM 300 G2: XLR-3F connector, balanced + ...450 g Microphones Transducer principle Sensitivity Pick-up pattern Max. Line 1 MΩ - power consumption at 50 Ω SK 300 G2 typ. 30 mW SKM 300 G2 AF characteristics Max. Line 2.4 Vrms - Input impedance Microphone 10 kΩ, unbalanced - Transmitters RF characteristics RF output power at...

