
Instructions for Use
Page 50
... ew 100 G2 4 The channel bank system 4 System variants ...5 Overview of operating controls 6 EM 100 G2 rack-mount receiver 6 EK 100 G2 bodypack receiver 7 SK 100 G2 bodypack transmitter 8 SKP 100 G2 plug-on transmitter 9 SKM 100 G2 radiomicrophone 10 Indications and displays on the receivers 11 Indications and displays on the transmitters 13 Preparing the components for use 14 EM 100 G2 rack-mount receiver 14 EK 100 G2 bodypack receiver...
... ew 100 G2 4 The channel bank system 4 System variants ...5 Overview of operating controls 6 EM 100 G2 rack-mount receiver 6 EK 100 G2 bodypack receiver 7 SK 100 G2 bodypack transmitter 8 SKP 100 G2 plug-on transmitter 9 SKM 100 G2 radiomicrophone 10 Indications and displays on the receivers 11 Indications and displays on the transmitters 13 Preparing the components for use 14 EM 100 G2 rack-mount receiver 14 EK 100 G2 bodypack receiver...
Instructions for Use
Page 51
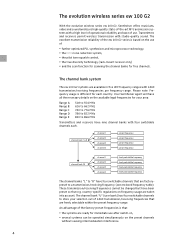
... after switch-on, y several systems can be changed but have four switchable channels that are factorypreset to a transmission/receiving frequency (see enclosed frequency table). The evolution wireless series ew 100 G2 With the evolution wireless series ew 100 G2, Sennheiser offers musicians, video and sound amateurs high-quality state-of-the-art RF transmission systems with a high level...
... after switch-on, y several systems can be changed but have four switchable channels that are factorypreset to a transmission/receiving frequency (see enclosed frequency table). The evolution wireless series ew 100 G2 With the evolution wireless series ew 100 G2, Sennheiser offers musicians, video and sound amateurs high-quality state-of-the-art RF transmission systems with a high level...

Instructions for Use
Page 53
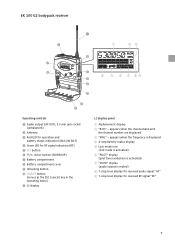
... LC display panel ቢ Display for the current channel bank "1 ... 8, U" ባ Display for the current channel number "1 ... 4" ቤ "B.CH" - Overview of operating controls EM 100 G2 rack-mount receiver ³ · »¿ ´ ቢ ባቤ ብ ቦቧ ቨ ቩቪ ቫ ቭቮ ¹ Ƹ Operating controls ³ LC display...
... LC display panel ቢ Display for the current channel bank "1 ... 8, U" ባ Display for the current channel number "1 ... 4" ቤ "B.CH" - Overview of operating controls EM 100 G2 rack-mount receiver ³ · »¿ ´ ቢ ባቤ ብ ቦቧ ቨ ቩቪ ቫ ቭቮ ¹ Ƹ Operating controls ³ LC display...
Instructions for Use
Page 54
...100 G2 bodypack receiver · ³ ቢ ባቤ » ¸ µ ¿ ´ ² ¶ º ¾ Operating controls ³ Audio output (AF OUT), 3.5 mm jack socket (unbalanced) · Antenna » Red LED for operation and battery status indication (ON/LOW BAT) ¿ Green LED for received...PILOT" display (pilot tone evaluation is activated) ቨ "MUTE" display (audio output is muted) ቩ 7-step level display for received audio signal "AF" ቪ 7-step level display for RF signal indication (RF) ´ SET button ² ̄/̆ ...
...100 G2 bodypack receiver · ³ ቢ ባቤ » ¸ µ ¿ ´ ² ¶ º ¾ Operating controls ³ Audio output (AF OUT), 3.5 mm jack socket (unbalanced) · Antenna » Red LED for operation and battery status indication (ON/LOW BAT) ¿ Green LED for received...PILOT" display (pilot tone evaluation is activated) ቨ "MUTE" display (audio output is muted) ቩ 7-step level display for received audio signal "AF" ቪ 7-step level display for RF signal indication (RF) ´ SET button ² ̄/̆ ...

Instructions for Use
Page 58
...muted (with the pilot tone transmission or evaluation activated). ቮ EK 100 G2 ቨ RF signal indication (EK 100 G2 only) The green LED (RF) ᕤ at the front of the EK 100 G2 lights up : The receiver is switched on and the capacity of the batteries/accupack BA 2015 is ... on its remaining battery/accupack capacity to the EM 100 G2 receiver and the transmitter low battery icon ቧ starts flashing on the receiver display panel. ብ EM 100 G2 Indications and displays on the receivers Operation and battery status indication (EK 100 G2 only) The red LED (LOW BAT/ON) ᕣ...
...muted (with the pilot tone transmission or evaluation activated). ቮ EK 100 G2 ቨ RF signal indication (EK 100 G2 only) The green LED (RF) ᕤ at the front of the EK 100 G2 lights up : The receiver is switched on and the capacity of the batteries/accupack BA 2015 is ... on its remaining battery/accupack capacity to the EM 100 G2 receiver and the transmitter low battery icon ቧ starts flashing on the receiver display panel. ብ EM 100 G2 Indications and displays on the receivers Operation and battery status indication (EK 100 G2 only) The red LED (LOW BAT/ON) ᕣ...
Instructions for Use
Page 59
.../deactivating the pilot tone transmission or pilot tone evaluation" on page 35). ቫ EK 100 G2 ቧ EK 100 G2 Diversity display (EM 100 G2 only) The EM 100 G2 receiver operates on the true diversity principle (see: „Diversity reception" on page 41). EM 100 G2 EK 100 G2 "PILOT" display The "PILOT" display ቫ or ቧ lights up when the pilot...
.../deactivating the pilot tone transmission or pilot tone evaluation" on page 35). ቫ EK 100 G2 ቧ EK 100 G2 Diversity display (EM 100 G2 only) The EM 100 G2 receiver operates on the true diversity principle (see: „Diversity reception" on page 41). EM 100 G2 EK 100 G2 "PILOT" display The "PILOT" display ቫ or ቧ lights up when the pilot...
Instructions for Use
Page 61
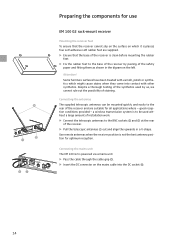
...; Preparing the components for use EM 100 G2 rack-mount receiver Mounting the receiver feet To ensure that the base of the receiver is clean before mounting the rubber feet. ̈ Fix the rubber feet to the base of the receiver by us, we cannot rule out the possibility of the receiver and are supplied. ̈ Ensure...
...; Preparing the components for use EM 100 G2 rack-mount receiver Mounting the receiver feet To ensure that the base of the receiver is clean before mounting the rubber feet. ̈ Fix the rubber feet to the base of the receiver by us, we cannot rule out the possibility of the receiver and are supplied. ̈ Ensure...
Instructions for Use
Page 62
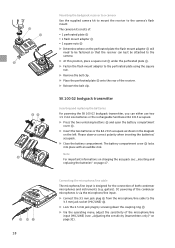
...GA 2 rack adapter. The AM 2 antenna mount consists of the amplifier or mixing console (see: „Adjusting the audio output level (receivers only)" on balanced and unbalanced connection, please refer to the section "Connector assignment" auf Seite 43. ̈ Via the operating menu, adapt... ƾ to BNC connector ƿ) y 2 plains washers ƿ y 2 nuts 15 º¾ Connecting the amplifier/mixing console The EM 100 G2's audio outputs are available as an accessory) to mount the transmitter's antenna connection to the front of the GA 2 rack adapter. amplifier, mixing console...
...GA 2 rack adapter. The AM 2 antenna mount consists of the amplifier or mixing console (see: „Adjusting the audio output level (receivers only)" on balanced and unbalanced connection, please refer to the section "Connector assignment" auf Seite 43. ̈ Via the operating menu, adapt... ƾ to BNC connector ƿ) y 2 plains washers ƿ y 2 nuts 15 º¾ Connecting the amplifier/mixing console The EM 100 G2's audio outputs are available as an accessory) to mount the transmitter's antenna connection to the front of the GA 2 rack adapter. amplifier, mixing console...
Instructions for Use
Page 63
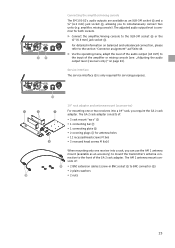
...plain washers and nuts. ̈ Connect the two BNC connectors ƿ to the BNC sockets ¸ and Ƹ at the rear of the receiver. ̈ Slide the receiver into a 19" rack. ̈ Screw the rack mount "ears" tight. ̈ Connect the two telescopic antennas ƹ to the two BNC...the rack mount "ears" tight. ƺ ƺ ƿ ƺ Ƽ ƻ ƽ ƺ ƾ ƻ ƹ To mount two EM 100 G2 into a rack: ̈ Place the two receivers side by side onto a flat surface, their bottom sides facing upwards. ̈ Align the connecting plate Ƽ over the holes in a V-shape...
...plain washers and nuts. ̈ Connect the two BNC connectors ƿ to the BNC sockets ¸ and Ƹ at the rear of the receiver. ̈ Slide the receiver into a 19" rack. ̈ Screw the rack mount "ears" tight. ̈ Connect the two telescopic antennas ƹ to the two BNC...the rack mount "ears" tight. ƺ ƺ ƿ ƺ Ƽ ƻ ƽ ƺ ƾ ƻ ƹ To mount two EM 100 G2 into a rack: ̈ Place the two receivers side by side onto a flat surface, their bottom sides facing upwards. ̈ Align the connecting plate Ƽ over the holes in a V-shape...
Instructions for Use
Page 64
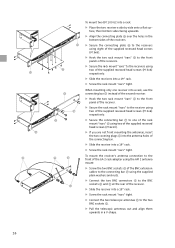
.... y The monitoring of the operating time are available as accessories. º¾ º ³ EK 100 G2 bodypack receiver Inserting and replacing the batteries For powering the EK 100 G2 bodypack receiver, you can connect a PA system or a recording unit (e.g. For charging the accupack, only use the BA ... of the connected unit (see: „Adjusting the audio output level (receivers only)" on the left. Due to the audio output You can either use two 1.5 V AA size batteries or the rechargeable Sennheiser BA 2015 accupack. ̈ Press the two unlocking buttons ᕩ and...
.... y The monitoring of the operating time are available as accessories. º¾ º ³ EK 100 G2 bodypack receiver Inserting and replacing the batteries For powering the EK 100 G2 bodypack receiver, you can connect a PA system or a recording unit (e.g. For charging the accupack, only use the BA ... of the connected unit (see: „Adjusting the audio output level (receivers only)" on the left. Due to the audio output You can either use two 1.5 V AA size batteries or the rechargeable Sennheiser BA 2015 accupack. ̈ Press the two unlocking buttons ᕩ and...
Instructions for Use
Page 65
... only)" on page 17. guitars). SK 100 G2 bodypack transmitter Inserting and replacing the batteries For powering the SK 100 G2 bodypack transmitter, you can best be fastened so that the receiver can either use two 1.5 V AA size batteries or the rechargeable Sennheiser BA 2015 accupack. ̈ Press the ...perforated plate using the square nut. ̈ Remove the belt clip. ̈ Place the perforated plate ¹ onto the rear of the receiver. ̈ Reinsert the belt clip. Connecting the microphone/line cable The microphone/line input is via the microphone/line input. ̈ Connect...
... only)" on page 17. guitars). SK 100 G2 bodypack transmitter Inserting and replacing the batteries For powering the SK 100 G2 bodypack transmitter, you can best be fastened so that the receiver can either use two 1.5 V AA size batteries or the rechargeable Sennheiser BA 2015 accupack. ̈ Press the ...perforated plate using the square nut. ̈ Remove the belt clip. ̈ Place the perforated plate ¹ onto the rear of the receiver. ̈ Reinsert the belt clip. Connecting the microphone/line cable The microphone/line input is via the microphone/line input. ̈ Connect...
Instructions for Use
Page 66
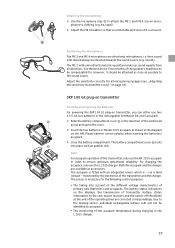
... phones to clothing (e.g. Adjust the sensitivity correctly for all directions. SKP 100 G2 plug-on transmitter Inserting and replacing the batteries For powering the SKP 100 G2 plug-on transmitter, you can either use two 1.5 V AA size batteries or the rechargeable Sennheiser BA 2015 accupack. ̈ Slide the battery compartment cover ᕩ ...ƺ to attach the ME 2 and ME 4 clip-on the displays, the transmission of transmitter battery status information to the rack-mount receivers and the switch-off thresholds at the end of the operating time are corrected correspondingly.
... phones to clothing (e.g. Adjust the sensitivity correctly for all directions. SKP 100 G2 plug-on transmitter Inserting and replacing the batteries For powering the SKP 100 G2 plug-on transmitter, you can either use two 1.5 V AA size batteries or the rechargeable Sennheiser BA 2015 accupack. ̈ Slide the battery compartment cover ᕩ ...ƺ to attach the ME 2 and ME 4 clip-on the displays, the transmission of transmitter battery status information to the rack-mount receivers and the switch-off thresholds at the end of the operating time are corrected correspondingly.

Instructions for Use
Page 69
...plug-on transmitter on/off ̈ Press the ON/OFF button ᕨ to switch the bodypack receiver/transmitter » on. Using the components Switching the components on/off The ew 100 G2 transmitters and receivers can only be used for extended periods of time. Note: Remove the batteries or the accupack when ...776; Press the POWER button ´ to switch the receiver on. ̈ To switch the receiver off, press the POWER button until "OFF" appears on the display panel. Within the operating menu, the ON/OFF button or the POWER button (EM 100 G2 only) serves as the ESC (cancel) key, i.e you...
...plug-on transmitter on/off ̈ Press the ON/OFF button ᕨ to switch the bodypack receiver/transmitter » on. Using the components Switching the components on/off The ew 100 G2 transmitters and receivers can only be used for extended periods of time. Note: Remove the batteries or the accupack when ...776; Press the POWER button ´ to switch the receiver on. ̈ To switch the receiver off, press the POWER button until "OFF" appears on the display panel. Within the operating menu, the ON/OFF button or the POWER button (EM 100 G2 only) serves as the ESC (cancel) key, i.e you...

Instructions for Use
Page 70
... radiomicrophone off, press the ON/OFF button ¹ until "OFF" appears on the receiver display panel. ̈ Set the MUTE switch back to the original position to retransmit the audio SKP 100 G2 signal. The lock mode prevents that the pilot tone function is activated on both the transmitter... and the receiver, the "MUTE" display also appears on the display. Activating/deactivating the lock mode All...
... radiomicrophone off, press the ON/OFF button ¹ until "OFF" appears on the receiver display panel. ̈ Set the MUTE switch back to the original position to retransmit the audio SKP 100 G2 signal. The lock mode prevents that the pilot tone function is activated on both the transmitter... and the receiver, the "MUTE" display also appears on the display. Activating/deactivating the lock mode All...
Instructions for Use
Page 71
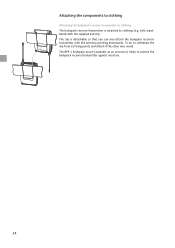
The clip is attached to clothing (e.g. Attaching the components to clothing Attaching the bodypack receiver/transmitter to clothing The bodypack receiver/transmitter is detachable so that you can also attach the bodypack receiver/ transmitter with the supplied belt clip. The BPP 1 bodypack pouch (available as an accessory) helps to protect the bodypack receiver/transmitter against moisture. 24 To do so, withdraw the clip from its fixing points and attach it the other way round. belt, waistband) with the antenna pointing downwards.
The clip is attached to clothing (e.g. Attaching the components to clothing Attaching the bodypack receiver/transmitter to clothing The bodypack receiver/transmitter is detachable so that you can also attach the bodypack receiver/ transmitter with the supplied belt clip. The BPP 1 bodypack pouch (available as an accessory) helps to protect the bodypack receiver/transmitter against moisture. 24 To do so, withdraw the clip from its fixing points and attach it the other way round. belt, waistband) with the antenna pointing downwards.
Instructions for Use
Page 72
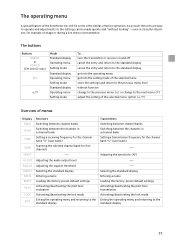
...the next menu (̄) adjust the setting of the selected menu: option (̆/̄) Overview of the Sennheiser ew 100 G2 series is the similar, intuitive operation. turn the transmitter or receiver on stage or during a live show or presentation. As a result, the units are easy to operate ...the previous menu (̆) or change to the previous menu level without looking" - The buttons Buttons ON/OFF or POWER (EM 100 G2 only) SET ̆/̄ Mode Standard display Operating menu Setting mode Standard display Operating menu Setting mode Standard display Operating menu Setting mode...
...the next menu (̄) adjust the setting of the selected menu: option (̆/̄) Overview of the Sennheiser ew 100 G2 series is the similar, intuitive operation. turn the transmitter or receiver on stage or during a live show or presentation. As a result, the units are easy to operate ...the previous menu (̆) or change to the previous menu level without looking" - The buttons Buttons ON/OFF or POWER (EM 100 G2 only) SET ̆/̄ Mode Standard display Operating menu Setting mode Standard display Operating menu Setting mode Standard display Operating menu Setting mode...
Instructions for Use
Page 73
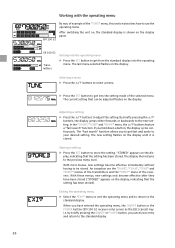
... become effective after they have entered the operating menu, the ON/OFF button or the POWER button (EM 100 G2 receiver only) serves as the ESC (cancel) key, i.e. EM 100 G2 EK 100 G2 Transmitters Getting into the operating menu ̈ Press the SET button to get fast and easily to your entry... function allows you have been stored ("STORED" appears on the display panel. Working with the operating menu By way of example of the receivers. The last menu selected flashes on the display, indicating that the setting has been stored). With these menus, new settings only become effective ...
... become effective after they have entered the operating menu, the ON/OFF button or the POWER button (EM 100 G2 receiver only) serves as the ESC (cancel) key, i.e. EM 100 G2 EK 100 G2 Transmitters Getting into the operating menu ̈ Press the SET button to get fast and easily to your entry... function allows you have been stored ("STORED" appears on the display panel. Working with the operating menu By way of example of the receivers. The last menu selected flashes on the display, indicating that the setting has been stored). With these menus, new settings only become effective ...

Instructions for Use
Page 74
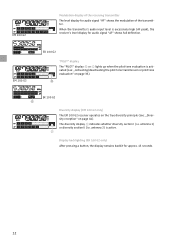
...̆ / ̄: 1...8, U (User Bank) SET: Stores the setting 1.04 B . CH 790.100 ̆ / ̄: Channel 01...04 SET: Stores the setting 791.125 ̆ / ̄: Receiving frequency in steps of 6 dB): EM 100 G2:+18...0...-24 dB EK 100 G2: +12...0...-30 dB SET: Stores the setting SQ HI ̆ / ̄: LO, MID, HI... selected channel bank for free channels Delete result = CLEAR SET: Releases locked channels LEV -24 ̆ / ̄: (in steps of the receivers EXIT SET BANK Changing the channel bank SET BANK 1 Current channel bank STORED CHAN Changing the channel SET 1.01 B .
...̆ / ̄: 1...8, U (User Bank) SET: Stores the setting 1.04 B . CH 790.100 ̆ / ̄: Channel 01...04 SET: Stores the setting 791.125 ̆ / ̄: Receiving frequency in steps of 6 dB): EM 100 G2:+18...0...-24 dB EK 100 G2: +12...0...-30 dB SET: Stores the setting SQ HI ̆ / ̄: LO, MID, HI... selected channel bank for free channels Delete result = CLEAR SET: Releases locked channels LEV -24 ̆ / ̄: (in steps of the receivers EXIT SET BANK Changing the channel bank SET BANK 1 Current channel bank STORED CHAN Changing the channel SET 1.01 B .

Instructions for Use
Page 75
OK ̆ / ̄: OK, NO "reset" = OK: SET: Receiver loads factory-preset default settings (only pilot tone setting is kept), receiver is restarted, standard display appears "reset" = NO SET: Reset is cancelled PLT. NO Security ...receiver a name Current receiver name STORED RESET Loading the factorypreset default settings SET RST. ON Pilot tone evaluation activated or deactivated STORED LOCK SET LOC.OFF Activating the lock mode Lock mode activated or deactivated STORED SET EXIT Exiting the operating menu NAME ̆ / ̄: Select standard display EM 100 G2: FREQ, NAME EK 100 G2...
OK ̆ / ̄: OK, NO "reset" = OK: SET: Receiver loads factory-preset default settings (only pilot tone setting is kept), receiver is restarted, standard display appears "reset" = NO SET: Reset is cancelled PLT. NO Security ...receiver a name Current receiver name STORED RESET Loading the factorypreset default settings SET RST. ON Pilot tone evaluation activated or deactivated STORED LOCK SET LOC.OFF Activating the lock mode Lock mode activated or deactivated STORED SET EXIT Exiting the operating menu NAME ̆ / ̄: Select standard display EM 100 G2: FREQ, NAME EK 100 G2...

Instructions for Use
Page 78
... this channel bank, an interfering frequency was detected on page 4). For intermodulationfree frequencies, please refer to select the desired transmission or receiving fre- BANK CHAN TUNE SCAN Adjustment tips for the operating menu Switching between channel banks Via the "BANK" menu, you can ...switch between the nine channel banks of the transmitters and receivers. The channel banks "1" to "8" have selected one or several transmission links into operation, you have four switchable channels that are factory...
... this channel bank, an interfering frequency was detected on page 4). For intermodulationfree frequencies, please refer to select the desired transmission or receiving fre- BANK CHAN TUNE SCAN Adjustment tips for the operating menu Switching between channel banks Via the "BANK" menu, you can ...switch between the nine channel banks of the transmitters and receivers. The channel banks "1" to "8" have selected one or several transmission links into operation, you have four switchable channels that are factory...

