Quick Guide XS Wireless Digital
Page 1
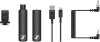
... Romania Portable Lavalier Set / Portable Interview Set / Portable ENG Set Labels for wireless link identification 1 23 TX 1 1 23 TX 2 Pedalboard Set USB C *3 RX 1 RX 2 *2 USB A *1 XLR *1 : power via power supply unit *2 : power via USB *3 : charge plug via USB Audio Out 6.3 mm Model: RX 35 Ser No . 0000000000 Made in Romania Made in Romania XSW Digital - Transmitters (TX) Receivers (RX) Sennheiser Documentation App XS Wireless Digital Instrument Base Set Pedalboard Set XSW Digital TX 63 XSW Digital RX 63 or online at www.sennheiser.com/download XS Wireless...
... Romania Portable Lavalier Set / Portable Interview Set / Portable ENG Set Labels for wireless link identification 1 23 TX 1 1 23 TX 2 Pedalboard Set USB C *3 RX 1 RX 2 *2 USB A *1 XLR *1 : power via power supply unit *2 : power via USB *3 : charge plug via USB Audio Out 6.3 mm Model: RX 35 Ser No . 0000000000 Made in Romania Made in Romania XSW Digital - Transmitters (TX) Receivers (RX) Sennheiser Documentation App XS Wireless Digital Instrument Base Set Pedalboard Set XSW Digital TX 63 XSW Digital RX 63 or online at www.sennheiser.com/download XS Wireless...
Quick Guide XS Wireless Digital
Page 2
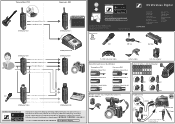
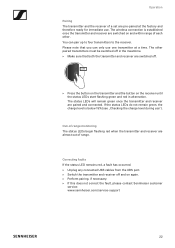
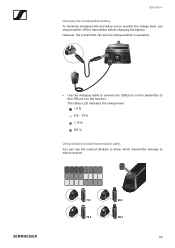
... Charging OFF 100 % > 75 % 5 % ... 75 % < 5 % Switch Off ON OFF Pairing min. 3 s Sennheiser Documentation App Instruction manual | Bedienungsanleitung | Notice d'emploi | Istruzioni per l'uso | Instrucciones de manejo | Manual de instruções | Gebruiksaanwijzing | Instrukcja obsługi | Bruksanvisning | Betjeningsvejledning | Käyttöohje Kullanım kılavuzu or online at www.sennheiser.com/download XS Wireless Digital_ OFF PAIRING min. 5 s Pairing 0.5 s 0.5 s Nearly out of range Error Instruction Manual
... Charging OFF 100 % > 75 % 5 % ... 75 % < 5 % Switch Off ON OFF Pairing min. 3 s Sennheiser Documentation App Instruction manual | Bedienungsanleitung | Notice d'emploi | Istruzioni per l'uso | Instrucciones de manejo | Manual de instruções | Gebruiksaanwijzing | Instrukcja obsługi | Bruksanvisning | Betjeningsvejledning | Käyttöohje Kullanım kılavuzu or online at www.sennheiser.com/download XS Wireless Digital_ OFF PAIRING min. 5 s Pairing 0.5 s 0.5 s Nearly out of range Error Instruction Manual
Instruction manual - XS Wireless Digital PDF
Page 4
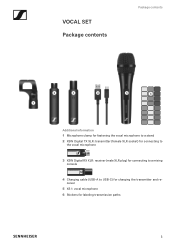
VOCAL SET Package contents ► ► Package contents Additional information 1 Microphone clamp for fastening the vocal microphone to a stand 2 XSW Digital TX XLR: transmitter (female XLR socket) for connecting to the vocal microphone ► 3 XSW Digital RX XLR: receiver (male XLR plug) for connecting to a mixing console ► 4 Charging cable (USB-A to USB-C) for charging the transmitter and receiver 5 XS 1: vocal microphone 6 Stickers for labeling transmission paths 3
VOCAL SET Package contents ► ► Package contents Additional information 1 Microphone clamp for fastening the vocal microphone to a stand 2 XSW Digital TX XLR: transmitter (female XLR socket) for connecting to the vocal microphone ► 3 XSW Digital RX XLR: receiver (male XLR plug) for connecting to a mixing console ► 4 Charging cable (USB-A to USB-C) for charging the transmitter and receiver 5 XS 1: vocal microphone 6 Stickers for labeling transmission paths 3

Instruction manual - XS Wireless Digital PDF
Page 10
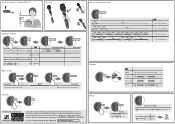
... transmitter at the factory and therefore ready for immediate use "). Correcting faults If the status LED remains red, a fault has occurred. ▷ Unplug any connected USB cables from the UBS port. ▷ Switch the transmitter and receiver off and on the receiver until the status LEDs start flashing green and red in the meantime. ▷ Make sure that you can pair up to four transmitters to the receiver...
... transmitter at the factory and therefore ready for immediate use "). Correcting faults If the status LED remains red, a fault has occurred. ▷ Unplug any connected USB cables from the UBS port. ▷ Switch the transmitter and receiver off and on the receiver until the status LEDs start flashing green and red in the meantime. ▷ Make sure that you can pair up to four transmitters to the receiver...

Instruction manual - XS Wireless Digital PDF
Page 11
LAVALIER SET Package contents ► Package contents Additional information 1 Belt clip for the transmitter 2 XSW Digital TX 35: transmitter (3.5 mm jack socket) for connecting to the clip-on microphone ► 3 XSW Digital RX XLR: receiver (male XLR plug) for connecting to a mixing console ► 4 Charging cable (USB-A to USB-C) for charging the transmitter and receiver 5 ME 2-2: clip-on microphone 6 Stickers for labeling transmission paths 10
LAVALIER SET Package contents ► Package contents Additional information 1 Belt clip for the transmitter 2 XSW Digital TX 35: transmitter (3.5 mm jack socket) for connecting to the clip-on microphone ► 3 XSW Digital RX XLR: receiver (male XLR plug) for connecting to a mixing console ► 4 Charging cable (USB-A to USB-C) for charging the transmitter and receiver 5 ME 2-2: clip-on microphone 6 Stickers for labeling transmission paths 10

Instruction manual - XS Wireless Digital PDF
Page 17
... wireless connection is below 15% (see „Checking the charge level during use"). Operation Pairing The transmitter and the receiver of a set are switched off. ► ▷ Press the button on the transmitter and the button on the receiver until the status LEDs start flashing green and red in alternation. Please note that both the transmitter and receiver are pre-paired at the factory and therefore ready for immediate use one transmitter...
... wireless connection is below 15% (see „Checking the charge level during use"). Operation Pairing The transmitter and the receiver of a set are switched off. ► ▷ Press the button on the transmitter and the button on the receiver until the status LEDs start flashing green and red in alternation. Please note that both the transmitter and receiver are pre-paired at the factory and therefore ready for immediate use one transmitter...
Instruction manual - XS Wireless Digital PDF
Page 18
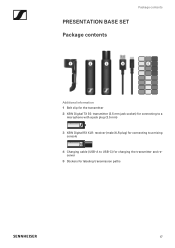
Package contents PRESENTATION BASE SET Package contents ► Additional information 1 Belt clip for the transmitter 2 XSW Digital TX 35: transmitter (3.5 mm jack socket) for connecting to a microphone with a jack plug (3.5 mm) ► 3 XSW Digital RX XLR: receiver (male XLR plug) for connecting to a mixing console ► 4 Charging cable (USB-A to USB-C) for charging the transmitter and receiver 5 Stickers for labeling transmission paths 17
Package contents PRESENTATION BASE SET Package contents ► Additional information 1 Belt clip for the transmitter 2 XSW Digital TX 35: transmitter (3.5 mm jack socket) for connecting to a microphone with a jack plug (3.5 mm) ► 3 XSW Digital RX XLR: receiver (male XLR plug) for connecting to a mixing console ► 4 Charging cable (USB-A to USB-C) for charging the transmitter and receiver 5 Stickers for labeling transmission paths 17
Instruction manual - XS Wireless Digital PDF
Page 23
... for immediate use "). Out-of-range monitoring The status LEDs begin flashing red when the transmitter and receiver are paired and connected. The wireless connection is below 15% (see „Checking the charge level during use . The other . Operation Pairing The transmitter and the receiver of a set are switched off. ► ▷ Press the button on the transmitter and the button on the receiver until the status LEDs start flashing green and red in...
... for immediate use "). Out-of-range monitoring The status LEDs begin flashing red when the transmitter and receiver are paired and connected. The wireless connection is below 15% (see „Checking the charge level during use . The other . Operation Pairing The transmitter and the receiver of a set are switched off. ► ▷ Press the button on the transmitter and the button on the receiver until the status LEDs start flashing green and red in...

Instruction manual - XS Wireless Digital PDF
Page 30
... flashing red when the transmitter and receiver are pre-paired at a time. Operation Pairing The transmitter and the receiver of a set are almost out of range. Correcting faults If the status LED remains red, a fault has occurred. ▷ Unplug any connected USB cables from the UBS port. ▷ Switch the transmitter and receiver off . ► ▷ Press the button on the transmitter and the button on the receiver until the status LEDs start flashing green and red...
... flashing red when the transmitter and receiver are pre-paired at a time. Operation Pairing The transmitter and the receiver of a set are almost out of range. Correcting faults If the status LED remains red, a fault has occurred. ▷ Unplug any connected USB cables from the UBS port. ▷ Switch the transmitter and receiver off . ► ▷ Press the button on the transmitter and the button on the receiver until the status LEDs start flashing green and red...
Instruction manual - XS Wireless Digital PDF
Page 40
... adhesive hook-and-loop fastener strips. ▷ Alternatively, you can attach the receiver with jack plugs (6.3 mm) or connect it to the next device on the Pedalboard. ▷ Connect the receiver's output to the input socket on your amplifier or on the next device on the Pedalboard. Connecting the receiver to an amplifier You can connect the receiver to an amplifier using a cable with screws using...
... adhesive hook-and-loop fastener strips. ▷ Alternatively, you can attach the receiver with jack plugs (6.3 mm) or connect it to the next device on the Pedalboard. ▷ Connect the receiver's output to the input socket on your amplifier or on the next device on the Pedalboard. Connecting the receiver to an amplifier You can connect the receiver to an amplifier using a cable with screws using...
Instruction manual - XS Wireless Digital PDF
Page 41
... rechargeable battery first (see „Checking the charge level during use the included power supply unit or power the receiver via the USB port. If the status LED flashes red, the charge level is not possible. The status LEDs remain green once the transmitter and receiver are not paired (see „Pairing"). 40 Switching on the transmitter: ► ▷ Briefly press the button on the receiver: ► Operation ▷ Connect the receiver...
... rechargeable battery first (see „Checking the charge level during use the included power supply unit or power the receiver via the USB port. If the status LED flashes red, the charge level is not possible. The status LEDs remain green once the transmitter and receiver are not paired (see „Pairing"). 40 Switching on the transmitter: ► ▷ Briefly press the button on the receiver: ► Operation ▷ Connect the receiver...
Instruction manual - XS Wireless Digital PDF
Page 45
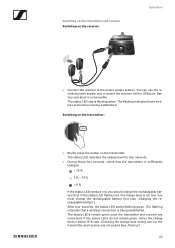
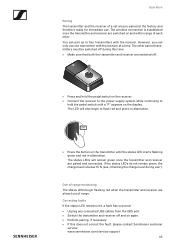
The status LED indicates the charge level. < 5% 5 % - 75 % > 75 % 100 % Using stickers to label transmission paths You can also be charged while in operation. ► ▷ Use the charging cable to connect the USB port on the transmitter to the USB port on the receiver. However, the transmitter can use the colored stickers to show which transmitter belongs to monitor the charge level, you to which receiver. ► 44 Operation Charging the rechargeable battery To minimize charging time and allow you should switch off the transmitter before charging the battery.
The status LED indicates the charge level. < 5% 5 % - 75 % > 75 % 100 % Using stickers to label transmission paths You can also be charged while in operation. ► ▷ Use the charging cable to connect the USB port on the transmitter to the USB port on the receiver. However, the transmitter can use the colored stickers to show which transmitter belongs to monitor the charge level, you to which receiver. ► 44 Operation Charging the rechargeable battery To minimize charging time and allow you should switch off the transmitter before charging the battery.
Instruction manual - XS Wireless Digital PDF
Page 46
... connected USB cables from the UBS port. ▷ Switch the transmitter and receiver off during use one transmitter with the receiver. The other . If the status LEDs do not remain green, the charge level is established once the transmitter and receiver are paired and connected. Operation Pairing The transmitter and the receiver of a set are switched off. ► ▷ Press and hold the pedal switch on the receiver. ▷ Connect the receiver to the power supply...
... connected USB cables from the UBS port. ▷ Switch the transmitter and receiver off during use one transmitter with the receiver. The other . If the status LEDs do not remain green, the charge level is established once the transmitter and receiver are paired and connected. Operation Pairing The transmitter and the receiver of a set are switched off. ► ▷ Press and hold the pedal switch on the receiver. ▷ Connect the receiver to the power supply...
Instruction manual - XS Wireless Digital PDF
Page 47
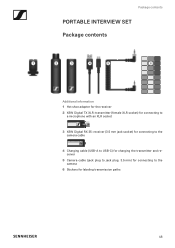
Package contents PORTABLE INTERVIEW SET Package contents ► Additional information 1 Hot shoe adapter for the receiver 2 XSW Digital TX XLR: transmitter (female XLR socket) for connecting to a microphone with an XLR socket ► 3 XSW Digital RX 35: receiver (3.5 mm jack socket) for connecting to the camera cable ► 4 Charging cable (USB-A to USB-C) for charging the transmitter and receiver 5 Camera cable (jack plug to jack plug, 3.5 mm) for connecting to the camera 6 Stickers for labeling transmission paths 46
Package contents PORTABLE INTERVIEW SET Package contents ► Additional information 1 Hot shoe adapter for the receiver 2 XSW Digital TX XLR: transmitter (female XLR socket) for connecting to a microphone with an XLR socket ► 3 XSW Digital RX 35: receiver (3.5 mm jack socket) for connecting to the camera cable ► 4 Charging cable (USB-A to USB-C) for charging the transmitter and receiver 5 Camera cable (jack plug to jack plug, 3.5 mm) for connecting to the camera 6 Stickers for labeling transmission paths 46
Instruction manual - XS Wireless Digital PDF
Page 55
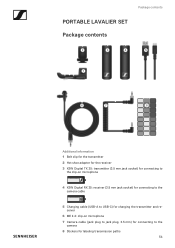
Package contents PORTABLE LAVALIER SET Package contents ► Additional information 1 Belt clip for the transmitter 2 Hot shoe adapter for the receiver 3 XSW Digital TX 35: transmitter (3.5 mm jack socket) for connecting to the clip-on microphone ► 4 XSW Digital RX 35: receiver (3.5 mm jack socket) for connecting to the camera cable ► 5 Charging cable (USB-A to USB-C) for charging the transmitter and receiver 6 ME 2-2: clip-on microphone 7 Camera cable (jack plug to jack plug, 3.5 mm) for connecting to the camera 8 Stickers for labeling transmission paths 54
Package contents PORTABLE LAVALIER SET Package contents ► Additional information 1 Belt clip for the transmitter 2 Hot shoe adapter for the receiver 3 XSW Digital TX 35: transmitter (3.5 mm jack socket) for connecting to the clip-on microphone ► 4 XSW Digital RX 35: receiver (3.5 mm jack socket) for connecting to the camera cable ► 5 Charging cable (USB-A to USB-C) for charging the transmitter and receiver 6 ME 2-2: clip-on microphone 7 Camera cable (jack plug to jack plug, 3.5 mm) for connecting to the camera 8 Stickers for labeling transmission paths 54
Instruction manual - XS Wireless Digital PDF
Page 64
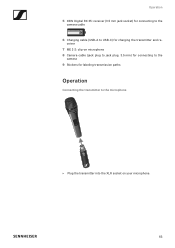
Operation 5 XSW Digital RX 35: receiver (3.5 mm jack socket) for connecting to the camera cable ► 6 Charging cable (USB-A to USB-C) for charging the transmitter and receiver 7 ME 2-2: clip-on microphone 8 Camera cable (jack plug to jack plug, 3.5 mm) for connecting to the camera 9 Stickers for labeling transmission paths Operation Connecting the transmitter to the microphone ► ▷ Plug the transmitter into the XLR socket on your microphone. 63
Operation 5 XSW Digital RX 35: receiver (3.5 mm jack socket) for connecting to the camera cable ► 6 Charging cable (USB-A to USB-C) for charging the transmitter and receiver 7 ME 2-2: clip-on microphone 8 Camera cable (jack plug to jack plug, 3.5 mm) for connecting to the camera 9 Stickers for labeling transmission paths Operation Connecting the transmitter to the microphone ► ▷ Plug the transmitter into the XLR socket on your microphone. 63
Instruction manual - XS Wireless Digital PDF
Page 72
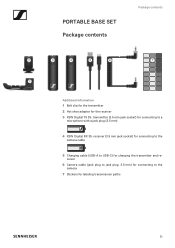
PORTABLE BASE SET Package contents ► Package contents Additional information 1 Belt clip for the transmitter 2 Hot shoe adapter for the receiver 3 XSW Digital TX 35: transmitter (3.5 mm jack socket) for connecting to a microphone with a jack plug (3.5 mm) ► 4 XSW Digital RX 35: receiver (3.5 mm jack socket) for connecting to the camera cable ► 5 Charging cable (USB-A to USB-C) for charging the transmitter and receiver 6 Camera cable (jack plug to jack plug, 3.5 mm) for connecting to the camera 7 Stickers for labeling transmission paths 71
PORTABLE BASE SET Package contents ► Package contents Additional information 1 Belt clip for the transmitter 2 Hot shoe adapter for the receiver 3 XSW Digital TX 35: transmitter (3.5 mm jack socket) for connecting to a microphone with a jack plug (3.5 mm) ► 4 XSW Digital RX 35: receiver (3.5 mm jack socket) for connecting to the camera cable ► 5 Charging cable (USB-A to USB-C) for charging the transmitter and receiver 6 Camera cable (jack plug to jack plug, 3.5 mm) for connecting to the camera 7 Stickers for labeling transmission paths 71
Product Specification XS Wireless Digital Portable Interview Set
Page 1
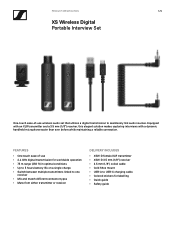
... connection. PRODUCT SPECIFICATION 1/5 XS Wireless Digital Portable Interview Set One-touch ease-of -use wireless audio set that utilizes a digital transmission to USB-C charging cable • Colored stickers for labelling • Quick guide • Safety guide FEATURES • One touch ease-of -use • 2.4 GHz digital transmission for worldwide operation • 75 m range (250 ft) in optimal conditions • Up to 5 hours battery life on a single charge • Switch between multiple transmitters linked to one receiver...
... connection. PRODUCT SPECIFICATION 1/5 XS Wireless Digital Portable Interview Set One-touch ease-of -use wireless audio set that utilizes a digital transmission to USB-C charging cable • Colored stickers for labelling • Quick guide • Safety guide FEATURES • One touch ease-of -use • 2.4 GHz digital transmission for worldwide operation • 75 m range (250 ft) in optimal conditions • Up to 5 hours battery life on a single charge • Switch between multiple transmitters linked to one receiver...
Product Specification XS Wireless Digital Portable Interview Set
Page 2
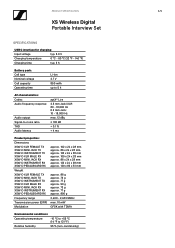
PRODUCT SPECIFICATION 2/5 XS Wireless Digital Portable Interview Set SPECIFICATIONS USB C interface for charging: Input voltage typ. 5.0 V Charging temperature 0 °C - 60 °C (32 °F - 140 °F) Charging time typ. 3 h Battery pack: Cell type Nominal voltage Cell capacity Operating time Li-Ion 3.7 V 850 mAh up to 5 h AF characteristics: Codec Audio frequency response Audio output Signal-to-noise ratio THD Audio latency aptX® Live 3.5 mm Jack/XLR: 80 - 18,000 Hz 6.3 mm Jack: 10...
PRODUCT SPECIFICATION 2/5 XS Wireless Digital Portable Interview Set SPECIFICATIONS USB C interface for charging: Input voltage typ. 5.0 V Charging temperature 0 °C - 60 °C (32 °F - 140 °F) Charging time typ. 3 h Battery pack: Cell type Nominal voltage Cell capacity Operating time Li-Ion 3.7 V 850 mAh up to 5 h AF characteristics: Codec Audio frequency response Audio output Signal-to-noise ratio THD Audio latency aptX® Live 3.5 mm Jack/XLR: 80 - 18,000 Hz 6.3 mm Jack: 10...
Product Specification XS Wireless Digital Portable Interview Set
Page 3
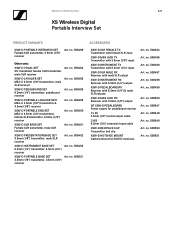
... XSW-D MINI JACK RX Receiver with 3.5mm (1/8") output NT XSW-D PEDALBOARD Power supply for pedalboard receiver CL 35 3.5mm (1/8") coiled output cable CI 63 6.3mm (1/4") extension input cable XSW-D BELTPACK CLIP Transmitter belt clip XSW-D HOTSHOE MOUNT Camera mount for XSW-D receivers Art. no . 508498 Art. no . 508497 Art. no . 508485 ME2-II, 3.5mm (1/8") transmitter, male XLR receiver XSW-D PEDALBOARD SET 6.3mm (1/4") transmitter, pedalboard receiver Art. PRODUCT SPECIFICATION 3/5 XS Wireless Digital Portable Interview Set PRODUCT VARIANTS XSW-D PORTABLE INTERVIEW SET...
... XSW-D MINI JACK RX Receiver with 3.5mm (1/8") output NT XSW-D PEDALBOARD Power supply for pedalboard receiver CL 35 3.5mm (1/8") coiled output cable CI 63 6.3mm (1/4") extension input cable XSW-D BELTPACK CLIP Transmitter belt clip XSW-D HOTSHOE MOUNT Camera mount for XSW-D receivers Art. no . 508498 Art. no . 508497 Art. no . 508485 ME2-II, 3.5mm (1/8") transmitter, male XLR receiver XSW-D PEDALBOARD SET 6.3mm (1/4") transmitter, pedalboard receiver Art. PRODUCT SPECIFICATION 3/5 XS Wireless Digital Portable Interview Set PRODUCT VARIANTS XSW-D PORTABLE INTERVIEW SET...

