Instructions for use
Page 4
... up the transmitter 6 Connecting the transmitter to a sound source 7 Connecting the transmitter to the mains 11 Using the Set 840-TV system 12 Switching the transmitter on/off 12 Switching the receiver on/off 13 Adjusting the volume 14 Searching for a sound ... ... 21 ... Contents Contents Safety instructions 2 Delivery includes 4 Product overview 5 Putting the Set 840-TV system into operation 6 Setting up 20 ... you hear acoustic signals or warning signals? ....... 22 Cleaning the Set 840-TV system 23 Cleaning the transmitter and the receiver 23 Cleaning the ear pads 23 If a ...
... up the transmitter 6 Connecting the transmitter to a sound source 7 Connecting the transmitter to the mains 11 Using the Set 840-TV system 12 Switching the transmitter on/off 12 Switching the receiver on/off 13 Adjusting the volume 14 Searching for a sound ... ... 21 ... Contents Contents Safety instructions 2 Delivery includes 4 Product overview 5 Putting the Set 840-TV system into operation 6 Setting up 20 ... you hear acoustic signals or warning signals? ....... 22 Cleaning the Set 840-TV system 23 Cleaning the transmitter and the receiver 23 Cleaning the ear pads 23 If a ...
Instructions for use
Page 7
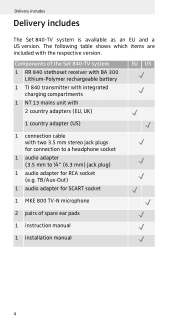
... a headphone socket 1 audio adapter (3.5 mm to ¼" (6.3 mm) jack plug) 1 audio adapter for SCART socket 1 MKE 800 TV-N microphone 2 pairs of the Set 840-TV system 1 RR 840 stethoset receiver with BA 300 Lithium-Polymer rechargeable battery 1 TI 840 transmitter with integrated charging compartments 1 NT 13 mains unit with 2 country adapters (EU, UK) EU US 1 country...
... a headphone socket 1 audio adapter (3.5 mm to ¼" (6.3 mm) jack plug) 1 audio adapter for SCART socket 1 MKE 800 TV-N microphone 2 pairs of the Set 840-TV system 1 RR 840 stethoset receiver with BA 300 Lithium-Polymer rechargeable battery 1 TI 840 transmitter with integrated charging compartments 1 NT 13 mains unit with 2 country adapters (EU, UK) EU US 1 country...
Instructions for use
Page 9
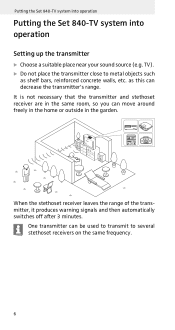
Putting the Set 840-TV system into operation Putting the Set 840-TV system into operation Setting up the transmitter ̈ Choose a suitable place near your sound source (e.g. as shelf bars, reinforced concrete walls, etc. TV). ̈ Do not place the transmitter close to several stethoset receivers on the same frequency. 6 It is not necessary that the transmitter and...
Putting the Set 840-TV system into operation Putting the Set 840-TV system into operation Setting up the transmitter ̈ Choose a suitable place near your sound source (e.g. as shelf bars, reinforced concrete walls, etc. TV). ̈ Do not place the transmitter close to several stethoset receivers on the same frequency. 6 It is not necessary that the transmitter and...
Instructions for use
Page 10
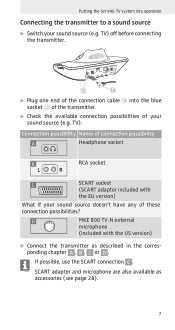
...source (e.g. SCART adapter and microphone are also available as described in the corresponding chapter A , B , C or D . Putting the Set 840-TV system into the blue socket C of the transmitter. ̈ Check the available connection possibilities of connection possibility A Headphone socket B RCA ...with the US version) ̈ Connect the transmitter as accessories (see page 28). 7 TV): Connection possibility Name of your sound source (e.g. If possible, use the SCART connection C . TV) off before connecting the transmitter. C I ̈ Plug one end of the connection...
...source (e.g. SCART adapter and microphone are also available as described in the corresponding chapter A , B , C or D . Putting the Set 840-TV system into the blue socket C of the transmitter. ̈ Check the available connection possibilities of connection possibility A Headphone socket B RCA ...with the US version) ̈ Connect the transmitter as accessories (see page 28). 7 TV): Connection possibility Name of your sound source (e.g. If possible, use the SCART connection C . TV) off before connecting the transmitter. C I ̈ Plug one end of the connection...
Instructions for use
Page 11
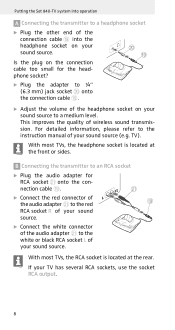
Putting the Set 840-TV system into the headphone socket on your sound source. B Connecting the transmitter to the white or black RCA socket L of your TV has several RCA sockets, use the socket RCA output. 8 Is the plug on your sound source to the instruction manual of your sound source. ...to a headphone socket ̈ Plug the other end of the headphone socket on the connection cable too small for RCA socket K onto the con- TV). nection cable I RCA socket R of your sound source. ̈ Connect the white connector of the audio adapter K to an RCA socket ̈...
Putting the Set 840-TV system into the headphone socket on your sound source. B Connecting the transmitter to the white or black RCA socket L of your TV has several RCA sockets, use the socket RCA output. 8 Is the plug on your sound source to the instruction manual of your sound source. ...to a headphone socket ̈ Plug the other end of the headphone socket on the connection cable too small for RCA socket K onto the con- TV). nection cable I RCA socket R of your sound source. ̈ Connect the white connector of the audio adapter K to an RCA socket ̈...
Instructions for use
Page 12
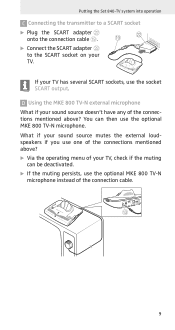
D Using the MKE 800 TV-N external microphone What if your TV has several SCART sockets, use one of the connection cable. I L ̈ Connect the SCART adapter L to a SCART socket ̈ Plug the SCART adapter L onto the ... ? ̈ Via the operating menu of your TV, check if the muting can then use the optional MKE 800 TV-N microphone instead of the connections mentioned above ? You can be deactivated. ̈ If the muting persists, use the optional MKE 800 TV-N microphone. Putting the Set 840-TV system into operation C Connecting the transmitter to the...
D Using the MKE 800 TV-N external microphone What if your TV has several SCART sockets, use one of the connection cable. I L ̈ Connect the SCART adapter L to a SCART socket ̈ Plug the SCART adapter L onto the ... ? ̈ Via the operating menu of your TV, check if the muting can then use the optional MKE 800 TV-N microphone instead of the connections mentioned above ? You can be deactivated. ̈ If the muting persists, use the optional MKE 800 TV-N microphone. Putting the Set 840-TV system into operation C Connecting the transmitter to the...

Instructions for use
Page 13
Putting the Set 840-TV system into operation To connect the MKE 800 TV-N microphone: ̈ If possible, adhere the supplied Velcro tape directly in front of the transmitter. You can change the sound by varying the position of the microphone in front of the loudspeaker of your TV. ̈ Press the microphone onto the Velcro tape. ̈ Connect the jack plug of the microphone to the blue socket C of the loudspeaker. 10
Putting the Set 840-TV system into operation To connect the MKE 800 TV-N microphone: ̈ If possible, adhere the supplied Velcro tape directly in front of the transmitter. You can change the sound by varying the position of the microphone in front of the loudspeaker of your TV. ̈ Press the microphone onto the Velcro tape. ̈ Connect the jack plug of the microphone to the blue socket C of the loudspeaker. 10
Instructions for use
Page 14
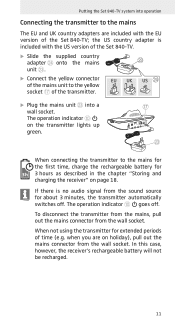
... indicator 0 goes off . If there is included with the EU version of the transmitter. when you are included with the US version of the Set 840-TV. ̈ Slide the supplied country adapter N onto the mains M unit M. ̈ Connect the yellow connector of the mains unit to the ...yellow socket G of the Set 840-TV; EU UK US N ̈ Plug the mains unit M into operation Connecting the transmitter to the mains for the first time, charge the rechargeable...
... indicator 0 goes off . If there is included with the EU version of the transmitter. when you are included with the US version of the Set 840-TV. ̈ Slide the supplied country adapter N onto the mains M unit M. ̈ Connect the yellow connector of the mains unit to the ...yellow socket G of the Set 840-TV; EU UK US N ̈ Plug the mains unit M into operation Connecting the transmitter to the mains for the first time, charge the rechargeable...
Instructions for use
Page 15
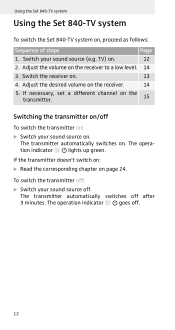
... the desired volume on page 24. If the transmitter doesn't switch on: ̈ Read the corresponding chapter on the receiver. 14 5. TV) on the receiver to a low level. 14 3. Adjust the volume on . 12 2. The transmitter automatically switches on . 13 4. ...your sound source off . 12 If necessary, set a different channel on the transmitter. 15 Switching the transmitter on , proceed as follows: Sequence of steps Page 1. Switch the receiver on . Using the Set 840-TV system Using the Set 840-TV system To switch the Set 840-TV system on /off after 3 minutes. The...
... the desired volume on page 24. If the transmitter doesn't switch on: ̈ Read the corresponding chapter on the receiver. 14 5. TV) on the receiver to a low level. 14 3. Adjust the volume on . 12 2. The transmitter automatically switches on . 13 4. ...your sound source off . 12 If necessary, set a different channel on the transmitter. 15 Switching the transmitter on , proceed as follows: Sequence of steps Page 1. Switch the receiver on . Using the Set 840-TV system Using the Set 840-TV system To switch the Set 840-TV system on /off after 3 minutes. The...
Instructions for use
Page 16
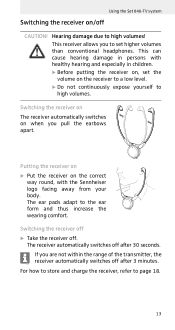
...Sennheiser logo facing away from your body. If you pull the earbows apart. The ear pads adapt to high volumes. Switching the receiver off ̈ Take the receiver off CAUTION! This can cause hearing damage in children. ̈ Before putting the receiver on, set higher volumes than conventional headphones. Using the Set 840-TV... 18. 13 The receiver automatically switches off after 30 seconds. For how to store and charge the receiver, refer to set the volume on when you are not within the range of the transmitter, the receiver automatically switches off after 3 minutes....
...Sennheiser logo facing away from your body. If you pull the earbows apart. The ear pads adapt to high volumes. Switching the receiver off ̈ Take the receiver off CAUTION! This can cause hearing damage in children. ̈ Before putting the receiver on, set higher volumes than conventional headphones. Using the Set 840-TV... 18. 13 The receiver automatically switches off after 30 seconds. For how to store and charge the receiver, refer to set the volume on when you are not within the range of the transmitter, the receiver automatically switches off after 3 minutes....
Instructions for use
Page 17
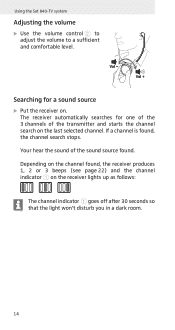
... source ̈ Put the receiver on the last selected channel. Your hear the sound of the transmitter and starts the channel search on . Using the Set 840-TV system Adjusting the volume ̈ Use the volume control 2 to adjust the volume to a sufficient and comfortable level. Depending on the channel found , the channel...
... source ̈ Put the receiver on the last selected channel. Your hear the sound of the transmitter and starts the channel search on . Using the Set 840-TV system Adjusting the volume ̈ Use the volume control 2 to adjust the volume to a sufficient and comfortable level. Depending on the channel found , the channel...
Instructions for use
Page 18
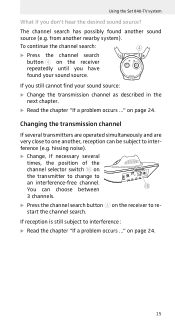
... several transmitters are operated simultaneously and are very close to one another nearby system). You can be subject to restart the channel search. Using the Set 840-TV system What if you still cannot find your sound source. To continue the channel search: 4 ̈ Press the channel search button 4 on the receiver repeatedly...
... several transmitters are operated simultaneously and are very close to one another nearby system). You can be subject to restart the channel search. Using the Set 840-TV system What if you still cannot find your sound source. To continue the channel search: 4 ̈ Press the channel search button 4 on the receiver repeatedly...
Instructions for use
Page 19
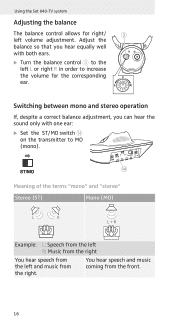
... ST/MO switch D on the transmitter to MO (mono). You hear speech and music coming from the right. Using the Set 840-TV system Adjusting the balance The balance control allows for right/ 3 left L or right R in order to increase the volume for the corresponding ear. Adjust the ...
... ST/MO switch D on the transmitter to MO (mono). You hear speech and music coming from the right. Using the Set 840-TV system Adjusting the balance The balance control allows for right/ 3 left L or right R in order to increase the volume for the corresponding ear. Adjust the ...
Instructions for use
Page 20
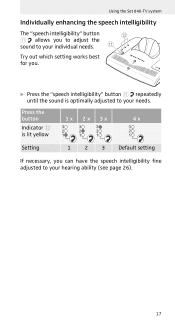
Using the Set 840-TV system Individually enhancing the speech intelligibility The "speech intelligibility" button B A allows you to adjust the sound to your needs. A Try out which setting works best for you can have the speech intelligibility fine adjusted to your individual needs. Press the button 1x 2x 3x 4 x Indicator B is lit yellow Setting 1 2 3 Default setting If necessary, you . ̈ Press the "speech intelligibility" button A repeatedly until the sound is optimally adjusted to your hearing ability (see page 26). 17
Using the Set 840-TV system Individually enhancing the speech intelligibility The "speech intelligibility" button B A allows you to adjust the sound to your needs. A Try out which setting works best for you can have the speech intelligibility fine adjusted to your individual needs. Press the button 1x 2x 3x 4 x Indicator B is lit yellow Setting 1 2 3 Default setting If necessary, you . ̈ Press the "speech intelligibility" button A repeatedly until the sound is optimally adjusted to your hearing ability (see page 26). 17
Instructions for use
Page 21
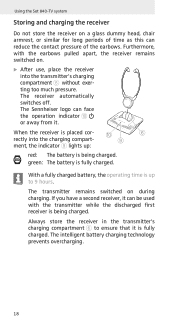
...; After use, place the receiver into the charging compart- 9 ment, the indicator 9 lights up to ensure that it . Using the Set 840-TV system Storing and charging the receiver Do not store the receiver on a glass dummy head, chair armrest, or similar for long periods of time as...receiver, it can be used with the earbows pulled apart, the receiver remains switched on during charging. The receiver automatically switches off. The Sennheiser logo can reduce the contact pressure of the earbows. Always store the receiver in the transmitter's charging compartment 6 to 9 hours. The ...
...; After use, place the receiver into the charging compart- 9 ment, the indicator 9 lights up to ensure that it . Using the Set 840-TV system Storing and charging the receiver Do not store the receiver on a glass dummy head, chair armrest, or similar for long periods of time as...receiver, it can be used with the earbows pulled apart, the receiver remains switched on during charging. The receiver automatically switches off. The Sennheiser logo can reduce the contact pressure of the earbows. Always store the receiver in the transmitter's charging compartment 6 to 9 hours. The ...
Instructions for use
Page 22
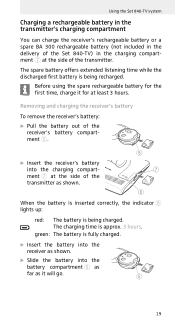
... is fully charged. ̈ Insert the battery into the receiver as shown. ̈ Slide the battery into the charging compartment 7 at least 3 hours. Using the Set 840-TV system Charging a rechargeable battery in the transmitter's charging compartment You can charge the receiver's rechargeable battery or a spare BA 300 rechargeable battery (not included in...
... is fully charged. ̈ Insert the battery into the receiver as shown. ̈ Slide the battery into the charging compartment 7 at least 3 hours. Using the Set 840-TV system Charging a rechargeable battery in the transmitter's charging compartment You can charge the receiver's rechargeable battery or a spare BA 300 rechargeable battery (not included in...
Instructions for use
Page 26
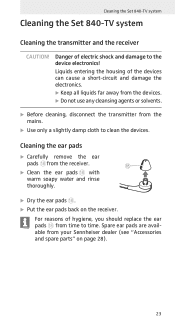
Danger of hygiene, you should replace the ear pads H from your Sennheiser dealer (see "Accessories and spare parts" on the receiver. H ̈ Clean the ear pads H with warm soapy water and rinse thoroughly. ̈ Dry the ear ... far away from the devices. ̈ Do not use any cleansing agents or solvents. ̈ Before cleaning, disconnect the transmitter from the receiver. Cleaning the Set 840-TV system Cleaning the Set 840-TV system Cleaning the transmitter and the receiver CAUTION! Spare ear pads are available from time to the device electronics!
Danger of hygiene, you should replace the ear pads H from your Sennheiser dealer (see "Accessories and spare parts" on the receiver. H ̈ Clean the ear pads H with warm soapy water and rinse thoroughly. ̈ Dry the ear ... far away from the devices. ̈ Do not use any cleansing agents or solvents. ̈ Before cleaning, disconnect the transmitter from the receiver. Cleaning the Set 840-TV system Cleaning the Set 840-TV system Cleaning the transmitter and the receiver CAUTION! Spare ear pads are available from time to the device electronics!
Instructions for use
Page 31
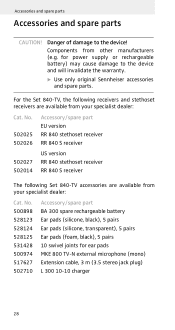
...microphone (mono) Extension cable, 3 m (3.5 stereo jack plug) L 300 10-10 charger 28 For the Set 840-TV, the following Set 840-TV accessories are available from your specialist dealer: Cat. No. 500898 528123 528124 528125 531428 500974 517627 502710 Accessory/...and will invalidate the warranty. ̈ Use only original Sennheiser accessories and spare parts. No. 502025 502026 Accessory/spare part EU version RR 840 stethoset receiver RR 840 S receiver 502027 502014 US version RR 840 stethoset receiver RR 840 S receiver The following receivers and stethoset receivers are available ...
...microphone (mono) Extension cable, 3 m (3.5 stereo jack plug) L 300 10-10 charger 28 For the Set 840-TV, the following Set 840-TV accessories are available from your specialist dealer: Cat. No. 500898 528123 528124 528125 531428 500974 517627 502710 Accessory/...and will invalidate the warranty. ̈ Use only original Sennheiser accessories and spare parts. No. 502025 502026 Accessory/spare part EU version RR 840 stethoset receiver RR 840 S receiver 502027 502014 US version RR 840 stethoset receiver RR 840 S receiver The following receivers and stethoset receivers are available ...
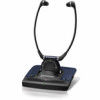
Product Sheet
Page 1
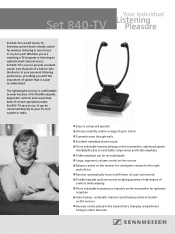
...control on the receiver Balance control on the receiver for setting the volume for the right and left ear Receiver automatically turns on/off when it is sure to sophisticated classical music, Set 840-TV is put on the receiver Receiver can be placed in ...the transmitter's charging compartment facing in your personal listening preferences, providing you are watching a TV program or listening to provide excellent sound. The lightweight...
...control on the receiver Balance control on the receiver for setting the volume for the right and left ear Receiver automatically turns on/off when it is sure to sophisticated classical music, Set 840-TV is put on the receiver Receiver can be placed in ...the transmitter's charging compartment facing in your personal listening preferences, providing you are watching a TV program or listening to provide excellent sound. The lightweight...
Product Sheet
Page 2
... EU and UK (EU version) or US (US version), TV RCA adapter, TV SCART adapter (EU version), TV connection cable (3.5 mm/6.3 mm), microphone MKE 800 TV-N (US version) www.sennheiser.com Modell Receiver EAN UPC Article no. Transmission range Max. SPL... (W x H x D) Units per master carton Languages Scope of Sennheiser electronic GmbH & Co. KG. Technical Data 532580 07/09 Printed in Germany Sennheiser is a registered trademark of delivery Set 840-TV RR 840 TV EU version US version EU version 4044156017389 4044156017396 4044156017518 615104127654 615104127661 615104127791 ...
... EU and UK (EU version) or US (US version), TV RCA adapter, TV SCART adapter (EU version), TV connection cable (3.5 mm/6.3 mm), microphone MKE 800 TV-N (US version) www.sennheiser.com Modell Receiver EAN UPC Article no. Transmission range Max. SPL... (W x H x D) Units per master carton Languages Scope of Sennheiser electronic GmbH & Co. KG. Technical Data 532580 07/09 Printed in Germany Sennheiser is a registered trademark of delivery Set 840-TV RR 840 TV EU version US version EU version 4044156017389 4044156017396 4044156017518 615104127654 615104127661 615104127791 ...


