
Instructions for Use
Page 32
... Selecting a frequency memory 48 16 Adjusting the sensitivity (SEnSit 49 17 Selecting the sensitivity range (Att 50 18 Switching the phantom powering on/off (PHAnto 51 19 Selecting the content of the standard display (DiSPL 52 20 Configuring a frequency memory 53 Setting a frequency (tunE 54 Assigning a channel number (Ch no 55 21 Activating/deactivating the lock-mode function (LOC 56 22 Error checklist 58...
... Selecting a frequency memory 48 16 Adjusting the sensitivity (SEnSit 49 17 Selecting the sensitivity range (Att 50 18 Switching the phantom powering on/off (PHAnto 51 19 Selecting the content of the standard display (DiSPL 52 20 Configuring a frequency memory 53 Setting a frequency (tunE 54 Assigning a channel number (Ch no 55 21 Activating/deactivating the lock-mode function (LOC 56 22 Error checklist 58...
Instructions for Use
Page 33
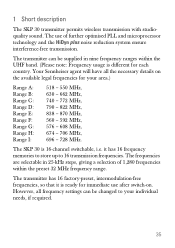
..., 696 - 728 MHz. Your Sennheiser agent will have all frequency settings can be changed to 16 transmission frequencies. The transmitter can be supplied in 25-kHz steps, giving a selection of further optimised PLL and microprocessor technology and the HiDyn plus noise reduction system ensure interference-free transmission. 1 Short description The SKP 30 transmitter permits wireless transmission with studioquality sound. However, all the necessary...
..., 696 - 728 MHz. Your Sennheiser agent will have all frequency settings can be changed to 16 transmission frequencies. The transmitter can be supplied in 25-kHz steps, giving a selection of further optimised PLL and microprocessor technology and the HiDyn plus noise reduction system ensure interference-free transmission. 1 Short description The SKP 30 transmitter permits wireless transmission with studioquality sound. However, all the necessary...

Instructions for Use
Page 34
2 Special features • Diecast metal casing • State-of-the-art PLL technology, 16 switchable channels • HiDyn plus noise reduction system • Signal-to-noise ratio > 114 dB(A) • Battery status indication with "LowBat" warning on the transmitter and transmission of "LowBat" warning to suitable receivers • Switchable 48 V phantom powering for powering condenser microphones • Balanced microphone input 3 Areas of application • Suitable for a wide variety of applications • Converts any wired microphone to wireless 36
2 Special features • Diecast metal casing • State-of-the-art PLL technology, 16 switchable channels • HiDyn plus noise reduction system • Signal-to-noise ratio > 114 dB(A) • Battery status indication with "LowBat" warning on the transmitter and transmission of "LowBat" warning to suitable receivers • Switchable 48 V phantom powering for powering condenser microphones • Balanced microphone input 3 Areas of application • Suitable for a wide variety of applications • Converts any wired microphone to wireless 36

Instructions for Use
Page 36
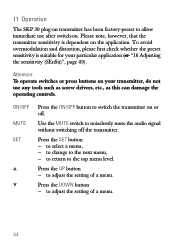
5 Operating controls ᕡᕢ ᕧᕨ ᕩµ ³ Microphone input, XLR-3 socket · Mechanical locking ring of XLR-3 socket » LC display ¿ SET button ´ ̄ button (DOWN) ² ̆ button (UP) ¶ MUTE switch º Battery compartment ¾ ON/OFF button µ Red LED for operation and battery status indication 38
5 Operating controls ᕡᕢ ᕧᕨ ᕩµ ³ Microphone input, XLR-3 socket · Mechanical locking ring of XLR-3 socket » LC display ¿ SET button ´ ̄ button (DOWN) ² ̆ button (UP) ¶ MUTE switch º Battery compartment ¾ ON/OFF button µ Red LED for operation and battery status indication 38

Instructions for Use
Page 39
.../OFF button until "OFF" appears on . With the phantom powering switched on, the operating time of the battery will be reduced to switch the transmitter on the display and/or the red LED goes off. For dynamic microphones: Via the menu, switch off the plug-on the phantom powering (P48) (u page 51). The red LED µ lights up. ̈ For phantom powered condenser microphones: Via the menu, switch on transmitter before changing the microphone...
.../OFF button until "OFF" appears on . With the phantom powering switched on, the operating time of the battery will be reduced to switch the transmitter on the display and/or the red LED goes off. For dynamic microphones: Via the menu, switch off the plug-on the phantom powering (P48) (u page 51). The red LED µ lights up. ̈ For phantom powered condenser microphones: Via the menu, switch on transmitter before changing the microphone...
Instructions for Use
Page 42
...; Press the ON/OFF button to select a menu, - Press the DOWN button - to switch the transmitter on or off the transmitter. to change to noiselessly mute the audio signal without switching off . Attention: To operate switches or press buttons on the application. Use the MUTE switch to the next menu, - Press the UP button - 11 Operation The SKP 30 plug-on transmitter has been factory-preset to adjust the setting of a menu. 44 Please note, however...
...; Press the ON/OFF button to select a menu, - Press the DOWN button - to switch the transmitter on or off the transmitter. to change to noiselessly mute the audio signal without switching off . Attention: To operate switches or press buttons on the application. Use the MUTE switch to the next menu, - Press the UP button - 11 Operation The SKP 30 plug-on transmitter has been factory-preset to adjust the setting of a menu. 44 Please note, however...

Instructions for Use
Page 43
... display for battery status 13 Basic functions of the menu is indicated. 45 one second, the selected menu appears on the display and then the current setting of the Sennheiser operating menu The SKP 30 offers straightforward, menu-assisted operation via the SET, ̆ and ̄ buttons. Your selection becomes effective immediately. Press the SET button to enter the top menu level: By briefly pressing SET again, you can change...
... display for battery status 13 Basic functions of the menu is indicated. 45 one second, the selected menu appears on the display and then the current setting of the Sennheiser operating menu The SKP 30 offers straightforward, menu-assisted operation via the SET, ̆ and ̄ buttons. Your selection becomes effective immediately. Press the SET button to enter the top menu level: By briefly pressing SET again, you can change...

Instructions for Use
Page 44
...: New settings become effective immediately and will be taken to avoid causing interference to the previous setting, the flashing stops. N.B.: When changing transmission frequencies, care should be retained in memory on the display. If you return to other channels/ users. Press the ̆/̄ buttons to the top menu level. Press the SET button to return to adjust the settings of the selected menu: The new setting starts flashing on switch...
...: New settings become effective immediately and will be taken to avoid causing interference to the previous setting, the flashing stops. N.B.: When changing transmission frequencies, care should be retained in memory on the display. If you return to other channels/ users. Press the ̆/̄ buttons to the top menu level. Press the SET button to return to adjust the settings of the selected menu: The new setting starts flashing on switch...

Instructions for Use
Page 45
14 Overview of menus Display SEnSit Att PHAnto DiSPL tunE Ch no LOC Possible adjustments Adjusting the sensitivity (u page 49) Selecting the sensitivity range (u page 50) Switching the phantom powering for condenser microphones on/off (u page 51) Selecting the content of the standard display (u page 52) Changing the transmission frequency (u page 54) Changing the channel number (u page 55) Locking the operating controls to prevent accidental programming / Unlocking the operating controls (u page 56) 47
14 Overview of menus Display SEnSit Att PHAnto DiSPL tunE Ch no LOC Possible adjustments Adjusting the sensitivity (u page 49) Selecting the sensitivity range (u page 50) Switching the phantom powering for condenser microphones on/off (u page 51) Selecting the content of the standard display (u page 52) Changing the transmission frequency (u page 54) Changing the channel number (u page 55) Locking the operating controls to prevent accidental programming / Unlocking the operating controls (u page 56) 47

Instructions for Use
Page 46
...; Press the SET button to show the frequency setting as standard. 48 Note: You can directly switch between the factory-preset fixed frequency memories (presets). whether the frequency or the channel number is displayed (u "19 Selecting the content of the standard display i.e. The display starts flashing. 15 Selecting a frequency memory - The transmitter is not pressed, the transmitter will store the new frequency automatically on switch-off). selecting a frequency and channel number ̈...
...; Press the SET button to show the frequency setting as standard. 48 Note: You can directly switch between the factory-preset fixed frequency memories (presets). whether the frequency or the channel number is displayed (u "19 Selecting the content of the standard display i.e. The display starts flashing. 15 Selecting a frequency memory - The transmitter is not pressed, the transmitter will store the new frequency automatically on switch-off). selecting a frequency and channel number ̈...
Instructions for Use
Page 47
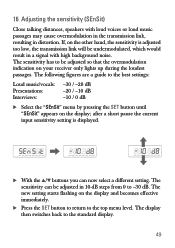
... -30 dB. The display then switches back to the top menu level. 16 Adjusting the sensitivity (SEnSit) Close talking distances, speakers with high background noise. If, on the other hand, the sensitivity is displayed. ̈ With the ̆/̄ buttons you can be adjusted so that the overmodulation indication on your receiver only lights up during the loudest passages. The new setting starts fl...
... -30 dB. The display then switches back to the top menu level. 16 Adjusting the sensitivity (SEnSit) Close talking distances, speakers with high background noise. If, on the other hand, the sensitivity is displayed. ̈ With the ̆/̄ buttons you can be adjusted so that the overmodulation indication on your receiver only lights up during the loudest passages. The new setting starts fl...
Instructions for Use
Page 48
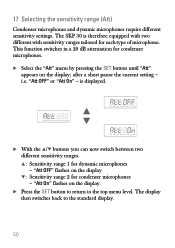
17 Selecting the sensitivity range (Att) Condenser microphones and dynamic microphones require different sensitivity settings. The SKP 30 is displayed. ̆ ̄ ̈ With the ̆/̄ buttons you can now switch between two different sensitivity ranges. ̆: Sensitivity range 1 for each type of microphone. "Att On" flashes on the display. ̈ Press the SET button to return to the standard display. 50 after a short pause the current...
17 Selecting the sensitivity range (Att) Condenser microphones and dynamic microphones require different sensitivity settings. The SKP 30 is displayed. ̆ ̄ ̈ With the ̆/̄ buttons you can now switch between two different sensitivity ranges. ̆: Sensitivity range 1 for each type of microphone. "Att On" flashes on the display. ̈ Press the SET button to return to the standard display. 50 after a short pause the current...
Instructions for Use
Page 49
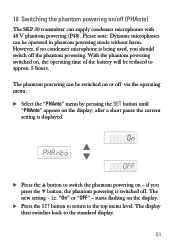
... powering on/off (PHAnto) The SKP 30 transmitter can be switched on or off via the operating menu: ̈ Select the "PHAnto" menu by pressing the SET button until "PHAnto" appears on the display; With the phantom powering switched on the display. ̈ Press the SET button to return to approx. 5 hours. if you should switch off . i.e. starts flashing on , the operating time of the battery will be operated in phantom powering mode...
... powering on/off (PHAnto) The SKP 30 transmitter can be switched on or off via the operating menu: ̈ Select the "PHAnto" menu by pressing the SET button until "PHAnto" appears on the display; With the phantom powering switched on the display. ̈ Press the SET button to return to approx. 5 hours. if you should switch off . i.e. starts flashing on , the operating time of the battery will be operated in phantom powering mode...

Instructions for Use
Page 50
... display then switches back to the top menu level. whether the frequency or the channel number is displayed. ̆ ̄ ̈ With the ̆/̄ buttons you can choose the content of the standard display (DiSPL) You can now choose between: Frequency: "FrEqu" Channel number: "ChAnnL" The new setting for the standard display starts flashing on the display; after a short pause the current setting is displayed. ̈ Select the "DiSPL" menu...
... display then switches back to the top menu level. whether the frequency or the channel number is displayed. ̆ ̄ ̈ With the ̆/̄ buttons you can choose the content of the standard display (DiSPL) You can now choose between: Frequency: "FrEqu" Channel number: "ChAnnL" The new setting for the standard display starts flashing on the display; after a short pause the current setting is displayed. ̈ Select the "DiSPL" menu...
Instructions for Use
Page 51
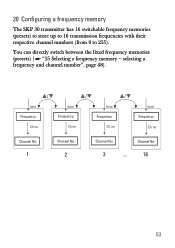
Channel No. 3 ... 16 53 selecting a frequency and channel number", page 48). į/Ĭ į/Ĭ į/Ĭ tune tune tune tune Frequency Frequency Frequency Frequency Ch no Ch no Ch no Ch no Channel No. 1 Channel No. 2 Channel No. You can directly switch between the fixed frequency memories (presets) ( u "15 Selecting a frequency memory - 20 Configuring a frequency memory The SKP 30 transmitter has 16 switchable frequency memories (presets) to store up to 16 transmission frequencies with their respective channel numbers (from 0 to 255).
Channel No. 3 ... 16 53 selecting a frequency and channel number", page 48). į/Ĭ į/Ĭ į/Ĭ tune tune tune tune Frequency Frequency Frequency Frequency Ch no Ch no Ch no Ch no Channel No. 1 Channel No. 2 Channel No. You can directly switch between the fixed frequency memories (presets) ( u "15 Selecting a frequency memory - 20 Configuring a frequency memory The SKP 30 transmitter has 16 switchable frequency memories (presets) to store up to 16 transmission frequencies with their respective channel numbers (from 0 to 255).
Instructions for Use
Page 52
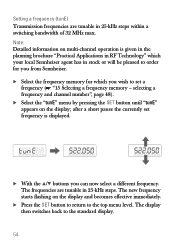
... in 25-kHz steps within a switching bandwidth of 32 MHz max. Note: Detailed information on multi-channel operation is displayed. ̈ With the ̆/̄ buttons you wish to set a frequency (u "15 Selecting a frequency memory - after a short pause the currently set frequency is given in the planning brochure "Practical Applications in RF Technology" which your local Sennheiser agent has in stock or...
... in 25-kHz steps within a switching bandwidth of 32 MHz max. Note: Detailed information on multi-channel operation is displayed. ̈ With the ̆/̄ buttons you wish to set a frequency (u "15 Selecting a frequency memory - after a short pause the currently set frequency is given in the planning brochure "Practical Applications in RF Technology" which your local Sennheiser agent has in stock or...
Instructions for Use
Page 53
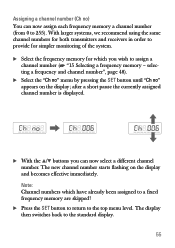
The new channel number starts flashing on the display; The display then switches back to 255). Assigning a channel number (Ch no " appears on the display and becomes effective immediately. Note: Channel numbers which you can now assign each frequency memory a channel number (from 0 to the standard display. 55 With larger systems, we recommend using the same channel numbers for both transmitters and receivers in order to provide for simpler monitoring of...
The new channel number starts flashing on the display; The display then switches back to 255). Assigning a channel number (Ch no " appears on the display and becomes effective immediately. Note: Channel numbers which you can now assign each frequency memory a channel number (from 0 to the standard display. 55 With larger systems, we recommend using the same channel numbers for both transmitters and receivers in order to provide for simpler monitoring of...
Instructions for Use
Page 54
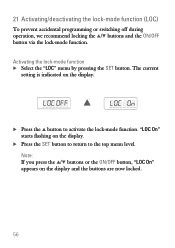
... setting is indicated on the display and the buttons are now locked. 56 Activating the lock-mode function ̈ Select the "LOC" menu by pressing the SET button. 21 Activating/deactivating the lock-mode function (LOC) To prevent accidental programming or switching off during operation, we recommend locking the ̆/̄ buttons and the ON/OFF button via the lock-mode function. Note: If you press the ̆/̄ buttons...
... setting is indicated on the display and the buttons are now locked. 56 Activating the lock-mode function ̈ Select the "LOC" menu by pressing the SET button. 21 Activating/deactivating the lock-mode function (LOC) To prevent accidental programming or switching off during operation, we recommend locking the ̆/̄ buttons and the ON/OFF button via the lock-mode function. Note: If you press the ̆/̄ buttons...

Instructions for Use
Page 55
The display switches back to deactivate the lock-mode function. "LOC On" appears on the display. ̈ Press the SET button to return to the top menu level. "LOC OFF" starts flashing on the display. ̄ ̈ Press the ̄ button to the standard display and the buttons can now be operated as usual. 57 Deactivating the lock-mode function ̈ Select the "LOC" menu by pressing the SET button.
The display switches back to deactivate the lock-mode function. "LOC On" appears on the display. ̈ Press the SET button to return to the top menu level. "LOC OFF" starts flashing on the display. ̄ ̈ Press the ̄ button to the standard display and the buttons can now be operated as usual. 57 Deactivating the lock-mode function ̈ Select the "LOC" menu by pressing the SET button.
Instructions for Use
Page 56
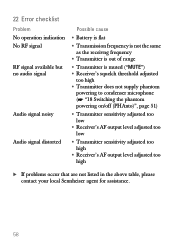
22 Error checklist Problem No operation indication No RF signal RF signal available but no audio signal Audio signal noisy Audio signal distorted Possible cause ț Battery is flat ț Transmission frequency is not the same as the receivng frequency ț Transmitter is out of range ț Transmitter is muted ("MUTE") ț Receiver's squelch threshold adjusted too high ț Transmitter does not supply phantom powering to condenser microphone (u "18 Switching the phantom powering on/off (PHAnto)", page...
22 Error checklist Problem No operation indication No RF signal RF signal available but no audio signal Audio signal noisy Audio signal distorted Possible cause ț Battery is flat ț Transmission frequency is not the same as the receivng frequency ț Transmitter is out of range ț Transmitter is muted ("MUTE") ț Receiver's squelch threshold adjusted too high ț Transmitter does not supply phantom powering to condenser microphone (u "18 Switching the phantom powering on/off (PHAnto)", page...


