
Instructions for Use
Page 2
... with a receiver 17 Synchronizing the plug-on transmitter with receivers - multi-channel operation 17 Cleaning the plug-on transmitter 18 Recommendations and tips 18 If a problem occurs 19 Accessories ...20 Specifications ...21 Manufacturer Declarations 22 Index ...23 Supplementary information can be found on the SKP 100 G3 product page on our website at www.sennheiser.com. 1
... with a receiver 17 Synchronizing the plug-on transmitter with receivers - multi-channel operation 17 Cleaning the plug-on transmitter 18 Recommendations and tips 18 If a problem occurs 19 Accessories ...20 Specifications ...21 Manufacturer Declarations 22 Index ...23 Supplementary information can be found on the SKP 100 G3 product page on our website at www.sennheiser.com. 1

Instructions for Use
Page 4
...SKP 100 G3 Combinable with studio-quality sound. Receivers all dynamic microphones EK 100 G3 diversity receiver We recommend using dynamic Sennheiser microphones condenser microphones that • a transmission system is ready for immediate use . the Sennheiser K6 system EM 100 G3 stationary receiver PEAK 20.12 EM 100...receivers are available in the same UHF frequency ranges and are not phantompowered, e.g. The SKP 100 G3 plug-on transmitter The SKP 100 G3 plug-on transmitter This plug-on transmitter is available in 6 UHF frequency ranges with 1,680 transmission frequencies per ...
...SKP 100 G3 Combinable with studio-quality sound. Receivers all dynamic microphones EK 100 G3 diversity receiver We recommend using dynamic Sennheiser microphones condenser microphones that • a transmission system is ready for immediate use . the Sennheiser K6 system EM 100 G3 stationary receiver PEAK 20.12 EM 100...receivers are available in the same UHF frequency ranges and are not phantompowered, e.g. The SKP 100 G3 plug-on transmitter The SKP 100 G3 plug-on transmitter This plug-on transmitter is available in 6 UHF frequency ranges with 1,680 transmission frequencies per ...
Instructions for Use
Page 5
For an overview of the frequency information sheet can be downloaded from the SKP 100 G3 product page on transmitter 2 AA size batteries, 1.5 V 1 instruction manual 1 frequency information sheet 1 RF power information sheet 4 Updated versions of the frequency presets, please refer to ... might be changed. Delivery includes The factory-preset frequencies within one frequency bank are not intermodulation-free. Delivery includes The packaging contains the following items: 1 SKP 100 G3 plug-on our website at www.sennheiser.com.
For an overview of the frequency information sheet can be downloaded from the SKP 100 G3 product page on transmitter 2 AA size batteries, 1.5 V 1 instruction manual 1 frequency information sheet 1 RF power information sheet 4 Updated versions of the frequency presets, please refer to ... might be changed. Delivery includes The factory-preset frequencies within one frequency bank are not intermodulation-free. Delivery includes The packaging contains the following items: 1 SKP 100 G3 plug-on our website at www.sennheiser.com.
Instructions for Use
Page 6
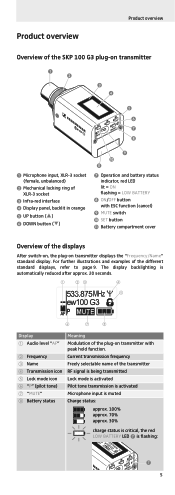
...4712; "MUTE" Lock mode is activated Pilot tone transmission is activated Microphone input is muted ቩ Battery status Charge status: approx. 100% approx. 70% approx. 30% charge status is critical, the red LOW BATTERY LED ¶ is automatically reduced after approx. 20 ...5 Current transmission frequency ቤ Name Freely selectable name of the displays After switch-on, the plug-on transmitter displays the "Frequency/Name" standard display. Product overview Product overview Overview of the SKP 100 G3 plug-on transmitter ³ · » ¿ ´ ² ¶ º...
...4712; "MUTE" Lock mode is activated Pilot tone transmission is activated Microphone input is muted ቩ Battery status Charge status: approx. 100% approx. 70% approx. 30% charge status is critical, the red LOW BATTERY LED ¶ is automatically reduced after approx. 20 ...5 Current transmission frequency ቤ Name Freely selectable name of the displays After switch-on, the plug-on transmitter displays the "Frequency/Name" standard display. Product overview Product overview Overview of the SKP 100 G3 plug-on transmitter ³ · » ¿ ´ ² ¶ º...

Instructions for Use
Page 7
... uses the microphone body as shown below. Plugging the plug-on page 20). The L 2015 charger can either use two 1.5 V AA size batteries or the rechargeable Sennheiser BA 2015 accupack (see "Accessories" on transmitter onto a microphone ̈ Plug the microphone's XLR-3M socket onto the ...184; ̈ Close the battery compartment. therefore microphones with an audible click. Putting the plug-on transmitter into operation Putting the plug-on transmitter into operation Inserting the batteries/accupack For powering the plug-on transmitter, you can only charge the BA 2015 accupack.
... uses the microphone body as shown below. Plugging the plug-on page 20). The L 2015 charger can either use two 1.5 V AA size batteries or the rechargeable Sennheiser BA 2015 accupack (see "Accessories" on transmitter onto a microphone ̈ Plug the microphone's XLR-3M socket onto the ...184; ̈ Close the battery compartment. therefore microphones with an audible click. Putting the plug-on transmitter into operation Putting the plug-on transmitter into operation Inserting the batteries/accupack For powering the plug-on transmitter, you can only charge the BA 2015 accupack.
Instructions for Use
Page 8
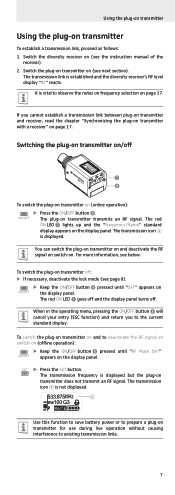
...signal. The plug-on page ...plug-on transmitter and receiver, read the chapter "Synchronizing the plug-on transmitter with a receiver" on . To switch the plug... the plug-on...plug-on the display panel. You can switch the plug...-on transmitter on and deactivate the RF signal on switch-on page 17. SET ̈ Press the SET button. Switch the diversity receiver on (online operation): ON/OFF ̈ Press the ON/OFF button º. Switching the plug...-on transmitter on/off ¶ º To switch the plug-on transmitter on (see the instruction manual of the receiver). 2. To switch the plug...
...signal. The plug-on page ...plug-on transmitter and receiver, read the chapter "Synchronizing the plug-on transmitter with a receiver" on . To switch the plug... the plug-on...plug-on the display panel. You can switch the plug...-on transmitter on and deactivate the RF signal on switch-on page 17. SET ̈ Press the SET button. Switch the diversity receiver on (online operation): ON/OFF ̈ Press the ON/OFF button º. Switching the plug...-on transmitter on/off ¶ º To switch the plug-on transmitter on (see the instruction manual of the receiver). 2. To switch the plug...

Instructions for Use
Page 9
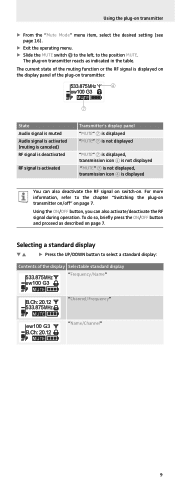
... to mute the audio signal or to the left (position MUTE) Mutes the audio signal ... to deactivate the RF signal. How you are using the plug-on transmitter: ̈ Press the ON/OFF button. The lock mode icon ቦ flashes prior to the left (position MUTE) Deactivates the RF signal (... the RF signal: ̈ Press the ON/OFF button. The lock mode is displayed again. to the lock mode being activated again. 533.875MHz ew100 G3 ቦ AF P MUTE Muting the audio signal or deactivating the RF signal ¾ The MUTE switch ¾ allows you exit the operating menu. Using ...
... to mute the audio signal or to the left (position MUTE) Mutes the audio signal ... to deactivate the RF signal. How you are using the plug-on transmitter: ̈ Press the ON/OFF button. The lock mode icon ቦ flashes prior to the left (position MUTE) Deactivates the RF signal (... the RF signal: ̈ Press the ON/OFF button. The lock mode is displayed again. to the lock mode being activated again. 533.875MHz ew100 G3 ቦ AF P MUTE Muting the audio signal or deactivating the RF signal ¾ The MUTE switch ¾ allows you exit the operating menu. Using ...
Instructions for Use
Page 10
...indicated in the table. Selecting a standard display ̈ Press the UP/DOWN button to select a standard display: Contents of the plug-on transmitter: 533.875MHz ብ ew100 G3 AF P MUTE ቨ State Audio signal is muted Audio signal is activated (muting is canceled) RF signal is deactivated RF ...page 7. The plug-on page 7. The current state of the muting function or the RF signal is displayed on the display panel of the display Selectable standard display 533.875MHz ew100 G3 AF P MUTE "Frequency/Name" B.Ch: 20.12 533.875MHz AF P MUTE "Channel/Frequency" ew100 G3 B.Ch: 20....
...indicated in the table. Selecting a standard display ̈ Press the UP/DOWN button to select a standard display: Contents of the plug-on transmitter: 533.875MHz ብ ew100 G3 AF P MUTE ቨ State Audio signal is muted Audio signal is activated (muting is canceled) RF signal is deactivated RF ...page 7. The plug-on page 7. The current state of the muting function or the RF signal is displayed on the display panel of the display Selectable standard display 533.875MHz ew100 G3 AF P MUTE "Frequency/Name" B.Ch: 20.12 533.875MHz AF P MUTE "Channel/Frequency" ew100 G3 B.Ch: 20....
Instructions for Use
Page 11
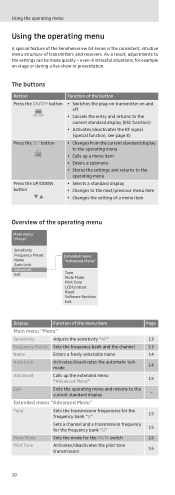
... made quickly - Using the operating menu Using the operating menu A special feature of the Sennheiser ew G3 series is the consistent, intuitive menu structure of the button Press the ON/OFF button ON/OFF • Switches the plug-on transmitter on stage or during a live show or presentation. The buttons Button Function of...
... made quickly - Using the operating menu Using the operating menu A special feature of the Sennheiser ew G3 series is the consistent, intuitive menu structure of the button Press the ON/OFF button ON/OFF • Switches the plug-on transmitter on stage or during a live show or presentation. The buttons Button Function of...
Instructions for Use
Page 14
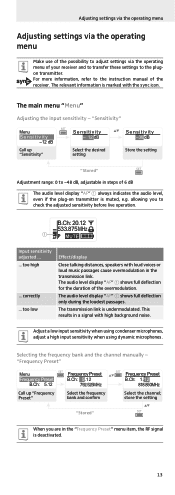
... transfer these settings to -48 dB, adjustable in steps of 6 dB The audio level display "AF" ቢ always indicates the audio level, even if the plug-on transmitter is muted, e.g. The audio level display "AF" ቢ shows full deflection only during the loudest passages. Selecting the frequency bank and the channel...
... transfer these settings to -48 dB, adjustable in steps of 6 dB The audio level display "AF" ቢ always indicates the audio level, even if the plug-on transmitter is muted, e.g. The audio level display "AF" ቢ shows full deflection only during the loudest passages. Selecting the frequency bank and the channel...

Instructions for Use
Page 15
... SET button to change to the next segment/ character or to observe the notes on frequency selection on the current standard display indicates that the plug-on the "Frequency/Name" and "Name/ Channel" standard displays (see page 9). "Auto Lock" Menu Auto Lock Active Call up "Name" SET Name Lichael Enter a ... up to 8 characters such as follows: ̈ Press the UP/DOWN button to select a character. Entering a name - the name of the performer) for the plug-on how to use the lock mode, refer to select the desired setting. The lock mode icon ቦ on page 17. Adjusting settings via the...
... SET button to change to the next segment/ character or to observe the notes on frequency selection on the current standard display indicates that the plug-on the "Frequency/Name" and "Name/ Channel" standard displays (see page 9). "Auto Lock" Menu Auto Lock Active Call up "Name" SET Name Lichael Enter a ... up to 8 characters such as follows: ̈ Press the UP/DOWN button to select a character. Entering a name - the name of the performer) for the plug-on how to use the lock mode, refer to select the desired setting. The lock mode icon ቦ on page 17. Adjusting settings via the...

Instructions for Use
Page 16
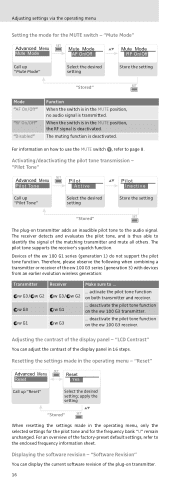
... a transmission frequency. SET ̈ Press the SET button. "Tune" When you have selected one of the system banks and then select the "Tune" menu, the plug-on the display panel. SET Advanced Menu Tune Tune 543 .200 MHz B.Ch: U. 1 Call up "Tune" (special function) Tune 548.200 MHz B.Ch: U. 1 Select the...
... a transmission frequency. SET ̈ Press the SET button. "Tune" When you have selected one of the system banks and then select the "Tune" menu, the plug-on the display panel. SET Advanced Menu Tune Tune 543 .200 MHz B.Ch: U. 1 Call up "Tune" (special function) Tune 548.200 MHz B.Ch: U. 1 Select the...
Instructions for Use
Page 17
...combining a transmitter or receiver of the display panel - For information on the ew 100 G3 transmitter. Activating/deactivating the pilot tone transmission - Adjusting the contrast of the ew 100 G3 series (generation 3) with devices from an earlier evolution wireless generation: Transmitter Receiver Make...The plug-on transmitter. 16 The receiver detects and evaluates the pilot tone, and is deactivated. deactivate the pilot tone function on both transmitter and receiver. Displaying the software revision - activate the pilot tone function w G3/ w G2 on the ew 100 G3 receiver....
...combining a transmitter or receiver of the display panel - For information on the ew 100 G3 transmitter. Activating/deactivating the pilot tone transmission - Adjusting the contrast of the ew 100 G3 series (generation 3) with devices from an earlier evolution wireless generation: Transmitter Receiver Make...The plug-on transmitter. 16 The receiver detects and evaluates the pilot tone, and is deactivated. deactivate the pilot tone function on both transmitter and receiver. Displaying the software revision - activate the pilot tone function w G3/ w G2 on the ew 100 G3 receiver....

Instructions for Use
Page 18
...you have to synchronize the channels of the receiver. If you set the plug-on transmitter to the instruction manual of the devices. multi-channel operation Combined with ew 100 G3 receivers, ew 100 G3 plug-on transmitters can be used in your receiver. For more information on ... that the desired frequencies are synchronized with each other. on multi-channel operation, visit the SKP 100 G3 product page at www.sennheiser.com. 17 Alternatively, you can set the channel on the plug-on transmitter manually: ̈ Make sure that can form transmission links that you still cannot...
...you have to synchronize the channels of the receiver. If you set the plug-on transmitter to the instruction manual of the devices. multi-channel operation Combined with ew 100 G3 receivers, ew 100 G3 plug-on transmitters can be used in your receiver. For more information on ... that the desired frequencies are synchronized with each other. on multi-channel operation, visit the SKP 100 G3 product page at www.sennheiser.com. 17 Alternatively, you can set the channel on the plug-on transmitter manually: ̈ Make sure that can form transmission links that you still cannot...

Instructions for Use
Page 19
...use the channels within one frequency bank. Recommendations and tips ... Liquids entering the housing of 20 cm between plug-on transmitter and receiving antennas. • The plug-on transmitter! therefore microphones with a metal casing should only use any solvents or cleansing agents. ̈ ... to a large extent on location and can cause a short-circuit and damage the electronics. ̈ Keep all liquids away from the plug-on transmitter • For best results, make sure that the transmitter sensitivity is correctly adjusted. ... for best signal transmission. ... for...
...use the channels within one frequency bank. Recommendations and tips ... Liquids entering the housing of 20 cm between plug-on transmitter and receiving antennas. • The plug-on transmitter! therefore microphones with a metal casing should only use any solvents or cleansing agents. ̈ ... to a large extent on location and can cause a short-circuit and damage the electronics. ̈ Keep all liquids away from the plug-on transmitter • For best results, make sure that the transmitter sensitivity is correctly adjusted. ... for best signal transmission. ... for...
Instructions for Use
Page 20
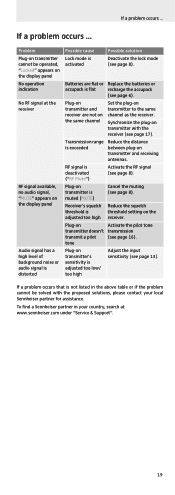
...If a problem occurs that is flat recharge the accupack (see page 8). Plug-on transmitter and receiver are flat or Replace the batteries or accupack is not listed in your local Sennheiser partner for assistance. Plug-on transmitter's sensitivity is deactivated ("RF Mute") Activate the RF signal (... Transmission range is muted (MUTE) Cancel the muting (see page 17). Plug-on the display panel No operation indication No RF signal at www.sennheiser.com under "Service & Support". 19 To find a Sennheiser partner in the above table or if the problem cannot be operated, "Locked...
...If a problem occurs that is flat recharge the accupack (see page 8). Plug-on transmitter and receiver are flat or Replace the batteries or accupack is not listed in your local Sennheiser partner for assistance. Plug-on transmitter's sensitivity is deactivated ("RF Mute") Activate the RF signal (... Transmission range is muted (MUTE) Cancel the muting (see page 17). Plug-on the display panel No operation indication No RF signal at www.sennheiser.com under "Service & Support". 19 To find a Sennheiser partner in the above table or if the problem cannot be operated, "Locked...

Instructions for Use
Page 22
input voltage Input impedance Adjustment range of input sensitivity Sennheiser HDX 80-18,000 Hz ≥ 110 dBA ≤0.9 % 3.3 Vrms 60 kΩ, unbalanced 48 dB, adjustable in steps of 6 dB Overall device Temperature range -10 &#... up to 12 user programmable channels 42 MHz ±24 kHz/±48 kHz ≤ ±15 ppm typ. 30 mW can be switched off plug-on ≤25 µA transmitter Operating time typ. 8 hrs Dimensions approx. 105 mm x 43 mm x 43 mm Weight (incl. Specifications Specifications RF characteristics Modulation Frequency...
input voltage Input impedance Adjustment range of input sensitivity Sennheiser HDX 80-18,000 Hz ≥ 110 dBA ≤0.9 % 3.3 Vrms 60 kΩ, unbalanced 48 dB, adjustable in steps of 6 dB Overall device Temperature range -10 &#... up to 12 user programmable channels 42 MHz ±24 kHz/±48 kHz ≤ ±15 ppm typ. 30 mW can be switched off plug-on ≤25 µA transmitter Operating time typ. 8 hrs Dimensions approx. 105 mm x 43 mm x 43 mm Weight (incl. Specifications Specifications RF characteristics Modulation Frequency...

Instructions for Use
Page 23
.... These limits are available at www.sennheiser.com. Before putting the device into operation, please observe the respective country-specific regulations! 22 This class B digital device complies with RSS-210 of the plug-on a circuit different from that may cause ...undesired operation. Statements regarding FCC and Industry Canada This device complies with Part 15 of its operational lifetime by Sennheiser electronic Corp. Manufacturer Declarations Pin assignment of Conformity ...
.... These limits are available at www.sennheiser.com. Before putting the device into operation, please observe the respective country-specific regulations! 22 This class B digital device complies with RSS-210 of the plug-on a circuit different from that may cause ...undesired operation. Statements regarding FCC and Industry Canada This device complies with Part 15 of its operational lifetime by Sennheiser electronic Corp. Manufacturer Declarations Pin assignment of Conformity ...

Instructions for Use
Page 24
... B batteries, inserting 6 buttons (function of the ~) 10 C channel assigning a frequency 15 overview 3 selecting (Frequency Preset) 13 setting (Tune) 15 charging accupack 6 battery status display 5 cleaning (plug-on transmitter) 18 connecting (microphones) 6 D deactivating temporarily (lock mode) 8 displays adjusting the contrast of the display panel (LCD Contrast) 16 charge status 5 overview 5 standard displays...
... B batteries, inserting 6 buttons (function of the ~) 10 C channel assigning a frequency 15 overview 3 selecting (Frequency Preset) 13 setting (Tune) 15 charging accupack 6 battery status display 5 cleaning (plug-on transmitter) 18 connecting (microphones) 6 D deactivating temporarily (lock mode) 8 displays adjusting the contrast of the display panel (LCD Contrast) 16 charge status 5 overview 5 standard displays...

Instructions for Use
Page 25
...revision) 16 Tune (setting a transmission frequency) 15 using 11 P Pilot Tone (activating/deactivating the pilot tone transmission) 16 plug-on transmitter cleaning 18 switching on/off 7 synchronizing with receiver 17 R Reset (resetting the settings in the operating menu) 16... system 17 transmission link 17 Software Revision (displaying the software revision) 16 standard display, selecting 9 switching on/off (plug-on transmitter) 7 synchronizing (plug-on transmitter/receiver) 17 T transmission frequency selecting (Frequency Preset) 13 setting (Tune) 15 transmission power, optimizing 18 ...
...revision) 16 Tune (setting a transmission frequency) 15 using 11 P Pilot Tone (activating/deactivating the pilot tone transmission) 16 plug-on transmitter cleaning 18 switching on/off 7 synchronizing with receiver 17 R Reset (resetting the settings in the operating menu) 16... system 17 transmission link 17 Software Revision (displaying the software revision) 16 standard display, selecting 9 switching on/off (plug-on transmitter) 7 synchronizing (plug-on transmitter/receiver) 17 T transmission frequency selecting (Frequency Preset) 13 setting (Tune) 15 transmission power, optimizing 18 ...