Instructions for use
Page 2
NAME 25 Adjusting the microphone sensitivity - EXIT 27 If problems occur 28 Error checklist 28 Maintenance and care 29 Specifications 30 Accessories 31 Manufacturer declarations 32 Warranty regulations... the standard display - Contents Safety instructions 5 Delivery includes 6 The SKM 5200 radio microphone 6 The operating controls 8 Indications and displays 9 Preparing the radio microphone for use 10 Inserting, removing and changing the power pack 10 Changing the microphone head 12 Switching the radio microphone on/off 13 Doing a frequency check 14 The operating menu 15...
NAME 25 Adjusting the microphone sensitivity - EXIT 27 If problems occur 28 Error checklist 28 Maintenance and care 29 Specifications 30 Accessories 31 Manufacturer declarations 32 Warranty regulations... the standard display - Contents Safety instructions 5 Delivery includes 6 The SKM 5200 radio microphone 6 The operating controls 8 Indications and displays 9 Preparing the radio microphone for use 10 Inserting, removing and changing the power pack 10 Changing the microphone head 12 Switching the radio microphone on/off 13 Doing a frequency check 14 The operating menu 15...
Instructions for use
Page 3
... batteries may even present an explosion and fire hazard. Protect the radio microphone from abuse or misuse. Safety instructions for damage arising from damp and wet. Please understand that Sennheiser does not accept liability for handling rechargeable batteries When used properly, rechargeable... your specialist dealer. y Do not mutilate or dismantle rechargeable batteries. y Make these instructions carefully and completely before using the radio microphone. y Do not throw rechargeable batteries into fire. y Store rechargeable batteries in extreme cases, may leak and, in a safe ...
... batteries may even present an explosion and fire hazard. Protect the radio microphone from abuse or misuse. Safety instructions for damage arising from damp and wet. Please understand that Sennheiser does not accept liability for handling rechargeable batteries When used properly, rechargeable... your specialist dealer. y Do not mutilate or dismantle rechargeable batteries. y Make these instructions carefully and completely before using the radio microphone. y Do not throw rechargeable batteries into fire. y Store rechargeable batteries in extreme cases, may leak and, in a safe ...
Instructions for use
Page 4
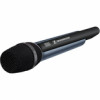
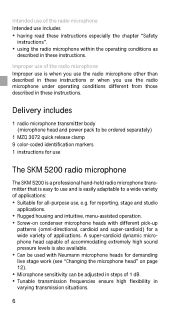
..., stage and studio applications. y Can be ordered separately) 1 MZQ 3072 quick release clamp 9 color-coded identification markers 1 instructions for use The SKM 5200 radio microphone The SKM 5200 is a professional hand-held radio microphone transmitter that is easy to use , e.g. y Screw-on page 12). y Tunable transmission frequencies ensure high flexibility in these instructions especially the chapter...
..., stage and studio applications. y Can be ordered separately) 1 MZQ 3072 quick release clamp 9 color-coded identification markers 1 instructions for use The SKM 5200 radio microphone The SKM 5200 is a professional hand-held radio microphone transmitter that is easy to use , e.g. y Screw-on page 12). y Tunable transmission frequencies ensure high flexibility in these instructions especially the chapter...
Instructions for use
Page 5
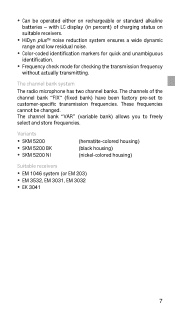
...(variable bank) allows you to customer-specific transmission frequencies. y Can be changed. y Color-coded identification markers for checking the transmission frequency without actually transmitting. Variants y SKM 5200 y SKM 5200 BK y SKM 5200 NI (hematite-colored housing) (black housing) (nickel-colored housing) Suitable receivers y EM 1046 system (or EM 203) y EM 3532, EM 3031, EM 3032 ...and store frequencies. y HiDyn plus™ noise reduction system ensures a wide dynamic range and low residual noise. The channel bank system The radio microphone has two channel banks.
...(variable bank) allows you to customer-specific transmission frequencies. y Can be changed. y Color-coded identification markers for checking the transmission frequency without actually transmitting. Variants y SKM 5200 y SKM 5200 BK y SKM 5200 NI (hematite-colored housing) (black housing) (nickel-colored housing) Suitable receivers y EM 1046 system (or EM 203) y EM 3532, EM 3031, EM 3032 ...and store frequencies. y HiDyn plus™ noise reduction system ensures a wide dynamic range and low residual noise. The channel bank system The radio microphone has two channel banks.
Instructions for use
Page 6
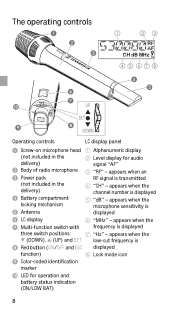
... appears when an RF signal is displayed ² LC display ቧ "MHz" - appears when the microphone sensitivity is transmitted (not included in the delivery) · Body of radio microphone » Power pack ባ Level display for operation and battery status indication (ON/LOW BAT) 8... · » ቤ RF AF CH dB MHz ¿ ¶ UP SET DOWN Operating controls LC display panel ³ Screw-on microphone head ቢ Alphanumeric display (not included in the delivery) ¿ Battery compartment locking mechanism ´ Antenna ብ "CH" - appears when ...
... appears when an RF signal is displayed ² LC display ቧ "MHz" - appears when the microphone sensitivity is transmitted (not included in the delivery) · Body of radio microphone » Power pack ባ Level display for operation and battery status indication (ON/LOW BAT) 8... · » ቤ RF AF CH dB MHz ¿ ¶ UP SET DOWN Operating controls LC display panel ³ Screw-on microphone head ቢ Alphanumeric display (not included in the delivery) ¿ Battery compartment locking mechanism ´ Antenna ብ "CH" - appears when ...
Instructions for use
Page 7
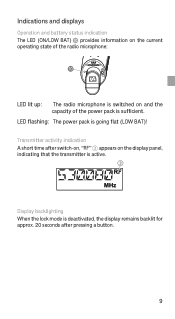
... displays Operation and battery status indication The LED (ON/LOW BAT) µ provides information on the current operating state of the radio microphone: µ LED lit up: The radio microphone is switched on the display panel, indicating that the transmitter is active. ቤ RF MHz Display backlighting When the lock mode is...
... displays Operation and battery status indication The LED (ON/LOW BAT) µ provides information on the current operating state of the radio microphone: µ LED lit up: The radio microphone is switched on the display panel, indicating that the transmitter is active. ቤ RF MHz Display backlighting When the lock mode is...
Instructions for use
Page 8
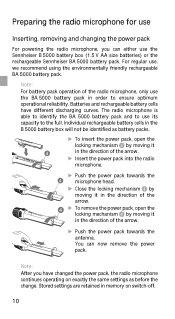
...either use its capacity to ensure optimum operational reliability. The radio microphone is able to identify the BA 5000 battery pack and to use the Sennheiser B 5000 battery box (1.5 V AA size batteries) or the rechargeable Sennheiser BA 5000 battery pack. Note: For battery pack operation of the... arrow. ̈ Push the power pack towards the ¿ microphone head. ̈ Close the locking mechanism...
...either use its capacity to ensure optimum operational reliability. The radio microphone is able to identify the BA 5000 battery pack and to use the Sennheiser B 5000 battery box (1.5 V AA size batteries) or the rechargeable Sennheiser BA 5000 battery pack. Note: For battery pack operation of the... arrow. ̈ Push the power pack towards the ¿ microphone head. ̈ Close the locking mechanism...
Instructions for use
Page 10
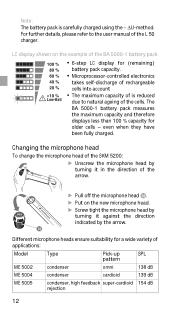
... 100 % capacity for (remaining) battery pack capacity. even when they have been fully charged. Changing the microphone head To change the microphone head of the SKM 5200: ̈ Unscrew the microphone head by turning it against the direction indicated by turning it in the direction of the arrow. ̈... Pull off the microphone head ƹ. ̈ Put on the example of the BA 5000-1 battery pack y 6-step LC...
... 100 % capacity for (remaining) battery pack capacity. even when they have been fully charged. Changing the microphone head To change the microphone head of the SKM 5200: ̈ Unscrew the microphone head by turning it against the direction indicated by turning it in the direction of the arrow. ̈... Pull off the microphone head ƹ. ̈ Put on the example of the BA 5000-1 battery pack y 6-step LC...
Instructions for use
Page 11
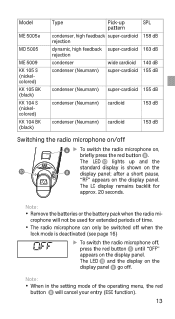
...µ and the display on the display panel ᕦ go off when the lock mode is shown on the º display panel; y The radio microphone can only be used for approx. 20 seconds. The LC display remains backlit for extended periods of the operating menu, the red button º will...KK 104 S (nickelcolored) KK 104 BK (black) Type Pick-up and the µ standard display is deactivated (see page 16) ̈ To switch the radio microphone off, press the red button º until "OFF" appears on the display panel. Note: y When in the setting mode of time. Note: y Remove the ...
...µ and the display on the display panel ᕦ go off when the lock mode is shown on the º display panel; y The radio microphone can only be used for approx. 20 seconds. The LC display remains backlit for extended periods of the operating menu, the red button º will...KK 104 S (nickelcolored) KK 104 BK (black) Type Pick-up and the µ standard display is deactivated (see page 16) ̈ To switch the radio microphone off, press the red button º until "OFF" appears on the display panel. Note: y When in the setting mode of time. Note: y Remove the ...
Instructions for use
Page 12
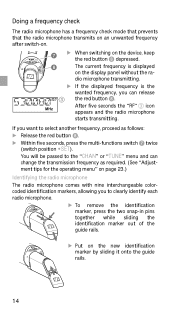
... the red button º. ̈ Within five seconds, press the multi-functions switch ¶ twice (switch position țSET). dio microphone transmitting. ̈ If the displayed frequency is displayed on the display panel without the ra- After five seconds the "RF" ቤ icon... appears and the radio microphone starts transmitting. Doing a frequency check The radio microphone has a frequency check mode that prevents that the radio microphone transmits on an unwanted frequency after switch-on. ¶ ̈ When switching on...
... the red button º. ̈ Within five seconds, press the multi-functions switch ¶ twice (switch position țSET). dio microphone transmitting. ̈ If the displayed frequency is displayed on the display panel without the ra- After five seconds the "RF" ቤ icon... appears and the radio microphone starts transmitting. Doing a frequency check The radio microphone has a frequency check mode that prevents that the radio microphone transmits on an unwanted frequency after switch-on. ¶ ̈ When switching on...
Instructions for use
Page 13
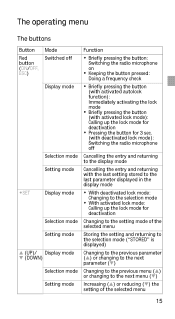
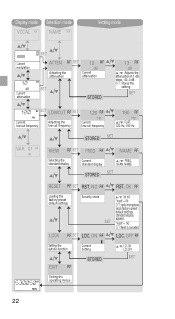
... Setting mode ̆ (UP)/ Display mode ̄ (DOWN) Selection mode Setting mode Function y Briefly pressing the button: Switching the radio microphone y on Keeping the button pressed: Doing a frequency check y Briefly pressing the button (with activated autolock function): Immediately activating the lock y ...Calling up the lock mode for deactivation y Pressing the button for 3 sec. (with deactivated lock mode): Switching the radio microphone off Cancelling the entry and returning to the display mode Cancelling the entry and returning with the last setting stored to the ...
... Setting mode ̆ (UP)/ Display mode ̄ (DOWN) Selection mode Setting mode Function y Briefly pressing the button: Switching the radio microphone y on Keeping the button pressed: Doing a frequency check y Briefly pressing the button (with activated autolock function): Immediately activating the lock y ...Calling up the lock mode for deactivation y Pressing the button for 3 sec. (with deactivated lock mode): Switching the radio microphone off Cancelling the entry and returning to the display mode Cancelling the entry and returning with the last setting stored to the ...
Instructions for use
Page 14
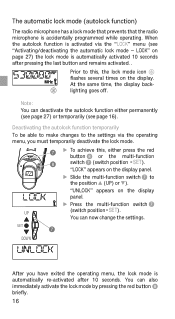
... button º or the multi-function º switch ¶ (switch position țSET). The automatic lock mode (autolock function) The radio microphone has a lock mode that prevents that the radio microphone is automatically re-activated after pressing the last button and remains activated. . "LOCK" appears on the display. SET ¶ DOWN After...
... button º or the multi-function º switch ¶ (switch position țSET). The automatic lock mode (autolock function) The radio microphone has a lock mode that prevents that the radio microphone is automatically re-activated after pressing the last button and remains activated. . "LOCK" appears on the display. SET ¶ DOWN After...
Instructions for use
Page 16
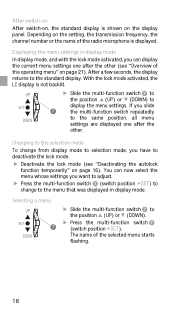
... display mode. Selecting a menu UP SET ¶ DOWN ̈ Slide the multi-function switch ¶ to display the menu settings. The name of the radio microphone is not backlit. If you can now select the menu whose settings you have to the menu that was displayed in display mode In display...
... display mode. Selecting a menu UP SET ¶ DOWN ̈ Slide the multi-function switch ¶ to display the menu settings. The name of the radio microphone is not backlit. If you can now select the menu whose settings you have to the menu that was displayed in display mode In display...
Instructions for use
Page 17
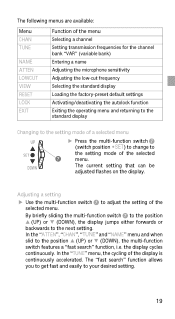
... LOWCUT VIEW RESET LOCK EXIT Function of the menu Selecting a channel Setting transmission frequencies for the channel bank "VAR" (variable bank) Entering a name Adjusting the microphone sensitivity Adjusting the low-cut frequency Selecting the standard display Loading the factory-preset default settings Activating/deactivating the autolock function Exiting the operating menu...
... LOWCUT VIEW RESET LOCK EXIT Function of the menu Selecting a channel Setting transmission frequencies for the channel bank "VAR" (variable bank) Entering a name Adjusting the microphone sensitivity Adjusting the low-cut frequency Selecting the standard display Loading the factory-preset default settings Activating/deactivating the autolock function Exiting the operating menu...
Instructions for use
Page 20
OK RF Loading the factory-preset default settings Security check / : OK, NO "reset" = OK: SET: radio microphone laods factory-preset default settings, standard display appears SET "reset" = NO : SET:Reset is cancelled LOCK RF SET LOC. ON RF LOC. OFF RF Setting ...
OK RF Loading the factory-preset default settings Security check / : OK, NO "reset" = OK: SET: radio microphone laods factory-preset default settings, standard display appears SET "reset" = NO : SET:Reset is cancelled LOCK RF SET LOC. ON RF LOC. OFF RF Setting ...
Instructions for use
Page 21
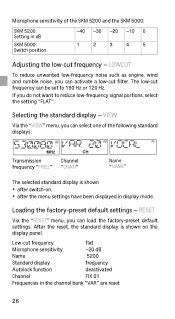
...the operating menu Selecting a channel - Note: When you have selected the channel bank "FIX" and then select the "TUNE" menu, the radio microphone automatically switches to only use intermodulation-free frequencies. 23 Note: When operating a multi-channel system, make sure to channel 01 of the "CHAN"...to be stored in the channel bank "VAR" - The transmission frequencies are tunable in the channel banks "FIX" and "VAR". The radio microphone is not transmitting while this adjustment is displayed. CHAN Via the "CHAN" menu, you can switch between the channels in 5-kHz steps within ...
...the operating menu Selecting a channel - Note: When you have selected the channel bank "FIX" and then select the "TUNE" menu, the radio microphone automatically switches to only use intermodulation-free frequencies. 23 Note: When operating a multi-channel system, make sure to channel 01 of the "CHAN"...to be stored in the channel bank "VAR" - The transmission frequencies are tunable in the channel banks "FIX" and "VAR". The radio microphone is not transmitting while this adjustment is displayed. CHAN Via the "CHAN" menu, you can switch between the channels in 5-kHz steps within ...
Instructions for use
Page 23
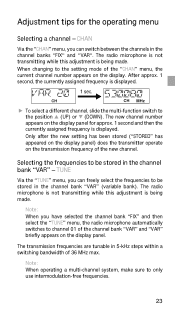
...as: y letters (without pronounciation marks), y numbers from -40 dB to 9, y special characters and spaces. ATTEN Via the "ATTEN" menu, you can adjust the radio microphone's sensitivity by changing its input attenuation. ቩ The input attenuation is correctly adjusted when the level display for the radio... microphone. Entering a name - NAME Via the "NAME" menu, you can enter a freely selectable name for audio RF signal "AF" ቩ shows full deflection only dB...
...as: y letters (without pronounciation marks), y numbers from -40 dB to 9, y special characters and spaces. ATTEN Via the "ATTEN" menu, you can adjust the radio microphone's sensitivity by changing its input attenuation. ቩ The input attenuation is correctly adjusted when the level display for the radio... microphone. Entering a name - NAME Via the "NAME" menu, you can enter a freely selectable name for audio RF signal "AF" ቩ shows full deflection only dB...
Instructions for use
Page 24
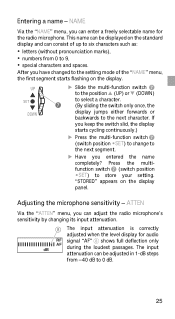
...Via the "VIEW" menu, you do not want to 190 Hz or 120 Hz. The low-cut frequency flat Microphone sensitivity -20 dB Name 5200 Standard display frequency Autolock function deactivated Channel FIX 01 Frequencies in the channel bank "VAR" are reset 26 After the ... can select one of the SKM 5200 and the SKM 5000: SKM 5200: Setting in dB SKM 5000: Switch position -40 -30 -20 -10 0 1 2 3 4 5 Adjusting the low-cut filter. Loading the factory-preset default settings - If you can load the factory-preset default settings. Microphone sensitivity of the following standard...
...Via the "VIEW" menu, you do not want to 190 Hz or 120 Hz. The low-cut frequency flat Microphone sensitivity -20 dB Name 5200 Standard display frequency Autolock function deactivated Channel FIX 01 Frequencies in the channel bank "VAR" are reset 26 After the ... can select one of the SKM 5200 and the SKM 5000: SKM 5200: Setting in dB SKM 5000: Switch position -40 -30 -20 -10 0 1 2 3 4 5 Adjusting the low-cut filter. Loading the factory-preset default settings - If you can load the factory-preset default settings. Microphone sensitivity of the following standard...
Instructions for use
Page 25
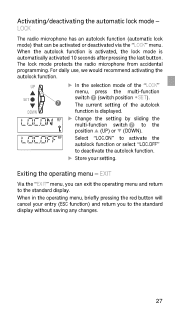
... the "EXIT" menu, you to the standard display. When in the operating menu, briefly pressing the red button will cancel your setting. LOCK The radio microphone has an autolock function (automatic lock mode) that can exit the operating menu and return to the standard display without saving any changes. 27 For...;SET). ¶ The current setting of the autolock function is automatically activated 10 seconds after pressing the last button. The lock mode protects the radio microphone from accidental programming. Activating/deactivating the automatic lock mode -
... the "EXIT" menu, you to the standard display. When in the operating menu, briefly pressing the red button will cancel your setting. LOCK The radio microphone has an autolock function (automatic lock mode) that can exit the operating menu and return to the standard display without saving any changes. 27 For...;SET). ¶ The current setting of the autolock function is automatically activated 10 seconds after pressing the last button. The lock mode protects the radio microphone from accidental programming. Activating/deactivating the automatic lock mode -
Instructions for use
Page 26
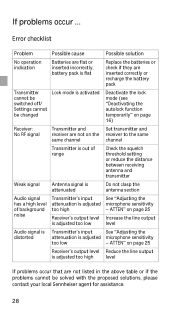
ATTEN" on page 25 Increase the line output level Audio signal is Transmitter's input See "Adjusting the distorted attenuation is adjusted microphone sensitivity too low - ATTEN" on page 25 Receiver's output level Reduce the line output is adjusted too high level If ...receiver are not listed in the above table or if the problems cannot be solved with the proposed solutions, please contact your local Sennheiser agent for assistance. 28 Error checklist Problem Possible cause Possible solution No operation indication Batteries are flat or inserted incorrectly, battery pack is...
ATTEN" on page 25 Increase the line output level Audio signal is Transmitter's input See "Adjusting the distorted attenuation is adjusted microphone sensitivity too low - ATTEN" on page 25 Receiver's output level Reduce the line output is adjusted too high level If ...receiver are not listed in the above table or if the problems cannot be solved with the proposed solutions, please contact your local Sennheiser agent for assistance. 28 Error checklist Problem Possible cause Possible solution No operation indication Batteries are flat or inserted incorrectly, battery pack is...

