
Instructions for Use
Page 37
... (transmitter only 60 Adjusting the squelch threshold (receiver section only 61 Selecting the content of the standard display 61 Configuring a frequency memory 62 Operating steps for configuring a frequency memory 62 Activating/deactivating the lock mode 64 Acoustically adapting the Soundfield System to a room 65 9 Care and maintenance 66 Replacing the windscreen 66 10 Troubleshooting 67 Error checklist 67 11 Recommended accessories 69 12 Specifications 70 EMP 2015 receiver/amplifier...
... (transmitter only 60 Adjusting the squelch threshold (receiver section only 61 Selecting the content of the standard display 61 Configuring a frequency memory 62 Operating steps for configuring a frequency memory 62 Activating/deactivating the lock mode 64 Acoustically adapting the Soundfield System to a room 65 9 Care and maintenance 66 Replacing the windscreen 66 10 Troubleshooting 67 Error checklist 67 11 Recommended accessories 69 12 Specifications 70 EMP 2015 receiver/amplifier...
Instructions for Use
Page 39
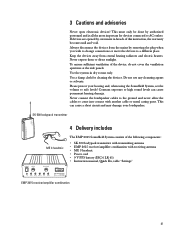
... in dry rooms only. Use a damp cloth for devices connected to high sound levels can cause a short circuit and may damage your hearing and, when using the Soundfield System, set the volume to come into contact with receiving antenna • ME 3 headmic • Power cord • 9 V PP3 battery (IEC 6 LR 61) • Instruction manual, Quick Fix, table "Settings" EMP 2015 receiver/amplifier combination 41 Use the system in breach...
... in dry rooms only. Use a damp cloth for devices connected to high sound levels can cause a short circuit and may damage your hearing and, when using the Soundfield System, set the volume to come into contact with receiving antenna • ME 3 headmic • Power cord • 9 V PP3 battery (IEC 6 LR 61) • Instruction manual, Quick Fix, table "Settings" EMP 2015 receiver/amplifier combination 41 Use the system in breach...
Instructions for Use
Page 40
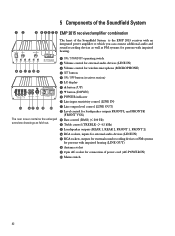
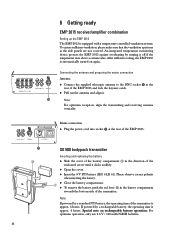
... EMP 2015 receiver with an integrated power amplifier to which you can connect additional audio and sound recording devices as well as FM systems for persons with impaired hearing. ᕡ ON / STAND BY operating switch ᕢ Volume control for external audio devices (LINE IN) ᕣ Volume control for wireless microphone (MICROPHONE) ᕤ SET button ᕥ ON / OFF button (receiver section) ² LC display ᕧ ̆ button (UP) º ̄ button (DOWN) ᕩ POWER indicator µ Line input sensitivity control...
... EMP 2015 receiver with an integrated power amplifier to which you can connect additional audio and sound recording devices as well as FM systems for persons with impaired hearing. ᕡ ON / STAND BY operating switch ᕢ Volume control for external audio devices (LINE IN) ᕣ Volume control for wireless microphone (MICROPHONE) ᕤ SET button ᕥ ON / OFF button (receiver section) ² LC display ᕧ ̆ button (UP) º ̄ button (DOWN) ᕩ POWER indicator µ Line input sensitivity control...
Instructions for Use
Page 41
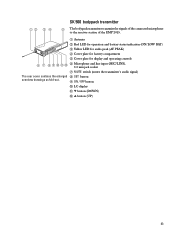
... of the EMP 2015. ቢ Antenna ባ Red LED for operation and battery status indication (ON/LOW BAT) ቤ Yellow LED for audio peak (AF PEAK) ብ Cover plate for battery compartment ቦ Cover plate for display and operating controls ቧ ቨ ቧ Microphone and line input (MIC/LINE), 3.5 mm jack socket ቨ MUTE switch (mutes the transmitter's audio signal) The rear cover contains the enlarged ቩ SET button overview drawings...
... of the EMP 2015. ቢ Antenna ባ Red LED for operation and battery status indication (ON/LOW BAT) ቤ Yellow LED for audio peak (AF PEAK) ብ Cover plate for battery compartment ቦ Cover plate for display and operating controls ቧ ቨ ቧ Microphone and line input (MIC/LINE), 3.5 mm jack socket ቨ MUTE switch (mutes the transmitter's audio signal) The rear cover contains the enlarged ቩ SET button overview drawings...
Instructions for Use
Page 42
... of the transmitter. Connecting the antenna and preparing the mains connection Antenna Ǡ Connect the supplied telescopic antenna to the BNC socket ƺ at the side panels are not covered. Note: If powered by a rechargeable battery, the operating time is approx. 6 hours. Mains connection Ǡ Plug the power cord into socket ƾ at the rear of the EMP 2015. ƾ ቯ SK 500 bodypack transmitter Inserting and replacing the battery Ǡ...
... of the transmitter. Connecting the antenna and preparing the mains connection Antenna Ǡ Connect the supplied telescopic antenna to the BNC socket ƺ at the side panels are not covered. Note: If powered by a rechargeable battery, the operating time is approx. 6 hours. Mains connection Ǡ Plug the power cord into socket ƾ at the rear of the EMP 2015. ƾ ቯ SK 500 bodypack transmitter Inserting and replacing the battery Ǡ...

Instructions for Use
Page 45
... damage your speaker. Ǡ Connect a loudspeaker cable to the amplifer. When installing a system with another cable or metal casing parts. When using more than one loudspeaker to each loudspeaker separately to each loudspeaker. Ǡ Connect each loudspeaker output ƺ. ƺ 47 This can connect up to the EMP 2015 Soundfield System. Danger of the loudspeaker cables must be 30 W minimum. During operation, the ends...
... damage your speaker. Ǡ Connect a loudspeaker cable to the amplifer. When installing a system with another cable or metal casing parts. When using more than one loudspeaker to each loudspeaker separately to each loudspeaker. Ǡ Connect each loudspeaker output ƺ. ƺ 47 This can connect up to the EMP 2015 Soundfield System. Danger of the loudspeaker cables must be 30 W minimum. During operation, the ends...

Instructions for Use
Page 46
... by setting the mains switch ƿ to "ON". Adjust the volume of the microphone Set the MICROPHONE volume control ᕣ to noiselessly mute the transmitter's audio signal (this switch does not turn the transmitter on. Adjusting the volume of the connected audio devices after turn the transmitter off, press and hold the ON / OFF button until ቦ "OFF" appears on the display. The red LED ባ lights up. Ǡ To turn -on. Muting the transmitter Use the MUTE switch...
... by setting the mains switch ƿ to "ON". Adjust the volume of the microphone Set the MICROPHONE volume control ᕣ to noiselessly mute the transmitter's audio signal (this switch does not turn the transmitter on. Adjusting the volume of the connected audio devices after turn the transmitter off, press and hold the ON / OFF button until ቦ "OFF" appears on the display. The red LED ባ lights up. Ǡ To turn -on. Muting the transmitter Use the MUTE switch...
Instructions for Use
Page 49
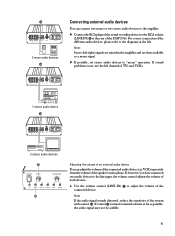
... EMP 2015. VCR) separately from the volume of the connected device. If sound problems occur, use the left channel of TVs and VCRs. 1 stereo audio device ƻ 2 stereo audio devices ᕢ µ Adjusting the volume of an external audio device You can connect two mono or two stereo audio devices to the amplifier. Ǡ Connect the RCA plugs of the sound recording devices to "mono" operation. If control µ is turned counterclockwise as far as a mono signal...
... EMP 2015. VCR) separately from the volume of the connected device. If sound problems occur, use the left channel of TVs and VCRs. 1 stereo audio device ƻ 2 stereo audio devices ᕢ µ Adjusting the volume of an external audio device You can connect two mono or two stereo audio devices to the amplifier. Ǡ Connect the RCA plugs of the sound recording devices to "mono" operation. If control µ is turned counterclockwise as far as a mono signal...
Instructions for Use
Page 50
... FM transmitter transmits the signals of one of the two RCA sockets (LINE OUT) Ƽ at the rear of the EMP 2015. Ǡ Connect the 3.5 mm jack plug of the connecting cable to the line input of Ƽ the FM transmitter. Ƽ Connecting FM systems for persons with a line or audio input which should be used for the first time, connect it via monitoring headphones to ensure problem-free operation. EMP 2015...
... FM transmitter transmits the signals of one of the two RCA sockets (LINE OUT) Ƽ at the rear of the EMP 2015. Ǡ Connect the 3.5 mm jack plug of the connecting cable to the line input of Ƽ the FM transmitter. Ƽ Connecting FM systems for persons with a line or audio input which should be used for the first time, connect it via monitoring headphones to ensure problem-free operation. EMP 2015...

Instructions for Use
Page 52
... each loudspeaker separately to 8 ohms. The peak pulse power must be 30 W minimum. Never connect the loudspeaker cables to the ground and never allow the cables to each loudspeaker. Ǡ Connect each loudspeaker output ƺ. ƺ 54 This can cause a short circuit and may damage your speaker. Ǡ Connect a loudspeaker cable to come into contact with up to eight...
... each loudspeaker separately to 8 ohms. The peak pulse power must be 30 W minimum. Never connect the loudspeaker cables to the ground and never allow the cables to each loudspeaker. Ǡ Connect each loudspeaker output ƺ. ƺ 54 This can cause a short circuit and may damage your speaker. Ǡ Connect a loudspeaker cable to come into contact with up to eight...
Instructions for Use
Page 53
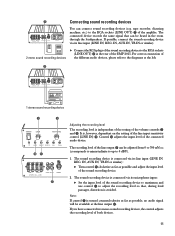
... similar). 2 mono sound recording devices Ǡ Connect the RCA plugs of the sound recording devices to the diagrams at the rear of the sound recording device. 2. The sound recording device is turned counterclockwise as far as possible and adjust the input level of the EMP 2015. IN, AUX IN, TB IN or similar): Ǡ Turn control ¸ clockwise as far as possible, no audio signal will be adjusted from 0 to 700...
... similar). 2 mono sound recording devices Ǡ Connect the RCA plugs of the sound recording devices to the diagrams at the rear of the sound recording device. 2. The sound recording device is turned counterclockwise as far as possible and adjust the input level of the EMP 2015. IN, AUX IN, TB IN or similar): Ǡ Turn control ¸ clockwise as far as possible, no audio signal will be adjusted from 0 to 700...
Instructions for Use
Page 54
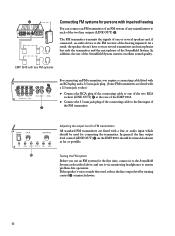
... the line input, the volume control adjusts the volume of the connected receiver. The signals of the EMP 2015. Note: Transmitter and receiver of each transmission link have connected two receivers to operate on the same frequency which must differ from the frequencies used by the loudspeakers. Connecting an EM 500 receiver EMP 2015 with an 1/4" (6.3 mm) jack plug and an RCA plug (u "Recommended accessories"). Ǡ Prepare the receiver for configuring a frequency memory"). Adjusting the volume of the connected receivers Ǡ Use the volume control (LINE...
... the line input, the volume control adjusts the volume of the connected receiver. The signals of the EMP 2015. Note: Transmitter and receiver of each transmission link have connected two receivers to operate on the same frequency which must differ from the frequencies used by the loudspeakers. Connecting an EM 500 receiver EMP 2015 with an 1/4" (6.3 mm) jack plug and an RCA plug (u "Recommended accessories"). Ǡ Prepare the receiver for configuring a frequency memory"). Adjusting the volume of the connected receivers Ǡ Use the volume control (LINE...
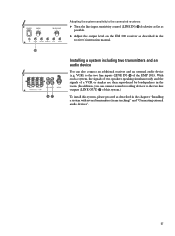
Instructions for Use
Page 55
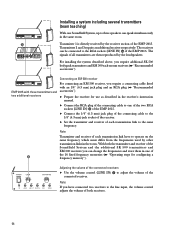
... in the room. (In addition, you can also connect an additional receiver and an external audio device (e.g. Installing a system including two transmitters and an audio device You can connect sound recording devices to the two line outputs (LINE OUT) Ƽ of the EMP 2015. µ ƻƼ Adapting the system sensitvity to the connected receivers Ǡ Turn the line input sensitivity control (LINE IN) µ clockwise as far as...
... in the room. (In addition, you can also connect an additional receiver and an external audio device (e.g. Installing a system including two transmitters and an audio device You can connect sound recording devices to the two line outputs (LINE OUT) Ƽ of the EMP 2015. µ ƻƼ Adapting the system sensitvity to the connected receivers Ǡ Turn the line input sensitivity control (LINE IN) µ clockwise as far as...

Instructions for Use
Page 57
... new setting starts flashing on the display. Your selection becomes effective immediately. Press the ̆/̄ buttons to adjust the settings of the Sennheiser operating menu With the Soundfield System, all necessary adjustments to the next menu. N.B.: When changing transmitter frequencies, care should be taken to avoid causing interference to the top menu level. If you briefly press the ̆/̄ buttons, you can change to the transmitter and receiver section settings...
... new setting starts flashing on the display. Your selection becomes effective immediately. Press the ̆/̄ buttons to adjust the settings of the Sennheiser operating menu With the Soundfield System, all necessary adjustments to the next menu. N.B.: When changing transmitter frequencies, care should be taken to avoid causing interference to the top menu level. If you briefly press the ̆/̄ buttons, you can change to the transmitter and receiver section settings...

Instructions for Use
Page 59
...; buttons you turn the transmitter off, hissing noise with high dynamics will be turned off (0 dB) or adjusted in MHz) or the channel number is displayed. Ǡ Press the SET button twice to the top menu level. whether the frequency (in 5-dB steps from 5 dB to 40 dB. (Selecting a smaller value reduces the squelch threshold, selecting a higher value increases the squelch threshold.) The new setting starts flashing on...
...; buttons you turn the transmitter off, hissing noise with high dynamics will be turned off (0 dB) or adjusted in MHz) or the channel number is displayed. Ǡ Press the SET button twice to the top menu level. whether the frequency (in 5-dB steps from 5 dB to 40 dB. (Selecting a smaller value reduces the squelch threshold, selecting a higher value increases the squelch threshold.) The new setting starts flashing on...

Instructions for Use
Page 60
... links simultaneously in the VHF band so that both systems cannot interfere with each other. you use a frequency twice. If you could operate up to the top menu level. whether the frequency or the channel number is not pressed, the device will store the new setting automatically on the display and becomes effective immediately. Ǡ Press the SET button to return to 16 transmission and receiving frequencies...
... links simultaneously in the VHF band so that both systems cannot interfere with each other. you use a frequency twice. If you could operate up to the top menu level. whether the frequency or the channel number is not pressed, the device will store the new setting automatically on the display and becomes effective immediately. Ǡ Press the SET button to return to 16 transmission and receiving frequencies...

Instructions for Use
Page 62
... the lock mode Ǡ Press the SET button five times to prevent accidental programming or turning off , first deactivate the lock mode. "Loc on" appears on the display. Ǡ Press the SET button to return to deactivate the lock mode. To turn the transmitter off during operation. The display switches back to the standard display and the buttons can lock the buttons on the transmitter and the receiver section to select the "Loc" menu. Deactivating the lock mode...
... the lock mode Ǡ Press the SET button five times to prevent accidental programming or turning off , first deactivate the lock mode. "Loc on" appears on the display. Ǡ Press the SET button to return to deactivate the lock mode. To turn the transmitter off during operation. The display switches back to the standard display and the buttons can lock the buttons on the transmitter and the receiver section to select the "Loc" menu. Deactivating the lock mode...
Instructions for Use
Page 65
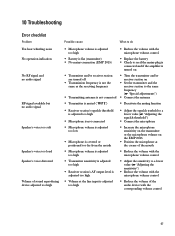
... Troubleshooting Error checklist Problem Possible cause What to do You hear whistling noise No operation indication No RF signal and no audio signal RF signal available but no audio signal Speaker's voice too soft Speaker's voice too loud Speaker's voice distorted Volume of sound reproducing device adjusted too high ț Microphone volume is adjusted too high ț Reduce the volume with the microphone volume control ț Battery is flat (transmitter) ț No mains connection (EMP 2015) ț Replace the battery...
... Troubleshooting Error checklist Problem Possible cause What to do You hear whistling noise No operation indication No RF signal and no audio signal RF signal available but no audio signal Speaker's voice too soft Speaker's voice too loud Speaker's voice distorted Volume of sound reproducing device adjusted too high ț Microphone volume is adjusted too high ț Reduce the volume with the microphone volume control ț Battery is flat (transmitter) ț No mains connection (EMP 2015) ț Replace the battery...

Instructions for Use
Page 66
Problem Dropouts Speaker's voice overlaid with background noise Sound is not clear / rough Possible cause What to do ț Antenna sensitivity is not sufficient ț Use a remote or telescopic antenna ț Transmitting antenna is not connected ț Connection of transmitting antenna has worked loose ț Transmission frequency is not the same as the receiving frequency ț Connect the antenna ț Screw the antenna tight ț Set the transmitter and the receiver section...
Problem Dropouts Speaker's voice overlaid with background noise Sound is not clear / rough Possible cause What to do ț Antenna sensitivity is not sufficient ț Use a remote or telescopic antenna ț Transmitting antenna is not connected ț Connection of transmitting antenna has worked loose ț Transmission frequency is not the same as the receiving frequency ț Connect the antenna ț Screw the antenna tight ț Set the transmitter and the receiver section...
Instructions for Use
Page 68
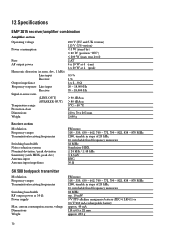
... kHz, 16 switchable fixed frequency memories 32 MHz Sennheiser HDX ± 24 kHz / ± 48 kHz < 2.5 µV BNC 50 Ω SK 500 bodypack transmitter Modulation Frequency ranges Transmission/receiving frequencies Switching bandwidth RF output power at 50 Ω Power supply Max. current consumption at nom. dev., 1 kHz) Line input Receiver Output impedance Frequency response Line input Receiver Signal-to-noise ratio (LINE OUT) (SPEAKER OUT) Temperature range Protection class Dimensions Weight...
... kHz, 16 switchable fixed frequency memories 32 MHz Sennheiser HDX ± 24 kHz / ± 48 kHz < 2.5 µV BNC 50 Ω SK 500 bodypack transmitter Modulation Frequency ranges Transmission/receiving frequencies Switching bandwidth RF output power at 50 Ω Power supply Max. current consumption at nom. dev., 1 kHz) Line input Receiver Output impedance Frequency response Line input Receiver Signal-to-noise ratio (LINE OUT) (SPEAKER OUT) Temperature range Protection class Dimensions Weight...

