
Instructions for use
Page 2
... line phone using the headset 25 Calling via the PC using the headset 26 Switching between Phone and PC mode 28 Holding a conference call 28 Adjusting the volume 29 Muting the headset's microphone 30 Using the advanced functions 30 If you leave the DECT range 31 Cleaning and maintaining the headset system 32 Replacing the ear pad(s 32 Replacing the headset's rechargeable battery 33 If a problem occurs ...35 Accessories and spare parts 36 Specifications ...37...
... line phone using the headset 25 Calling via the PC using the headset 26 Switching between Phone and PC mode 28 Holding a conference call 28 Adjusting the volume 29 Muting the headset's microphone 30 Using the advanced functions 30 If you leave the DECT range 31 Cleaning and maintaining the headset system 32 Replacing the ear pad(s 32 Replacing the headset's rechargeable battery 33 If a problem occurs ...35 Accessories and spare parts 36 Specifications ...37...
Instructions for use
Page 3
... instruction manual when passing the product on to third parties. • Do not use the DW series* base station for long periods of time. • Only operate the power supply unit from the type of the product. Keep the DW series headsets at all users at least 1.2" (3 cm) from cardiac pacemakers or implanted defibrillators! • Protect your hearing from high volume levels. • Only use the power...
... instruction manual when passing the product on to third parties. • Do not use the DW series* base station for long periods of time. • Only operate the power supply unit from the type of the product. Keep the DW series headsets at all users at least 1.2" (3 cm) from cardiac pacemakers or implanted defibrillators! • Protect your hearing from high volume levels. • Only use the power...
Instructions for use
Page 5
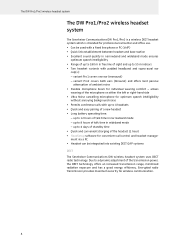
... without annoying background noise • Permits conference calls with up to 12 hours of a new headset • Long battery operating time: - up to a dynamic adjustment of ambient noise • Flexible microphone boom for individual wearing comfort - Due to 4 headsets • Quick and easy pairing of talk time in wideband mode - variant Pro2 covers both ears (binaural) and offers best passive attenuation of the transmission power, the DECT technology...
... without annoying background noise • Permits conference calls with up to 12 hours of a new headset • Long battery operating time: - up to a dynamic adjustment of ambient noise • Flexible microphone boom for individual wearing comfort - Due to 4 headsets • Quick and easy pairing of talk time in wideband mode - variant Pro2 covers both ears (binaural) and offers best passive attenuation of the transmission power, the DECT technology...

Instructions for use
Page 10
... Setting mode/GAP pairing mode Pairing of the PHONE button » lights up ¿ flashes ´ LINK LED ¿ lights up blue lights up blue flashes blue slowly flashes red if off flashes blue/red Meaning Charging mode Active link to recharge the battery within the next few minutes (see page 22). ³ ´ 4 Overview of the LEDs Overview of the LEDs Base station LED of the PC button ³ » lights up flashes LED of an additional headset to the base station 9 Headset LED HEADSET ብ lights up red flashes red...
... Setting mode/GAP pairing mode Pairing of the PHONE button » lights up ¿ flashes ´ LINK LED ¿ lights up blue lights up blue flashes blue slowly flashes red if off flashes blue/red Meaning Charging mode Active link to recharge the battery within the next few minutes (see page 22). ³ ´ 4 Overview of the LEDs Overview of the LEDs Base station LED of the PC button ³ » lights up flashes LED of an additional headset to the base station 9 Headset LED HEADSET ብ lights up red flashes red...

Instructions for use
Page 12
... call control, please use in PC mode, the power from the PC via the DIP switch row ¸, refer to page 20. 11 For charging the rechargeable battery within the specified charging ¿ times (see page 22) and for the headset system via the USB cable is required. The LINK LED ¿ lights up white. For additional information on the following pages. The LED of the last used mode button (PHONE...
... call control, please use in PC mode, the power from the PC via the DIP switch row ¸, refer to page 20. 11 For charging the rechargeable battery within the specified charging ¿ times (see page 22) and for the headset system via the USB cable is required. The LINK LED ¿ lights up white. For additional information on the following pages. The LED of the last used mode button (PHONE...

Instructions for use
Page 13
... connect the Phone socket º to the phone with headset socket headset socket on the telephone. º ¾ Ƽ ̈ Set the DIP switch ¸ #1 and #2 to the upper position. 12 Putting the headset system into operation A Connection to a fixed line phone without headset socket ̈ Disconnect the handset cable from the telephone. ̈ Connect the handset cable to the Handset socket ¾. ̈ Use the telephone cable Ƽ to connect...
... connect the Phone socket º to the phone with headset socket headset socket on the telephone. º ¾ Ƽ ̈ Set the DIP switch ¸ #1 and #2 to the upper position. 12 Putting the headset system into operation A Connection to a fixed line phone without headset socket ̈ Disconnect the handset cable from the telephone. ̈ Connect the handset cable to the Handset socket ¾. ̈ Use the telephone cable Ƽ to connect...
Instructions for use
Page 14
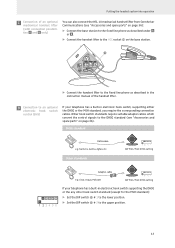
... instruction manual of an optional mechanical handset lifter (with connection possibilities A and B only) You can also connect the HSL 10 mechanical handset lifter from Sennheiser Communications (see "Accessories and spare parts" on the base station. µ ̈ Connect the handset lifter to the upper position. 13 Putting the headset system into operation C Connection of the handset lifter. Other hook switch standards require suitable adapter cables which convert the control...
... instruction manual of an optional mechanical handset lifter (with connection possibilities A and B only) You can also connect the HSL 10 mechanical handset lifter from Sennheiser Communications (see "Accessories and spare parts" on the base station. µ ̈ Connect the handset lifter to the upper position. 13 Putting the headset system into operation C Connection of the handset lifter. Other hook switch standards require suitable adapter cables which convert the control...
Instructions for use
Page 15
... the lower position. Alcatel DW Pro1/Pro2 MSH setting If your PC. Setting up the base station ̈ Place the base station at www.senncom.com/headsetselector. Putting the headset system into operation MSH standard MSH cable e.g. The necessary connection and adapter cables are available from the fixed line phone. The operating system detects the USB audio device "Sennheiser DECT" and installs the necessary drivers. ƽ Ƹ 14...
... the lower position. Alcatel DW Pro1/Pro2 MSH setting If your PC. Setting up the base station ̈ Place the base station at www.senncom.com/headsetselector. Putting the headset system into operation MSH standard MSH cable e.g. The necessary connection and adapter cables are available from the fixed line phone. The operating system detects the USB audio device "Sennheiser DECT" and installs the necessary drivers. ƽ Ƹ 14...

Instructions for use
Page 18
... the headset system into operation ̈ Push the AUDIO button ቧ in the direction in Phone mode and adjusting it automatically lifts the handset). The system is set to increase the volume until the HEADSET LED ብ goes off. A wireless link is established between the headset and the base station, the LINK LED ¿ lights up blue and the HEADSET LED ብ flashes blue. » 4 ¿ 5 ̈ Lift the handset (If a handset lifter is disturbed, adjust the audio...
... the headset system into operation ̈ Push the AUDIO button ቧ in the direction in Phone mode and adjusting it automatically lifts the handset). The system is set to increase the volume until the HEADSET LED ብ goes off. A wireless link is established between the headset and the base station, the LINK LED ¿ lights up blue and the HEADSET LED ብ flashes blue. » 4 ¿ 5 ̈ Lift the handset (If a handset lifter is disturbed, adjust the audio...

Instructions for use
Page 20
... PC connection When Phone mode is established between the headset and the base station, the LINK LED ¿ lights up blue and the HEADSET LED ብ flashes blue. ³ ¿ 4 5 ̈ Use your operating system). A wireless link is selected (the LED of your softphone to make a call to someone who will help you adjust the correct microphone sensitivity for PC mode (see the instruction manual of the PHONE button » lights up white. ̈ Press either the LINK button ቦ...
... PC connection When Phone mode is established between the headset and the base station, the LINK LED ¿ lights up blue and the HEADSET LED ብ flashes blue. ³ ¿ 4 5 ̈ Use your operating system). A wireless link is selected (the LED of your softphone to make a call to someone who will help you adjust the correct microphone sensitivity for PC mode (see the instruction manual of the PHONE button » lights up white. ̈ Press either the LINK button ቦ...
Instructions for use
Page 21
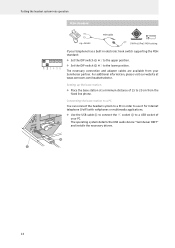
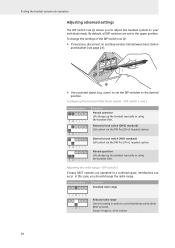
... the headset system into operation Adjusting advanced settings The DIP switch row ¸ allows you should change the settings of approx. 10 m indoors 20 To change the radio range. Electronic hook switch (DHSG standard) Call control via the DW Pro1/Pro2 headset system. DIP switch 1 and 2 Switch position Function Manual operation Lifts/hangs up the handset manually or using the handset lifter. Configuring the handset lifter/hook switch - DIP switch 3 If many DECT systems are set the DIP switches to...
... the headset system into operation Adjusting advanced settings The DIP switch row ¸ allows you should change the settings of approx. 10 m indoors 20 To change the radio range. Electronic hook switch (DHSG standard) Call control via the DW Pro1/Pro2 headset system. DIP switch 1 and 2 Switch position Function Manual operation Lifts/hangs up the handset manually or using the handset lifter. Configuring the handset lifter/hook switch - DIP switch 3 If many DECT systems are set the DIP switches to...

Instructions for use
Page 24
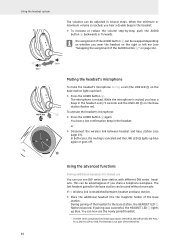
... to conserve battery power. The HEADSET LED ብ flashes blue 3 times and the wireless link to standby mode. Using the headset system When the battery is disconnected. The link is heard in the headset. ... Establishing a wireless link between headset and base station To establish a wireless link between headset and base station: ̈ Press the LINK button ቦ on ̈ Press and hold the LINK button ቦ for 5 seconds. you hear a low battery warning (three beeps)in the headset. 4 5 Switching the headset off...
... to conserve battery power. The HEADSET LED ብ flashes blue 3 times and the wireless link to standby mode. Using the headset system When the battery is disconnected. The link is heard in the headset. ... Establishing a wireless link between headset and base station To establish a wireless link between headset and base station: ̈ Press the LINK button ቦ on ̈ Press and hold the LINK button ቦ for 5 seconds. you hear a low battery warning (three beeps)in the headset. 4 5 Switching the headset off...

Instructions for use
Page 26
... hear a ring tone in the headset and the LED of the fixed line phone: ̈ Put on and establish a wireless link between headset and base station (see page 23). Making a call and a handset lifter/electronic hook switch with ring tone detection is automatically accepted. If you are not using a handset lifter/electronic hook switch: ̈ Dial the desired number. ̈ Put on your fixed line phone. If you are using a handset lifter/electronic hook switch...
... hear a ring tone in the headset and the LED of the fixed line phone: ̈ Put on and establish a wireless link between headset and base station (see page 23). Making a call and a handset lifter/electronic hook switch with ring tone detection is automatically accepted. If you are not using a handset lifter/electronic hook switch: ̈ Dial the desired number. ̈ Put on your fixed line phone. If you are using a handset lifter/electronic hook switch...

Instructions for use
Page 30
... LINK LED ¿ flashes blue). You can adjust the volume using the AUDIO button ቧ or by using the volume control of your operating system). 29 Listening at high volume levels for the two other guest headsets. 4 ̈ Call the other headsets participating in the conference call are disconnected. If pairing was successful, the HEADSET LED ብ lights up blue. ̈ Take the guest headset out of the master headset. ¿ The HEADSET LED ብ flashes blue/red and the headset pairs to...
... LINK LED ¿ flashes blue). You can adjust the volume using the AUDIO button ቧ or by using the volume control of your operating system). 29 Listening at high volume levels for the two other guest headsets. 4 ̈ Call the other headsets participating in the conference call are disconnected. If pairing was successful, the HEADSET LED ብ lights up blue. ̈ Take the guest headset out of the master headset. ¿ The HEADSET LED ብ flashes blue/red and the headset pairs to...
Instructions for use
Page 31
...* headsets. The DW 800 is muted, you hear a double beep in the headset. Using the headset system The volumes can be used without more ado. When the minimum or maximum volume is canceled and the LINK LED ¿ lights up blue. While the microphone is not part of the AUDIO button ቧ" on the base station lights up blue): ̈ Press the AUDIO button ቧ. The last headset paired to the base station, the HEADSET LED ብ flashes blue/red...
...* headsets. The DW 800 is muted, you hear a double beep in the headset. Using the headset system The volumes can be used without more ado. When the minimum or maximum volume is canceled and the LINK LED ¿ lights up blue. While the microphone is not part of the AUDIO button ቧ" on the base station lights up blue): ̈ Press the AUDIO button ቧ. The last headset paired to the base station, the HEADSET LED ብ flashes blue/red...
Instructions for use
Page 32
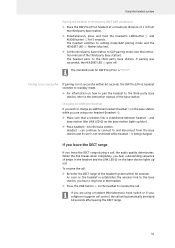
... headset switches to standby mode. ̈ For information on the base station lights up red. If you leave the DECT range If you are using your softphone supports call control, the call . If you are using a handset lifter/electronic hook switch or if your headset (headset a): ̈ Make sure that a wireless link is not successful within 60 seconds. Pairing is not successful If pairing is established between headset a and base station (the LINK LED...
... headset switches to standby mode. ̈ For information on the base station lights up red. If you leave the DECT range If you are using your softphone supports call control, the call . If you are using a handset lifter/electronic hook switch or if your headset (headset a): ̈ Make sure that a wireless link is not successful within 60 seconds. Pairing is not successful If pairing is established between headset a and base station (the LINK LED...

Instructions for use
Page 36
... other party cannot hear me Microphone sensitivity is quickly Overaged rechargeable battery depleted even after charging Replace the overaged rechargeable battery with a new one (see page 33). Wait several minutes until the charging process starts. Distance between base station and Increase the distance between headset and base station. Adjust the base station to your headset to the properly, my voice sounds too low adjusted Phone mode (see page 18...
... other party cannot hear me Microphone sensitivity is quickly Overaged rechargeable battery depleted even after charging Replace the overaged rechargeable battery with a new one (see page 33). Wait several minutes until the charging process starts. Distance between base station and Increase the distance between headset and base station. Adjust the base station to your headset to the properly, my voice sounds too low adjusted Phone mode (see page 18...

Instructions for use
Page 42
... phone 25 via the PC 26 D DECT 4 leaving the DECT range 31 DECT GAP telephone pairing 31 DHSG connection to an optional electronic hook switch 13 Dial tone adjusting 18 DIP switch 1 and 2 configuring the handset lifter/ hook switch 20 DIP switch 3 adjusting the radio range 20 DIP switch 4 establishing the wireless link 21 DIP switch 5 switching between wideband and narrowband mode 21 DIP switch 6 limiting the volume 21 E Ear pad(s) replacing 32 G GAP telephone pairing...
... phone 25 via the PC 26 D DECT 4 leaving the DECT range 31 DECT GAP telephone pairing 31 DHSG connection to an optional electronic hook switch 13 Dial tone adjusting 18 DIP switch 1 and 2 configuring the handset lifter/ hook switch 20 DIP switch 3 adjusting the radio range 20 DIP switch 4 establishing the wireless link 21 DIP switch 5 switching between wideband and narrowband mode 21 DIP switch 6 limiting the volume 21 E Ear pad(s) replacing 32 G GAP telephone pairing...

Instructions for use
Page 43
... H Headset adjusting 24 charging 22 labeling 16 overview 7 pairing additional headsets for shared use 30 pairing to third party DECT GAP telephone 31 putting into operation 16 putting on 24 Headset microphone muting 30 Headset system testing the headset system in PC mode and adjusting it 19 testing the headset system in Phone mode and adjusting it 17 HeadSetup software installing 15 specifications 15 L LEDs base station 9 headset 9 overview 9 M Microphone sensitivity adjustment for Phone mode 18 Microphone volume control setting 18 MSH connection...
... H Headset adjusting 24 charging 22 labeling 16 overview 7 pairing additional headsets for shared use 30 pairing to third party DECT GAP telephone 31 putting into operation 16 putting on 24 Headset microphone muting 30 Headset system testing the headset system in PC mode and adjusting it 19 testing the headset system in Phone mode and adjusting it 17 HeadSetup software installing 15 specifications 15 L LEDs base station 9 headset 9 overview 9 M Microphone sensitivity adjustment for Phone mode 18 Microphone volume control setting 18 MSH connection...
Fact Sheet
Page 1
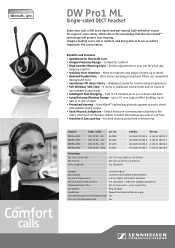
... (accessory - Switch from • Intuitive & Easy pairing - ActiveGard™ technology protects against acoustic shock and sudden sound surges • Desk Phone & Softphone - UK DW 20 ML - order separately) Plug and play Supports multiple softphone usage Yes Yes Imagine making every call from one communication channel to select the channel you 4 hours talk time • Long Distance Wireless Range - DW Pro1 ML Single-sided DECT headset Enjoy your hearing.
... (accessory - Switch from • Intuitive & Easy pairing - ActiveGard™ technology protects against acoustic shock and sudden sound surges • Desk Phone & Softphone - UK DW 20 ML - order separately) Plug and play Supports multiple softphone usage Yes Yes Imagine making every call from one communication channel to select the channel you 4 hours talk time • Long Distance Wireless Range - DW Pro1 ML Single-sided DECT headset Enjoy your hearing.


