
Manual
Page 2
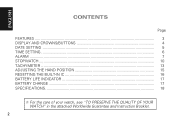
E ENnGglLiIsShH CONTENTS Page FEATURES ...3 DISPLAY AND CROWNS/BUTTONS 4 DATE SETTING ...5 TIME SETTING ...6 ALARM ...7 STOPWATCH ...10 TACHYMETER ...13 ADJUSTING THE HAND POSITION 15 RESETTING THE BUILT-IN IC 16 BATTERY LIFE INDICATOR 17 BATTERY CHANGE ...17 SPECIFICATIONS ...18 6 For the care of your watch, see "TO PRESERVE THE QUALITY OF YOUR WATCH" in the attached Worldwide Guarantee and Instruction Booklet. 2
E ENnGglLiIsShH CONTENTS Page FEATURES ...3 DISPLAY AND CROWNS/BUTTONS 4 DATE SETTING ...5 TIME SETTING ...6 ALARM ...7 STOPWATCH ...10 TACHYMETER ...13 ADJUSTING THE HAND POSITION 15 RESETTING THE BUILT-IN IC 16 BATTERY LIFE INDICATOR 17 BATTERY CHANGE ...17 SPECIFICATIONS ...18 6 For the care of your watch, see "TO PRESERVE THE QUALITY OF YOUR WATCH" in the attached Worldwide Guarantee and Instruction Booklet. 2
Manual
Page 3
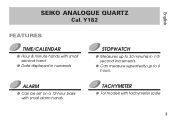
English SEIKO ANALOGUE QUARTZ Cal. q Can measure repeatedly up to 6 hours. TACHYMETER q For models with small alarm hands. ALARM q Can be set on a 12-hour basis with tachymeter scale 3 Y182 FEATURES TIME/CALENDAR q Hour & minute hands with small second hand q Date displayed in numerals STOPWATCH q Measures up to 30 minutes in 1/5 second increments.
English SEIKO ANALOGUE QUARTZ Cal. q Can measure repeatedly up to 6 hours. TACHYMETER q For models with small alarm hands. ALARM q Can be set on a 12-hour basis with tachymeter scale 3 Y182 FEATURES TIME/CALENDAR q Hour & minute hands with small second hand q Date displayed in numerals STOPWATCH q Measures up to 30 minutes in 1/5 second increments.
Manual
Page 4
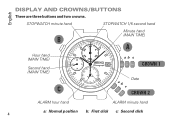
English DISPLAY AND CROWNS/BUTTONS There are three buttons and two crowns. STOPWATCH minute hand STOPWATCH 1/5 second hand B 30 Minute hand (MAIN TIME) A 25 10 5 20 Hour hand (MAIN TIME) Second hand (MAIN TIME) C 9 10 4 3 2 8 MIN. 11 12 1 ALARM 76 5 ab c CROWN 1 a b Date c CROWN 2 ALARM hour hand ALARM minute hand a: Normal position b: First click c: Second click 4
English DISPLAY AND CROWNS/BUTTONS There are three buttons and two crowns. STOPWATCH minute hand STOPWATCH 1/5 second hand B 30 Minute hand (MAIN TIME) A 25 10 5 20 Hour hand (MAIN TIME) Second hand (MAIN TIME) C 9 10 4 3 2 8 MIN. 11 12 1 ALARM 76 5 ab c CROWN 1 a b Date c CROWN 2 ALARM hour hand ALARM minute hand a: Normal position b: First click c: Second click 4
Manual
Page 5
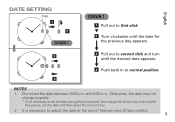
... 1 Do not set the date and then reset the correct time. 2 It is necessary to normal position. English ¬ DATE SETTING Date 1 « 1 2 CROWN 1 3 « « 4 CROWN 1 1 Pull out to first click. ˝ 2 Turn clockwise until the date for the previous day appears. ˝ 3 Pull out to second click and turn until the desired date appears. ˝ 4 Push back in to adjust the date at the end...
... 1 Do not set the date and then reset the correct time. 2 It is necessary to normal position. English ¬ DATE SETTING Date 1 « 1 2 CROWN 1 3 « « 4 CROWN 1 1 Pull out to first click. ˝ 2 Turn clockwise until the date for the previous day appears. ˝ 3 Pull out to second click and turn until the desired date appears. ˝ 4 Push back in to adjust the date at the end...
Manual
Page 6
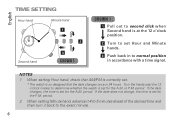
... set for the A.M. Turn the hands past the 12 o'clock marker to determine whether the watch is so designed that the date changes once in accordance with a time signal. period. period. If the date does not change, the time is set for the P.M. English 45 TIME SETTING Hour hand 60 30 Second hand 15 « Minute hand 1 « 2 3 CROWN 1 CROWN 1 1 Pull out to second click when Second hand is at the 12 o'clock position. ˝ 2 Turn to set Hour and Minute hands...
... set for the A.M. Turn the hands past the 12 o'clock marker to determine whether the watch is so designed that the date changes once in accordance with a time signal. period. period. If the date does not change, the time is set for the P.M. English 45 TIME SETTING Hour hand 60 30 Second hand 15 « Minute hand 1 « 2 3 CROWN 1 CROWN 1 1 Pull out to second click when Second hand is at the 12 o'clock position. ˝ 2 Turn to set Hour and Minute hands...
Manual
Page 7
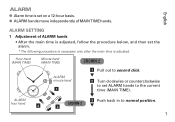
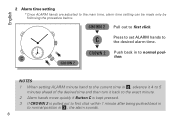
Hour hand (MAIN TIME) Minute hand (MAIN TIME) CROWN 2 ALARM hour hand 11 12 1 ALARM 76 5 3 9 10 4 « ALARM minute hand «1 CROWN 2 2 1 Pull out to second click. ˝ 2 Turn clockwise or counterclockwise to set on a 12-hour basis. English 3 2 8 ALARM q Alarm time is adjusted. ALARM SETTING 1 Adjustment of MAIN TIME hands. q ALARM hands move independently of ALARM hands • After the main time is adjusted, follow the procedure below, and then set the alarm. * The following procedure is necessary only after the main time is set ALARM hands to the...
Hour hand (MAIN TIME) Minute hand (MAIN TIME) CROWN 2 ALARM hour hand 11 12 1 ALARM 76 5 3 9 10 4 « ALARM minute hand «1 CROWN 2 2 1 Pull out to second click. ˝ 2 Turn clockwise or counterclockwise to set on a 12-hour basis. English 3 2 8 ALARM q Alarm time is adjusted. ALARM SETTING 1 Adjustment of MAIN TIME hands. q ALARM hands move independently of ALARM hands • After the main time is adjusted, follow the procedure below, and then set the alarm. * The following procedure is necessary only after the main time is set ALARM hands to the...
Manual
Page 8
... 3 , the alarm sounds. 8 Press to set ALARM hands to normal position. C 11 12 1 ALARM 76 5 9 10 4 « 3 2 8 « CROWN 2 CROWN 2 ˝ C ˝ CROWN 2 Pull out to the main time, alarm time setting can be made only by following the procedure below. English 2 Alarm time setting * Once ALARM hands are adjusted to first click. NOTES 1 When setting ALARM minute hand to the current time in 2 , advance it 4 to 5 minutes ahead of the desired time and then turn it...
... 3 , the alarm sounds. 8 Press to set ALARM hands to normal position. C 11 12 1 ALARM 76 5 9 10 4 « 3 2 8 « CROWN 2 CROWN 2 ˝ C ˝ CROWN 2 Pull out to the main time, alarm time setting can be made only by following the procedure below. English 2 Alarm time setting * Once ALARM hands are adjusted to first click. NOTES 1 When setting ALARM minute hand to the current time in 2 , advance it 4 to 5 minutes ahead of the desired time and then turn it...
Manual
Page 9
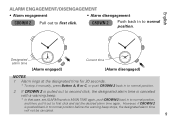
... it manually, press Button A, B or C, or push CROWN 2 back in to normal position. 2 If CROWN 2 is pulled out to second click, the designated alarm time is pushed back in to normal position before the warning beep stops, the designated alarm time will not be canceled. 9 Designated alarm time 11 12 1 ALARM 76 5 « [Alarm engaged] 9 10 4 9 10 4 Current time 11 12 1 ALARM 76 5 [Alarm disengaged] « NOTES 1 Alarm rings...
... it manually, press Button A, B or C, or push CROWN 2 back in to normal position. 2 If CROWN 2 is pulled out to second click, the designated alarm time is pushed back in to normal position before the warning beep stops, the designated alarm time will not be canceled. 9 Designated alarm time 11 12 1 ALARM 76 5 « [Alarm engaged] 9 10 4 9 10 4 Current time 11 12 1 ALARM 76 5 [Alarm disengaged] « NOTES 1 Alarm rings...
Manual
Page 10
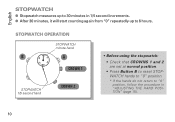
q After 30 minutes, it will start counting again from "0" repeatedly up to 30 minutes in "ADJUSTING THE HAND POSITION" (page 15). 10 STOPWATCH OPERATION STOPWATCH minute hand B 30 A 5 20 MIN. CROWN 1 STOPWATCH 1/5 second hand CROWN 2 • Before using the stopwatch: • Check that CROWNS 1 and 2 are set at normal position. • Press Button B to reset STOPWATCH hands to "0" position. * If the hands do not return to 6 hours. English 25 10 STOPWATCH q Stopwatch measures up to "0" position, follow the procedure in 1/5 second increments.
q After 30 minutes, it will start counting again from "0" repeatedly up to 30 minutes in "ADJUSTING THE HAND POSITION" (page 15). 10 STOPWATCH OPERATION STOPWATCH minute hand B 30 A 5 20 MIN. CROWN 1 STOPWATCH 1/5 second hand CROWN 2 • Before using the stopwatch: • Check that CROWNS 1 and 2 are set at normal position. • Press Button B to reset STOPWATCH hands to "0" position. * If the hands do not return to 6 hours. English 25 10 STOPWATCH q Stopwatch measures up to "0" position, follow the procedure in 1/5 second increments.

Manual
Page 11
English B A 1 Standard measurement A START ˝ A STOP ˝ B RESET 2 Accumulated elapsed time measurement A ˝ A ˝ A ○ ○ ○ ˝ A ˝ B START STOP RESTART STOP RESET * Restart and stop of stopwatch can be repeated by pressing Button A. 3 Split time measurement A ˝ B ˝ B ○○○ ˝ A ˝ B START SPLIT SPLIT STOP RESET RELEASE * Measurement and release of split time can be repeated by pressing Button B. 11
English B A 1 Standard measurement A START ˝ A STOP ˝ B RESET 2 Accumulated elapsed time measurement A ˝ A ˝ A ○ ○ ○ ˝ A ˝ B START STOP RESTART STOP RESET * Restart and stop of stopwatch can be repeated by pressing Button A. 3 Split time measurement A ˝ B ˝ B ○○○ ˝ A ˝ B START SPLIT SPLIT STOP RESET RELEASE * Measurement and release of split time can be repeated by pressing Button B. 11

Manual
Page 12
English ˝ ˝ ˝ ˝ 4 Measurement of two competitors A START B FINISH TIME OF 1ST COMPETITOR A 2ND COMPETITOR FINISHES B FINISH TIME OF 2ND COMPETITOR B RESET NOTES 1 If CROWN 1 is pulled out to second click, STOPWATCH hands are reset to "0" position. 2 If CROWN 2 is pulled out to first or second click, STOPWATCH hands are reset to "0" position. 3 When stopwatch has been reset and Button A is pressed before the hands reach "0" position, stopwatch still starts counting when Button A is pressed. 12
English ˝ ˝ ˝ ˝ 4 Measurement of two competitors A START B FINISH TIME OF 1ST COMPETITOR A 2ND COMPETITOR FINISHES B FINISH TIME OF 2ND COMPETITOR B RESET NOTES 1 If CROWN 1 is pulled out to second click, STOPWATCH hands are reset to "0" position. 2 If CROWN 2 is pulled out to first or second click, STOPWATCH hands are reset to "0" position. 3 When stopwatch has been reset and Button A is pressed before the hands reach "0" position, stopwatch still starts counting when Button A is pressed. 12

Manual
Page 13
... or 1 mile. 2 Tachymeter scale indicated by STOPWATCH second hand gives the average speed per hour. 25 10 Ex. 1 30 STOPWATCH second hand: MIN. 40 seconds Tachymeter scale: "90" "90" (tachymeter scale figure) x 1 (km or mile) = 90 km/h or mph * Tachymeter scale can be used only when the time required is less than 60 seconds. English 5 20 TACHYMETER (for models with tachymeter scale on...
... or 1 mile. 2 Tachymeter scale indicated by STOPWATCH second hand gives the average speed per hour. 25 10 Ex. 1 30 STOPWATCH second hand: MIN. 40 seconds Tachymeter scale: "90" "90" (tachymeter scale figure) x 1 (km or mile) = 90 km/h or mph * Tachymeter scale can be used only when the time required is less than 60 seconds. English 5 20 TACHYMETER (for models with tachymeter scale on...

Manual
Page 14
Ex. 1 30 MIN. 5 20 STOPWATCH second hand: 20 seconds Tachymeter scale: "180" "180" (tachymeter scale figure) x 1 job = 180 jobs/hour Ex. 2: If 15 jobs are completed in 20 seconds: "180" (tachymeter scale figure) x 15 jobs = 2700 jobs/hour 14 English 25 10 To measure the hourly rate of operation 1 Use the stopwatch to measure the time required to complete 1 job. 2 Tachymeter scale indicated by STOPWATCH second hand gives the average number of jobs accomplished per hour.
Ex. 1 30 MIN. 5 20 STOPWATCH second hand: 20 seconds Tachymeter scale: "180" "180" (tachymeter scale figure) x 1 job = 180 jobs/hour Ex. 2: If 15 jobs are completed in 20 seconds: "180" (tachymeter scale figure) x 15 jobs = 2700 jobs/hour 14 English 25 10 To measure the hourly rate of operation 1 Use the stopwatch to measure the time required to complete 1 job. 2 Tachymeter scale indicated by STOPWATCH second hand gives the average number of jobs accomplished per hour.
Manual
Page 15
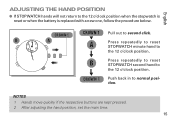
... reset STOPWATCH second hand to the 12 o'clock position. ˝ CROWN 1 Push back in to second click. CROWN 1 CROWN 1 Pull out to normal position. NOTES 1 Hands move quickly if the respective buttons are kept pressed. 2 After adjusting the hand position, set the main time. 15 English 5 20 ADJUSTING THE HAND POSITION q If STOPWATCH hands will not return to the 12 o'clock position when the stopwatch is reset or when the battery is replaced with a new...
... reset STOPWATCH second hand to the 12 o'clock position. ˝ CROWN 1 Push back in to second click. CROWN 1 CROWN 1 Pull out to normal position. NOTES 1 Hands move quickly if the respective buttons are kept pressed. 2 After adjusting the hand position, set the main time. 15 English 5 20 ADJUSTING THE HAND POSITION q If STOPWATCH hands will not return to the 12 o'clock position when the stopwatch is reset or when the battery is replaced with a new...
Manual
Page 16
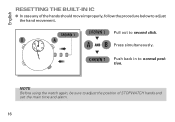
B A 30 5 20 MIN. « ˝ A AND B ˝ Press simultaneously. « CROWN 1 Push back in to second click. CROWN 1 CROWN 1 Pull out to normal position. English 25 10 RESETTING THE BUILT-IN IC q In case any of the hands should move improperly, follow the procedure below to adjust the position of STOPWATCH hands and set the main time and alarm. 16 NOTE Before using the watch again, be sure to adjust the hand movement.
B A 30 5 20 MIN. « ˝ A AND B ˝ Press simultaneously. « CROWN 1 Push back in to second click. CROWN 1 CROWN 1 Pull out to normal position. English 25 10 RESETTING THE BUILT-IN IC q In case any of the hands should move improperly, follow the procedure below to adjust the position of STOPWATCH hands and set the main time and alarm. 16 NOTE Before using the watch again, be sure to adjust the hand movement.
Manual
Page 17
... not remove the battery from the watch should last approximately 2 years. BATTERY CHANGE 2 Years The miniature battery which powers your possession may stop operating. However, because the battery is necessary to prevent any malfunction. q If it is inserted at two-second intervals, replace the battery with a new one . * If the alarm is used while the second hand is moving at the factory to check the function and performance of the watch may...
... not remove the battery from the watch should last approximately 2 years. BATTERY CHANGE 2 Years The miniature battery which powers your possession may stop operating. However, because the battery is necessary to prevent any malfunction. q If it is inserted at two-second intervals, replace the battery with a new one . * If the alarm is used while the second hand is moving at the factory to check the function and performance of the watch may...
Manual
Page 18
... battery. Minute and 1/5 second hands The stopwatch can measure up to change without prior notice for product improvement. q The battery is set on a 12-hour basis. 7 Battery SEIKO SR927W, 1 piece 8 IC (Integrated Circuit C-MOS-LSI 18 * The specifications are subject to 30 minutes in numerals. SPECIFICATIONS 1 Frequency of alarm 1 minute 4 Operational temperature range 5°C ~ +50°C (23°F ~ 122°F) 5 Driving system Step motor, 4 pieces 6 Display system Time Three hands (Hour, minute and small second hands) Date Stopwatch Alarm Displayed in 1/5 seconds...
... battery. Minute and 1/5 second hands The stopwatch can measure up to change without prior notice for product improvement. q The battery is set on a 12-hour basis. 7 Battery SEIKO SR927W, 1 piece 8 IC (Integrated Circuit C-MOS-LSI 18 * The specifications are subject to 30 minutes in numerals. SPECIFICATIONS 1 Frequency of alarm 1 minute 4 Operational temperature range 5°C ~ +50°C (23°F ~ 122°F) 5 Driving system Step motor, 4 pieces 6 Display system Time Three hands (Hour, minute and small second hands) Date Stopwatch Alarm Displayed in 1/5 seconds...


