
Manual
Page 3
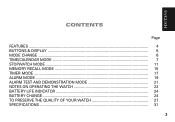
ENEnGgLliIsShH CONTENTS Page FEATURES ...4 BUTTONS & DISPLAY 5 MODE CHANGE ...6 TIME/CALENDAR MODE 7 STOPWATCH MODE 11 MEMORY RECALL MODE 15 TIMER MODE ...17 ALARM MODE ...19 ALARM TEST AND DEMONSTRATION MODE 21 NOTES ON OPERATING THE WATCH 22 BATTERY LIFE INDICATOR 24 BATTERY CHANGE ...24 TO PRESERVE THE QUALITY OF YOUR WATCH 27 SPECIFICATIONS ...31 3
ENEnGgLliIsShH CONTENTS Page FEATURES ...4 BUTTONS & DISPLAY 5 MODE CHANGE ...6 TIME/CALENDAR MODE 7 STOPWATCH MODE 11 MEMORY RECALL MODE 15 TIMER MODE ...17 ALARM MODE ...19 ALARM TEST AND DEMONSTRATION MODE 21 NOTES ON OPERATING THE WATCH 22 BATTERY LIFE INDICATOR 24 BATTERY CHANGE ...24 TO PRESERVE THE QUALITY OF YOUR WATCH 27 SPECIFICATIONS ...31 3
Manual
Page 4
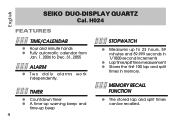
English SEIKO DUO-DISPLAY QUARTZ Cal. MEMORY RECALL FUNCTION ● The stored lap and split times can be recalled. TIMER ● Countdown timer ● A time-up warning beep and time-up beep 4 STOPWATCH ● Measures up to Dec. 31, 2055 ALARM ● Two daily alarms work independently. H024 FEATURES TIME/CALENDAR ● Hour and minute hands ● Fully automatic calendar from Jan. 1. 2006 to 23 hours, 59 minutes and 59.999 seconds in 1/1000-second increments ● Lap time/split time measurement ● Stores the first 100 lap and split times in memory.
English SEIKO DUO-DISPLAY QUARTZ Cal. MEMORY RECALL FUNCTION ● The stored lap and split times can be recalled. TIMER ● Countdown timer ● A time-up warning beep and time-up beep 4 STOPWATCH ● Measures up to Dec. 31, 2055 ALARM ● Two daily alarms work independently. H024 FEATURES TIME/CALENDAR ● Hour and minute hands ● Fully automatic calendar from Jan. 1. 2006 to 23 hours, 59 minutes and 59.999 seconds in 1/1000-second increments ● Lap time/split time measurement ● Stores the first 100 lap and split times in memory.

Manual
Page 5
English BUTTONS & DISPLAY [TIME/CALENDAR mode] Hour hand Mode indicator Minute hand 5
English BUTTONS & DISPLAY [TIME/CALENDAR mode] Hour hand Mode indicator Minute hand 5

Manual
Page 6
English ➡ MODE CHANGE A With each press, the mode in the digital display changes in the following order: Mode indicator A ❋ : The flashing STOPWATCH/ TIMER indicator in any display mode shows that the stopwatch/timer is counting. ➡ ➡ TIME TIME/ CALENDAR ★ mode CHR STOPWATCH mode RCLL MEMORY RECALL mode ➡ TMR TIMER mode ➡ ALM ALARM mode ★ : When the hourly time signal/confirmation sound for button operation is switched on, a beep sounds with each press of Button A. 6
English ➡ MODE CHANGE A With each press, the mode in the digital display changes in the following order: Mode indicator A ❋ : The flashing STOPWATCH/ TIMER indicator in any display mode shows that the stopwatch/timer is counting. ➡ ➡ TIME TIME/ CALENDAR ★ mode CHR STOPWATCH mode RCLL MEMORY RECALL mode ➡ TMR TIMER mode ➡ ALM ALARM mode ★ : When the hourly time signal/confirmation sound for button operation is switched on, a beep sounds with each press of Button A. 6

Manual
Page 7
... the day and date are shown. To show the digital time, press any one of leap years from 2006 up to show TIME/CALENDAR mode. [FULL (Time & Calendar) Display] Hour hand Date Minute hand [D&D(Day & Date) Display] Date B C ★ If left untouched for 2 minutes when Day & Date Display is left untouched for 2 minutes Day of the week Mode indicator ▲ A PM indicator for odd and even months including February of the four buttons. 7 English ▲ TIME/CALENDAR MODE (TIME) ● The calendar adjusts automatically for 12-hour display only Hour Minute D Second...
... the day and date are shown. To show the digital time, press any one of leap years from 2006 up to show TIME/CALENDAR mode. [FULL (Time & Calendar) Display] Hour hand Date Minute hand [D&D(Day & Date) Display] Date B C ★ If left untouched for 2 minutes when Day & Date Display is left untouched for 2 minutes Day of the week Mode indicator ▲ A PM indicator for odd and even months including February of the four buttons. 7 English ▲ TIME/CALENDAR MODE (TIME) ● The calendar adjusts automatically for 12-hour display only Hour Minute D Second...

Manual
Page 8
... button, a flashing item changes over in the following order (See *1 on page 22) With each press of the hour and minute hands, advance them by pressing button D before setting the analogue time, as the hour and minute hands move together with the digital time. ● If the digital time display cannot be adjusted. Digital time/calendar setting B C D ▲ B Press for 2 to 3 seconds to "00" and start flashing. English TIME/CALENDAR SETTING ● Set the digital time first before setting the digital time...
... button, a flashing item changes over in the following order (See *1 on page 22) With each press of the hour and minute hands, advance them by pressing button D before setting the analogue time, as the hour and minute hands move together with the digital time. ● If the digital time display cannot be adjusted. Digital time/calendar setting B C D ▲ B Press for 2 to 3 seconds to "00" and start flashing. English TIME/CALENDAR SETTING ● Set the digital time first before setting the digital time...

Manual
Page 9
D Press to match the digital time. (See *3 on page 22) 9 English D Press repeatedly to set Hour and Minute hands to select the desired display. * [FULL(Time & Calendar) Display] or [D&D(Day & Date) Display] can be alternatively selected. Analogue time setting C D Analogue time setting display C Press to TIME/CALENDAR mode. (See *4 on page 22) C Press for the display selection. B Press to return to show analogue time setting display.
D Press to match the digital time. (See *3 on page 22) 9 English D Press repeatedly to set Hour and Minute hands to select the desired display. * [FULL(Time & Calendar) Display] or [D&D(Day & Date) Display] can be alternatively selected. Analogue time setting C D Analogue time setting display C Press to TIME/CALENDAR mode. (See *4 on page 22) C Press for the display selection. B Press to return to show analogue time setting display.
Manual
Page 10
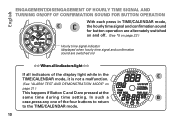
In such a D case,press any one of the display light while in the C TIME/CALENDAR mode, it is not a malfunction. (See "ALARM TEST AND DEMONSTRATION MODE" on page 21 ) This happens if Button C and D are pressed at the same time during time setting. English ENGAGEMENT/DISENGAGEMENT OF HOURLY TIME SIGNAL AND TURNING ON/OFF OF CONFIRMATION SOUND FOR BUTTON OPERATION With each press in TIME/CALENDAR mode, C C the hourly time signal and confirmation sound for button operation are alternately...
In such a D case,press any one of the display light while in the C TIME/CALENDAR mode, it is not a malfunction. (See "ALARM TEST AND DEMONSTRATION MODE" on page 21 ) This happens if Button C and D are pressed at the same time during time setting. English ENGAGEMENT/DISENGAGEMENT OF HOURLY TIME SIGNAL AND TURNING ON/OFF OF CONFIRMATION SOUND FOR BUTTON OPERATION With each press in TIME/CALENDAR mode, C C the hourly time signal and confirmation sound for button operation are alternately...

Manual
Page 12
C D 1 Standard measurement C C START STOP D RESET 2 Accumulated elapsed time measurement C C C ○○○ C D START STOP RESTART STOP RESET 12 * Stop and restart of stopwatch can be repeated as many times as required by pressing Button D. English STOPWATCH OPERATION ● Before using the stopwatch, reset the digital counter to read "00:00'00"000" by pressing Button C.
C D 1 Standard measurement C C START STOP D RESET 2 Accumulated elapsed time measurement C C C ○○○ C D START STOP RESTART STOP RESET 12 * Stop and restart of stopwatch can be repeated as many times as required by pressing Button D. English STOPWATCH OPERATION ● Before using the stopwatch, reset the digital counter to read "00:00'00"000" by pressing Button C.

Manual
Page 13
... lap time measured remain displayed for 10 seconds together with the flashing lap indicator, and then, the display automatically returns to the measurement in progress. * When Button C is pressed at the end of timing, the final lap time is reset to show the final split time. 13 English B Press when the stopwatch is displayed for 10 seconds with the flashing lap display indicator, and then the display automatically changes...
... lap time measured remain displayed for 10 seconds together with the flashing lap indicator, and then, the display automatically returns to the measurement in progress. * When Button C is pressed at the end of timing, the final lap time is reset to show the final split time. 13 English B Press when the stopwatch is displayed for 10 seconds with the flashing lap display indicator, and then the display automatically changes...
Manual
Page 17
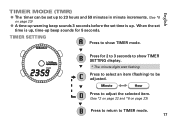
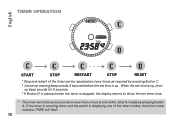
... hours and 59 minutes in minute increments. (See *8 on page 23) B Press to return to TIMER mode. 17 When the set time is up. English TIMER MODE (TMR) ● The timer can be adjusted. ▲ Minute Hour D Press to adjust the selected item. (See *2 on page 22 and *8 on page 23) ● A time-up warning beep sounds 3 seconds before the set time is up, time-up beep sounds for 2 to 3 seconds to show TIMER SETTING display. * The minute digits...
... hours and 59 minutes in minute increments. (See *8 on page 23) B Press to return to TIMER mode. 17 When the set time is up. English TIMER MODE (TMR) ● The timer can be adjusted. ▲ Minute Hour D Press to adjust the selected item. (See *2 on page 22 and *8 on page 23) ● A time-up warning beep sounds 3 seconds before the set time is up, time-up beep sounds for 2 to 3 seconds to show TIMER SETTING display. * The minute digits...
Manual
Page 18
... timer mode indicator (TMR) will continue to count down even if you move to show the set timer time. * The timer will flash. 18 When the set time is up , time- If the timer is counting down and the watch is stopped, the display returns to one of the other 5 modes by pressing Button C. * A time-up warning beep sounds 3 seconds before the set time is up . English TIMER OPERATION C D C C C ○○○ C D START STOP RESTART STOP RESET * Stop...
... timer mode indicator (TMR) will continue to count down even if you move to show the set timer time. * The timer will flash. 18 When the set time is up , time- If the timer is counting down and the watch is stopped, the display returns to one of the other 5 modes by pressing Button C. * A time-up warning beep sounds 3 seconds before the set time is up . English TIMER OPERATION C D C C C ○○○ C D START STOP RESTART STOP RESET * Stop...

Manual
Page 20
C Press to select an item (flashing) to select "ch" number, and follow the above procedures. Hour Minute D Press to adjust the selected item. (See *9 on page 23) B Press to return to ALARM mode. * The alarm mark is displayed and the alarm is automatically engaged. * If you want to use the alarm channel 2, press Button D to be adjusted. English ▲ ALARM TIME SETTING B C A D 20 ▲ ▲ ▲ ▲ ▲ B Press for 2 to 3 seconds to show ALARM SETTING display. * The hour digits start flashing.
C Press to select an item (flashing) to select "ch" number, and follow the above procedures. Hour Minute D Press to adjust the selected item. (See *9 on page 23) B Press to return to ALARM mode. * The alarm mark is displayed and the alarm is automatically engaged. * If you want to use the alarm channel 2, press Button D to be adjusted. English ▲ ALARM TIME SETTING B C A D 20 ▲ ▲ ▲ ▲ ▲ B Press for 2 to 3 seconds to show ALARM SETTING display. * The hour digits start flashing.

Manual
Page 21
... designated time for 20 seconds. The alarm sound can be heard, and then the DEMONSTRATION mode will start, showing the display of the buttons. 21 English ALARM ENGAGEMENT/DISENGAGEMENT A Press to stop it manually, press any of each press, alarm is operating, press button A or B to show ALARM mode. ▲ C With each mode repeatedly. C C "on" indicator Alarm indicator [Alarm engaged] "off" indicator [Alarm disengaged] * The alarm sounds at the same time in the TIME/CALENDAR mode. To stop the alarm.
... designated time for 20 seconds. The alarm sound can be heard, and then the DEMONSTRATION mode will start, showing the display of the buttons. 21 English ALARM ENGAGEMENT/DISENGAGEMENT A Press to stop it manually, press any of each press, alarm is operating, press button A or B to show ALARM mode. ▲ C With each mode repeatedly. C C "on" indicator Alarm indicator [Alarm engaged] "off" indicator [Alarm disengaged] * The alarm sounds at the same time in the TIME/CALENDAR mode. To stop the alarm.
Manual
Page 22
... indicator ("P" mark) from the afternoon is shown when the 12-hour display is selected. Press Button D again to 3 minutes. *5 The hourly time signal will not ring while alarm is sounding. 22 English NOTES ON OPERATING THE WATCH *1-*5 Remarks on time/calendar function: *1 • The day of the week is automatically set once the year, month and date are set, if you want to correct digital time to adjust second digits only, it is not necessary to adjust analogue time...
... indicator ("P" mark) from the afternoon is shown when the 12-hour display is selected. Press Button D again to 3 minutes. *5 The hourly time signal will not ring while alarm is sounding. 22 English NOTES ON OPERATING THE WATCH *1-*5 Remarks on time/calendar function: *1 • The day of the week is automatically set once the year, month and date are set, if you want to correct digital time to adjust second digits only, it is not necessary to adjust analogue time...
Manual
Page 23
...-hour display, the alarm time will also be shown in the 24-hour display. • When setting the hours in the 12-hour display, check that AM/PM is left untouched in the ALARM SETTING display with an item flashing, it will automatically return to the TIMER mode in 2 to 3 minutes. *9 Remarks on alarm function: • The digits advance quickly if Button D is kept pressed. • When the time in the TIME/CALENDAR mode is set...
...-hour display, the alarm time will also be shown in the 24-hour display. • When setting the hours in the 12-hour display, check that AM/PM is left untouched in the ALARM SETTING display with an item flashing, it will automatically return to the TIMER mode in 2 to 3 minutes. *9 Remarks on alarm function: • The digits advance quickly if Button D is kept pressed. • When the time in the TIME/CALENDAR mode is set...
Manual
Page 24
... 3 minutes a day, • the confirmation sound is used more than the specified period. BATTERY CHANGE The miniature battery which powers your possession may be less than 10 times a day, and/or • the timer is not affected. English BATTERY LIFE INDICATOR ● When the second digits start flashing in the TIME/CALENDAR mode, replace the battery with a new one as soon as possible to check the function and performance of the watch, its actual life...
... 3 minutes a day, • the confirmation sound is used more than the specified period. BATTERY CHANGE The miniature battery which powers your possession may be less than 10 times a day, and/or • the timer is not affected. English BATTERY LIFE INDICATOR ● When the second digits start flashing in the TIME/CALENDAR mode, replace the battery with a new one as soon as possible to check the function and performance of the watch, its actual life...
Manual
Page 25
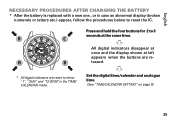
... PROCEDURES AFTER CHANGING THE BATTERY * After the battery is replaced with a new one , or in case an abnormal display (broken numerals or letters etc.) appear, follow the procedures below to reset the IC. ➡ B Press and hold the four buttons for 2 to 3 C seconds at left appears when the buttons are reset to show " 1" , " SUN" and "12:00 00" in the TIME/ CALENDAR mode. All digital indicators disappear...
... PROCEDURES AFTER CHANGING THE BATTERY * After the battery is replaced with a new one , or in case an abnormal display (broken numerals or letters etc.) appear, follow the procedures below to reset the IC. ➡ B Press and hold the four buttons for 2 to 3 C seconds at left appears when the buttons are reset to show " 1" , " SUN" and "12:00 00" in the TIME/ CALENDAR mode. All digital indicators disappear...
Manual
Page 28
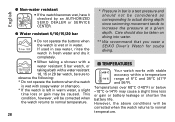
...AUTHORIZED SEIKO DEALER or SERVICE CENTER. ● Water resistant 5/10/15/20 bar • Do not operate the buttons when the watch is a test pressure and should also be taken on diving into water. ** We recommend that you wear a SEIKO Diver's Watch for scuba diving. ■ TEMPERATURES Your watch works with ...the watch returns to normal temperature. 28 * Pressure in warm water, a slight time loss or gain may cause a slight time loss or gain or battery leakage or shorten the battery life. Care should not be considered as corresponding to actual diving depth since swimming movement ...
...AUTHORIZED SEIKO DEALER or SERVICE CENTER. ● Water resistant 5/10/15/20 bar • Do not operate the buttons when the watch is a test pressure and should also be taken on diving into water. ** We recommend that you wear a SEIKO Diver's Watch for scuba diving. ■ TEMPERATURES Your watch works with ...the watch returns to normal temperature. 28 * Pressure in warm water, a slight time loss or gain may cause a slight time loss or gain or battery leakage or shorten the battery life. Care should not be considered as corresponding to actual diving depth since swimming movement ...
Manual
Page 31
... display system TIME/CALENDAR mode Hour, minute, second, date and day of the week PM indicator in the 12-hour display STOPWATCH mode Hour , minute, second, 1/1000 seconds and lap/ split number MEMORY RECALL mode Lap time / Split time (hour, minute, second and 1/ 1000 seconds) and lap/split number TIMER mode Countdown timer (hour and minute) ALARM mode Alarm time (hour and minute) PM indicator in the 12-hour display 7 Digital display medium Nematic Liquid Crystal, FEM (Field Effect Mode) 8 Battery SEIKO SR1130W, 1 piece 9 Battery life Approximately 3 years 10 IC (Integrated Circuit...
... display system TIME/CALENDAR mode Hour, minute, second, date and day of the week PM indicator in the 12-hour display STOPWATCH mode Hour , minute, second, 1/1000 seconds and lap/ split number MEMORY RECALL mode Lap time / Split time (hour, minute, second and 1/ 1000 seconds) and lap/split number TIMER mode Countdown timer (hour and minute) ALARM mode Alarm time (hour and minute) PM indicator in the 12-hour display 7 Digital display medium Nematic Liquid Crystal, FEM (Field Effect Mode) 8 Battery SEIKO SR1130W, 1 piece 9 Battery life Approximately 3 years 10 IC (Integrated Circuit...


