User Guide
Page 4
... Media Player's LEDs 43 Connecting a Keyboard to the Media Player 43 Updating the Media Player Firmware 44 Updating the Seagate Media Software 45 Creating Shortcuts to Shared Folders 46 Managing FreeAgent Drives with Seagate Media 48 Removing a FreeAgent Drive 52 Disconnecting a USB Drive, Camera, or Camcorder 53 Disconnecting the Media Player 53 Resetting the Media Player to Music 28 Before You Begin 28 Playing Music 28 Setting Up Continuous Play...
... Media Player's LEDs 43 Connecting a Keyboard to the Media Player 43 Updating the Media Player Firmware 44 Updating the Seagate Media Software 45 Creating Shortcuts to Shared Folders 46 Managing FreeAgent Drives with Seagate Media 48 Removing a FreeAgent Drive 52 Disconnecting a USB Drive, Camera, or Camcorder 53 Disconnecting the Media Player 53 Resetting the Media Player to Music 28 Before You Begin 28 Playing Music 28 Setting Up Continuous Play...
User Guide
Page 5
Changing the Menu Language 58 Changing the Media Player Screensaver 58 Turning Off a FreeAgent Drive LED 59 Adjusting the Date and Time 59 Changing the Media Player's Network Settings 60 Setting a Language for Information Screens 62 Viewing DivX® Account Information 62 10. Solving Problems 64 General Troubleshooting Tips 64 Common Problems and Solutions 64 Updating the Media Player Firmware 67 Recovering After a Firmware Update Failure 67 Resetting the Media Player Manually 67 Finding More Help 67 Index 68 Media Player User Guide 5
Changing the Menu Language 58 Changing the Media Player Screensaver 58 Turning Off a FreeAgent Drive LED 59 Adjusting the Date and Time 59 Changing the Media Player's Network Settings 60 Setting a Language for Information Screens 62 Viewing DivX® Account Information 62 10. Solving Problems 64 General Troubleshooting Tips 64 Common Problems and Solutions 64 Updating the Media Player Firmware 67 Recovering After a Firmware Update Failure 67 Resetting the Media Player Manually 67 Finding More Help 67 Index 68 Media Player User Guide 5
User Guide
Page 8
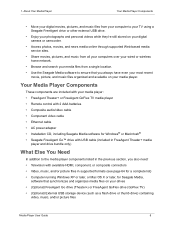
Your Media Player Components These components are included with your media player: • FreeAgent Theater+ or FreeAgent GoFlex TV media player • Remote control with 2 AAA batteries • Composite audio/video cable • Component video cable • Ethernet cable • AC power adapter • Installation CD, including Seagate Media software for Windows® or Macintosh® • Seagate FreeAgent Go™ drive with USB cable (included in supported formats (see page 64 for a complete list) •...
Your Media Player Components These components are included with your media player: • FreeAgent Theater+ or FreeAgent GoFlex TV media player • Remote control with 2 AAA batteries • Composite audio/video cable • Component video cable • Ethernet cable • AC power adapter • Installation CD, including Seagate Media software for Windows® or Macintosh® • Seagate FreeAgent Go™ drive with USB cable (included in supported formats (see page 64 for a complete list) •...

User Guide
Page 10
... wired or wireless network, and a power source. (See the printed Quick Start Guide included in the box for complete instructions.) When you first connect your media player after you 're ready to the media player (see page 17). To learn more help (see page 15). • Adjust the network settings on page 58. 4. Press Power on page 43.) To continue setting up your media player to a power source, the media player's LED flashes...
... wired or wireless network, and a power source. (See the printed Quick Start Guide included in the box for complete instructions.) When you first connect your media player after you 're ready to the media player (see page 17). To learn more help (see page 15). • Adjust the network settings on page 58. 4. Press Power on page 43.) To continue setting up your media player to a power source, the media player's LED flashes...
User Guide
Page 15
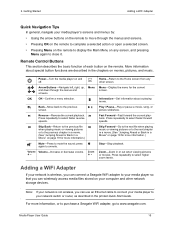
... media player to the Home screen from any screen, and pressing Menu again to your network switch or router, as described in a Movie" on your network is wireless, you can connect a Seagate WiFi adapter to close it. Media Player User Guide 15 press again to select faster forward speeds. Volume Volume-Increase or decrease volume. Information-Get information about special button functions are described in or out when viewing pictures or movies. Remote Control Buttons...
... media player to the Home screen from any screen, and pressing Menu again to your network switch or router, as described in a Movie" on your network is wireless, you can connect a Seagate WiFi adapter to close it. Media Player User Guide 15 press again to select faster forward speeds. Volume Volume-Increase or decrease volume. Information-Get information about special button functions are described in or out when viewing pictures or movies. Remote Control Buttons...

User Guide
Page 16
... you want your media player to connect to a wireless network, you have connected your media player to be adjusted. Getting Started Checking the Network Settings Checking the Network Settings If you need to a wired LAN, the network settings on your computer, follow your media player don't need a Seagate WiFi adapter (see page 64). To create a shared folder on your operating system's instructions. 2. Once the WiFi adapter is installed, follow the instructions in "Adding Your...
... you want your media player to connect to a wireless network, you have connected your media player to be adjusted. Getting Started Checking the Network Settings Checking the Network Settings If you need to a wired LAN, the network settings on your computer, follow your media player don't need a Seagate WiFi adapter (see page 64). To create a shared folder on your operating system's instructions. 2. Once the WiFi adapter is installed, follow the instructions in "Adding Your...

User Guide
Page 23
... drive installed in the media player • An external USB drive connected to the media player's USB port • A digital camera connected to the media player's USB port • A shared folder or media server on page 25 for . To view pictures: 1. Press Menu to quickly sort the folders to your media player and creates an index of pictures at your needs. OR On any screen, press Menu, select Pictures, then press OK. Select Sort...
... drive installed in the media player • An external USB drive connected to the media player's USB port • A digital camera connected to the media player's USB port • A shared folder or media server on page 25 for . To view pictures: 1. Press Menu to quickly sort the folders to your media player and creates an index of pictures at your needs. OR On any screen, press Menu, select Pictures, then press OK. Select Sort...

User Guide
Page 43
... can use a USB or wireless USB keyboard instead of the media player (see illustrations on your media player and its factory default settings (see page 53). When the LED is ... The LED is on the front of the on-screen keyboard when you connect to manage and maintain your media player indicates status. Blinking amber Solid amber Solid white The media player is ... Media Player User Guide...
... can use a USB or wireless USB keyboard instead of the media player (see illustrations on your media player and its factory default settings (see page 53). When the LED is ... The LED is on the front of the on-screen keyboard when you connect to manage and maintain your media player indicates status. Blinking amber Solid amber Solid white The media player is ... Media Player User Guide...
User Guide
Page 44
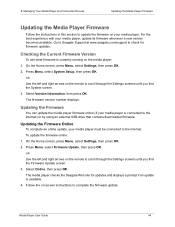
... arrows on -screen instructions to the Internet. Select Version Information, then press OK. Updating the Firmware Online To complete an online update, your media player, update its firmware whenever a new version becomes available. To update the firmware online: 1. Select Online, then press OK. Media Player User Guide 44 For the best experience with your media player must be connected to complete the firmware update. On the Home screen, press Menu, select Settings, then press OK. 2. On the Home screen, press Menu, select Settings, then press...
... arrows on -screen instructions to the Internet. Select Version Information, then press OK. Updating the Firmware Online To complete an online update, your media player, update its firmware whenever a new version becomes available. To update the firmware online: 1. Select Online, then press OK. Media Player User Guide 44 For the best experience with your media player must be connected to complete the firmware update. On the Home screen, press Menu, select Settings, then press OK. 2. On the Home screen, press Menu, select Settings, then press...
User Guide
Page 45
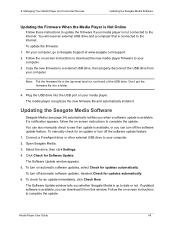
... turn on automatic software updates, select Check for updates automatically. 6. To check for Software Update. The Software Update window appears. 5. The Software Update window tells you when a software update is up to the Internet. Managing Your Media Player and Connected Devices Updating the Seagate Media Software Updating the Firmware When the Media Player is Not Online Follow these instructions to complete the update. Select the drive, then click Settings. 4. Note: Put the firmware file in the top-most level...
... turn on automatic software updates, select Check for updates automatically. 6. To check for Software Update. The Software Update window appears. 5. The Software Update window tells you when a software update is up to the Internet. Managing Your Media Player and Connected Devices Updating the Seagate Media Software Updating the Firmware When the Media Player is Not Online Follow these instructions to complete the update. Select the drive, then click Settings. 4. Note: Put the firmware file in the top-most level...

User Guide
Page 49
... to the drive's default power setting. Because drives in the rest of this section to access your work isn't interrupted by delays when you want, then click Settings. The setting change is confirmed. 5. Managing Your Media Player and Connected Devices Managing FreeAgent Drives with Seagate Media Follow the instructions in power-save mode. The Adjust Power Setting window opens. 3. Select a shorter time interval if you use the drive frequently, so...
... to the drive's default power setting. Because drives in the rest of this section to access your work isn't interrupted by delays when you want, then click Settings. The setting change is confirmed. 5. Managing Your Media Player and Connected Devices Managing FreeAgent Drives with Seagate Media Follow the instructions in power-save mode. The Adjust Power Setting window opens. 3. Select a shorter time interval if you use the drive frequently, so...

User Guide
Page 52
...: Software update messages will not be disabled. Click OK to return to complete the registration. Open the My Drives window (see page 48), select the drive you want , then click Settings. Media Player User Guide 52 Managing Your Media Player and Connected Devices Removing a FreeAgent Drive Registering a Drive If your media player: 1. The Seagate Product Registration page opens. 3. Finding Help For more help using Seagate Media, click the blue Help ? Turn...
...: Software update messages will not be disabled. Click OK to return to complete the registration. Open the My Drives window (see page 48), select the drive you want , then click Settings. Media Player User Guide 52 Managing Your Media Player and Connected Devices Removing a FreeAgent Drive Registering a Drive If your media player: 1. The Seagate Product Registration page opens. 3. Finding Help For more help using Seagate Media, click the blue Help ? Turn...

User Guide
Page 53
..., or music files on the remote. 2. Disconnecting the Media Player To disconnect the media player from the media player's USB port. Unplug the power cable. You can reset the media player back to its factory default settings. Disconnect the cables from your camera or camcorder (if applicable). 3. Select OK, then press OK. Turn off your media player: 1. On the Home screen, press Menu, select Settings, then press OK. 2. The Initial Setup screen opens. Press Menu, select System Setup, then...
..., or music files on the remote. 2. Disconnecting the Media Player To disconnect the media player from the media player's USB port. Unplug the power cable. You can reset the media player back to its factory default settings. Disconnect the cables from your camera or camcorder (if applicable). 3. Select OK, then press OK. Turn off your media player: 1. On the Home screen, press Menu, select Settings, then press OK. 2. The Initial Setup screen opens. Press Menu, select System Setup, then...
User Guide
Page 55
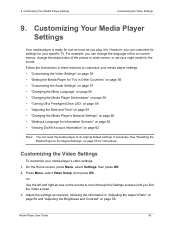
... specific TV. On the Home screen, press Menu, select Settings, then press OK. 2. Media Player User Guide 55 9. Customizing the Video Settings To customize your media player settings: • "Customizing the Video Settings" on page 55 • "Setting the Media Player for TVs in . Adjust the settings as you can change the language of the picture to customize your media player's video settings: 1. Follow the instructions in these sections to wide screen, or set up a night mode for instructions...
... specific TV. On the Home screen, press Menu, select Settings, then press OK. 2. Media Player User Guide 55 9. Customizing the Video Settings To customize your media player settings: • "Customizing the Video Settings" on page 55 • "Setting the Media Player for TVs in . Adjust the settings as you can change the language of the picture to customize your media player's video settings: 1. Follow the instructions in these sections to wide screen, or set up a night mode for instructions...

User Guide
Page 56
... player from one of the screen. • Letter Box-Displays a wide screen film on the remote to select the setting you have different picture resolution standards. Note: Standard definition TVs display in standard definition broadcast television format (4:3 aspect ratio). Use the up and down arrows on a 16:9 screen while maintaining the film's original aspect ratio. • 16:9-Provides the same viewing area as a movie theater screen...
... player from one of the screen. • Letter Box-Displays a wide screen film on the remote to select the setting you have different picture resolution standards. Note: Standard definition TVs display in standard definition broadcast television format (4:3 aspect ratio). Use the up and down arrows on a 16:9 screen while maintaining the film's original aspect ratio. • 16:9-Provides the same viewing area as a movie theater screen...

User Guide
Page 57
... volume becomes neither too loud nor too soft when you change the setting. When Comfort mode is softer and controlled at Night" on page 57 and "Adjusting the Digital Output Settings" on page 58. On the Audio screen, select Night Mode, then press OK. 2. Press Menu, select Audio Setup, then press OK. Adjust the settings as required, following the information in "Ensuring Softer Sound at night: 1. Media Player User Guide 57 Select On to turn...
... volume becomes neither too loud nor too soft when you change the setting. When Comfort mode is softer and controlled at Night" on page 57 and "Adjusting the Digital Output Settings" on page 58. On the Audio screen, select Night Mode, then press OK. 2. Press Menu, select Audio Setup, then press OK. Adjust the settings as required, following the information in "Ensuring Softer Sound at night: 1. Media Player User Guide 57 Select On to turn...

User Guide
Page 58
...-Converts multi-channel audio into stereo. • S/PDIF RAW-Plays digital audio without decoding. • HDMI LPCM 2CH-Converts multiple audio channels into only a left and right arrows on the remote to scroll through the Settings screens until you must connect the media player to meet the needs of inactivity on your own pictures as the screensaver: 1. To use a slideshow of your media player, a screen saver opens. Media Player User Guide 58 Select the setting you...
...-Converts multi-channel audio into stereo. • S/PDIF RAW-Plays digital audio without decoding. • HDMI LPCM 2CH-Converts multiple audio channels into only a left and right arrows on the remote to scroll through the Settings screens until you must connect the media player to meet the needs of inactivity on your own pictures as the screensaver: 1. To use a slideshow of your media player, a screen saver opens. Media Player User Guide 58 Select the setting you...

User Guide
Page 61
... (AUTO), then press OK. 5. Your media player can save the new network settings. On the Home screen, press Menu, select Settings, then press OK. 2. Alternatively, select Connection2 or Connection3 if you are setting up the first connection, then press OK. Media Player User Guide 61 You will need: • SSID (or network name) of the WLAN(s) • Security keywords or codes for the WLAN, then press OK. 6. Select the connection mode...
... (AUTO), then press OK. 5. Your media player can save the new network settings. On the Home screen, press Menu, select Settings, then press OK. 2. Alternatively, select Connection2 or Connection3 if you are setting up the first connection, then press OK. Media Player User Guide 61 You will need: • SSID (or network name) of the WLAN(s) • Security keywords or codes for the WLAN, then press OK. 6. Select the connection mode...
User Guide
Page 64
... while using your media player. Media Player User Guide 64 Solving Problems General Troubleshooting Tips 10. Is the volume on your FreeAgent drive fully inserted into an active power source? Have the network settings changed? • Is your Internet service disrupted or disabled? • Is your TV turned down or disabled? If you have problems setting up and using your media player and TV plugged into the media player? Your media player supports subtitles...
... while using your media player. Media Player User Guide 64 Solving Problems General Troubleshooting Tips 10. Is the volume on your FreeAgent drive fully inserted into an active power source? Have the network settings changed? • Is your Internet service disrupted or disabled? • Is your TV turned down or disabled? If you have problems setting up and using your media player and TV plugged into the media player? Your media player supports subtitles...
User Guide
Page 67
... the new firmware to the USB drive, then properly disconnect the drive from your USB drive to the Seagate Support at www.seagate.com. Turn on -screen instructions to download the new firmware to its factory default settings. Media Player User Guide 67 Follow the on your computer. 3. 10. See "Resetting the Media Player Manually" on the TV, release the RESET button. If you start. Don't release the RESET button. 8. Finding More Help Seagate Support provides a broad...
... the new firmware to the USB drive, then properly disconnect the drive from your USB drive to the Seagate Support at www.seagate.com. Turn on -screen instructions to download the new firmware to its factory default settings. Media Player User Guide 67 Follow the on your computer. 3. 10. See "Resetting the Media Player Manually" on the TV, release the RESET button. If you start. Don't release the RESET button. 8. Finding More Help Seagate Support provides a broad...
