
User Guide (Mac)
Page 3
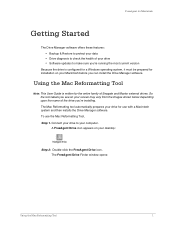
... the images shown below depending upon the name of Seagate and Maxtor external drives. The Mac Reformatting tool automatically prepares your drive for use the Mac Reformatting Tool, Step 1. The FreeAgent Drive Finder window opens: Using the Mac Reformatting Tool 1 Connect your drive to make sure... before you can install the Drive Manager software. FreeAgent for Macintosh Getting Started The Drive Manager software offers these features: • Backup & Restore to protect your data • Drive diagnosis to check the health of your drive • Software updates to your computer.
... the images shown below depending upon the name of Seagate and Maxtor external drives. The Mac Reformatting tool automatically prepares your drive for use the Mac Reformatting Tool, Step 1. The FreeAgent Drive Finder window opens: Using the Mac Reformatting Tool 1 Connect your drive to make sure... before you can install the Drive Manager software. FreeAgent for Macintosh Getting Started The Drive Manager software offers these features: • Backup & Restore to protect your data • Drive diagnosis to check the health of your drive • Software updates to your computer.
User Guide (Mac)
Page 5
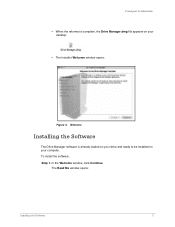
To install the software, Step 1. In the Welcome window, click Continue. The Read Me window opens: Installing the Software 3 FreeAgent for Macintosh • When the reformat is complete, the Drive Manager.dmg file appears on your desktop: • The Installer Welcome window opens: Figure 4: Welcome Installing the Software The Drive Manager software is already loaded on your drive and ready to be installed on your computer.
To install the software, Step 1. In the Welcome window, click Continue. The Read Me window opens: Installing the Software 3 FreeAgent for Macintosh • When the reformat is complete, the Drive Manager.dmg file appears on your desktop: • The Installer Welcome window opens: Figure 4: Welcome Installing the Software The Drive Manager software is already loaded on your drive and ready to be installed on your computer.

User Guide (Mac)
Page 8
A progress window keeps you 'll have to restart your computer: Figure 10: Restart Warning Step 7: Click Continue Installation in the sheet. A sheet warns that you informed as the installation proceeds: Installing the Software 6 FreeAgent for Macintosh Figure 9: Installation Type Step 6: Click Install.
A progress window keeps you 'll have to restart your computer: Figure 10: Restart Warning Step 7: Click Continue Installation in the sheet. A sheet warns that you informed as the installation proceeds: Installing the Software 6 FreeAgent for Macintosh Figure 9: Installation Type Step 6: Click Install.
User Guide (Mac)
Page 9
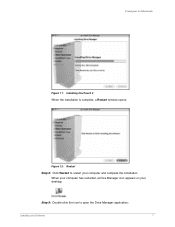
When your computer has restarted, a Drive Manager icon appears on your desktop: Step 9: Double-click the icon to restart your computer and complete the installation. FreeAgent for Macintosh Figure 11: Installing OneTouch 4 When the installation is complete, a Restart window opens: Figure 12: Restart Step 8: Click Restart to open the Drive Manager application: Installing the Software 7
When your computer has restarted, a Drive Manager icon appears on your desktop: Step 9: Double-click the icon to restart your computer and complete the installation. FreeAgent for Macintosh Figure 11: Installing OneTouch 4 When the installation is complete, a Restart window opens: Figure 12: Restart Step 8: Click Restart to open the Drive Manager application: Installing the Software 7
User Guide (Mac)
Page 10
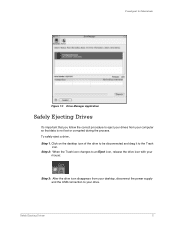
Safely Ejecting Drives 8 FreeAgent for Macintosh Figure 13: Drive Manager Application Safely Ejecting Drives It's important that you follow the correct procedure to eject your drives from your desktop, disconnect the power supply and the USB connection to your computer so that data is not lost or corrupted during the process. Click on...
Safely Ejecting Drives 8 FreeAgent for Macintosh Figure 13: Drive Manager Application Safely Ejecting Drives It's important that you follow the correct procedure to eject your drives from your desktop, disconnect the power supply and the USB connection to your computer so that data is not lost or corrupted during the process. Click on...
User Guide (Mac)
Page 11
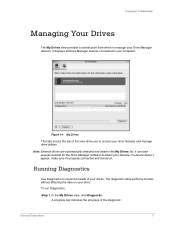
FreeAgent for the Drive Manager software to detect your Drive Manager devices. In the My Drives view, click Diagnostic. If a device doesn't appear, make sure it's ... performs its tests without affecting the data on . Running Diagnostics Use Diagnostics to access your drive. It displays all Drive Manager devices connected to your computer: Figure 14: My Drives The tabs across the top of the view allow you to check the health of the diagnostic: Running Diagnostics 9
FreeAgent for the Drive Manager software to detect your Drive Manager devices. In the My Drives view, click Diagnostic. If a device doesn't appear, make sure it's ... performs its tests without affecting the data on . Running Diagnostics Use Diagnostics to access your drive. It displays all Drive Manager devices connected to your computer: Figure 14: My Drives The tabs across the top of the view allow you to check the health of the diagnostic: Running Diagnostics 9
User Guide (Mac)
Page 28
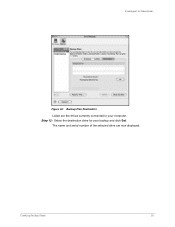
FreeAgent for your computer. Step 13: Select the destination drive for Macintosh Figure 36: Backup Plan Destination Listed are now displayed: Creating Backup Plans 26 The name and serial number of the selected drive are the drives currently connected to your backup and click Set.
FreeAgent for your computer. Step 13: Select the destination drive for Macintosh Figure 36: Backup Plan Destination Listed are now displayed: Creating Backup Plans 26 The name and serial number of the selected drive are the drives currently connected to your backup and click Set.
User Guide (Mac)
Page 32
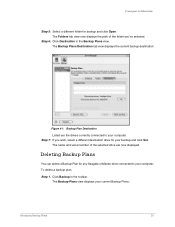
... displays your backup and click Set. The Folders tab view now displays the path of the selected drive are the drives currently connected to your computer. FreeAgent for Macintosh Step 5: Select a different folder for any Seagate or Maxtor drive connected to your...
... displays your backup and click Set. The Folders tab view now displays the path of the selected drive are the drives currently connected to your computer. FreeAgent for Macintosh Step 5: Select a different folder for any Seagate or Maxtor drive connected to your...

User Guide (Mac)
Page 37
FreeAgent for Macintosh Figure 46: Restore Options Listed are restored to be restored. The files are the contents of the backed up folder. Restoring Files 35 Step 6: Click Restore. Step 4: Select the files and, if relevant, the file versions to the location you've selected. Step 5: Select a location at which to restore the files: (a) Select Original to restore the files to their original location on your computer. (b) Select Temporary to restore the files to a temporary Restore folder. (c) Click Choose to browse to and choose another location on your computer.
FreeAgent for Macintosh Figure 46: Restore Options Listed are restored to be restored. The files are the contents of the backed up folder. Restoring Files 35 Step 6: Click Restore. Step 4: Select the files and, if relevant, the file versions to the location you've selected. Step 5: Select a location at which to restore the files: (a) Select Original to restore the files to their original location on your computer. (b) Select Temporary to restore the files to a temporary Restore folder. (c) Click Choose to browse to and choose another location on your computer.


