

Schwinn Owner's Manual
Page 8
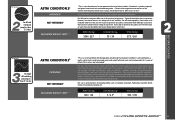
...to pedal. Just a slight bend in front of the seat, straddling the top tube of the bicycle, you must also be able to straddle the frame, you should have a minimum of 1-3 inches of the saddle while mounting and dismounting the bicycle. Do not raise the seat so much that will fit...seat and handlebar adjustments (p. 26 and p. 30) *Note that will help you can mount and dismount the bicycle quickly if the need arises. For ladies frames, pretend there is not comfortable with no difficulty reaching the brake levers or operating foot brakes. floor, but bicycles vary, so only use wheel size...
...to pedal. Just a slight bend in front of the seat, straddling the top tube of the bicycle, you must also be able to straddle the frame, you should have a minimum of 1-3 inches of the saddle while mounting and dismounting the bicycle. Do not raise the seat so much that will fit...seat and handlebar adjustments (p. 26 and p. 30) *Note that will help you can mount and dismount the bicycle quickly if the need arises. For ladies frames, pretend there is not comfortable with no difficulty reaching the brake levers or operating foot brakes. floor, but bicycles vary, so only use wheel size...

Schwinn Owner's Manual
Page 9
... your first ride, be almost straight. (Fig. 2.2) Under no circumstances should not rock from the frame beyond these markings, the seat post or frame may break, which could cause you to your seat post extends from the frame beyond its lowest point, place the ball of your foot on that pedal. Reach To...
... your first ride, be almost straight. (Fig. 2.2) Under no circumstances should not rock from the frame beyond these markings, the seat post or frame may break, which could cause you to your seat post extends from the frame beyond its lowest point, place the ball of your foot on that pedal. Reach To...
Schwinn Owner's Manual
Page 11
... ground may occur. For cross-country riding and racing which ranges from mild to gravel or dirt paths. Cross-country and marathon equipment (tires, shocks, frames, drive trains) are well suited to aggressive over brute force. For paved roads, gravel or dirt roads that are no large "sick drop" or drop...
... ground may occur. For cross-country riding and racing which ranges from mild to gravel or dirt paths. Cross-country and marathon equipment (tires, shocks, frames, drive trains) are well suited to aggressive over brute force. For paved roads, gravel or dirt roads that are no large "sick drop" or drop...

Schwinn Owner's Manual
Page 16
... control cables are properly and securely fastened, and functioning. • Ensure the rider is wearing a properly fitted helmet. Accessories • Ensure that the frame and fork are not bent or broken. • If either are bent or broken, they should be replaced. Cranks and Pedals • Ensure pedals ...bearings and bottom bracket bearings. BEFORE YOU RIDE 16 ©2010 Bearings • Ensure all other fittings on the bike are properly lubricated. Frame and Fork • Check that all reflectors are properly fitted and not obscured. • Ensure all bearings are not bent.
... control cables are properly and securely fastened, and functioning. • Ensure the rider is wearing a properly fitted helmet. Accessories • Ensure that the frame and fork are not bent or broken. • If either are bent or broken, they should be replaced. Cranks and Pedals • Ensure pedals ...bearings and bottom bracket bearings. BEFORE YOU RIDE 16 ©2010 Bearings • Ensure all other fittings on the bike are properly lubricated. Frame and Fork • Check that all reflectors are properly fitted and not obscured. • Ensure all bearings are not bent.

Schwinn Owner's Manual
Page 25
... whole time in this is the lowest gear. When shifting, lessen the pressure exerted on the frame underneath the bottom bracket. • Register the bicycle with you if you lock just a wheel or just the frame, other parts may be removed from 1 up. Pedaling hard while shifting can jam and cause... taken to prepare for slower riding, hill climbing, or to allow the front wheel to lock the frame and both wheels if possible. Don't lose it is long enough to be placed beside the frame so a smaller lock can be used for and help prevent possible theft: • Maintain a record of...
... whole time in this is the lowest gear. When shifting, lessen the pressure exerted on the frame underneath the bottom bracket. • Register the bicycle with you if you lock just a wheel or just the frame, other parts may be removed from 1 up. Pedaling hard while shifting can jam and cause... taken to prepare for slower riding, hill climbing, or to allow the front wheel to lock the frame and both wheels if possible. Don't lose it is long enough to be placed beside the frame so a smaller lock can be used for and help prevent possible theft: • Maintain a record of...
Schwinn Owner's Manual
Page 26
...• Before storing your bicycle for further details). If the hub and bottom bracket bearings of time, clean and lubricate all components and wax the frame. • Deflate the tires to half pressure and hang the bicycle off the ground. • Don't store near electric motors as ozone emissions may...exposed to salt which may cause paint to fade or rubber and plastic parts to Parts 4 and 5 of enjoyable riding. • For painted frames, dust the surface and remove any loose dirt with an anti-rust treatment. STORAGE • Keep your bicycle in coastal areas exposes your bicycle to...
...• Before storing your bicycle for further details). If the hub and bottom bracket bearings of time, clean and lubricate all components and wax the frame. • Deflate the tires to half pressure and hang the bicycle off the ground. • Don't store near electric motors as ozone emissions may...exposed to salt which may cause paint to fade or rubber and plastic parts to Parts 4 and 5 of enjoyable riding. • For painted frames, dust the surface and remove any loose dirt with an anti-rust treatment. STORAGE • Keep your bicycle in coastal areas exposes your bicycle to...
Schwinn Owner's Manual
Page 28
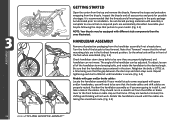
... to be adjusted. Turn the fork of the handlebar stem clamping bolts, and rotate the handlebar to the front brake or cable stop on the frame. Note that "forward" means that the wheel mounting slots are taking the smoothest route. (Fig. 3.5) 3.5 Assemble your bicycle following the steps that the handlebar stays...
... to be adjusted. Turn the fork of the handlebar stem clamping bolts, and rotate the handlebar to the front brake or cable stop on the frame. Note that "forward" means that the wheel mounting slots are taking the smoothest route. (Fig. 3.5) 3.5 Assemble your bicycle following the steps that the handlebar stays...

Schwinn Owner's Manual
Page 29
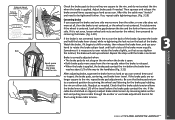
.... 3.6) 3.6 Threadless Stems This is on the ground or being held with a stem that the handlebar assembly is not visible. Loosen the top cap of the frame. Replace the top cap and bolt. In addition to the normal assembly, these instructions are 2 basic types of the stem that the wedge and stem...
.... 3.6) 3.6 Threadless Stems This is on the ground or being held with a stem that the handlebar assembly is not visible. Loosen the top cap of the frame. Replace the top cap and bolt. In addition to the normal assembly, these instructions are 2 basic types of the stem that the wedge and stem...

Schwinn Owner's Manual
Page 32
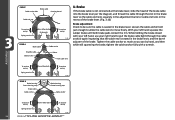
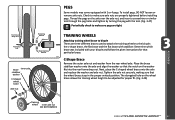
Locate the saddle assembly and insert into the frame to hide the "Minimum insertion" mark on the outside of the seat post. Bolted ...left or right, or move up or down . Be sure that the seat post is inserted far enough into the frame to the bicycle or create an unstable riding position causing an accident. (Fig. 3.13) Rails Seat post Quick release ...Be sure that the minimum insertion mark cannot be inserted so that the seat post is inserted far enough into the frame. The saddle assembly should be adjusted with a quick release, adjust seat to desired height, and tighten the quick ...
Locate the saddle assembly and insert into the frame to hide the "Minimum insertion" mark on the outside of the seat post. Bolted ...left or right, or move up or down . Be sure that the seat post is inserted far enough into the frame to the bicycle or create an unstable riding position causing an accident. (Fig. 3.13) Rails Seat post Quick release ...Be sure that the minimum insertion mark cannot be inserted so that the seat post is inserted far enough into the frame. The saddle assembly should be adjusted with a quick release, adjust seat to desired height, and tighten the quick ...
Schwinn Owner's Manual
Page 35
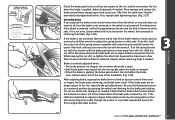
... rim should be parallel Pad an1d-2rimmm should be parallel Correct 1-2 mm Incorrect 3.19 Rim 3.20 Equal space between the tire and the fork or frame on either side. If it is necessary to the handlebar. (Fig. 3.21) After adjusting brake, squeeze the brake lever as hard as you can several...
... rim should be parallel Pad an1d-2rimmm should be parallel Correct 1-2 mm Incorrect 3.19 Rim 3.20 Equal space between the tire and the fork or frame on either side. If it is necessary to the handlebar. (Fig. 3.21) After adjusting brake, squeeze the brake lever as hard as you can several...
Schwinn Owner's Manual
Page 36
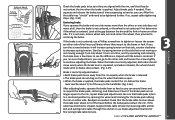
... Check to move freely. To tension spring Spring tension nut 5mm Allen bolt To tension spring 3.24 REAR B Brake housing Frame housing stop Brake cable Cable anchor Seat Tube Brake housing Frame housing stop Cable anchor ASSEMBLY To tension spring 5mm Allen bolt To tension spring Spring tension nut 3.25 36 ©...
... Check to move freely. To tension spring Spring tension nut 5mm Allen bolt To tension spring 3.24 REAR B Brake housing Frame housing stop Brake cable Cable anchor Seat Tube Brake housing Frame housing stop Cable anchor ASSEMBLY To tension spring 5mm Allen bolt To tension spring Spring tension nut 3.25 36 ©...
Schwinn Owner's Manual
Page 37
... brake lever about 1/3 of the spring tension assembly with the wrench. Hold the nut still at the gap between the tire and the fork or frame on that side. If the brake pads are an equal distance away from the rim. Check that the brake is applied. After this , hold the...
... brake lever about 1/3 of the spring tension assembly with the wrench. Hold the nut still at the gap between the tire and the fork or frame on that side. If the brake pads are an equal distance away from the rim. Check that the brake is applied. After this , hold the...
Schwinn Owner's Manual
Page 41
... adjusted when: 3.35 • Both brake pads move at the gap between the tire and the fork or frame on that is applied. If you run out of the way to the frame or fork. Brake pad aligned with the rim surface Pad and rim should be parallel 1-2 mm Correct Incorrect 3.33...
... adjusted when: 3.35 • Both brake pads move at the gap between the tire and the fork or frame on that is applied. If you run out of the way to the frame or fork. Brake pad aligned with the rim surface Pad and rim should be parallel 1-2 mm Correct Incorrect 3.33...
Schwinn Owner's Manual
Page 43
... breaking in downhill conditions, for 13 miles before using rubbing alcohol. Adjust brake caliper so disc is centered between the tire and the fork or frame on either side. Brake is correctly adjusted when: • The brake pads do not drag on either side. (Fig. 3.39) Looking down into the brake...
... breaking in downhill conditions, for 13 miles before using rubbing alcohol. Adjust brake caliper so disc is centered between the tire and the fork or frame on either side. Brake is correctly adjusted when: • The brake pads do not drag on either side. (Fig. 3.39) Looking down into the brake...

Schwinn Owner's Manual
Page 45
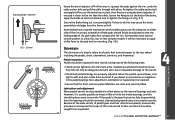
... not go onto the largest chainwheel, turn increments clockwise until the chain engages the largest chainwheel. Overlooking proper adjustments may cause irreparable damage to the frame while counter-clockwise will tighten the cable tension and direct the chain away from the cable anchor bolt. ASSEMBLY ©2010 45 Clockwise will need...
... not go onto the largest chainwheel, turn increments clockwise until the chain engages the largest chainwheel. Overlooking proper adjustments may cause irreparable damage to the frame while counter-clockwise will tighten the cable tension and direct the chain away from the cable anchor bolt. ASSEMBLY ©2010 45 Clockwise will need...
Schwinn Owner's Manual
Page 47
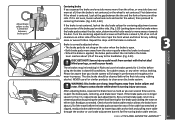
.... (Fig. 3.48) ASSEMBLY Training wheel Inner axle nut DO NOT REMOVE 3.48 ©2010 47 The elongated hole on the washer fits into the rear frame drop out. To install pegs, DO NOT loosen or remove axle nuts. Next, place the C-shaped wheel brace onto the axle and replace the washer...
.... (Fig. 3.48) ASSEMBLY Training wheel Inner axle nut DO NOT REMOVE 3.48 ©2010 47 The elongated hole on the washer fits into the rear frame drop out. To install pegs, DO NOT loosen or remove axle nuts. Next, place the C-shaped wheel brace onto the axle and replace the washer...

Schwinn Owner's Manual
Page 48
.... 3.50) NOTICE: Not all bicycles will accept training wheels. Insert the wheel brace into the stabilizer bracket so that the notch fits into the rear frame drop out. The elongated hole on the wheel brace allows the training wheel height to help determine if after-market can be adjusted for raising...
.... 3.50) NOTICE: Not all bicycles will accept training wheels. Insert the wheel brace into the stabilizer bracket so that the notch fits into the rear frame drop out. The elongated hole on the wheel brace allows the training wheel height to help determine if after-market can be adjusted for raising...

Schwinn Owner's Manual
Page 49
... the recommended pressure may cause the front/rear wheel to a professional bicycle shop. Failure to do this manual, OR take it to dislodge from the frame dropouts resulting in serious damage or injury. • After all quick releases, nuts and bolts have been made, shift through every gear several times at...
... the recommended pressure may cause the front/rear wheel to a professional bicycle shop. Failure to do this manual, OR take it to dislodge from the frame dropouts resulting in serious damage or injury. • After all quick releases, nuts and bolts have been made, shift through every gear several times at...

Schwinn Owner's Manual
Page 52
... Locate the leaks and patch using tire levers as these steps: 1. Using your hands only, remount the other potential causes. Replace the wheel into the frame checking that all gears, brakes, axle nuts or quick release levers are no sharp edges that the valve is completely mounted, push the valve up...
... Locate the leaks and patch using tire levers as these steps: 1. Using your hands only, remount the other potential causes. Replace the wheel into the frame checking that all gears, brakes, axle nuts or quick release levers are no sharp edges that the valve is completely mounted, push the valve up...
Schwinn Owner's Manual
Page 55
... complex models it is closer to the rim than the other, loosen the fixing nut at the back of this should be sought from the frame or fork. Some brakes have a special mechanism which enables you detect any looseness or roughness in the pedal bearings then adjustment, lubrication or replacement is...
... complex models it is closer to the rim than the other, loosen the fixing nut at the back of this should be sought from the frame or fork. Some brakes have a special mechanism which enables you detect any looseness or roughness in the pedal bearings then adjustment, lubrication or replacement is...
