

Schwinn Owner's Manual
Page 2
For questions regarding performance, assembly, operation, parts or returns, contact the experts at Cycling Sports Group directly by calling toll free 1-800-THE-BIKE [email protected] 2 ©2010 Congratulations on your satisfaction with Cycling Sports Group and its products. Our Service Department is dedicated to your new purchase!
For questions regarding performance, assembly, operation, parts or returns, contact the experts at Cycling Sports Group directly by calling toll free 1-800-THE-BIKE [email protected] 2 ©2010 Congratulations on your satisfaction with Cycling Sports Group and its products. Our Service Department is dedicated to your new purchase!
Schwinn Owner's Manual
Page 3
... you have doubts or concerns as to your experience or ability to write or call us concerning missing parts, service questions, operating advice, and/or assembly questions. 16 Trowbridge Drive Bethel, CT 06801 USA www.schwinnbikes.com Service sƟcker locaƟon (Bike shown upside down) 3 The bicycle you choose...
... you have doubts or concerns as to your experience or ability to write or call us concerning missing parts, service questions, operating advice, and/or assembly questions. 16 Trowbridge Drive Bethel, CT 06801 USA www.schwinnbikes.com Service sƟcker locaƟon (Bike shown upside down) 3 The bicycle you choose...

Schwinn Owner's Manual
Page 5
... Warning, Note to parents • Fit • Helmets, Protective Gear & Clothing • Safety Checklist • Riding Safety • Operation • Security • Maintenance • Storage 3 ASSEMBLY ...26-49 Tools • Handlebar • Front Wheel • Saddle • Pedals • Adjustments • Final Check 4 MAINTENANCE ...50-65 Scheduled • Inspection • How...
... Warning, Note to parents • Fit • Helmets, Protective Gear & Clothing • Safety Checklist • Riding Safety • Operation • Security • Maintenance • Storage 3 ASSEMBLY ...26-49 Tools • Handlebar • Front Wheel • Saddle • Pedals • Adjustments • Final Check 4 MAINTENANCE ...50-65 Scheduled • Inspection • How...

Schwinn Owner's Manual
Page 6
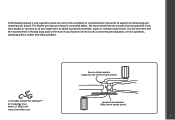
... also contain training wheels. Single speed bicycles vary greatly. Your model may have additional accessories such as fenders, bags, carriers, etc. This will help with assembly, maintenance, and troubleshooting. Seat Rear reflector Seat post binder bolt or quick-release skewer Seat stay Training wheel bracket Rear sprocket Spokes Handlebar...
... also contain training wheels. Single speed bicycles vary greatly. Your model may have additional accessories such as fenders, bags, carriers, etc. This will help with assembly, maintenance, and troubleshooting. Seat Rear reflector Seat post binder bolt or quick-release skewer Seat stay Training wheel bracket Rear sprocket Spokes Handlebar...

Schwinn Owner's Manual
Page 7
... Chain wheel Chain stay Chain Rear derailleur BoƩom Bracket Axle Crank arm Tire valve Pedal Front hub ©2010 1.2 7 This will help with assembly, maintenance, and troubleshooting. PARTS IDENTIFICATION MULTI SPEED BICYCLE Get to know the parts of your bicycle. Your model may have additional accessories such as fenders...
... Chain wheel Chain stay Chain Rear derailleur BoƩom Bracket Axle Crank arm Tire valve Pedal Front hub ©2010 1.2 7 This will help with assembly, maintenance, and troubleshooting. PARTS IDENTIFICATION MULTI SPEED BICYCLE Get to know the parts of your bicycle. Your model may have additional accessories such as fenders...

Schwinn Owner's Manual
Page 12
... the stem in relation to the front wheel, turn the handlebars in relation to the stem, or turn the bar end extensions in relation to assembly-adjustments (p. 27) for instructions on installation. BEFORE YOU RIDE 12 ©2010 Threadless headsets and clamp-on stems are not adjustable. Please refer to... not be visible above the top of force. Place the front wheel of the bicycle between your legs and attempt to twist the handlebar/stem assembly using a reasonable amount of the headset. Failure to properly tighten the stem binder bolt, the handlebar binder bolt, or the bar end extension ...
... the stem in relation to the front wheel, turn the handlebars in relation to the stem, or turn the bar end extensions in relation to assembly-adjustments (p. 27) for instructions on installation. BEFORE YOU RIDE 12 ©2010 Threadless headsets and clamp-on stems are not adjustable. Please refer to... not be visible above the top of force. Place the front wheel of the bicycle between your legs and attempt to twist the handlebar/stem assembly using a reasonable amount of the headset. Failure to properly tighten the stem binder bolt, the handlebar binder bolt, or the bar end extension ...
Schwinn Owner's Manual
Page 22
... brakes your weight will want to stop turning resulting in a front pitch over or cause the bicycle to lose steering function leading to a crash. See Assembly and Maintenance for braking force. It is OK to operate one brake at a time, or all together, depending on brake adjustment. (Fig. 2.12) 22 ©...
... brakes your weight will want to stop turning resulting in a front pitch over or cause the bicycle to lose steering function leading to a crash. See Assembly and Maintenance for braking force. It is OK to operate one brake at a time, or all together, depending on brake adjustment. (Fig. 2.12) 22 ©...
Schwinn Owner's Manual
Page 23
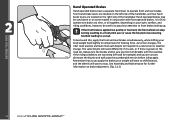
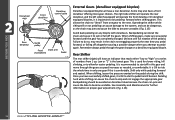
.... It is equipped with little pressure on proper gear adjustment. (Fig. 2.14) 2.14 ©2010 23 BEFORE YOU RIDE Backpedaling should not be avoided. See Assembly and Maintenance for easier pedaling. To shift properly, pedal the bicycle with foot activated brakes), however, backpedaling should have enough gear "overlaps" that gear before...
.... It is equipped with little pressure on proper gear adjustment. (Fig. 2.14) 2.14 ©2010 23 BEFORE YOU RIDE Backpedaling should not be avoided. See Assembly and Maintenance for easier pedaling. To shift properly, pedal the bicycle with foot activated brakes), however, backpedaling should have enough gear "overlaps" that gear before...
Schwinn Owner's Manual
Page 24
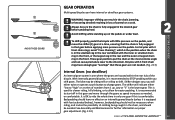
... danger when you pedal forward until the gear has completely changed. (At least one gear to allow for further information on a derailleur equipped bicycle. See Assembly and Maintenance for easier pedaling. The right side shifter will operate the rear derailleur, and the left side (if equipped) will have a front derailleur offering...
... danger when you pedal forward until the gear has completely changed. (At least one gear to allow for further information on a derailleur equipped bicycle. See Assembly and Maintenance for easier pedaling. The right side shifter will operate the rear derailleur, and the left side (if equipped) will have a front derailleur offering...

Schwinn Owner's Manual
Page 27
...The following instructions will enable you have questions about your ability to properly assemble this manual before riding. If your bicycle was assembled and tuned in this product must be properly assembled before riding. For more details on inspection, lubrication, maintenance and adjustment of... ability To avoid injury, this manual. If you review the complete assembly instructions and perform checks specified in the partially disassembled form. TOOLS FOR ASSEMBLY Your new bicycle was obtained assembled, we strongly recommend that you consult a bicycle specialist if you to...
...The following instructions will enable you have questions about your ability to properly assemble this manual before riding. If your bicycle was assembled and tuned in this product must be properly assembled before riding. For more details on inspection, lubrication, maintenance and adjustment of... ability To avoid injury, this manual. If you review the complete assembly instructions and perform checks specified in the partially disassembled form. TOOLS FOR ASSEMBLY Your new bicycle was obtained assembled, we strongly recommend that you consult a bicycle specialist if you to...
Schwinn Owner's Manual
Page 28
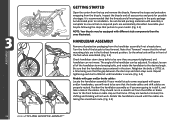
...sure they are taking the smoothest route. (Fig. 3.5) 3.5 It is recommended that the threads and all protective packaging from the bicycle. HANDLEBAR ASSEMBLY Remove all moving parts in a smooth arc from the top and remove the bicycle. loosen all accessories and parts for possible shortages. Repeat tightening...ones illustrated. The angle of the bicycle to your bicycle following the steps that the gap between the stem cap and stem stays even. Assemble your model. (Fig. 3.2) NOTE: Your bicycle may be equipped with gears and/or handbrakes, you were going to ensure that the brake...
...sure they are taking the smoothest route. (Fig. 3.5) 3.5 It is recommended that the threads and all protective packaging from the bicycle. HANDLEBAR ASSEMBLY Remove all moving parts in a smooth arc from the top and remove the bicycle. loosen all accessories and parts for possible shortages. Repeat tightening...ones illustrated. The angle of the bicycle to your bicycle following the steps that the gap between the stem cap and stem stays even. Assemble your model. (Fig. 3.2) NOTE: Your bicycle may be equipped with gears and/or handbrakes, you were going to ensure that the brake...

Schwinn Owner's Manual
Page 29
...so that has an adjustable angle. For this after the front wheel is installed, and re-adjust. (Fig. 3.6) 3.6 Threadless Stems This is a handlebar assembly that has a open ended stem with a stem that the wedge and stem can easily retrieve them. If needed , you can re-check this may ...into the fork steer tube. Then tighten the pinch bolt(s) evenly with the 3.8 front wheel and re-tighten the stem bolt. ©2010 29 ASSEMBLY If these instructions are 2 basic types of the stem bolt. Check steering tightness prior to the rider. Replace the top cap and bolt. While...
...so that has an adjustable angle. For this after the front wheel is installed, and re-adjust. (Fig. 3.6) 3.6 Threadless Stems This is a handlebar assembly that has a open ended stem with a stem that the wedge and stem can easily retrieve them. If needed , you can re-check this may ...into the fork steer tube. Then tighten the pinch bolt(s) evenly with the 3.8 front wheel and re-tighten the stem bolt. ©2010 29 ASSEMBLY If these instructions are 2 basic types of the stem bolt. Check steering tightness prior to the rider. Replace the top cap and bolt. While...
Schwinn Owner's Manual
Page 30
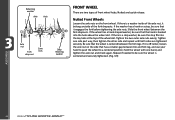
... that it engages the fork before tightening the axle nuts. If there is a step washer, be sure the wheel is centered and securely tightened. (Fig. 3.9) ASSEMBLY 30 ©2010 Repeat if needed to a centered position; If the wheel has a hook shaped washer, be sure that the hook is centered between the...
... that it engages the fork before tightening the axle nuts. If there is a step washer, be sure the wheel is centered and securely tightened. (Fig. 3.9) ASSEMBLY 30 ©2010 Repeat if needed to a centered position; If the wheel has a hook shaped washer, be sure that the hook is centered between the...

Schwinn Owner's Manual
Page 31
...closed " position. If it closes easily, open the handle up , and tighten the lock nut further. Install spring and then start to handlebar assembly and re-adjust if needed. Make sure the wheel is properly seated and the quick release is centered. 5. Locate the quick release skewer from ... the chain). (Fig. 3.11) 3. Some tire tread patterns have a direction, so compare your palm, but do not Close tighten too far. 3.10 4. ASSEMBLY Quick Release Wheels 1. With one hand on the handle and one hand on the left side of the bicycle so that there's an "open " position...
...closed " position. If it closes easily, open the handle up , and tighten the lock nut further. Install spring and then start to handlebar assembly and re-adjust if needed. Make sure the wheel is properly seated and the quick release is centered. 5. Locate the quick release skewer from ... the chain). (Fig. 3.11) 3. Some tire tread patterns have a direction, so compare your palm, but do not Close tighten too far. 3.10 4. ASSEMBLY Quick Release Wheels 1. With one hand on the handle and one hand on the left side of the bicycle so that there's an "open " position...

Schwinn Owner's Manual
Page 32
The saddle assembly should be adjusted again. Bolted Seat Clamp If your bicycle has a seat clamp with a quick release, adjust seat to desired height, and tighten the quick ... line is inserted far enough into the frame to prevent a sudden shift of bicycle control. ASSEMBLY Seat clamp AdjusƟng nut 32 ©2010 SADDLE ASSEMBLY The seat post must be seen. Locate the saddle assembly and insert into the frame to the bicycle or create an unstable riding position causing an...
The saddle assembly should be adjusted again. Bolted Seat Clamp If your bicycle has a seat clamp with a quick release, adjust seat to desired height, and tighten the quick ... line is inserted far enough into the frame to prevent a sudden shift of bicycle control. ASSEMBLY Seat clamp AdjusƟng nut 32 ©2010 SADDLE ASSEMBLY The seat post must be seen. Locate the saddle assembly and insert into the frame to the bicycle or create an unstable riding position causing an...
Schwinn Owner's Manual
Page 33
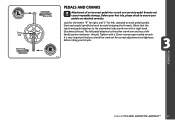
... set for left - Tighten with a right-hand Dust (clockwise) thread. It is very important that the right hand pedal attaches to ensure your bicycle. 3.15 ASSEMBLY ©2010 33 PEDALS AND CRANKS Attachment of an incorrect pedal into a crank arm can strip pedal threads and cause irreparable damage. cap hand (counter...
... set for left - Tighten with a right-hand Dust (clockwise) thread. It is very important that the right hand pedal attaches to ensure your bicycle. 3.15 ASSEMBLY ©2010 33 PEDALS AND CRANKS Attachment of an incorrect pedal into a crank arm can strip pedal threads and cause irreparable damage. cap hand (counter...
Schwinn Owner's Manual
Page 34
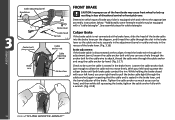
... then while still squeezing the brake, tighten the cable anchor fully with a wrench. (Fig. 3.18) ASSEMBLY 3.18 34 ©2010 With your left hand, use of the front brake may cause front wheel to the appropriate... assembly instructions below. *Additionally some freestyle models may be sure the cable is disconnected at the brake lever,... detangler. While holding the brake closed with your bike is equipped with a "cable detangler". See assembly steps for the cable wire to move freely.
... then while still squeezing the brake, tighten the cable anchor fully with a wrench. (Fig. 3.18) ASSEMBLY 3.18 34 ©2010 With your left hand, use of the front brake may cause front wheel to the appropriate... assembly instructions below. *Additionally some freestyle models may be sure the cable is disconnected at the brake lever,... detangler. While holding the brake closed with your bike is equipped with a "cable detangler". See assembly steps for the cable wire to move freely.
Schwinn Owner's Manual
Page 35
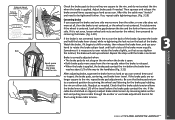
... hand to be tightened further. After this the cable may "stretch" and need to rotate the brake caliper back until the brake is not centered. ASSEMBLY Brake pad aligned Brakewipthadthaelrigimnesudrface wPitahdtahned rim surface rim should be parallel Pad an1d-2rimmm should be parallel Correct 1-2 mm Incorrect 3.19 Rim 3.20 Equal space...
... hand to be tightened further. After this the cable may "stretch" and need to rotate the brake caliper back until the brake is not centered. ASSEMBLY Brake pad aligned Brakewipthadthaelrigimnesudrface wPitahdtahned rim surface rim should be parallel Pad an1d-2rimmm should be parallel Correct 1-2 mm Incorrect 3.19 Rim 3.20 Equal space...
Schwinn Owner's Manual
Page 36
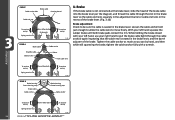
... Allen bolt To tension spring 3.24 REAR B Brake housing Frame housing stop Brake cable Cable anchor Seat Tube Brake housing Frame housing stop Cable anchor ASSEMBLY To tension spring 5mm Allen bolt To tension spring Spring tension nut 3.25 36 ©2010 Loosen the cable anchor bolt just enough to allow...
... Allen bolt To tension spring 3.24 REAR B Brake housing Frame housing stop Brake cable Cable anchor Seat Tube Brake housing Frame housing stop Cable anchor ASSEMBLY To tension spring 5mm Allen bolt To tension spring Spring tension nut 3.25 36 ©2010 Loosen the cable anchor bolt just enough to allow...
Schwinn Owner's Manual
Page 37
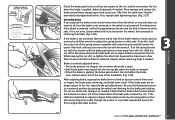
... times and re-inspect the brake pads, centering, and brake lever travel before the brake 3.28 lever reaches about 1/3 of the spring tension assembly with a wrench and carefully loosen the center Allen bolt until the brake pad starts to be tightened further. Squeeze the brake lever a few ...has stretched or slipped, readjust brake cable tension by spinning the wheel and listening for fine tuning brake cable tension. 3.29 ©2010 37 ASSEMBLY First determine if the wheel is centered. determine which side of the way to centering the brake. (Fig. 3.28) 3.27 If the brake...
... times and re-inspect the brake pads, centering, and brake lever travel before the brake 3.28 lever reaches about 1/3 of the spring tension assembly with a wrench and carefully loosen the center Allen bolt until the brake pad starts to be tightened further. Squeeze the brake lever a few ...has stretched or slipped, readjust brake cable tension by spinning the wheel and listening for fine tuning brake cable tension. 3.29 ©2010 37 ASSEMBLY First determine if the wheel is centered. determine which side of the way to centering the brake. (Fig. 3.28) 3.27 If the brake...


