
Schwinn Owner's Manual
Page 6
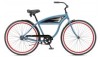
... Chain Crank arm Chain stay Rim Tire 1.1 6 ©2010 This will help with assembly, maintenance, and troubleshooting. Your model may have additional accessories such as fenders, bags, carriers, etc. PARTS IDENTIFICATION SINGLE SPEED BICYCLE Get to know the parts of your bicycle.
... Chain Crank arm Chain stay Rim Tire 1.1 6 ©2010 This will help with assembly, maintenance, and troubleshooting. Your model may have additional accessories such as fenders, bags, carriers, etc. PARTS IDENTIFICATION SINGLE SPEED BICYCLE Get to know the parts of your bicycle.

Schwinn Owner's Manual
Page 7
This will help with assembly, maintenance, and troubleshooting. Your model may have additional accessories such as fenders, bags, carriers, etc. Multi speed bicycles vary greatly. Gear control cable Freewheel Wheel reflector Rim Seat Rear reflector Seat post Quick ...
This will help with assembly, maintenance, and troubleshooting. Your model may have additional accessories such as fenders, bags, carriers, etc. Multi speed bicycles vary greatly. Gear control cable Freewheel Wheel reflector Rim Seat Rear reflector Seat post Quick ...
Schwinn Owner's Manual
Page 46
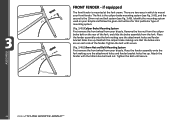
...System First remove the front wheel from your bicycle. Tighten the bolt until secure. 3.46 Identify the mounting system used on each side of the fender. Tighten the bolt until secure. (Fig. 3.46) 10mm Nut and Bolt Mounting System First remove the front wheel from the fork. Place 3.45 ...the fender assembly onto the fork making sure the attachment holes and fender bracket holes line up . Attach the fender with the 10mm hex bolt and nut. if equipped The front fender is the 10mm nut and bolt system (see Fig. 3.46). ...
...System First remove the front wheel from your bicycle. Tighten the bolt until secure. 3.46 Identify the mounting system used on each side of the fender. Tighten the bolt until secure. (Fig. 3.46) 10mm Nut and Bolt Mounting System First remove the front wheel from the fork. Place 3.45 ...the fender assembly onto the fork making sure the attachment holes and fender bracket holes line up . Attach the fender with the 10mm hex bolt and nut. if equipped The front fender is the 10mm nut and bolt system (see Fig. 3.46). ...


