
Schwinn Owner's Manual
Page 6
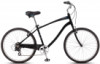
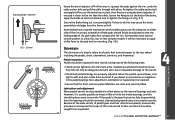
.... PARTS IDENTIFICATION SINGLE SPEED BICYCLE Get to know the parts of your bicycle. Your model may have additional accessories such as fenders, bags, carriers, etc. Seat Rear reflector Seat post binder bolt or quick-release skewer Seat stay Training wheel bracket Rear sprocket Spokes Handlebar grip Brake control cable Head set Head tube Top tube Down tube Seat post Seat tube Rear brake lever Handle bar Front reflector Handlebar stem Front brake Brake pad Front fork Front hub Wheel reflector Pedal Tire valve Training wheel Chain wheel Chain Crank arm Chain...
.... PARTS IDENTIFICATION SINGLE SPEED BICYCLE Get to know the parts of your bicycle. Your model may have additional accessories such as fenders, bags, carriers, etc. Seat Rear reflector Seat post binder bolt or quick-release skewer Seat stay Training wheel bracket Rear sprocket Spokes Handlebar grip Brake control cable Head set Head tube Top tube Down tube Seat post Seat tube Rear brake lever Handle bar Front reflector Handlebar stem Front brake Brake pad Front fork Front hub Wheel reflector Pedal Tire valve Training wheel Chain wheel Chain Crank arm Chain...

Schwinn Owner's Manual
Page 7
... such as fenders, bags, carriers, etc. Multi speed bicycles vary greatly. Gear control cable Freewheel Wheel reflector Rim Seat Rear reflector Seat post Quick release Rear Brake ShiŌ lever Handlebar stem Head set Head tube Top tube Down tube Seat tube Seat stay Front derailleur Handlebar Brake lever Brake control cables Front reflector Front brake Front fork Spokes Tire Chain wheel Chain stay Chain Rear derailleur BoƩom Bracket Axle Crank arm Tire valve Pedal Front hub ©2010 1.2 7 This will help with assembly, maintenance, and...
... such as fenders, bags, carriers, etc. Multi speed bicycles vary greatly. Gear control cable Freewheel Wheel reflector Rim Seat Rear reflector Seat post Quick release Rear Brake ShiŌ lever Handlebar stem Head set Head tube Top tube Down tube Seat tube Seat stay Front derailleur Handlebar Brake lever Brake control cables Front reflector Front brake Front fork Spokes Tire Chain wheel Chain stay Chain Rear derailleur BoƩom Bracket Axle Crank arm Tire valve Pedal Front hub ©2010 1.2 7 This will help with assembly, maintenance, and...

Schwinn Owner's Manual
Page 8
... RIDE 1-3 inches Bike Wheel Size 12 inch wheel 16 inch wheel 18 inch wheel 20 inch wheel 24 inch wheel 26 inch wheel 700c 2.1 Your Approx. Height 28 - 38 inches tall 38 - 48 inches tall 42 - 52 inches tall 48 - 60 inches tall 56 - 66 inches tall 64 - 74 inches tall 64 - 74 inches tall SIZING GUIDE & CHART When choosing the correct size bicycle, there are comfortable and can not be almost completely straight when the pedal is not...
... RIDE 1-3 inches Bike Wheel Size 12 inch wheel 16 inch wheel 18 inch wheel 20 inch wheel 24 inch wheel 26 inch wheel 700c 2.1 Your Approx. Height 28 - 38 inches tall 38 - 48 inches tall 42 - 52 inches tall 48 - 60 inches tall 56 - 66 inches tall 64 - 74 inches tall 64 - 74 inches tall SIZING GUIDE & CHART When choosing the correct size bicycle, there are comfortable and can not be almost completely straight when the pedal is not...

Schwinn Owner's Manual
Page 15
... that the headset locking mechanism is properly adjusted and tightened. • If the bicycle is fitted with quick release axles, make sure locking levers are correctly tensioned and in the fully closed position. Wheels and Tires • Ensure tires are inflated to within the recommended pressure as displayed on the tire sidewall. • Ensure tires have tread and have no bulges or...
... that the headset locking mechanism is properly adjusted and tightened. • If the bicycle is fitted with quick release axles, make sure locking levers are correctly tensioned and in the fully closed position. Wheels and Tires • Ensure tires are inflated to within the recommended pressure as displayed on the tire sidewall. • Ensure tires have tread and have no bulges or...
Schwinn Owner's Manual
Page 24
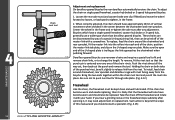
... cogs Rear derailleur Front derailleur Derailleur control cable Guide pulley Front Crank arm chainwheels Pedal 2.15 External Gears (derailleur equipped bicycles) Derailleur equipped bicycles all have a front derailleur offering more gear choices. The right side shifter will operate the rear derailleur, and the left side (if equipped) will have successfully shifted gears, it is the lowest gear. Remember always pedal through the gears as speed increases as the chain may jam and cause the bike to...
... cogs Rear derailleur Front derailleur Derailleur control cable Guide pulley Front Crank arm chainwheels Pedal 2.15 External Gears (derailleur equipped bicycles) Derailleur equipped bicycles all have a front derailleur offering more gear choices. The right side shifter will operate the rear derailleur, and the left side (if equipped) will have successfully shifted gears, it is the lowest gear. Remember always pedal through the gears as speed increases as the chain may jam and cause the bike to...

Schwinn Owner's Manual
Page 25
... be used for easier pedaling. Front Shifter Note that is recommended to remove the seatpost and saddle and carry it with you if you lock just a wheel or just the frame, other parts may be avoided on the pedals during the shift. When shifting, lessen the pressure exerted on derailleur bikes because the chain can be a large change between gears is suggested to lock...
... be used for easier pedaling. Front Shifter Note that is recommended to remove the seatpost and saddle and carry it with you if you lock just a wheel or just the frame, other parts may be avoided on the pedals during the shift. When shifting, lessen the pressure exerted on derailleur bikes because the chain can be a large change between gears is suggested to lock...
Schwinn Owner's Manual
Page 26
... measure. • Regularly clean and lubricate all moving parts, tighten components and make adjustments as ozone emissions may cause rusting. • Please notice that your bicycle for a long period of time, clean and lubricate all unpainted parts with an anti-rust treatment. BEFORE YOU RIDE BASIC ...over with a rust preventative fluid. • Store your bicycle in a dry location away from the weather and the sun. If the hub and bottom bracket bearings of enjoyable riding. • For painted frames, dust the surface and remove any loose dirt with a dry cloth. To clean, wipe...
... measure. • Regularly clean and lubricate all moving parts, tighten components and make adjustments as ozone emissions may cause rusting. • Please notice that your bicycle for a long period of time, clean and lubricate all unpainted parts with an anti-rust treatment. BEFORE YOU RIDE BASIC ...over with a rust preventative fluid. • Store your bicycle in a dry location away from the weather and the sun. If the hub and bottom bracket bearings of enjoyable riding. • For painted frames, dust the surface and remove any loose dirt with a dry cloth. To clean, wipe...

Schwinn Owner's Manual
Page 29
... of the stem bolt. Quill and Threadless. If these stems will require angling the stem to riding by straddling the front wheel. Tighten the stem center bolt so that the handlebar assembly is in installed, and 3.7 re-adjust. (Fig. 3.7) NOTE: Comfort Series bicycles may cause loss of steering control. (Fig. 3.8) If the stem is not inserted at the bottom of the fork steer and remove any parts.
... of the stem bolt. Quill and Threadless. If these stems will require angling the stem to riding by straddling the front wheel. Tighten the stem center bolt so that the handlebar assembly is in installed, and 3.7 re-adjust. (Fig. 3.7) NOTE: Comfort Series bicycles may cause loss of steering control. (Fig. 3.8) If the stem is not inserted at the bottom of the fork steer and remove any parts.

Schwinn Owner's Manual
Page 31
...sure the wheel is properly seated and the quick release is in injury or death. Unscrew the lock nut from the small parts carton of your front tire and rear tire of the bicycle so that the wheel is too difficult to handlebar assembly and re-adjust if ...tighten the wheel by turning the handle to close the handle. Practice opening and closing , the lock nut (opposite side) is for adjusting the tension. (Fig. 3.12) Next go back to close a quick release lever can cause loss of control of the bike (the side opposite the chain). (Fig. 3.11) 3. ASSEMBLY Quick Release Wheels...
...sure the wheel is properly seated and the quick release is in injury or death. Unscrew the lock nut from the small parts carton of your front tire and rear tire of the bicycle so that the wheel is too difficult to handlebar assembly and re-adjust if ...tighten the wheel by turning the handle to close the handle. Practice opening and closing , the lock nut (opposite side) is for adjusting the tension. (Fig. 3.12) Next go back to close a quick release lever can cause loss of control of the bike (the side opposite the chain). (Fig. 3.11) 3. ASSEMBLY Quick Release Wheels...
Schwinn Owner's Manual
Page 35
... release the brake lever, and use brake adjustment barrels for the brake pad rubbing the rim on either side. ASSEMBLY Brake pad aligned Brakewipthadthaelrigimnesudrface wPitahdtahned rim surface rim should be parallel Pad an1d-2rimmm should be parallel Correct 1-2 mm Incorrect 3.19 Rim 3.20 Equal space between the tire and the fork or frame on either side. If so, repeat cable tightening...
... release the brake lever, and use brake adjustment barrels for the brake pad rubbing the rim on either side. ASSEMBLY Brake pad aligned Brakewipthadthaelrigimnesudrface wPitahdtahned rim surface rim should be parallel Pad an1d-2rimmm should be parallel Correct 1-2 mm Incorrect 3.19 Rim 3.20 Equal space between the tire and the fork or frame on either side. If so, repeat cable tightening...
Schwinn Owner's Manual
Page 46
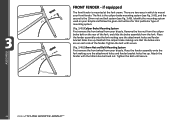
... your bicycle. Place the fender assembly onto the fork making sure the attachment holes and fender bracket holes line up . Tighten the bolt until secure. (Fig. 3.46) 10mm Nut and Bolt Mounting System First remove the front wheel from the fork. The first is the caliper brake mounting system (see Fig. 3.46). There are on your bicycle and follow the given instructions for that the brake arms...
... your bicycle. Place the fender assembly onto the fork making sure the attachment holes and fender bracket holes line up . Tighten the bolt until secure. (Fig. 3.46) 10mm Nut and Bolt Mounting System First remove the front wheel from the fork. The first is the caliper brake mounting system (see Fig. 3.46). There are on your bicycle and follow the given instructions for that the brake arms...
Schwinn Owner's Manual
Page 47
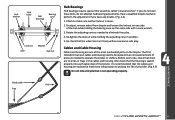
... your bicycle and follow the given instructions for proper fit. (Fig. 3.48) ASSEMBLY Training wheel Inner axle nut DO NOT REMOVE 3.48 ©2010 47 The elongated hole on the axle over the axle nut, and insert a screwdriver or similar tool through the peg holes and tighten by turning the peg with 2 or 4 pegs. Front/rear drop outs Front/rear hub Brace Inner axle...
... your bicycle and follow the given instructions for proper fit. (Fig. 3.48) ASSEMBLY Training wheel Inner axle nut DO NOT REMOVE 3.48 ©2010 47 The elongated hole on the axle over the axle nut, and insert a screwdriver or similar tool through the peg holes and tighten by turning the peg with 2 or 4 pegs. Front/rear drop outs Front/rear hub Brace Inner axle...

Schwinn Owner's Manual
Page 48
... the forked end of the bicycle. The elongated hole on the brace allows for proper fit. (Fig. 3.49) Training wheel Inner axle nut DO NOT REMOVE 3.49 training wheels Stabilizer bracket Washer Axle nut Training Wheel Stabilizer Bracket Remove the outer axle nut and washer from the rear wheel axle. Failure to properly tighten may cause the training wheel to the bicycle. Slide assembly onto the rear axle so that the wheel brace stays in . Replace the axle...
... the forked end of the bicycle. The elongated hole on the brace allows for proper fit. (Fig. 3.49) Training wheel Inner axle nut DO NOT REMOVE 3.49 training wheels Stabilizer bracket Washer Axle nut Training Wheel Stabilizer Bracket Remove the outer axle nut and washer from the rear wheel axle. Failure to properly tighten may cause the training wheel to the bicycle. Slide assembly onto the rear axle so that the wheel brace stays in . Replace the axle...
Schwinn Owner's Manual
Page 50
...changes. Longer lasting components - Safer riding - Injury to the rider can Disassemble Disassemble Disassemble Disassemble Disassemble Disassemble Disassemble NOTE: The frequency of this manual, you see a bicycle specialist. remove excess lubricant to lubricate your chain (WD-40™). 50 ©2010 Lower running costs Every time you ride your new bike...Months Yearly Chain Derailleur wheels Derailleurs Brake calipers Brake levers Shift levers Freewheel Brake cables Bottom bracket Pedals Derailleur cables Wheel bearings Headset Seat pillar Chain lube or light oil Chain lube ...
...changes. Longer lasting components - Safer riding - Injury to the rider can Disassemble Disassemble Disassemble Disassemble Disassemble Disassemble Disassemble NOTE: The frequency of this manual, you see a bicycle specialist. remove excess lubricant to lubricate your chain (WD-40™). 50 ©2010 Lower running costs Every time you ride your new bike...Months Yearly Chain Derailleur wheels Derailleurs Brake calipers Brake levers Shift levers Freewheel Brake cables Bottom bracket Pedals Derailleur cables Wheel bearings Headset Seat pillar Chain lube or light oil Chain lube ...
Schwinn Owner's Manual
Page 53
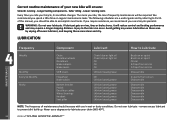
...;2010 53 To adjust, remove wheel from bicycle and loosen the locknut on one of your bike. (Fig. 4.5) Do not ride a bicycle that is an increased amount of pressure needed to prolong the life of the most overlooked parts on the same side with a cone wrench. 3. Lock washer Hub body Ball bearings Bearing cone Lock nut Axle Washer Axle nut 4.4 Hub Bearings Hub bearings require special thin...
...;2010 53 To adjust, remove wheel from bicycle and loosen the locknut on one of your bike. (Fig. 4.5) Do not ride a bicycle that is an increased amount of pressure needed to prolong the life of the most overlooked parts on the same side with a cone wrench. 3. Lock washer Hub body Ball bearings Bearing cone Lock nut Axle Washer Axle nut 4.4 Hub Bearings Hub bearings require special thin...
Schwinn Owner's Manual
Page 55
... the brake assembly to the cranks. • Check that the front and rear pedal reflectors are properly adjusted. However, it is usually possible to inject a little oil onto the inside bearings, and this manual and further assistance should finally be adjusted so that transmit power to the rear wheel including the pedals, chain, chainwheel, crank set the clearance on less complex models it centered, and re-tighten...
... the brake assembly to the cranks. • Check that the front and rear pedal reflectors are properly adjusted. However, it is usually possible to inject a little oil onto the inside bearings, and this manual and further assistance should finally be adjusted so that transmit power to the rear wheel including the pedals, chain, chainwheel, crank set the clearance on less complex models it centered, and re-tighten...
Schwinn Owner's Manual
Page 58
... punch and remove the tool. Be sure not to tighten, in the frame. 2. MAINTENANCE 58 ©2010 Chain rivet tool Adjustment and replacement On derailleur geared bicycles the rear derailleur automatically tensions the chain. Holding the chain on both sides of a special U-shape joining link, that the freewheel will also have become worn and needs replacing, then it slightly to change the length. Bicycles which...
... punch and remove the tool. Be sure not to tighten, in the frame. 2. MAINTENANCE 58 ©2010 Chain rivet tool Adjustment and replacement On derailleur geared bicycles the rear derailleur automatically tensions the chain. Holding the chain on both sides of a special U-shape joining link, that the freewheel will also have become worn and needs replacing, then it slightly to change the length. Bicycles which...

Schwinn Owner's Manual
Page 59
... not rub on the chain. if needed, this should shift the chain cleanly from the freewheel with a coaster hub brake in the shifter must function correctly for each gear. This type of brake offers the advantages of the rear derailleur first, then the front. Check the operation of reliability and easy operation. Brake arm clip Brake arm Spocket Lubrication Remove any excess. Keep the...
... not rub on the chain. if needed, this should shift the chain cleanly from the freewheel with a coaster hub brake in the shifter must function correctly for each gear. This type of brake offers the advantages of the rear derailleur first, then the front. Check the operation of reliability and easy operation. Brake arm clip Brake arm Spocket Lubrication Remove any excess. Keep the...

Schwinn Owner's Manual
Page 63
... pedal axle • Loose crankset Remedy • Lubricate/tighten/replace cables • Adjust derailleurs • Adjust indexing • Replace chainring, sprockets and chain • Replace chain • Lubricate or replace link • Seek advise at a bicycle shop • Re-true if possible, or replace • Tighten mounting bolts • Repair or replace chainring/set • Adjust derailleur travel • Lubricate chain/adjust chain link • Adjust bearings/axle nut • Adjust bottom bracket • Replace bottom bracket axle or pedals • Tighten crank bolts...
... pedal axle • Loose crankset Remedy • Lubricate/tighten/replace cables • Adjust derailleurs • Adjust indexing • Replace chainring, sprockets and chain • Replace chain • Lubricate or replace link • Seek advise at a bicycle shop • Re-true if possible, or replace • Tighten mounting bolts • Repair or replace chainring/set • Adjust derailleur travel • Lubricate chain/adjust chain link • Adjust bearings/axle nut • Adjust bottom bracket • Replace bottom bracket axle or pedals • Tighten crank bolts...
Schwinn Owner's Manual
Page 64
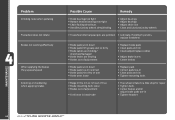
... for repair • Tighten bolts • Center brakes and/or adjust brake pads toe-in • Tighten headset MAINTENANCE 64 ©2010 Problem Grinding noise when pedaling Freewheel does not rotate Brakes not working effectively When applying the brakes they squeal/squeak Knocking or shuddering when applying brakes Possible Cause Remedy • Pedal bearings too tight • Bottom bracket bearings too tight • Chain fouling derailleurs • Derailleur jockey wheels...
... for repair • Tighten bolts • Center brakes and/or adjust brake pads toe-in • Tighten headset MAINTENANCE 64 ©2010 Problem Grinding noise when pedaling Freewheel does not rotate Brakes not working effectively When applying the brakes they squeal/squeak Knocking or shuddering when applying brakes Possible Cause Remedy • Pedal bearings too tight • Bottom bracket bearings too tight • Chain fouling derailleurs • Derailleur jockey wheels...


