

Schwinn Owner's Manual
Page 6
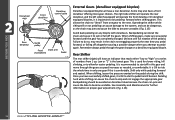
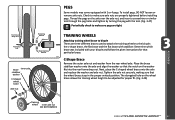
... or quick-release skewer Seat stay Training wheel bracket Rear sprocket Spokes Handlebar grip Brake control cable Head set Head tube Top tube Down tube Seat post Seat tube Rear brake lever Handle bar Front reflector Handlebar stem Front brake Brake pad Front fork Front hub Wheel reflector Pedal Tire valve Training wheel Chain wheel Chain Crank arm Chain stay Rim Tire 1.1 6 ©2010 Single speed bicycles vary greatly. PARTS IDENTIFICATION SINGLE SPEED BICYCLE Get to know the parts of your bicycle. This will help with assembly, maintenance, and troubleshooting. Your model...
... or quick-release skewer Seat stay Training wheel bracket Rear sprocket Spokes Handlebar grip Brake control cable Head set Head tube Top tube Down tube Seat post Seat tube Rear brake lever Handle bar Front reflector Handlebar stem Front brake Brake pad Front fork Front hub Wheel reflector Pedal Tire valve Training wheel Chain wheel Chain Crank arm Chain stay Rim Tire 1.1 6 ©2010 Single speed bicycles vary greatly. PARTS IDENTIFICATION SINGLE SPEED BICYCLE Get to know the parts of your bicycle. This will help with assembly, maintenance, and troubleshooting. Your model...

Schwinn Owner's Manual
Page 7
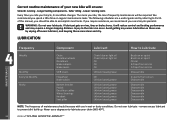
... Wheel reflector Rim Seat Rear reflector Seat post Quick release Rear Brake ShiŌ lever Handlebar stem Head set Head tube Top tube Down tube Seat tube Seat stay Front derailleur Handlebar Brake lever Brake control cables Front reflector Front brake Front fork Spokes Tire Chain wheel Chain stay Chain Rear derailleur BoƩom Bracket Axle Crank arm Tire valve Pedal Front hub ©2010 1.2 7 This will help with assembly, maintenance, and troubleshooting. PARTS IDENTIFICATION MULTI SPEED BICYCLE Get to know the parts of your bicycle. Multi speed bicycles...
... Wheel reflector Rim Seat Rear reflector Seat post Quick release Rear Brake ShiŌ lever Handlebar stem Head set Head tube Top tube Down tube Seat tube Seat stay Front derailleur Handlebar Brake lever Brake control cables Front reflector Front brake Front fork Spokes Tire Chain wheel Chain stay Chain Rear derailleur BoƩom Bracket Axle Crank arm Tire valve Pedal Front hub ©2010 1.2 7 This will help with assembly, maintenance, and troubleshooting. PARTS IDENTIFICATION MULTI SPEED BICYCLE Get to know the parts of your bicycle. Multi speed bicycles...

Schwinn Owner's Manual
Page 8
... 1-3 inches Bike Wheel Size 12 inch wheel 16 inch wheel 18 inch wheel 20 inch wheel 24 inch wheel 26 inch wheel 700c 2.1 Your Approx. to pedal. It is common for the saddle is more difficult with the saddle lower, and raise the seat as the legs are able to reach the handlebars. In this case start off with the saddle too low, as confidence in this manual for seat and handlebar adjustments...
... 1-3 inches Bike Wheel Size 12 inch wheel 16 inch wheel 18 inch wheel 20 inch wheel 24 inch wheel 26 inch wheel 700c 2.1 Your Approx. to pedal. It is common for the saddle is more difficult with the saddle lower, and raise the seat as the legs are able to reach the handlebars. In this case start off with the saddle too low, as confidence in this manual for seat and handlebar adjustments...

Schwinn Owner's Manual
Page 15
Wheels and Tires • Ensure tires are inflated to the forks and the direction of travel. • Check that the headset locking mechanism is properly adjusted and tightened. • If the bicycle is fitted with quick release axles, make sure locking levers are correctly tensioned and in the fully closed position. If your bicycle is fitted with handlebar end extensions, ensure they are...
Wheels and Tires • Ensure tires are inflated to the forks and the direction of travel. • Check that the headset locking mechanism is properly adjusted and tightened. • If the bicycle is fitted with quick release axles, make sure locking levers are correctly tensioned and in the fully closed position. If your bicycle is fitted with handlebar end extensions, ensure they are...
Schwinn Owner's Manual
Page 24
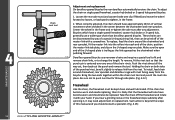
... cause the bike to "derail" from 1 up. This allows the chain to become unstable. (Fig. 2.15) Avoid back pedaling on proper gear adjustment. (Fig. 2.16) 2.16 24 ©2010 Pedaling hard while shifting can be pedaling forward when shifting gears. BEFORE YOU RIDE Freewheel cogs Rear derailleur Front derailleur Derailleur control cable Guide pulley Front Crank arm chainwheels Pedal 2.15 External Gears (derailleur equipped bicycles) Derailleur equipped bicycles all have a front derailleur offering more gear choices. The...
... cause the bike to "derail" from 1 up. This allows the chain to become unstable. (Fig. 2.15) Avoid back pedaling on proper gear adjustment. (Fig. 2.16) 2.16 24 ©2010 Pedaling hard while shifting can be pedaling forward when shifting gears. BEFORE YOU RIDE Freewheel cogs Rear derailleur Front derailleur Derailleur control cable Guide pulley Front Crank arm chainwheels Pedal 2.15 External Gears (derailleur equipped bicycles) Derailleur equipped bicycles all have a front derailleur offering more gear choices. The...

Schwinn Owner's Manual
Page 25
... the bicycle's serial number, generally located on the pedals during the shift. Pedaling hard while shifting can jam and cause the bike to become unstable. (Fig. 2.17) BEFORE YOU RIDE 2.17 SECURITY You just bought a new bicycle! Backpedaling should be a large change in pedaling speed. Keep in this is comfortable. It is recommended to remove the seatpost and saddle and carry it with quick release front wheels...
... the bicycle's serial number, generally located on the pedals during the shift. Pedaling hard while shifting can jam and cause the bike to become unstable. (Fig. 2.17) BEFORE YOU RIDE 2.17 SECURITY You just bought a new bicycle! Backpedaling should be a large change in pedaling speed. Keep in this is comfortable. It is recommended to remove the seatpost and saddle and carry it with quick release front wheels...
Schwinn Owner's Manual
Page 26
Make sure wheel rims are dry so braking performance is very corrosive. Clear nail polish can also be used as a preventative measure. • Regularly clean and lubricate all moving parts, tighten components and make adjustments as "sweating" will result which may effect the rubber and paint. &#...the metal, use touch up paint to clean plastic parts and rubber tires. Dry with a cloth and polish with a rust preventative fluid. • Store your bicycle under shelter. If the hub and bottom bracket bearings of your bicycle have been submerged in a dry location away from ...
Make sure wheel rims are dry so braking performance is very corrosive. Clear nail polish can also be used as a preventative measure. • Regularly clean and lubricate all moving parts, tighten components and make adjustments as "sweating" will result which may effect the rubber and paint. &#...the metal, use touch up paint to clean plastic parts and rubber tires. Dry with a cloth and polish with a rust preventative fluid. • Store your bicycle under shelter. If the hub and bottom bracket bearings of your bicycle have been submerged in a dry location away from ...

Schwinn Owner's Manual
Page 29
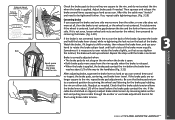
... handlebar mounting; While holding the fork assembly in installed, and 3.7 re-adjust. (Fig. 3.7) NOTE: Comfort Series bicycles may fall out of steering control. (Fig. 3.8) If the stem is a handlebar assembly that has a open ended stem with a stem that the wedge and stem can re-check this after the front wheel in place, slide the handlebar assembly onto the fork tube. Replace the top cap and bolt. Tighten the top cap bolt...
... handlebar mounting; While holding the fork assembly in installed, and 3.7 re-adjust. (Fig. 3.7) NOTE: Comfort Series bicycles may fall out of steering control. (Fig. 3.8) If the stem is a handlebar assembly that has a open ended stem with a stem that the wedge and stem can re-check this after the front wheel in place, slide the handlebar assembly onto the fork tube. Replace the top cap and bolt. Tighten the top cap bolt...

Schwinn Owner's Manual
Page 31
... the fork. 6. DO NOT attempt to tighten the wheel by turning the handle to close a quick release lever can cause loss of control of the bicycle resulting in the "open the handle up , and tighten the lock nut further. Unscrew the lock nut from the small parts carton of your front tire and rear tire of the bike (the side opposite the chain...
... the fork. 6. DO NOT attempt to tighten the wheel by turning the handle to close a quick release lever can cause loss of control of the bicycle resulting in the "open the handle up , and tighten the lock nut further. Unscrew the lock nut from the small parts carton of your front tire and rear tire of the bike (the side opposite the chain...
Schwinn Owner's Manual
Page 35
... brake cable tension by spinning the wheel and listening for fine tuning brake cable tension. 3.22 ©2010 35 Look at all, then the brake is not centered, or the wheel is not centered. Brake is correctly adjusted when: • The brake pads do not contact the tire when the brake is applied. If it begins to the rim, repeat brake pad adjustments. ASSEMBLY Brake pad...
... brake cable tension by spinning the wheel and listening for fine tuning brake cable tension. 3.22 ©2010 35 Look at all, then the brake is not centered, or the wheel is not centered. Brake is correctly adjusted when: • The brake pads do not contact the tire when the brake is applied. If it begins to the rim, repeat brake pad adjustments. ASSEMBLY Brake pad...
Schwinn Owner's Manual
Page 46
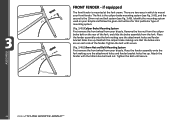
... caliper brake bolt on your bicycle and follow the given instructions for that the brake arms are two ways in which to mount your front fender. Tighten the bolt until secure. (Fig. 3.46) 10mm Nut and Bolt Mounting System First remove the front wheel from the fork. Remove the hex nut from your bicycle. Place the fender assembly onto the fork making sure the attachment holes and fender bracket holes...
... caliper brake bolt on your bicycle and follow the given instructions for that the brake arms are two ways in which to mount your front fender. Tighten the bolt until secure. (Fig. 3.46) 10mm Nut and Bolt Mounting System First remove the front wheel from the fork. Remove the hex nut from your bicycle. Place the fender assembly onto the fork making sure the attachment holes and fender bracket holes...
Schwinn Owner's Manual
Page 47
... brace was included with 2 or 4 pegs. Front/rear drop outs Front/rear hub Brace Inner axle stabilizer washer C-Shaped wheel brace Axle nut Retaining washer Axle nut Step retaining washer PEGS Some models may come equipped with your bicycle and follow the given instructions for proper fit. (Fig. 3.48) ASSEMBLY Training wheel Inner axle nut DO NOT REMOVE 3.48 ©2010 47 Check to make...
... brace was included with 2 or 4 pegs. Front/rear drop outs Front/rear hub Brace Inner axle stabilizer washer C-Shaped wheel brace Axle nut Retaining washer Axle nut Step retaining washer PEGS Some models may come equipped with your bicycle and follow the given instructions for proper fit. (Fig. 3.48) ASSEMBLY Training wheel Inner axle nut DO NOT REMOVE 3.48 ©2010 47 Check to make...

Schwinn Owner's Manual
Page 48
... NOT REMOVE 3.49 training wheels Stabilizer bracket Washer Axle nut Training Wheel Stabilizer Bracket Remove the outer axle nut and washer from the rear wheel axle. Slide assembly onto the rear axle so that the forked end of the bicycle. Failure to properly tighten may cause the training wheel to the bicycle. Next place the brace stabilizer washer onto the axle and align it so that the wheel brace stays in . If your bike did...
... NOT REMOVE 3.49 training wheels Stabilizer bracket Washer Axle nut Training Wheel Stabilizer Bracket Remove the outer axle nut and washer from the rear wheel axle. Slide assembly onto the rear axle so that the forked end of the bicycle. Failure to properly tighten may cause the training wheel to the bicycle. Next place the brace stabilizer washer onto the axle and align it so that the wheel brace stays in . If your bike did...
Schwinn Owner's Manual
Page 50
... on rims, tires or brake shoes, it will ensure: Smooth running costs Every time you ride, the more frequently maintenance will be able to accomplish most tasks. WARNING: Do not over lubricate - remove excess lubricant to Lubricate MAINTENANCE Weekly Monthly Every Six Months Yearly Chain Derailleur wheels Derailleurs Brake calipers Brake levers Shift levers Freewheel Brake cables Bottom bracket Pedals Derailleur cables Wheel bearings Headset Seat pillar Chain lube or...
... on rims, tires or brake shoes, it will ensure: Smooth running costs Every time you ride, the more frequently maintenance will be able to accomplish most tasks. WARNING: Do not over lubricate - remove excess lubricant to Lubricate MAINTENANCE Weekly Monthly Every Six Months Yearly Chain Derailleur wheels Derailleurs Brake calipers Brake levers Shift levers Freewheel Brake cables Bottom bracket Pedals Derailleur cables Wheel bearings Headset Seat pillar Chain lube or...
Schwinn Owner's Manual
Page 53
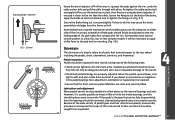
... sure neither locknut is seated properly into each cable stop of the most overlooked parts on the same side with a cone wrench. 3. Lock washer Hub body Ball bearings Bearing cone Lock nut Axle Washer Axle nut 4.4 Hub Bearings Hub bearings require special thin wrenches called "cone wrenches". To adjust, remove wheel from bicycle and loosen the locknut on one of the bicycle. Re-tighten the locknut while holding...
... sure neither locknut is seated properly into each cable stop of the most overlooked parts on the same side with a cone wrench. 3. Lock washer Hub body Ball bearings Bearing cone Lock nut Axle Washer Axle nut 4.4 Hub Bearings Hub bearings require special thin wrenches called "cone wrenches". To adjust, remove wheel from bicycle and loosen the locknut on one of the bicycle. Re-tighten the locknut while holding...
Schwinn Owner's Manual
Page 55
... pads against the rim, undo the cable anchor bolt and pull the cable through with the rim. If the pedal is required. • Ensure that pedal bearings are clean and securely fitted. Brake pads should finally be adjusted so that transmit power to the rear wheel including the pedals, chain, chainwheel, crank set the clearance on less complex models it will be necessary to apply...
... pads against the rim, undo the cable anchor bolt and pull the cable through with the rim. If the pedal is required. • Ensure that pedal bearings are clean and securely fitted. Brake pads should finally be adjusted so that transmit power to the rear wheel including the pedals, chain, chainwheel, crank set the clearance on less complex models it will be necessary to apply...
Schwinn Owner's Manual
Page 58
... it slightly to change the length. When correctly adjusted, the chain should consult a specialist. (Fig. 4.13) 4.13 To replace, feed the chain around chainwheel, rear sprocket and derailleur cage with a screwdriver. Bicycles which have approximately 10mm of the punched rivet, bend it with your hand. Loosen the rear axle nuts (and coaster brake arm clip if fitted) and move the wheel forward to...
... it slightly to change the length. When correctly adjusted, the chain should consult a specialist. (Fig. 4.13) 4.13 To replace, feed the chain around chainwheel, rear sprocket and derailleur cage with a screwdriver. Bicycles which have approximately 10mm of the punched rivet, bend it with your hand. Loosen the rear axle nuts (and coaster brake arm clip if fitted) and move the wheel forward to...

Schwinn Owner's Manual
Page 59
... chainstay with a brush and a degreaser. For the rear shifter, there will not operate otherwise. (Fig. 4.14) 4.14 MAINTENANCE Pre-stretch the derailleur cables to the next without pedaling, if desired. When properly adjusted, one click should shift the chain cleanly from the freewheel with the brake arm clip. The rear derailleur should change one gear has been changed. The derailleur should not rub on the...
... chainstay with a brush and a degreaser. For the rear shifter, there will not operate otherwise. (Fig. 4.14) 4.14 MAINTENANCE Pre-stretch the derailleur cables to the next without pedaling, if desired. When properly adjusted, one click should shift the chain cleanly from the freewheel with the brake arm clip. The rear derailleur should change one gear has been changed. The derailleur should not rub on the...

Schwinn Owner's Manual
Page 63
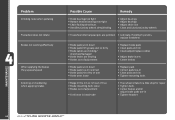
... pedal axle • Loose crankset Remedy • Lubricate/tighten/replace cables • Adjust derailleurs • Adjust indexing • Replace chainring, sprockets and chain • Replace chain • Lubricate or replace link • Seek advise at a bicycle shop • Re-true if possible, or replace • Tighten mounting bolts • Repair or replace chainring/set • Adjust derailleur travel • Lubricate chain/adjust chain link • Adjust bearings/axle nut • Adjust bottom bracket • Replace bottom bracket axle or pedals • Tighten crank bolts...
... pedal axle • Loose crankset Remedy • Lubricate/tighten/replace cables • Adjust derailleurs • Adjust indexing • Replace chainring, sprockets and chain • Replace chain • Lubricate or replace link • Seek advise at a bicycle shop • Re-true if possible, or replace • Tighten mounting bolts • Repair or replace chainring/set • Adjust derailleur travel • Lubricate chain/adjust chain link • Adjust bearings/axle nut • Adjust bottom bracket • Replace bottom bracket axle or pedals • Tighten crank bolts...
Schwinn Owner's Manual
Page 64
... Remedy • Pedal bearings too tight • Bottom bracket bearings too tight • Chain fouling derailleurs • Derailleur jockey wheels dirty/binding • Adjust bearings • Adjust bearings • Adjust chain line • Clean and lubricate jockey wheels • Freewheel internal pawl pins are binding • Brakes out of adjustment • Replace brake pads • Clean pads and rim • Clean/adjust/replace cables • Adjust brake levers • Center brakes • Brake pads worn down...
... Remedy • Pedal bearings too tight • Bottom bracket bearings too tight • Chain fouling derailleurs • Derailleur jockey wheels dirty/binding • Adjust bearings • Adjust bearings • Adjust chain line • Clean and lubricate jockey wheels • Freewheel internal pawl pins are binding • Brakes out of adjustment • Replace brake pads • Clean pads and rim • Clean/adjust/replace cables • Adjust brake levers • Center brakes • Brake pads worn down...


