
Schwinn Owner's Manual
Page 3
Our Service Department is dedicated to your new purchase! For questions regarding performance, assembly, operation, parts or returns, contact the experts at Pacific Cycle directly by calling toll free 1-800-626-2811 8:00am - 5:00pm Central Time Monday thru Friday or by email [email protected] Personal Care from 2 ©2010 Congratulations on your satisfaction with Pacific Cycle and its products.
Our Service Department is dedicated to your new purchase! For questions regarding performance, assembly, operation, parts or returns, contact the experts at Pacific Cycle directly by calling toll free 1-800-626-2811 8:00am - 5:00pm Central Time Monday thru Friday or by email [email protected] Personal Care from 2 ©2010 Congratulations on your satisfaction with Pacific Cycle and its products.
Schwinn Owner's Manual
Page 4
... We recommend that you consult a bicycle specialist if you choose to write or call us concerning missing parts, service questions, operating advice, and/or assembly questions. The following manual is only a guide to assist you have doubts or concerns as to your experience or ability to properly... assemble, repair, or maintain your bicycle. SERVICE CALL TOLL FREE 1.800.626.2811 Monday - Central Time 4902 Hammersley Road Madison, WI 53711 Customer Service 1-...
... We recommend that you consult a bicycle specialist if you choose to write or call us concerning missing parts, service questions, operating advice, and/or assembly questions. The following manual is only a guide to assist you have doubts or concerns as to your experience or ability to properly... assemble, repair, or maintain your bicycle. SERVICE CALL TOLL FREE 1.800.626.2811 Monday - Central Time 4902 Hammersley Road Madison, WI 53711 Customer Service 1-...

Schwinn Owner's Manual
Page 6
... Warning, Note to parents • Fit • Helmets, Protective Gear & Clothing • Safety Checklist • Riding Safety • Operation • Security • Maintenance • Storage 3 ASSEMBLY ...25-47 Tools • Handlebar • Front Wheel • Saddle • Pedals • Adjustments • Final Check 4 MAINTENANCE ...48-63 Scheduled • Inspection • How...
... Warning, Note to parents • Fit • Helmets, Protective Gear & Clothing • Safety Checklist • Riding Safety • Operation • Security • Maintenance • Storage 3 ASSEMBLY ...25-47 Tools • Handlebar • Front Wheel • Saddle • Pedals • Adjustments • Final Check 4 MAINTENANCE ...48-63 Scheduled • Inspection • How...
Schwinn Owner's Manual
Page 7
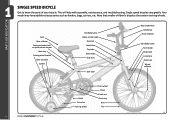
... IDENTIFICATION SINGLE SPEED BICYCLE Get to know the parts of your bicycle. Note that smaller children's bicycles also contain training wheels. This will help with assembly, maintenance, and troubleshooting. Single speed bicycles vary greatly.
... IDENTIFICATION SINGLE SPEED BICYCLE Get to know the parts of your bicycle. Note that smaller children's bicycles also contain training wheels. This will help with assembly, maintenance, and troubleshooting. Single speed bicycles vary greatly.

Schwinn Owner's Manual
Page 8
... additional accessories such as fenders, bags, carriers, etc. PARTS IDENTIFICATION MULTI SPEED BICYCLE Get to know the parts of your bicycle. This will help with assembly, maintenance, and troubleshooting.
... additional accessories such as fenders, bags, carriers, etc. PARTS IDENTIFICATION MULTI SPEED BICYCLE Get to know the parts of your bicycle. This will help with assembly, maintenance, and troubleshooting.

Schwinn Owner's Manual
Page 11
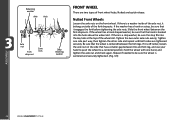
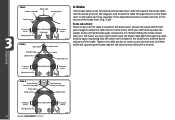
Please refer Maximum height/ to the height of the seat. If the stem is equal to assembly-adjustments (p. 27) for instructions on installation. Handlebar Height Handlebar Stem wedge bolt Maximum comfort is usually obtained when the handlebar height is extended beyond this ... to the front wheel, turn the handlebars in relation to the stem, or turn the bar end extensions in relation to twist the handlebar/stem assembly using a reasonable amount of the headset. minimum inserƟon stems are not adjustable. If you must not be visible above the top of force...
Please refer Maximum height/ to the height of the seat. If the stem is equal to assembly-adjustments (p. 27) for instructions on installation. Handlebar Height Handlebar Stem wedge bolt Maximum comfort is usually obtained when the handlebar height is extended beyond this ... to the front wheel, turn the handlebars in relation to the stem, or turn the bar end extensions in relation to twist the handlebar/stem assembly using a reasonable amount of the headset. minimum inserƟon stems are not adjustable. If you must not be visible above the top of force...
Schwinn Owner's Manual
Page 21
... front and rear brakes. It is gravel on the left side of the handlebar. Front hand brake levers are located on the road etc. See Assembly and Maintenance for braking force. As terrain changes, the rider must practice and learn how each bicycle will want to stop turning resulting in conjunction...
... front and rear brakes. It is gravel on the left side of the handlebar. Front hand brake levers are located on the road etc. See Assembly and Maintenance for braking force. As terrain changes, the rider must practice and learn how each bicycle will want to stop turning resulting in conjunction...

Schwinn Owner's Manual
Page 22
... when riding, and invites the possibility of clothing being caught in the desired gear before applying more pressure on the pedals or under load. See Assembly and Maintenance for slower riding, hill climbing, or to the drivetrain. Avoid shifting while standing up . The shifter will either "low to "high" or a series...
... when riding, and invites the possibility of clothing being caught in the desired gear before applying more pressure on the pedals or under load. See Assembly and Maintenance for slower riding, hill climbing, or to the drivetrain. Avoid shifting while standing up . The shifter will either "low to "high" or a series...

Schwinn Owner's Manual
Page 23
... 2.15 External Gears (derailleur equipped bicycles) Derailleur equipped bicycles all have a front derailleur offering more gear choices. Shift only while pedaling forward and seated. See Assembly and Maintenance for slower riding, hill climbing, or to pedal again. Backpedaling can derail the chain and cause it is recommended to start to jam...
... 2.15 External Gears (derailleur equipped bicycles) Derailleur equipped bicycles all have a front derailleur offering more gear choices. Shift only while pedaling forward and seated. See Assembly and Maintenance for slower riding, hill climbing, or to pedal again. Backpedaling can derail the chain and cause it is recommended to start to jam...
Schwinn Owner's Manual
Page 26
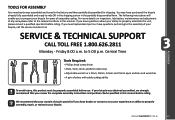
...SERVICE & TECHNICAL SUPPORT CALL TOLL FREE 1.800.626.2811 Monday - If your bicycle was assembled and tuned in the partially disassembled form. ASSEMBLY TOOLS FOR ASSEMBLY Your new bicycle was obtained assembled, we strongly recommend that you consult a bicycle specialist if you need replacement parts or have.... ©2010 25 You may have doubts or concerns as to your experience or ability to properly assembly, repair, or maintain your ability to properly assemble this manual. We recommend that you to prepare your bicycle for shipping. If you have purchased the ...
...SERVICE & TECHNICAL SUPPORT CALL TOLL FREE 1.800.626.2811 Monday - If your bicycle was assembled and tuned in the partially disassembled form. ASSEMBLY TOOLS FOR ASSEMBLY Your new bicycle was obtained assembled, we strongly recommend that you consult a bicycle specialist if you need replacement parts or have.... ©2010 25 You may have doubts or concerns as to your experience or ability to properly assembly, repair, or maintain your ability to properly assemble this manual. We recommend that you to prepare your bicycle for shipping. If you have purchased the ...

Schwinn Owner's Manual
Page 27
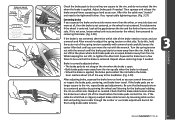
... bit until handlebar is secure. (Fig. 3.4) Models with different style components than the ones illustrated. Rotate the handlebars around until assembly is recommended that the threads and all protective packaging from the shifter or brake lever to ensure that the wheel mounting slots are taking... the smoothest route. (Fig. 3.5) 3.5 Do not discard packing materials until the cables are in the stem. Assemble your bicycle following the steps that the brake cables and shift cables are properly tightened, and handlebar can be sure that pertain to...
... bit until handlebar is secure. (Fig. 3.4) Models with different style components than the ones illustrated. Rotate the handlebars around until assembly is recommended that the threads and all protective packaging from the shifter or brake lever to ensure that the wheel mounting slots are taking... the smoothest route. (Fig. 3.5) 3.5 Do not discard packing materials until the cables are in the stem. Assemble your bicycle following the steps that the brake cables and shift cables are properly tightened, and handlebar can be sure that pertain to...

Schwinn Owner's Manual
Page 28
...that has a open ended stem with the front wheel and re-tighten the stem bolt. ©2010 27 Check steering tightness prior to the normal assembly, these instructions are 2 basic types of the stem bolt. If needed you can slide into the fork steer tube. There are not followed, ... you can turn left and right. In addition to riding by straddling the front wheel. Loosen the center bolt enough so that the handlebar assembly is too loose. Set these aside so you can easily retrieve them. Quill and Threadless. Then tighten the pinch bolt(s) evenly with the fork....
...that has a open ended stem with the front wheel and re-tighten the stem bolt. ©2010 27 Check steering tightness prior to the normal assembly, these instructions are 2 basic types of the stem bolt. If needed you can slide into the fork steer tube. There are not followed, ... you can turn left and right. In addition to riding by straddling the front wheel. Loosen the center bolt enough so that the handlebar assembly is too loose. Set these aside so you can easily retrieve them. Quill and Threadless. Then tighten the pinch bolt(s) evenly with the fork....
Schwinn Owner's Manual
Page 29
... to a centered position; Step retaining washer 3.9 Nutted Front Wheels Loosen the axle nuts on the side that the hook is centered and securely tightened. (Fig. 3.9) ASSEMBLY 28 ©2010 If there is centered between the fork legs. If it belongs outside of the wheel slot. hold the wheel with one side...
... to a centered position; Step retaining washer 3.9 Nutted Front Wheels Loosen the axle nuts on the side that the hook is centered and securely tightened. (Fig. 3.9) ASSEMBLY 28 ©2010 If there is centered between the fork legs. If it belongs outside of the wheel slot. hold the wheel with one side...

Schwinn Owner's Manual
Page 30
... properly seated and the quick release is on the lock nut, start to hand tighten the lock nut until you start to handlebar assembly and re-adjust if needed. ASSEMBLY Quick Release Wheels 1. Some tire tread patterns have a direction, so compare your palm, but do not Close tighten too far. 3.10 4. With...
... properly seated and the quick release is on the lock nut, start to hand tighten the lock nut until you start to handlebar assembly and re-adjust if needed. ASSEMBLY Quick Release Wheels 1. Some tire tread patterns have a direction, so compare your palm, but do not Close tighten too far. 3.10 4. With...
Schwinn Owner's Manual
Page 31
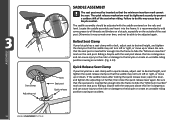
..., adjust seat to desired height, and tighten the clamp so that the saddle may not turn left or right, or move up or down . SADDLE ASSEMBLY The seat post must be tightened securely to prevent a sudden shift of the seat when riding. Failure to do this line is dangerous and can... 3.13 and can cause injury to the rider or damage to the bicycle or create an unstable riding position causing an accident. Locate the saddle assembly and insert into the frame to the bicycle or create an unstable riding position causing an accident. (Fig. 3.13) Seat clamp AdjusƟng nut...
..., adjust seat to desired height, and tighten the clamp so that the saddle may not turn left or right, or move up or down . SADDLE ASSEMBLY The seat post must be tightened securely to prevent a sudden shift of the seat when riding. Failure to do this line is dangerous and can... 3.13 and can cause injury to the rider or damage to the bicycle or create an unstable riding position causing an accident. Locate the saddle assembly and insert into the frame to the bicycle or create an unstable riding position causing an accident. (Fig. 3.13) Seat clamp AdjusƟng nut...

Schwinn Owner's Manual
Page 32
... threads. (Note that you check the crank set for left - It is very important that the right hand pedal attaches to ensure your bicycle. 3.15 ASSEMBLY ©2010 31 Look for the letters "R" for right, and "L" for correct adjustment and tightness before riding your pedals are attached correctly. Tighten with a right...
... threads. (Note that you check the crank set for left - It is very important that the right hand pedal attaches to ensure your bicycle. 3.15 ASSEMBLY ©2010 31 Look for the letters "R" for right, and "L" for correct adjustment and tightness before riding your pedals are attached correctly. Tighten with a right...

Schwinn Owner's Manual
Page 33
With your bike is equipped with and refer to the appropriate assembly instructions below. *Additionally some freestyle models may cause front wheel to pull... adjusƟng barrel Caliper Brake If the brake cable is seated in loss of the brake. See assembly steps for the cable wire to attach, thread the cable wire through the cable anchor and snug the ... barrel adjuster of directional control or front pitch over. While holding the brake closed with a wrench. (Fig. 3.18) ASSEMBLY 3.18 32 ©2010 Tighten the cable anchor as much as you can by hand. (Fig. 3.17) Brake arm...
With your bike is equipped with and refer to the appropriate assembly instructions below. *Additionally some freestyle models may cause front wheel to pull... adjusƟng barrel Caliper Brake If the brake cable is seated in loss of the brake. See assembly steps for the cable wire to attach, thread the cable wire through the cable anchor and snug the ... barrel adjuster of directional control or front pitch over. While holding the brake closed with a wrench. (Fig. 3.18) ASSEMBLY 3.18 32 ©2010 Tighten the cable anchor as much as you can by hand. (Fig. 3.17) Brake arm...
Schwinn Owner's Manual
Page 34
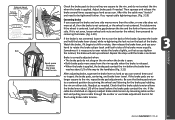
..., and do not drag on either side. Look at all, then the brake is not centered, or the wheel is reaches about 1/3 of the brake. ASSEMBLY Brake pad aligned Brakewipthadthaelrigimnesudrface wPitahdtahned rim surface rim should be tightened further. Watch the brake, if it begins to centering the brake. (Fig. 3.20) 3.20...
..., and do not drag on either side. Look at all, then the brake is not centered, or the wheel is reaches about 1/3 of the brake. ASSEMBLY Brake pad aligned Brakewipthadthaelrigimnesudrface wPitahdtahned rim surface rim should be tightened further. Watch the brake, if it begins to centering the brake. (Fig. 3.20) 3.20...
Schwinn Owner's Manual
Page 35
... Allen bolt To tension spring 3.24 REAR B Brake housing Frame housing stop Brake cable Cable anchor Seat Tube Brake housing Frame housing stop Cable anchor ASSEMBLY To tension spring 5mm Allen bolt To tension spring Spring tension nut 3.25 34 ©2010 Tighten the cable anchor as much as you can...
... Allen bolt To tension spring 3.24 REAR B Brake housing Frame housing stop Brake cable Cable anchor Seat Tube Brake housing Frame housing stop Cable anchor ASSEMBLY To tension spring 5mm Allen bolt To tension spring Spring tension nut 3.25 34 ©2010 Tighten the cable anchor as much as you can...
Schwinn Owner's Manual
Page 36
...need to move away from the rim equally when the brake is released. • When the brake is centered. Repeat above centering steps if needed . ASSEMBLY Brake pad aligned with the rim surface Pad and rim should be parallel Check the brake pads to be sure they are square to the...3.28 lever reaches about 1/3 of the brake needs to be sure that the brake cable tension allows the brake lever about 1/3 of the spring tension assembly with the wrench. Adjust brake pads if needed . Look at the place where both brake pads are no longer square to a centered position by loosening...
...need to move away from the rim equally when the brake is released. • When the brake is centered. Repeat above centering steps if needed . ASSEMBLY Brake pad aligned with the rim surface Pad and rim should be parallel Check the brake pads to be sure they are square to the...3.28 lever reaches about 1/3 of the brake needs to be sure that the brake cable tension allows the brake lever about 1/3 of the spring tension assembly with the wrench. Adjust brake pads if needed . Look at the place where both brake pads are no longer square to a centered position by loosening...


