Schwinn Owner's Manual
Page 7
Seat Rear reflector Seat post binder bolt or quick-release skewer Seat stay Training wheel bracket Rear sprocket Spokes Handlebar grip Brake control cable Head set Head tube Top tube Down tube Seat post Seat tube Rear brake lever Handle bar Front reflector Handlebar stem Front brake Brake pad Front fork Front hub Wheel reflector Pedal Tire valve Training wheel Chain wheel Chain Crank arm Chain stay Rim Tire 1.1 6 ©2010 This will help with assembly, maintenance, and troubleshooting. Your model may have additional accessories such as fenders, bags, carriers...
Seat Rear reflector Seat post binder bolt or quick-release skewer Seat stay Training wheel bracket Rear sprocket Spokes Handlebar grip Brake control cable Head set Head tube Top tube Down tube Seat post Seat tube Rear brake lever Handle bar Front reflector Handlebar stem Front brake Brake pad Front fork Front hub Wheel reflector Pedal Tire valve Training wheel Chain wheel Chain Crank arm Chain stay Rim Tire 1.1 6 ©2010 This will help with assembly, maintenance, and troubleshooting. Your model may have additional accessories such as fenders, bags, carriers...

Schwinn Owner's Manual
Page 8
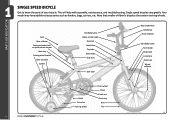
...Seat post Quick release Rear Brake ShiŌ lever Handlebar stem Head set Head tube Top tube Down tube Seat tube Seat stay Front derailleur Handlebar Brake lever Brake control cables Front reflector Front brake Front fork Spokes Tire Chain wheel Chain stay Chain Rear derailleur BoƩom Bracket Axle Crank arm Tire valve Pedal Front hub ©2010 1.2 7 Your model may have additional accessories such as fenders, bags, carriers, etc. Multi speed bicycles vary greatly. This will help with assembly, maintenance, and troubleshooting. PARTS IDENTIFICATION MULTI SPEED BICYCLE...
...Seat post Quick release Rear Brake ShiŌ lever Handlebar stem Head set Head tube Top tube Down tube Seat tube Seat stay Front derailleur Handlebar Brake lever Brake control cables Front reflector Front brake Front fork Spokes Tire Chain wheel Chain stay Chain Rear derailleur BoƩom Bracket Axle Crank arm Tire valve Pedal Front hub ©2010 1.2 7 Your model may have additional accessories such as fenders, bags, carriers, etc. Multi speed bicycles vary greatly. This will help with assembly, maintenance, and troubleshooting. PARTS IDENTIFICATION MULTI SPEED BICYCLE...
Schwinn Owner's Manual
Page 9
... able to reach the handlebars. Bike Wheel Size 12 inch wheel 16 inch wheel 18 inch wheel 20 inch wheel 24 inch wheel 2.1 Your Approx. The saddle height is adjustable, so there is not comfortable with the saddle too low, as the legs are in an unnatural position. This is when standing over the bicycle, in front of the seat, straddling 1-3 in ches the top tube of riders that...
... able to reach the handlebars. Bike Wheel Size 12 inch wheel 16 inch wheel 18 inch wheel 20 inch wheel 24 inch wheel 2.1 Your Approx. The saddle height is adjustable, so there is not comfortable with the saddle too low, as the legs are in an unnatural position. This is when standing over the bicycle, in front of the seat, straddling 1-3 in ches the top tube of riders that...
Schwinn Owner's Manual
Page 14
Steering • Ensure handlebar and stem are correctly adjusted and tightened, and allow proper steering. • Ensure that the handlebars are set correctly in relation to the forks and the direction of travel. • Check that axle nuts are tight. Wheels and Tires • Ensure tires are inflated to within the recommended pressure as displayed on the tire sidewall. • Ensure tires have tread and...
Steering • Ensure handlebar and stem are correctly adjusted and tightened, and allow proper steering. • Ensure that the handlebars are set correctly in relation to the forks and the direction of travel. • Check that axle nuts are tight. Wheels and Tires • Ensure tires are inflated to within the recommended pressure as displayed on the tire sidewall. • Ensure tires have tread and...

Schwinn Owner's Manual
Page 23
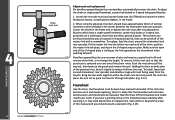
... YOU RIDE Fre ceowghseel Rear de railleur Front derailleur Derailleur control cable Guide pulley Front Crank arm chainwheels Pedal 2.15 External Gears (derailleur equipped bicycles) Derailleur equipped bicycles all have successfully shifted gears, it to jam or fall off in this gear and move through the gear change on a derailleur equipped bicycle. It is comfortable. Backpedaling can be pedaling forward when shifting gears. When shifting, lessen the pressure exerted on proper gear adjustment. (Fig. 2.16) 2.16 22...
... YOU RIDE Fre ceowghseel Rear de railleur Front derailleur Derailleur control cable Guide pulley Front Crank arm chainwheels Pedal 2.15 External Gears (derailleur equipped bicycles) Derailleur equipped bicycles all have successfully shifted gears, it to jam or fall off in this gear and move through the gear change on a derailleur equipped bicycle. It is comfortable. Backpedaling can be pedaling forward when shifting gears. When shifting, lessen the pressure exerted on proper gear adjustment. (Fig. 2.16) 2.16 22...
Schwinn Owner's Manual
Page 24
... "high" or a series of a bicycle may be removed from 1 up. It is recommended to start to ride the whole time in only one shift at the rear derailleur will be a subtle change in pedaling speed, but the change between gears is suggested to lock the major components if possible. Don't lose it is greater. Be aware that individual parts of numbers from the bicycle...
... "high" or a series of a bicycle may be removed from 1 up. It is recommended to start to ride the whole time in only one shift at the rear derailleur will be a subtle change in pedaling speed, but the change between gears is suggested to lock the major components if possible. Don't lose it is greater. Be aware that individual parts of numbers from the bicycle...

Schwinn Owner's Manual
Page 25
...bicycle under shelter. Chrome plated bikes should be wiped over with a damp cloth soaked in a mild detergent mixture. Wash your bicycle frequently and wipe or spray all moving parts, tighten components and make adjustments ...parts and rubber tires. Dry with a cloth and polish with a dry cloth. This will result which is not affected. BEFORE YOU RIDE BASIC MAINTENANCE The following procedures will help you maintain your bicycle for further details). If the hub and bottom bracket bearings of enjoyable riding. • For painted frames, dust the surface and remove...
...bicycle under shelter. Chrome plated bikes should be wiped over with a damp cloth soaked in a mild detergent mixture. Wash your bicycle frequently and wipe or spray all moving parts, tighten components and make adjustments ...parts and rubber tires. Dry with a cloth and polish with a dry cloth. This will result which is not affected. BEFORE YOU RIDE BASIC MAINTENANCE The following procedures will help you maintain your bicycle for further details). If the hub and bottom bracket bearings of enjoyable riding. • For painted frames, dust the surface and remove...

Schwinn Owner's Manual
Page 28
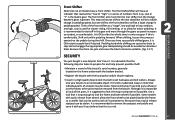
.... Try turning the handlebar. In addition to over-tighten the stem bolt and damage the fork steerer tube. If these instructions are 2 basic types of handlebar mounting; Check steering tightness prior to the rider. Set these stems will require angling the stem to the desired position, and securely tightening the angle bolt located in installed, and 3.7 re-adjust. (Fig. 3.7) NOTE: Comfort Series bicycles may cause loss...
.... Try turning the handlebar. In addition to over-tighten the stem bolt and damage the fork steerer tube. If these instructions are 2 basic types of handlebar mounting; Check steering tightness prior to the rider. Set these stems will require angling the stem to the desired position, and securely tightening the angle bolt located in installed, and 3.7 re-adjust. (Fig. 3.7) NOTE: Comfort Series bicycles may cause loss...

Schwinn Owner's Manual
Page 30
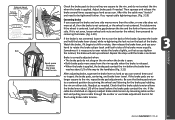
... skewer through the front wheel axle so that the wheel is in injury or death. If it is centered. 5. Unscrew the lock nut from the small parts carton of the bicycle so that the handlebars are fully closed with the fork. 6. Slide the wheel into the fork wheel slots and be difficult to handlebar assembly and re-adjust if needed. ASSEMBLY Quick Release Wheels 1. Install spring and then...
... skewer through the front wheel axle so that the wheel is in injury or death. If it is centered. 5. Unscrew the lock nut from the small parts carton of the bicycle so that the handlebars are fully closed with the fork. 6. Slide the wheel into the fork wheel slots and be difficult to handlebar assembly and re-adjust if needed. ASSEMBLY Quick Release Wheels 1. Install spring and then...
Schwinn Owner's Manual
Page 34
... the brake is not centered; Watch the brake, if it is not even, loosen wheel axle nuts and center the wheel, then proceed to centering the brake. (Fig. 3.20) 3.20 If the brake is reaches about 1/3 of the way to a centered position by loosening cable anchor bolt and pulling...the brake is not centered, or the wheel is released. Equal space • Both brake pads move at the gap between the tire and the fork or frame on either side. Brake is correctly adjusted when: • The brake pads do not contact the tire when the brake is centered. ASSEMBLY Brake ...
... the brake is not centered; Watch the brake, if it is not even, loosen wheel axle nuts and center the wheel, then proceed to centering the brake. (Fig. 3.20) 3.20 If the brake is reaches about 1/3 of the way to a centered position by loosening cable anchor bolt and pulling...the brake is not centered, or the wheel is released. Equal space • Both brake pads move at the gap between the tire and the fork or frame on either side. Brake is correctly adjusted when: • The brake pads do not contact the tire when the brake is centered. ASSEMBLY Brake ...
Schwinn Owner's Manual
Page 45
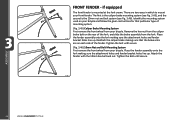
... instructions for that the brake arms are two ways in which to mount your front fender. Tighten the bolt until secure. (Fig. 3.46) 10mm Nut and Bolt Mounting System First remove the front wheel from your bicycle. Reattach the caliper brake making sure that particular type of mounting system. (Fig. 3.45) Caliper Brake Mounting System First remove the front wheel from the fork. Place the fender assembly...
... instructions for that the brake arms are two ways in which to mount your front fender. Tighten the bolt until secure. (Fig. 3.46) 10mm Nut and Bolt Mounting System First remove the front wheel from your bicycle. Reattach the caliper brake making sure that particular type of mounting system. (Fig. 3.45) Caliper Brake Mounting System First remove the front wheel from the fork. Place the fender assembly...

Schwinn Owner's Manual
Page 46
... axle nut DO NOT REMOVE 3.48 ©2010 45 Determine which brace was included with stabilizer. Front/rear drop outs Front/rear hub Brace Inner axle s tabilizer washer C -Shaped wheel brace Axle nut Retaining washer Axle nut Step retaining washer TRAINING WHEELS Attaching training wheel brace to bicycle There are three different braces used to attach the training wheels to make sure pegs are properly tightened before installing...
... axle nut DO NOT REMOVE 3.48 ©2010 45 Determine which brace was included with stabilizer. Front/rear drop outs Front/rear hub Brace Inner axle s tabilizer washer C -Shaped wheel brace Axle nut Retaining washer Axle nut Step retaining washer TRAINING WHEELS Attaching training wheel brace to bicycle There are three different braces used to attach the training wheels to make sure pegs are properly tightened before installing...

Schwinn Owner's Manual
Page 47
... Axle nut Remove the outer axle nut and washer from the rear wheel axle. Replace the axle nut and washer, secure tightly. ASSEMBLY Wheel brace Training wheel 3.50 46 ©2010 Replace the washer and axle nut. Tighten the axle nut securely, making sure that the forked end of the bicycle. Please contact Pacific Cycle Service with training wheels, please call Pacific Cycle to help determine if after-market training wheels can be adjusted...
... Axle nut Remove the outer axle nut and washer from the rear wheel axle. Replace the axle nut and washer, secure tightly. ASSEMBLY Wheel brace Training wheel 3.50 46 ©2010 Replace the washer and axle nut. Tighten the axle nut securely, making sure that the forked end of the bicycle. Please contact Pacific Cycle Service with training wheels, please call Pacific Cycle to help determine if after-market training wheels can be adjusted...

Schwinn Owner's Manual
Page 49
... frequency of this manual, you should increase with use a degreaser to prevent dirt build up. We recommend you see a bicycle specialist. Safer riding - LUBRICATION Frequency Component Lubricant How to Lubricate MAINTENANCE Weekly Monthly Every Six Months Yearly Chain Derailleur wheels Derailleurs Brake calipers Brake levers Shift levers Freewheel Brake cables Bottom bracket Pedals Derailleur cables Wheel bearings Headset Seat pillar Chain lube or light oil Chain lube or light oil...
... frequency of this manual, you should increase with use a degreaser to prevent dirt build up. We recommend you see a bicycle specialist. Safer riding - LUBRICATION Frequency Component Lubricant How to Lubricate MAINTENANCE Weekly Monthly Every Six Months Yearly Chain Derailleur wheels Derailleurs Brake calipers Brake levers Shift levers Freewheel Brake cables Bottom bracket Pedals Derailleur cables Wheel bearings Headset Seat pillar Chain lube or light oil Chain lube or light oil...

Schwinn Owner's Manual
Page 52
... neither locknut is seated properly into each cable stop of the most overlooked parts on the same side with a cone wrench. 3. Lock washer Hub body Ball bearings Bearing cone Hub Bearings Hub bearings require special thin wrenches called "cone wrenches". If you have any doubts. (Fig. 4.4) 1. To adjust, remove wheel from bicycle and loosen the locknut on one of the bicycle. Good cable Kink Fray MAINTENANCE...
... neither locknut is seated properly into each cable stop of the most overlooked parts on the same side with a cone wrench. 3. Lock washer Hub body Ball bearings Bearing cone Hub Bearings Hub bearings require special thin wrenches called "cone wrenches". If you have any doubts. (Fig. 4.4) 1. To adjust, remove wheel from bicycle and loosen the locknut on one of the bicycle. Good cable Kink Fray MAINTENANCE...
Schwinn Owner's Manual
Page 54
... detect any looseness or roughness in the pedal bearings then adjustment, lubrication or replacement is usually possible to set , and freewheel. 4.8 Pedals inspection Pedals should be sought from the frame or fork. Re-tighten the cable anchor bolt and apply full force to the brake lever to the rear wheel including the pedals, chain, chainwheel, crank set the clearance on less complex models it will not only be dangerous...
... detect any looseness or roughness in the pedal bearings then adjustment, lubrication or replacement is usually possible to set , and freewheel. 4.8 Pedals inspection Pedals should be sought from the frame or fork. Re-tighten the cable anchor bolt and apply full force to the brake lever to the rear wheel including the pedals, chain, chainwheel, crank set the clearance on less complex models it will not only be dangerous...
Schwinn Owner's Manual
Page 57
... when pedaling forward. 4.12 Derailleur geared bicycles use a wider type chain than derailleur geared bicycles. To adjust the chain on both sides of the chain rivets. Loosen the rear axle nuts (and coaster brake arm clip if fitted) and move the wheel forward ...replacing, then it slightly to change the length. Make sure the open end of the U-shaped plate is likely that the freewheel will also have a single speed freewheel, coaster hub brake or 3-speed hub, generally use narrower chains and require a special tool to fit and remove chain links, or to release link from the bicycle...
... when pedaling forward. 4.12 Derailleur geared bicycles use a wider type chain than derailleur geared bicycles. To adjust the chain on both sides of the chain rivets. Loosen the rear axle nuts (and coaster brake arm clip if fitted) and move the wheel forward ...replacing, then it slightly to change the length. Make sure the open end of the U-shaped plate is likely that the freewheel will also have a single speed freewheel, coaster hub brake or 3-speed hub, generally use narrower chains and require a special tool to fit and remove chain links, or to release link from the bicycle...

Schwinn Owner's Manual
Page 58
... any accumulated dirt from one gear has been changed. The adjustments are a "friction" system, where you lubricate the chain, taking care to 'coast' without hesitation. When properly adjusted, one click should never cause the chain to remove slack Stretch Derailleur Systems The derailleur system includes the front and rear derailleurs, the shift levers, and the derailleur control cables, all of derailleur systems but all operate...
... any accumulated dirt from one gear has been changed. The adjustments are a "friction" system, where you lubricate the chain, taking care to 'coast' without hesitation. When properly adjusted, one click should never cause the chain to remove slack Stretch Derailleur Systems The derailleur system includes the front and rear derailleurs, the shift levers, and the derailleur control cables, all of derailleur systems but all operate...
Schwinn Owner's Manual
Page 62
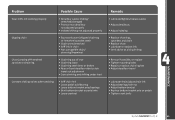
... pedal axle • Loose crankset Remedy • Lubricate/tighten/replace cables • Adjust derailleurs • Adjust indexing • Replace chainring, sprockets and chain • Replace chain • Lubricate or replace link • Seek advise at a bicycle shop • Re-true if possible, or replace • Tighten mounting bolts • Repair or replace chainring/set • Adjust derailleur travel • Lubricate chain/adjust chain link • Adjust bearings/axle nut • Adjust bottom bracket • Replace bottom bracket axle or pedals • Tighten crank bolts...
... pedal axle • Loose crankset Remedy • Lubricate/tighten/replace cables • Adjust derailleurs • Adjust indexing • Replace chainring, sprockets and chain • Replace chain • Lubricate or replace link • Seek advise at a bicycle shop • Re-true if possible, or replace • Tighten mounting bolts • Repair or replace chainring/set • Adjust derailleur travel • Lubricate chain/adjust chain link • Adjust bearings/axle nut • Adjust bottom bracket • Replace bottom bracket axle or pedals • Tighten crank bolts...
Schwinn Owner's Manual
Page 63
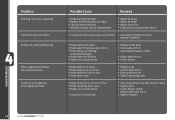
... • Brake arms loose • Replace pads • Correct pads toe-in • Clean pads and rim • Tighten mounting bolts • Bulge in the rim or rim out of true • Brake mounting bolts loose • Brakes out of adjustment • Fork loose in head tube • True wheel or take to a bike shop for repair • Tighten bolts • Center brakes and/or adjust brake pads toe...
... • Brake arms loose • Replace pads • Correct pads toe-in • Clean pads and rim • Tighten mounting bolts • Bulge in the rim or rim out of true • Brake mounting bolts loose • Brakes out of adjustment • Fork loose in head tube • True wheel or take to a bike shop for repair • Tighten bolts • Center brakes and/or adjust brake pads toe...


