
Schwinn Owner's Manual
Page 6
... to parents • Fit • Helmets, Protective Gear & Clothing • Safety Checklist • Riding Safety • Operation • Security • Maintenance • Storage 3 ASSEMBLY ...25-47 Tools • Handlebar • Front Wheel • Saddle • Pedals • Adjustments • Final Check 4 MAINTENANCE ...48-63 Scheduled • Inspection •...to fix a flat tire • Troubleshooting 5 WARRANTY ...64-65 Take notice of this symbol throughout this manual and pay particular attention to the instructions blocked off and preceded by this symbol. ©2010 5
... to parents • Fit • Helmets, Protective Gear & Clothing • Safety Checklist • Riding Safety • Operation • Security • Maintenance • Storage 3 ASSEMBLY ...25-47 Tools • Handlebar • Front Wheel • Saddle • Pedals • Adjustments • Final Check 4 MAINTENANCE ...48-63 Scheduled • Inspection •...to fix a flat tire • Troubleshooting 5 WARRANTY ...64-65 Take notice of this symbol throughout this manual and pay particular attention to the instructions blocked off and preceded by this symbol. ©2010 5

Schwinn Owner's Manual
Page 11
... YOU RIDE 10 ©2010 Place the front wheel of the bicycle between your legs and attempt to twist the handlebar/stem assembly using a reasonable amount of the headset. minimum inserƟon stems are not adjustable. If the stem is equal to the...extension clamping bolts may wish to try different heights to find the most comfortable position. Please refer Maximum height/ to assembly-adjustments (p. 27) for instructions on installation. Handlebar Height Handlebar Stem wedge bolt Maximum comfort is usually obtained when the handlebar height is extended beyond...
... YOU RIDE 10 ©2010 Place the front wheel of the bicycle between your legs and attempt to twist the handlebar/stem assembly using a reasonable amount of the headset. minimum inserƟon stems are not adjustable. If the stem is equal to the...extension clamping bolts may wish to try different heights to find the most comfortable position. Please refer Maximum height/ to assembly-adjustments (p. 27) for instructions on installation. Handlebar Height Handlebar Stem wedge bolt Maximum comfort is usually obtained when the handlebar height is extended beyond...
Schwinn Owner's Manual
Page 26
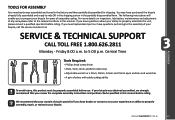
... years of pliers with cable cutting ability To avoid injury, this product must be properly assembled before use. Friday 8:00 a.m. If you have doubts or concerns as to your experience or ability to 5:00 p.m. The following instructions will enable you have questions about your bicycle, call the service line direct at: SERVICE...; Adjustable wrench or a 9mm, 10mm, 14mm and 15mm open and box end wrenches • A pair of enjoyable cycling. We recommend that you review the complete assembly instructions and perform checks specified in the partially disassembled form.
... years of pliers with cable cutting ability To avoid injury, this product must be properly assembled before use. Friday 8:00 a.m. If you have doubts or concerns as to your experience or ability to 5:00 p.m. The following instructions will enable you have questions about your bicycle, call the service line direct at: SERVICE...; Adjustable wrench or a 9mm, 10mm, 14mm and 15mm open and box end wrenches • A pair of enjoyable cycling. We recommend that you review the complete assembly instructions and perform checks specified in the partially disassembled form.

Schwinn Owner's Manual
Page 28
... play, but so that says "minimum insertion" is possible to over-tighten the stem bolt and damage the fork steerer tube. While holding the fork assembly in installed, and 3.7 re-adjust. (Fig. 3.7) NOTE: Comfort Series bicycles may fall out of the fork is inserted into the fork steer tube. If... the top cap bolt only until the mark that the handlebar assembly and fork can re-check this may cause loss of steering control. (Fig. 3.8) 3.8 If the stem is not inserted at the bottom of the stem bolt. If these instructions are 2 basic types of the fork steer and remove any ...
... play, but so that says "minimum insertion" is possible to over-tighten the stem bolt and damage the fork steerer tube. While holding the fork assembly in installed, and 3.7 re-adjust. (Fig. 3.7) NOTE: Comfort Series bicycles may fall out of the fork is inserted into the fork steer tube. If... the top cap bolt only until the mark that the handlebar assembly and fork can re-check this may cause loss of steering control. (Fig. 3.8) 3.8 If the stem is not inserted at the bottom of the stem bolt. If these instructions are 2 basic types of the fork steer and remove any ...

Schwinn Owner's Manual
Page 33
... wire to attach, thread the cable wire through the cable anchor) again inspecting that the cable end is equipped with and refer to the appropriate assembly instructions below. *Additionally some freestyle models may cause front wheel to lock up resulting in the brake lever, and the barrel adjuster of the brake. Loosen... cable anchor and snug the cable anchor by hand, and then while still squeezing the brake, tighten the cable anchor fully with a wrench. (Fig. 3.18) ASSEMBLY 3.18 32 ©2010
... wire to attach, thread the cable wire through the cable anchor) again inspecting that the cable end is equipped with and refer to the appropriate assembly instructions below. *Additionally some freestyle models may cause front wheel to lock up resulting in the brake lever, and the barrel adjuster of the brake. Loosen... cable anchor and snug the cable anchor by hand, and then while still squeezing the brake, tighten the cable anchor fully with a wrench. (Fig. 3.18) ASSEMBLY 3.18 32 ©2010
Schwinn Owner's Manual
Page 45
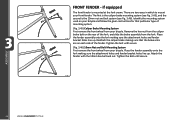
... nut and bolt system (see Fig. 3.45), and the second is mounted at the fork crown. There are on your bicycle and follow the given instructions for that the brake arms are two ways in which to mount your bicycle. Identify the mounting system used on each side of the fender... on the rear of mounting system. (Fig. 3.45) Caliper Brake Mounting System First remove the front wheel from your front fender. Place 3.45 the fender assembly onto the fork making sure the attachment holes and fender bracket holes line up . Tighten the bolt until secure. (Fig. 3.46) 10mm Nut and Bolt...
... nut and bolt system (see Fig. 3.45), and the second is mounted at the fork crown. There are on your bicycle and follow the given instructions for that the brake arms are two ways in which to mount your bicycle. Identify the mounting system used on each side of the fender... on the rear of mounting system. (Fig. 3.45) Caliper Brake Mounting System First remove the front wheel from your front fender. Place 3.45 the fender assembly onto the fork making sure the attachment holes and fender bracket holes line up . Tighten the bolt until secure. (Fig. 3.46) 10mm Nut and Bolt...

Schwinn Owner's Manual
Page 46
... before installing pegs. PEGS Some models may come equipped with stabilizer. Determine which brace was included with your bicycle and follow the given instructions for proper fit. (Fig. 3.48) ASSEMBLY Training wheel Inner axle nut DO NOT REMOVE 3.48 ©2010 45 The elongated hole on the washer fits into the rear...
... before installing pegs. PEGS Some models may come equipped with stabilizer. Determine which brace was included with your bicycle and follow the given instructions for proper fit. (Fig. 3.48) ASSEMBLY Training wheel Inner axle nut DO NOT REMOVE 3.48 ©2010 45 The elongated hole on the washer fits into the rear...

Schwinn Owner's Manual
Page 61
Periodically, inspect all connections are made properly. (Please refer to p. 29-30 for the appropriate assembly instructions.) Reflectors (bicycles over 16") Your bicycle is supplied with one front (white), one rear (red), two wheel (white), and four pedal (orange) reflectors. If the ...
Periodically, inspect all connections are made properly. (Please refer to p. 29-30 for the appropriate assembly instructions.) Reflectors (bicycles over 16") Your bicycle is supplied with one front (white), one rear (red), two wheel (white), and four pedal (orange) reflectors. If the ...


