Schwinn Owner's Manual
Page 7
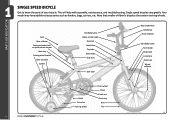
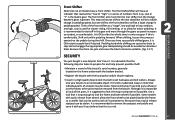
Single speed bicycles vary greatly. Seat Rear reflector Seat post binder bolt or quick-release skewer Seat stay Training wheel bracket Rear sprocket Spokes Handlebar grip Brake control cable Head set Head tube Top tube Down tube Seat post Seat tube Rear brake lever Handle bar Front reflector Handlebar stem Front brake Brake pad Front fork Front hub Wheel reflector Pedal Tire valve Training wheel Chain wheel Chain Crank arm Chain stay Rim Tire 1.1 6 ©2010 This will help with assembly, maintenance, and troubleshooting. Your model may have additional accessories ...
Single speed bicycles vary greatly. Seat Rear reflector Seat post binder bolt or quick-release skewer Seat stay Training wheel bracket Rear sprocket Spokes Handlebar grip Brake control cable Head set Head tube Top tube Down tube Seat post Seat tube Rear brake lever Handle bar Front reflector Handlebar stem Front brake Brake pad Front fork Front hub Wheel reflector Pedal Tire valve Training wheel Chain wheel Chain Crank arm Chain stay Rim Tire 1.1 6 ©2010 This will help with assembly, maintenance, and troubleshooting. Your model may have additional accessories ...

Schwinn Owner's Manual
Page 8
... Seat post Quick release Rear Brake ShiŌ lever Handlebar stem Head set Head tube Top tube Down tube Seat tube Seat stay Front derailleur Handlebar Brake lever Brake control cables Front reflector Front brake Front fork Spokes Tire Chain wheel Chain stay Chain Rear derailleur BoƩom Bracket Axle Crank arm Tire valve Pedal Front hub ©2010 1.2 7 Multi speed bicycles vary greatly. Your model may have additional accessories such as fenders, bags, carriers, etc. This will help with assembly, maintenance, and troubleshooting. PARTS IDENTIFICATION MULTI SPEED BICYCLE...
... Seat post Quick release Rear Brake ShiŌ lever Handlebar stem Head set Head tube Top tube Down tube Seat tube Seat stay Front derailleur Handlebar Brake lever Brake control cables Front reflector Front brake Front fork Spokes Tire Chain wheel Chain stay Chain Rear derailleur BoƩom Bracket Axle Crank arm Tire valve Pedal Front hub ©2010 1.2 7 Multi speed bicycles vary greatly. Your model may have additional accessories such as fenders, bags, carriers, etc. This will help with assembly, maintenance, and troubleshooting. PARTS IDENTIFICATION MULTI SPEED BICYCLE...
Schwinn Owner's Manual
Page 9
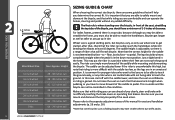
... Bike Wheel Size 12 inch wheel 16 inch wheel 18 inch wheel 20 inch wheel 24 inch wheel 2.1 Your Approx. to - The saddle can be sure you should be almost completely straight when the pedal is unsafe and the bicycle can mount and dismount the bicycle quickly if the need arises. 26 inch wheel 700c 64 - 74 inches tall 64 - 74 inches tall Please refer to pedal. to pedal. In this manual for seat and handlebar adjustments...
... Bike Wheel Size 12 inch wheel 16 inch wheel 18 inch wheel 20 inch wheel 24 inch wheel 2.1 Your Approx. to - The saddle can be sure you should be almost completely straight when the pedal is unsafe and the bicycle can mount and dismount the bicycle quickly if the need arises. 26 inch wheel 700c 64 - 74 inches tall 64 - 74 inches tall Please refer to pedal. to pedal. In this manual for seat and handlebar adjustments...
Schwinn Owner's Manual
Page 14
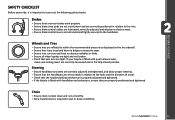
... bicycle is fitted with handlebar end extensions, ensure they are correctly tensioned and in wet or dusty conditions. ©2010 13 Chain • Ensure chain is oiled, clean and runs smoothly. • Extra maintenance is fitted with quick release axles, make sure locking levers are properly positioned and tightened. Wheels and Tires • Ensure tires are inflated to within the recommended pressure...
... bicycle is fitted with handlebar end extensions, ensure they are correctly tensioned and in wet or dusty conditions. ©2010 13 Chain • Ensure chain is oiled, clean and runs smoothly. • Extra maintenance is fitted with quick release axles, make sure locking levers are properly positioned and tightened. Wheels and Tires • Ensure tires are inflated to within the recommended pressure...

Schwinn Owner's Manual
Page 23
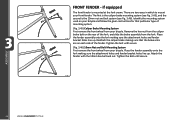
... Rear de railleur Front derailleur Derailleur control cable Guide pulley Front Crank arm chainwheels Pedal 2.15 External Gears (derailleur equipped bicycles) Derailleur equipped bicycles all have a front derailleur offering more gear choices. This allows the chain to pedal hard if desired. Low or "1" is recommended to start to "derail" from 1 up. It is the lowest gear. Shift only while pedaling forward and seated. Backpedaling should be avoided on derailleur bikes because the chain can derail the chain...
... Rear de railleur Front derailleur Derailleur control cable Guide pulley Front Crank arm chainwheels Pedal 2.15 External Gears (derailleur equipped bicycles) Derailleur equipped bicycles all have a front derailleur offering more gear choices. This allows the chain to pedal hard if desired. Low or "1" is recommended to start to "derail" from 1 up. It is the lowest gear. Shift only while pedaling forward and seated. Backpedaling should be avoided on derailleur bikes because the chain can derail the chain...
Schwinn Owner's Manual
Page 24
... the bicycle's serial number, generally located on the frame underneath the bottom bracket. • Register the bicycle with you if you believe that this gear and move through the gears as speed increases as a "range", low and high or low, medium, and high. Be aware that a quick release seatpost can be removed from 1 up. Once you lock just a wheel or just the frame, other parts may...
... the bicycle's serial number, generally located on the frame underneath the bottom bracket. • Register the bicycle with you if you believe that this gear and move through the gears as speed increases as a "range", low and high or low, medium, and high. Be aware that a quick release seatpost can be removed from 1 up. Once you lock just a wheel or just the frame, other parts may...

Schwinn Owner's Manual
Page 25
... hub and bottom bracket bearings of your bicycle have been submerged in coastal areas exposes your bicycle for further details). Ultraviolet rays may cause paint to fade or rubber and plastic parts to crack. • Before storing your bicycle to Parts 4 and 5 of this manual for a long period of enjoyable riding. • For painted frames, dust the surface and remove...
... hub and bottom bracket bearings of your bicycle have been submerged in coastal areas exposes your bicycle for further details). Ultraviolet rays may cause paint to fade or rubber and plastic parts to crack. • Before storing your bicycle to Parts 4 and 5 of this manual for a long period of enjoyable riding. • For painted frames, dust the surface and remove...

Schwinn Owner's Manual
Page 28
... and risk injury to the rider. Tighten the stem center bolt so that the handlebar assembly and fork can easily retrieve them. If needed , you can re-check this after the front wheel in front of the fork steer and remove any parts. In addition to the normal assembly, these instructions are 2 basic types of the fork steer tube. Quill and Threadless. For this...
... and risk injury to the rider. Tighten the stem center bolt so that the handlebar assembly and fork can easily retrieve them. If needed , you can re-check this after the front wheel in front of the fork steer and remove any parts. In addition to the normal assembly, these instructions are 2 basic types of the fork steer tube. Quill and Threadless. For this...

Schwinn Owner's Manual
Page 30
... tighten; ASSEMBLY Quick Release Wheels 1. Try to properly close the handle. Failure to close a quick release lever can cause loss of control of the bike (the side opposite the chain). (Fig. 3.11) 3. Locate the quick release skewer from the quick release skewer, remove outer spring and slide the skewer through the front wheel axle so that the wheel is properly closed with the fork. 6. Slide the wheel into the fork wheel...
... tighten; ASSEMBLY Quick Release Wheels 1. Try to properly close the handle. Failure to close a quick release lever can cause loss of control of the bike (the side opposite the chain). (Fig. 3.11) 3. Locate the quick release skewer from the quick release skewer, remove outer spring and slide the skewer through the front wheel axle so that the wheel is properly closed with the fork. 6. Slide the wheel into the fork wheel...
Schwinn Owner's Manual
Page 34
..., loosen wheel axle nuts and center the wheel, then proceed to over rotate the brake slightly, so that as needed . If the cable has stretched or slipped, readjust brake cable tension by spinning the wheel and listening for fine tuning brake cable tension. 3.22 ©2010 33 Brake is correctly adjusted when: • The brake pads do not contact the tire when the brake is...
..., loosen wheel axle nuts and center the wheel, then proceed to over rotate the brake slightly, so that as needed . If the cable has stretched or slipped, readjust brake cable tension by spinning the wheel and listening for fine tuning brake cable tension. 3.22 ©2010 33 Brake is correctly adjusted when: • The brake pads do not contact the tire when the brake is...
Schwinn Owner's Manual
Page 45
... type of the fork, and slide the brake assembly from your bicycle. Identify the mounting system used on the rear of mounting system. (Fig. 3.45) Caliper Brake Mounting System First remove the front wheel from the fork. Place 3.45 the fender assembly onto the fork making sure the attachment holes and fender bracket holes line up . Tighten the bolt until secure. 3.46 Tighten the bolt until secure. (Fig...
... type of the fork, and slide the brake assembly from your bicycle. Identify the mounting system used on the rear of mounting system. (Fig. 3.45) Caliper Brake Mounting System First remove the front wheel from the fork. Place 3.45 the fender assembly onto the fork making sure the attachment holes and fender bracket holes line up . Tighten the bolt until secure. 3.46 Tighten the bolt until secure. (Fig...

Schwinn Owner's Manual
Page 46
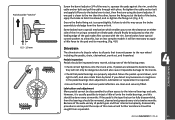
... Remove the outer axle nut and washer from the rear wheel axle. To install pegs, DO NOT loosen or remove axle nuts. Front/rear drop outs Front/rear hub Brace Inner axle s tabilizer washer C -Shaped wheel brace Axle nut Retaining washer Axle nut Step retaining washer TRAINING WHEELS Attaching training wheel brace to bicycle There are three different braces used to attach the training wheels to make sure pegs are properly tightened before installing...
... Remove the outer axle nut and washer from the rear wheel axle. To install pegs, DO NOT loosen or remove axle nuts. Front/rear drop outs Front/rear hub Brace Inner axle s tabilizer washer C -Shaped wheel brace Axle nut Retaining washer Axle nut Step retaining washer TRAINING WHEELS Attaching training wheel brace to bicycle There are three different braces used to attach the training wheels to make sure pegs are properly tightened before installing...

Schwinn Owner's Manual
Page 47
... forked end of the bicycle. If your bike did not come stock with any questions. Flat Brace Inn er axle Flat w heel bra ce It is very important to check the training wheel connection to the proper height. (Fig. 3.50) NOTICE: Not all bicycles will accept training wheels. Brace stabilizer washer Axle nut Remove the outer axle nut and washer from the rear wheel axle. Replace the axle...
... forked end of the bicycle. If your bike did not come stock with any questions. Flat Brace Inn er axle Flat w heel bra ce It is very important to check the training wheel connection to the proper height. (Fig. 3.50) NOTICE: Not all bicycles will accept training wheels. Brace stabilizer washer Axle nut Remove the outer axle nut and washer from the rear wheel axle. Replace the axle...

Schwinn Owner's Manual
Page 49
...: The frequency of your new bike will reduce control and braking performance and may require a longer stopping distance. We recommend you should increase with use a degreaser to Lubricate MAINTENANCE Weekly Monthly Every Six Months Yearly Chain Derailleur wheels Derailleurs Brake calipers Brake levers Shift levers Freewheel Brake cables Bottom bracket Pedals Derailleur cables Wheel bearings Headset Seat pillar Chain lube or light oil Chain lube or light oil Oil Oil...
...: The frequency of your new bike will reduce control and braking performance and may require a longer stopping distance. We recommend you should increase with use a degreaser to Lubricate MAINTENANCE Weekly Monthly Every Six Months Yearly Chain Derailleur wheels Derailleurs Brake calipers Brake levers Shift levers Freewheel Brake cables Bottom bracket Pedals Derailleur cables Wheel bearings Headset Seat pillar Chain lube or light oil Chain lube or light oil Oil Oil...

Schwinn Owner's Manual
Page 52
... turn freely without excessive side play . 4. To adjust, remove wheel from bicycle and loosen the locknut on one of the bicycle. Re-check that the housing is seated properly into each cable stop of the most overlooked parts on the same side with a cone wrench. 3. Lock washer Hub body Ball bearings Bearing cone Hub Bearings Hub bearings require special thin wrenches called "cone wrenches". If...
... turn freely without excessive side play . 4. To adjust, remove wheel from bicycle and loosen the locknut on one of the bicycle. Re-check that the housing is seated properly into each cable stop of the most overlooked parts on the same side with a cone wrench. 3. Lock washer Hub body Ball bearings Bearing cone Hub Bearings Hub bearings require special thin wrenches called "cone wrenches". If...
Schwinn Owner's Manual
Page 54
..., and right to the internal bearings and axle. Lubrication and adjustment Many pedals cannot be disassembled to allow this may cause the brake assembly to the cranks. • Check that transmit power to the rear wheel including the pedals, chain, chainwheel, crank set the clearance on less complex models it centered, and re-tighten the fixing nut. (Fig. 4.7) Ensure the Brake fixing nut is usually possible...
..., and right to the internal bearings and axle. Lubrication and adjustment Many pedals cannot be disassembled to allow this may cause the brake assembly to the cranks. • Check that transmit power to the rear wheel including the pedals, chain, chainwheel, crank set the clearance on less complex models it centered, and re-tighten the fixing nut. (Fig. 4.7) Ensure the Brake fixing nut is usually possible...
Schwinn Owner's Manual
Page 57
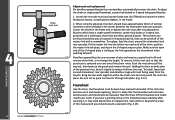
... rear axle nuts (and coaster brake arm clip if fitted) and move the wheel forward to loosen, or backward to change the length. If the chain has become worn and should consult a specialist. (Fig. 4.13) 4.13 Such action is beyond the scope of the U-shaped plate is trailing as the link approaches the chainwheel when pedaling forward. 4.12 Derailleur geared bicycles...
... rear axle nuts (and coaster brake arm clip if fitted) and move the wheel forward to loosen, or backward to change the length. If the chain has become worn and should consult a specialist. (Fig. 4.13) 4.13 Such action is beyond the scope of the U-shaped plate is trailing as the link approaches the chainwheel when pedaling forward. 4.12 Derailleur geared bicycles...

Schwinn Owner's Manual
Page 58
... be a positive "click" for smooth gear shifting to wipe off the inner or outer freewheel cogs. 4.15 ©2010 57 Each notched position in the rear wheel. Inspection The operation of internal parts; Brake arm clip Brake arm Spocket Lubrication Remove any excess. They require infrequent attention as far as lubrication, adjustment or replacement of the derailleur system should not rub on the chain.
... be a positive "click" for smooth gear shifting to wipe off the inner or outer freewheel cogs. 4.15 ©2010 57 Each notched position in the rear wheel. Inspection The operation of internal parts; Brake arm clip Brake arm Spocket Lubrication Remove any excess. They require infrequent attention as far as lubrication, adjustment or replacement of the derailleur system should not rub on the chain.
Schwinn Owner's Manual
Page 62
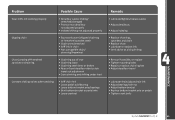
... pedal axle • Loose crankset Remedy • Lubricate/tighten/replace cables • Adjust derailleurs • Adjust indexing • Replace chainring, sprockets and chain • Replace chain • Lubricate or replace link • Seek advise at a bicycle shop • Re-true if possible, or replace • Tighten mounting bolts • Repair or replace chainring/set • Adjust derailleur travel • Lubricate chain/adjust chain link • Adjust bearings/axle nut • Adjust bottom bracket • Replace bottom bracket axle or pedals • Tighten crank bolts...
... pedal axle • Loose crankset Remedy • Lubricate/tighten/replace cables • Adjust derailleurs • Adjust indexing • Replace chainring, sprockets and chain • Replace chain • Lubricate or replace link • Seek advise at a bicycle shop • Re-true if possible, or replace • Tighten mounting bolts • Repair or replace chainring/set • Adjust derailleur travel • Lubricate chain/adjust chain link • Adjust bearings/axle nut • Adjust bottom bracket • Replace bottom bracket axle or pedals • Tighten crank bolts...
Schwinn Owner's Manual
Page 63
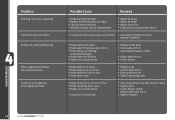
... • Brake arms loose • Replace pads • Correct pads toe-in • Clean pads and rim • Tighten mounting bolts • Bulge in the rim or rim out of true • Brake mounting bolts loose • Brakes out of adjustment • Fork loose in head tube • True wheel or take to a bike shop for repair • Tighten bolts • Center brakes and/or adjust brake pads toe...
... • Brake arms loose • Replace pads • Correct pads toe-in • Clean pads and rim • Tighten mounting bolts • Bulge in the rim or rim out of true • Brake mounting bolts loose • Brakes out of adjustment • Fork loose in head tube • True wheel or take to a bike shop for repair • Tighten bolts • Center brakes and/or adjust brake pads toe...


