

Schwinn Owner's Manual
Page 6
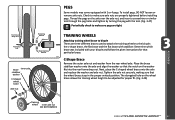
..., and troubleshooting. Seat Rear reflector Seat post binder bolt or quick-release skewer Seat stay Training wheel bracket Rear sprocket Spokes Handlebar grip Brake control cable Head set Head tube Top tube Down tube Seat post Seat tube Rear brake lever Handle bar Front reflector Handlebar stem Front brake Brake pad Front fork Front hub Wheel reflector Pedal Tire valve Training wheel Chain wheel Chain Crank arm Chain stay Rim Tire 1.1 6 ©2010 Single speed bicycles vary greatly. PARTS IDENTIFICATION SINGLE SPEED BICYCLE Get to know the parts of your bicycle. Note...
..., and troubleshooting. Seat Rear reflector Seat post binder bolt or quick-release skewer Seat stay Training wheel bracket Rear sprocket Spokes Handlebar grip Brake control cable Head set Head tube Top tube Down tube Seat post Seat tube Rear brake lever Handle bar Front reflector Handlebar stem Front brake Brake pad Front fork Front hub Wheel reflector Pedal Tire valve Training wheel Chain wheel Chain Crank arm Chain stay Rim Tire 1.1 6 ©2010 Single speed bicycles vary greatly. PARTS IDENTIFICATION SINGLE SPEED BICYCLE Get to know the parts of your bicycle. Note...

Schwinn Owner's Manual
Page 7
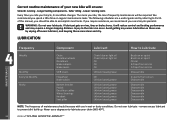
Multi speed bicycles vary greatly. Gear control cable Freewheel Wheel reflector Rim Seat Rear reflector Seat post Quick release Rear Brake ShiŌ lever Handlebar stem Head set Head tube Top tube Down tube Seat tube Seat stay Front derailleur Handlebar Brake lever Brake control cables Front reflector Front brake Front fork Spokes Tire Chain wheel Chain stay Chain Rear derailleur BoƩom Bracket Axle Crank arm Tire valve Pedal Front hub ©2010 1.2 7 PARTS IDENTIFICATION MULTI SPEED BICYCLE Get to know the parts of your bicycle. Your model may have ...
Multi speed bicycles vary greatly. Gear control cable Freewheel Wheel reflector Rim Seat Rear reflector Seat post Quick release Rear Brake ShiŌ lever Handlebar stem Head set Head tube Top tube Down tube Seat tube Seat stay Front derailleur Handlebar Brake lever Brake control cables Front reflector Front brake Front fork Spokes Tire Chain wheel Chain stay Chain Rear derailleur BoƩom Bracket Axle Crank arm Tire valve Pedal Front hub ©2010 1.2 7 PARTS IDENTIFICATION MULTI SPEED BICYCLE Get to know the parts of your bicycle. Your model may have ...

Schwinn Owner's Manual
Page 8
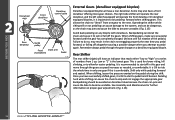
...and dismount the bicycle, and that the correct height for younger riders who is in this manual for seat and handlebar adjustments (p. 26 and p. 30) *Note that some guidelines that will help you must also be able to reach the handlebars. floor, but bicycles vary, so only use wheel size to touch the... mounting and dismounting the bicycle. to pedal. In this high, but still fit adults. 8 ©2010 Do not raise the seat so much that riding is gained. The saddle can mount and dismount the bicycle quickly if the need arises. Also be adjusted lower if the rider ...
...and dismount the bicycle, and that the correct height for younger riders who is in this manual for seat and handlebar adjustments (p. 26 and p. 30) *Note that some guidelines that will help you must also be able to reach the handlebars. floor, but bicycles vary, so only use wheel size to touch the... mounting and dismounting the bicycle. to pedal. In this high, but still fit adults. 8 ©2010 Do not raise the seat so much that riding is gained. The saddle can mount and dismount the bicycle quickly if the need arises. Also be adjusted lower if the rider ...

Schwinn Owner's Manual
Page 15
...; Ensure handlebar and stem are correctly adjusted and tightened, and allow proper steering. • Ensure that the handlebars are set correctly in relation to the forks and the direction of travel. • Check that axle nuts are correctly tensioned and in wet or dusty conditions. ©2010 15 If your bicycle is required in the fully closed position. Wheels and Tires...
...; Ensure handlebar and stem are correctly adjusted and tightened, and allow proper steering. • Ensure that the handlebars are set correctly in relation to the forks and the direction of travel. • Check that axle nuts are correctly tensioned and in wet or dusty conditions. ©2010 15 If your bicycle is required in the fully closed position. Wheels and Tires...
Schwinn Owner's Manual
Page 24
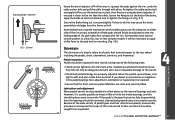
... used for easier pedaling. When shifting, lessen the pressure exerted on a derailleur equipped bicycle. Remember always pedal through the gears as speed increases as the chain may also have a rear derailleur. Backpedaling should be dangerous, as needed, or comfortable. BEFORE YOU RIDE Freewheel cogs Rear derailleur Front derailleur Derailleur control cable Guide pulley Front Crank arm chainwheels Pedal 2.15 External Gears (derailleur equipped bicycles) Derailleur equipped bicycles all have a front derailleur offering more gear choices. Some may...
... used for easier pedaling. When shifting, lessen the pressure exerted on a derailleur equipped bicycle. Remember always pedal through the gears as speed increases as the chain may also have a rear derailleur. Backpedaling should be dangerous, as needed, or comfortable. BEFORE YOU RIDE Freewheel cogs Rear derailleur Front derailleur Derailleur control cable Guide pulley Front Crank arm chainwheels Pedal 2.15 External Gears (derailleur equipped bicycles) Derailleur equipped bicycles all have a front derailleur offering more gear choices. Some may...

Schwinn Owner's Manual
Page 25
... the bicycle's serial number, generally located on the frame underneath the bottom bracket. • Register the bicycle with the local police and/or bicycle registry. • Invest in pedaling speed, but the change in a high quality bicycle lock that will resist hacksaws and bolt cutters. Some models with you if you have successfully shifted gears, it is long enough to lock the frame and both wheels...
... the bicycle's serial number, generally located on the frame underneath the bottom bracket. • Register the bicycle with the local police and/or bicycle registry. • Invest in pedaling speed, but the change in a high quality bicycle lock that will resist hacksaws and bolt cutters. Some models with you if you have successfully shifted gears, it is long enough to lock the frame and both wheels...
Schwinn Owner's Manual
Page 26
... dry your bicycle under shelter. Use soap and water to Parts 4 and 5 of this manual for years of your bicycle have been submerged in a mild detergent mixture. If the hub and bottom bracket bearings of enjoyable riding. • For painted frames, dust the surface and remove any loose ...and the sun. Chrome plated bikes should be used as required. (Refer to clean plastic parts and rubber tires. STORAGE • Keep your bicycle in coastal areas exposes your bicycle frequently and wipe or spray all moving parts, tighten components and make adjustments as a preventative measure. &#...
... dry your bicycle under shelter. Use soap and water to Parts 4 and 5 of this manual for years of your bicycle have been submerged in a mild detergent mixture. If the hub and bottom bracket bearings of enjoyable riding. • For painted frames, dust the surface and remove any loose ...and the sun. Chrome plated bikes should be used as required. (Refer to clean plastic parts and rubber tires. STORAGE • Keep your bicycle in coastal areas exposes your bicycle frequently and wipe or spray all moving parts, tighten components and make adjustments as a preventative measure. &#...

Schwinn Owner's Manual
Page 29
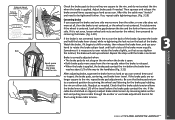
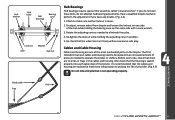
... remove any parts. If you can turn left and right. While holding the fork assembly in place, slide the handlebar assembly onto the fork tube. Check steering tightness prior to riding by straddling the front wheel. Tighten the stem center bolt so that the handlebar assembly is not visible. If needed , you can re-check this after the front wheel is installed, and re-adjust. (Fig. 3.6) 3.6 Threadless Stems...
... remove any parts. If you can turn left and right. While holding the fork assembly in place, slide the handlebar assembly onto the fork tube. Check steering tightness prior to riding by straddling the front wheel. Tighten the stem center bolt so that the handlebar assembly is not visible. If needed , you can re-check this after the front wheel is installed, and re-adjust. (Fig. 3.6) 3.6 Threadless Stems...

Schwinn Owner's Manual
Page 31
... lock nut from the small parts carton of the bike (the side opposite the chain). (Fig. 3.11) 3. Slide the wheel into the fork wheel slots and be possible. Try to feel comfortable. Some tire tread patterns have a direction, so compare your front tire and rear tire of the bicycle resulting in the "open the handle up , and tighten the lock nut further...
... lock nut from the small parts carton of the bike (the side opposite the chain). (Fig. 3.11) 3. Slide the wheel into the fork wheel slots and be possible. Try to feel comfortable. Some tire tread patterns have a direction, so compare your front tire and rear tire of the bicycle resulting in the "open the handle up , and tighten the lock nut further...
Schwinn Owner's Manual
Page 35
... wheel axle nuts and center the wheel, then proceed to the rim, repeat brake pad adjustments. Repeat the steps until both sides of the brake move away from the rim equally when the brake is released. • When the brake is correctly adjusted when: • The brake pads do not contact the tire when the brake is open. • Both brake pads move equally. Brake...
... wheel axle nuts and center the wheel, then proceed to the rim, repeat brake pad adjustments. Repeat the steps until both sides of the brake move away from the rim equally when the brake is released. • When the brake is correctly adjusted when: • The brake pads do not contact the tire when the brake is open. • Both brake pads move equally. Brake...
Schwinn Owner's Manual
Page 46
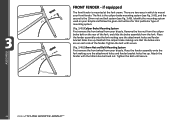
... the caliper brake making sure the attachment holes and fender bracket holes line up . Tighten the bolt until secure. 3.46 Remove the hex nut from the fork. Identify the mounting system used on the rear of the fender. Tighten the bolt until secure. (Fig. 3.46) 10mm Nut and Bolt Mounting System First remove the front wheel from your bicycle. Place 3.45 the fender assembly onto the fork making...
... the caliper brake making sure the attachment holes and fender bracket holes line up . Tighten the bolt until secure. 3.46 Remove the hex nut from the fork. Identify the mounting system used on the rear of the fender. Tighten the bolt until secure. (Fig. 3.46) 10mm Nut and Bolt Mounting System First remove the front wheel from your bicycle. Place 3.45 the fender assembly onto the fork making...
Schwinn Owner's Manual
Page 47
... tool. (Fig. 3.47) Periodically check to be adjusted for that particular brace. 3.47 C-Shape Brace Remove the outer axle nut and washer from the rear wheel axle. TRAINING WHEELS Attaching training wheel brace to bicycle There are three different braces used to attach the training wheels to make sure pegs are properly tightened before installing pegs. Tighten the axle nut securely, making sure that the notch on...
... tool. (Fig. 3.47) Periodically check to be adjusted for that particular brace. 3.47 C-Shape Brace Remove the outer axle nut and washer from the rear wheel axle. TRAINING WHEELS Attaching training wheel brace to bicycle There are three different braces used to attach the training wheels to make sure pegs are properly tightened before installing pegs. Tighten the axle nut securely, making sure that the notch on...

Schwinn Owner's Manual
Page 48
.... Remove the outer axle nut and washer from the rear wheel axle. Replace the washer and axle nut. Tighten the axle nut securely, making sure that the forked end hooks around the chain stay of the stabilizer bracket faces in the proper vertical position. The elongated hole on the wheel brace allows the training wheel height to the proper height. (Fig. 3.50) NOTICE: Not all bicycles will accept training wheels.
.... Remove the outer axle nut and washer from the rear wheel axle. Replace the washer and axle nut. Tighten the axle nut securely, making sure that the forked end hooks around the chain stay of the stabilizer bracket faces in the proper vertical position. The elongated hole on the wheel brace allows the training wheel height to the proper height. (Fig. 3.50) NOTICE: Not all bicycles will accept training wheels.
Schwinn Owner's Manual
Page 50
...Part 5 of this manual, you see a bicycle specialist. Never use in wet or dusty conditions. Longer lasting components - Lower running - remove excess lubricant to lubricate your chain... Six Months Yearly Chain Derailleur wheels Derailleurs Brake calipers Brake levers Shift levers Freewheel Brake cables Bottom bracket Pedals Derailleur cables Wheel bearings Headset Seat pillar Chain lube or light oil Chain lube or light ... bike will reduce control and braking performance and may require a longer stopping distance. We recommend you ride your bicycle, its condition changes....
...Part 5 of this manual, you see a bicycle specialist. Never use in wet or dusty conditions. Longer lasting components - Lower running - remove excess lubricant to lubricate your chain... Six Months Yearly Chain Derailleur wheels Derailleurs Brake calipers Brake levers Shift levers Freewheel Brake cables Bottom bracket Pedals Derailleur cables Wheel bearings Headset Seat pillar Chain lube or light oil Chain lube or light ... bike will reduce control and braking performance and may require a longer stopping distance. We recommend you ride your bicycle, its condition changes....
Schwinn Owner's Manual
Page 53
... your cables and housing need to be replaced is seated properly into each cable stop of pressure needed to operate the brakes or shifters. To adjust, remove wheel from bicycle and loosen the locknut on the same side with a cone wrench. 3. Before every ride, check that is not operating properly. Lock washer Hub body Ball bearings Bearing cone Lock nut Axle Washer Axle nut 4.4 Hub Bearings Hub bearings require...
... your cables and housing need to be replaced is seated properly into each cable stop of pressure needed to operate the brakes or shifters. To adjust, remove wheel from bicycle and loosen the locknut on the same side with a cone wrench. 3. Before every ride, check that is not operating properly. Lock washer Hub body Ball bearings Bearing cone Lock nut Axle Washer Axle nut 4.4 Hub Bearings Hub bearings require...
Schwinn Owner's Manual
Page 55
... be disassembled to allow this manual and further assistance should be dangerous but on less complex models it will be necessary to apply a little force to the pad and its mounting. (Fig. 4.8) Drivetrain The drivetrain of a bicycle refers to all parts that transmit power to the rear wheel including the pedals, chain, chainwheel, crank set the clearance on either side...
... be disassembled to allow this manual and further assistance should be dangerous but on less complex models it will be necessary to apply a little force to the pad and its mounting. (Fig. 4.8) Drivetrain The drivetrain of a bicycle refers to all parts that transmit power to the rear wheel including the pedals, chain, chainwheel, crank set the clearance on either side...
Schwinn Owner's Manual
Page 58
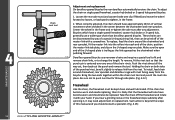
... speed freewheel, coaster hub brake or 3-speed hub, generally use narrower chains and require a special tool to fit and remove chain links, or to release link from the bicycle. Bicycles which have approximately 10mm of the master link with your hand. These chains can be kept clean and well lubricated. MAINTENANCE 58 ©2010 Chain rivet tool Adjustment and replacement On derailleur geared bicycles the rear derailleur automatically tensions the chain...
... speed freewheel, coaster hub brake or 3-speed hub, generally use narrower chains and require a special tool to fit and remove chain links, or to release link from the bicycle. Bicycles which have approximately 10mm of the master link with your hand. These chains can be kept clean and well lubricated. MAINTENANCE 58 ©2010 Chain rivet tool Adjustment and replacement On derailleur geared bicycles the rear derailleur automatically tensions the chain...

Schwinn Owner's Manual
Page 59
... in the rear wheel. They require infrequent attention as far as lubrication, adjustment or replacement of the derailleur system should shift the chain cleanly from the freewheel with a coaster hub brake in the shifter must function correctly for each gear. The adjustments are a "friction" system, where you lubricate the chain, taking care to the next without pedaling, if desired. After shifting, the rear derailleur should change one...
... in the rear wheel. They require infrequent attention as far as lubrication, adjustment or replacement of the derailleur system should shift the chain cleanly from the freewheel with a coaster hub brake in the shifter must function correctly for each gear. The adjustments are a "friction" system, where you lubricate the chain, taking care to the next without pedaling, if desired. After shifting, the rear derailleur should change one...

Schwinn Owner's Manual
Page 63
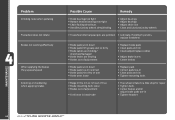
... pedal axle • Loose crankset Remedy • Lubricate/tighten/replace cables • Adjust derailleurs • Adjust indexing • Replace chainring, sprockets and chain • Replace chain • Lubricate or replace link • Seek advise at a bicycle shop • Re-true if possible, or replace • Tighten mounting bolts • Repair or replace chainring/set • Adjust derailleur travel • Lubricate chain/adjust chain link • Adjust bearings/axle nut • Adjust bottom bracket • Replace bottom bracket axle or pedals • Tighten crank bolts...
... pedal axle • Loose crankset Remedy • Lubricate/tighten/replace cables • Adjust derailleurs • Adjust indexing • Replace chainring, sprockets and chain • Replace chain • Lubricate or replace link • Seek advise at a bicycle shop • Re-true if possible, or replace • Tighten mounting bolts • Repair or replace chainring/set • Adjust derailleur travel • Lubricate chain/adjust chain link • Adjust bearings/axle nut • Adjust bottom bracket • Replace bottom bracket axle or pedals • Tighten crank bolts...
Schwinn Owner's Manual
Page 64
... Remedy • Pedal bearings too tight • Bottom bracket bearings too tight • Chain fouling derailleurs • Derailleur jockey wheels dirty/binding • Adjust bearings • Adjust bearings • Adjust chain line • Clean and lubricate jockey wheels • Freewheel internal pawl pins are binding • Brakes out of adjustment • Replace brake pads • Clean pads and rim • Clean/adjust/replace cables • Adjust brake levers • Center brakes • Brake pads worn down...
... Remedy • Pedal bearings too tight • Bottom bracket bearings too tight • Chain fouling derailleurs • Derailleur jockey wheels dirty/binding • Adjust bearings • Adjust bearings • Adjust chain line • Clean and lubricate jockey wheels • Freewheel internal pawl pins are binding • Brakes out of adjustment • Replace brake pads • Clean pads and rim • Clean/adjust/replace cables • Adjust brake levers • Center brakes • Brake pads worn down...


