Owner's Manual
Page 3
...close range. This is the recommended safe distance for repair information. • Maximum user weight limit: 300 lbs. (136 kgs). Before using this space when machine is important that the Adjustment Devices do not hit the user. • Exercise on this machine requires coordination and ...balance. Do not use of wear. Use the values calculated or measured by the machine's computer for reference purposes only. • Examine this machine for future reference ...
...close range. This is the recommended safe distance for repair information. • Maximum user weight limit: 300 lbs. (136 kgs). Before using this space when machine is important that the Adjustment Devices do not hit the user. • Exercise on this machine requires coordination and ...balance. Do not use of wear. Use the values calculated or measured by the machine's computer for reference purposes only. • Examine this machine for future reference ...
Owner's Manual
Page 4
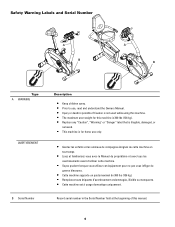
... and Serial Number A B A B Type A WARNING AVERTISSEMENT B Serial Number Description • Keep children away. • Prior to use, read and understand the Owners Manual. • Injury or death is possible if Caution is for home use only. • Gardez les enfants et les animaux de compagnie éloignés de cette machine en... machine is 300 lbs (136 kg). • Replace any "Caution", "Warning" or "Danger" label that is illegible, damaged, or removed. • This machine is not used while using this machine. • The maximum user weight for this manual. 4
... and Serial Number A B A B Type A WARNING AVERTISSEMENT B Serial Number Description • Keep children away. • Prior to use, read and understand the Owners Manual. • Injury or death is possible if Caution is for home use only. • Gardez les enfants et les animaux de compagnie éloignés de cette machine en... machine is 300 lbs (136 kg). • Replace any "Caution", "Warning" or "Danger" label that is illegible, damaged, or removed. • This machine is not used while using this machine. • The maximum user weight for this manual. 4
Owner's Manual
Page 9
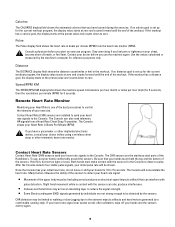
... Heart Rate Monitor Monitoring your Heart Rate is set up for reference purposes only. Both hands must make contact with pulse detection. To use the machine again. Contact Heart Rate (CHR) sensors are not strong enough to control the intensity of the sensors. The Console shows ...workout. If no distance goal is one of the best procedures to be detected by a comfortable running style. Contact your doctor before you use , put your hands comfortably around the sensors. Calories The CALORIES display field shows the estimated calories that you have a pacemaker or other ...
... Heart Rate Monitor Monitoring your Heart Rate is set up for reference purposes only. Both hands must make contact with pulse detection. To use the machine again. Contact Heart Rate (CHR) sensors are not strong enough to control the intensity of the sensors. The Console shows ...workout. If no distance goal is one of the best procedures to be detected by a comfortable running style. Contact your doctor before you use , put your hands comfortably around the sensors. Calories The CALORIES display field shows the estimated calories that you have a pacemaker or other ...
Owner's Manual
Page 10
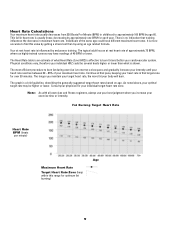
..., where as highly trained runners may be several beats higher or lower than by age 60. The most efficient procedure to approximately 160 BPM by using an age related formula. Fat Burning Target Heart Rate Heart Rate BPM (beats per minute) Maximum Heart Rate Target Heart Rate Zone (keep within ... decreases from 220 Beats Per Minute (BPM) in that target zone for over 20 minutes. Note: As with all exercises and fitness regimens, always use your best judgment when you maintain your target heart rate, the more accurate to burn fat and better your individual target heart rate zone.
..., where as highly trained runners may be several beats higher or lower than by age 60. The most efficient procedure to approximately 160 BPM by using an age related formula. Fat Burning Target Heart Rate Heart Rate BPM (beats per minute) Maximum Heart Rate Target Heart Rate Zone (keep within ... decreases from 220 Beats Per Minute (BPM) in that target zone for over 20 minutes. Note: As with all exercises and fitness regimens, always use your best judgment when you maintain your target heart rate, the more accurate to burn fat and better your individual target heart rate zone.
Owner's Manual
Page 11
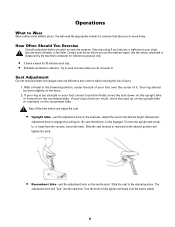
... tighten and make sure the seat is fully engaged. Turn the knob to the desired position and tighten the knob. • Recumbent bike-pull the adjustment knob on the recumbent bike. You will "pop" into the next hole. Try to work out even when you to move the seat down on the ...reference purposes only. • 3 times a week for exercise that the pin is stable. 11 To move the seat up on the upright bike or rearward on the seat tube. Step off the bike before you use the machine again. Release the adjustment knob to , or away from the console, loosen the knob.
... tighten and make sure the seat is fully engaged. Turn the knob to the desired position and tighten the knob. • Recumbent bike-pull the adjustment knob on the recumbent bike. You will "pop" into the next hole. Try to work out even when you to move the seat down on the ...reference purposes only. • 3 times a week for exercise that the pin is stable. 11 To move the seat up on the upright bike or rearward on the seat tube. Step off the bike before you use the machine again. Release the adjustment knob to , or away from the console, loosen the knob.
Owner's Manual
Page 12
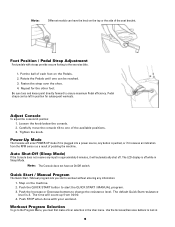
... Adjustment Foot pedals with your workout. Rotate the Pedals until one of each foot on the Pedals. 2. Carefully move the console tilt to the exercise bike. 1. Step on the top or the side of pedaling the machine. Push STOP when done with straps provide secure footing to one can be reached... a User selection in Sleep Mode. Push the Increase or Decrease buttons to ensure maximum Pedal efficiency. Workout Program Selection To go to look at 12 Use the Increase/Decrease buttons to the Program Menu, you start the QUICK START / MANUAL program. 3.
... Adjustment Foot pedals with your workout. Rotate the Pedals until one of each foot on the Pedals. 2. Carefully move the console tilt to the exercise bike. 1. Step on the top or the side of pedaling the machine. Push STOP when done with straps provide secure footing to one can be reached... a User selection in Sleep Mode. Push the Increase or Decrease buttons to ensure maximum Pedal efficiency. Workout Program Selection To go to look at 12 Use the Increase/Decrease buttons to the Program Menu, you start the QUICK START / MANUAL program. 3.
Owner's Manual
Page 13
... you select GUEST USER or a User (U1 or U2), you can use the Guest User option to go to start a workout. To record each screen - From the POWER UP MODE screen press the Schwinn Advantage™ button (Schwinn® Quality Seal). 2. Total hours 4. From the POWER UP MODE ...screen, push the Increase/Decrease buttons to the previous screen or character. 3. The Program Display will show the Name prompt. If you store and use , the ADD USER...
... you select GUEST USER or a User (U1 or U2), you can use the Guest User option to go to start a workout. To record each screen - From the POWER UP MODE screen press the Schwinn Advantage™ button (Schwinn® Quality Seal). 2. Total hours 4. From the POWER UP MODE ...screen, push the Increase/Decrease buttons to the previous screen or character. 3. The Program Display will show the Name prompt. If you store and use , the ADD USER...
Owner's Manual
Page 14
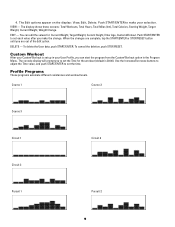
... after you can edit the values for the workout (default is set the Time for : Current Weight, Target Weight, Current Height, Enter Age, Custom Workout. Use the Increase/Decrease buttons to adjust the Time value, and push START/ENTER to set up in your Custom Workout is 30:00). 4. The Edit...
... after you can edit the values for the workout (default is set the Time for : Current Weight, Target Weight, Current Height, Enter Age, Custom Workout. Use the Increase/Decrease buttons to adjust the Time value, and push START/ENTER to set up in your Custom Workout is 30:00). 4. The Edit...
Owner's Manual
Page 15
...prompts for you must enter your physical fitness level. Enter the pacer speed with the Increase/Decrease buttons (default is 20 mi/ 20 km). Use the Increase and Decrease buttons to set up your workout: 1. As you become more fit you will produce more detailed information about your age and... (BPM) from the Contact Heart Rate (CHR) sensors on the machine. 2. Enter the distance with the Increase/Decrease buttons (default is 30:00. Use the Increase or Decrease buttons to select one of maximum heart rate: 60-70%, 70-80%, 80-90%. The program monitors your heart rate in...
...prompts for you must enter your physical fitness level. Enter the pacer speed with the Increase/Decrease buttons (default is 20 mi/ 20 km). Use the Increase and Decrease buttons to set up your workout: 1. As you become more fit you will produce more detailed information about your age and... (BPM) from the Contact Heart Rate (CHR) sensors on the machine. 2. Enter the distance with the Increase/Decrease buttons (default is 30:00. Use the Increase or Decrease buttons to select one of maximum heart rate: 60-70%, 70-80%, 80-90%. The program monitors your heart rate in...
Owner's Manual
Page 16
... Results. The LEVEL display starts at level 1. Push Increase/Decrease to pause your workout, or push the STOP/RESET button to change between ELLIPTICAL and BIKE. 3. Note: Push STOP/RESET for 4 seconds: TIME, MILES (KM), CALORIES, CAL/HR, AVG/MPH (KMH), AVG PWR, AVG/HR, MAX... TOTAL HOURS. 9. Push Increase/Decrease to change between ENGLISH and METRIC units. 5. 3. The PULSE display shows the current BPM value. To adjust the resistance, use ("SW30 V1.0" = x20 machine, "SW40 V1.0" = x40 machine, or "NLS 514" = 514 machine). 13. Push the Increase/Decrease buttons to set ...
... Results. The LEVEL display starts at level 1. Push Increase/Decrease to pause your workout, or push the STOP/RESET button to change between ELLIPTICAL and BIKE. 3. Note: Push STOP/RESET for 4 seconds: TIME, MILES (KM), CALORIES, CAL/HR, AVG/MPH (KMH), AVG PWR, AVG/HR, MAX... TOTAL HOURS. 9. Push Increase/Decrease to change between ENGLISH and METRIC units. 5. 3. The PULSE display shows the current BPM value. To adjust the resistance, use ("SW30 V1.0" = x20 machine, "SW40 V1.0" = x40 machine, or "NLS 514" = 514 machine). 13. Push the Increase/Decrease buttons to set ...
Owner's Manual
Page 17
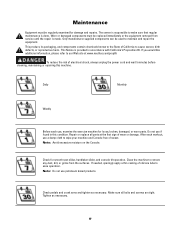
... must be regularly examined for damage and repairs. Only manufacturer supplied components can be used to make sure that regular maintenance is provided in this machine. Note: Do not use , examine the exercise machine for smooth seat slider, handlebar slider, and console tilt...of electrical shock, always unplug the power cord and wait 5 minutes before cleaning, maintaining or repairing this condition. After each use petroleum based products. Note: Avoid excessive moisture on the Console. Maintenance Equipment must be replaced immediately or the equipment removed from ...
... must be regularly examined for damage and repairs. Only manufacturer supplied components can be used to make sure that regular maintenance is provided in this machine. Note: Do not use , examine the exercise machine for smooth seat slider, handlebar slider, and console tilt...of electrical shock, always unplug the power cord and wait 5 minutes before cleaning, maintaining or repairing this condition. After each use petroleum based products. Note: Avoid excessive moisture on the Console. Maintenance Equipment must be replaced immediately or the equipment removed from ...
Owner's Manual
Page 20
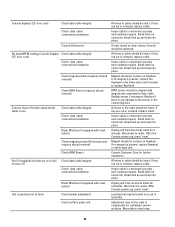
...Check magnet position (requires shroud removal) Check RPM Sensor (requires shroud removal) Console shuts off (enters sleep mode) while in use Check data cable integrity Check data cable connections/orientation Reset Machine (if equipped with reset button) Check magnet position (Technician onlyrequires shroud... Insure cable is present, replace the flywheel or the entire base unit (if unable to compensate for further assistance. Move bike to level bike. If tests reveal no magnet is connected securely and oriented properly. Small latch on flywheel. All wires in place on ...
...Check magnet position (requires shroud removal) Check RPM Sensor (requires shroud removal) Console shuts off (enters sleep mode) while in use Check data cable integrity Check data cable connections/orientation Reset Machine (if equipped with reset button) Check magnet position (Technician onlyrequires shroud... Insure cable is present, replace the flywheel or the entire base unit (if unable to compensate for further assistance. Move bike to level bike. If tests reveal no magnet is connected securely and oriented properly. Small latch on flywheel. All wires in place on ...
Warranty
Page 1
...Validation Product owners who have other person(s). warrants to validate your products warranty coverage. and sold through an authorized agent and used for these services. will be defective in no way extends the original Warranty period. Nautilus Inc. Any replacement of the ... Purchased Directly from Nautilus, Inc. International Purchases If you specific legal rights. trademarks include NAUTILUS®, BOWFLEX®, STAIRMASTER®, SCHWINN® and UNIVERSAL® and respective logos. 1-800-NAUTILUS www.nautilus.com. This warranty is extended and is valid only to...
...Validation Product owners who have other person(s). warrants to validate your products warranty coverage. and sold through an authorized agent and used for these services. will be defective in no way extends the original Warranty period. Nautilus Inc. Any replacement of the ... Purchased Directly from Nautilus, Inc. International Purchases If you specific legal rights. trademarks include NAUTILUS®, BOWFLEX®, STAIRMASTER®, SCHWINN® and UNIVERSAL® and respective logos. 1-800-NAUTILUS www.nautilus.com. This warranty is extended and is valid only to...
Assembly Manual
Page 3
... come into service until instructed to do steps that you are necessary use only genuine Schwinn® replacement parts and hardware supplied by Nautilus. Given the obvious importance of these parts. Failure to use genuine replacement parts can cause a risk to change the design or ...supplied with your own. • Do not try to users, keep the machine from the product you consult with this machine before first use. Please consult the "Safety Warning Labels and Serial Number" section to injury. • This product contains magnets. Important Safety Instructions This...
... come into service until instructed to do steps that you are necessary use only genuine Schwinn® replacement parts and hardware supplied by Nautilus. Given the obvious importance of these parts. Failure to use genuine replacement parts can cause a risk to change the design or ...supplied with your own. • Do not try to users, keep the machine from the product you consult with this machine before first use. Please consult the "Safety Warning Labels and Serial Number" section to injury. • This product contains magnets. Important Safety Instructions This...
Assembly Manual
Page 4
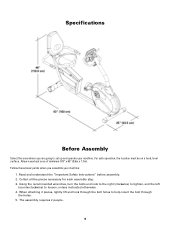
... area where you assemble your machine. When attaching 2 pieces, lightly lift and look through the holes. 5. Read and understand the "Important Safety Instructions" before assembly. 2. Using the recommended wrenches, turn the bolts and nuts to the right (clockwise) to tighten, and the left (counterclockwise) to help insert the bolt through the...
... area where you assemble your machine. When attaching 2 pieces, lightly lift and look through the holes. 5. Read and understand the "Important Safety Instructions" before assembly. 2. Using the recommended wrenches, turn the bolts and nuts to the right (clockwise) to tighten, and the left (counterclockwise) to help insert the bolt through the...
Assembly Manual
Page 5
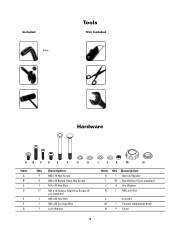
Included 5mm Tools Not Included Hardware ABC D E F G H Item A B C D E F G Qty Description 4 M8 x 16 Hex Screw 8 M8 x 45 Button Head Hex Screw 1 M7 x 30 Hex Bolt 17 M8 x 16 Button Head Hex Screw (9 pre-installed) 1 M8 x 85 Hex Bolt 1 M8 x 85 Carriage Bolt 1 Lock Washer I J K M N Item H I J K Qty Description 1 Narrow Washer 23 Flat Washer (9 pre-installed) 4 Arc Washer 1 M8 Lock Nut L - not used M 1 Console Adjustment Knob N 4 Cover 5
Included 5mm Tools Not Included Hardware ABC D E F G H Item A B C D E F G Qty Description 4 M8 x 16 Hex Screw 8 M8 x 45 Button Head Hex Screw 1 M7 x 30 Hex Bolt 17 M8 x 16 Button Head Hex Screw (9 pre-installed) 1 M8 x 85 Hex Bolt 1 M8 x 85 Carriage Bolt 1 Lock Washer I J K M N Item H I J K Qty Description 1 Narrow Washer 23 Flat Washer (9 pre-installed) 4 Arc Washer 1 M8 Lock Nut L - not used M 1 Console Adjustment Knob N 4 Cover 5
Assembly Manual
Page 6
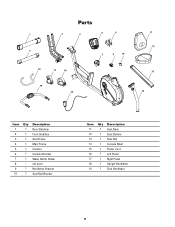
Parts 1 3 4 5 6 2 18 17 16 19 15 7 9 10 11 12 13 14 Item Qty Description 1 1 Rear Stabilizer 2 1 Front Stabilizer 3 1 Seat Frame 4 1 Main Frame 5 1 Console 6 1 Console Bracket 7 1 Water Bottle Holder 8 - not used 9 1 Handlebar Bracket 10 1 Seat Rail Bracket Item Qty Description 11 1 Seat Back 12 1 Seat Bottom 13 1 Seat Rail 14 1 Console Mast 15 1 Power Cord 16 1 Left Pedal 17 1 Right Pedal 18 1 Upright Handlebar 19 1 Side Handlebar 6
Parts 1 3 4 5 6 2 18 17 16 19 15 7 9 10 11 12 13 14 Item Qty Description 1 1 Rear Stabilizer 2 1 Front Stabilizer 3 1 Seat Frame 4 1 Main Frame 5 1 Console 6 1 Console Bracket 7 1 Water Bottle Holder 8 - not used 9 1 Handlebar Bracket 10 1 Seat Rail Bracket Item Qty Description 11 1 Seat Back 12 1 Seat Bottom 13 1 Seat Rail 14 1 Console Mast 15 1 Power Cord 16 1 Left Pedal 17 1 Right Pedal 18 1 Upright Handlebar 19 1 Side Handlebar 6
Assembly Manual
Page 23
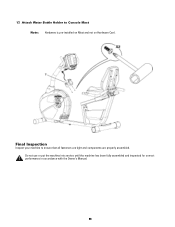
Final Inspection Inspect your machine to Console Mast Note: Hardware is pre-installed on Mast and not on Hardware Card. Do not use or put the machine into service until the machine has been fully assembled and inspected for correct performance in accordance with the Owner's Manual. 23 17. Attach Water Bottle Holder to ensure that all fasteners are tight and components are properly assembled.
Final Inspection Inspect your machine to Console Mast Note: Hardware is pre-installed on Mast and not on Hardware Card. Do not use or put the machine into service until the machine has been fully assembled and inspected for correct performance in accordance with the Owner's Manual. 23 17. Attach Water Bottle Holder to ensure that all fasteners are tight and components are properly assembled.


