
Instruction Manual
Page 1
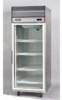
SRIM-200610-MED in Japan Reference No. INSTRUCTION MANUAL S.4NYO GENERAL PURPOSE LABORATORY REFRIGERATORS AND FREEZERS October 2006 SRR-23FD-MED SRF-23FD-MED SRR-23GD-MED SRR-49FD-MED SRF-49FD-MED SRR-49GD-MED SRR-72GD-MED SANYO Sales & Marketing Corp.
SRIM-200610-MED in Japan Reference No. INSTRUCTION MANUAL S.4NYO GENERAL PURPOSE LABORATORY REFRIGERATORS AND FREEZERS October 2006 SRR-23FD-MED SRF-23FD-MED SRR-23GD-MED SRR-49FD-MED SRF-49FD-MED SRR-49GD-MED SRR-72GD-MED SANYO Sales & Marketing Corp.

Instruction Manual
Page 2
...potential personal injury situation. Make sure to the units. Prohibited. Do not attempt to remove or repair any component. 1 Do not touch with this manual for safe and efficient operation. These notices provide helpful safety and efficient operation information. Handling the cord on this ... Make sure to read the Warning statements carefully before proceeding, and work cautiously. ► In addition, please read the Warning statements carefully before proceeding, and work cautiously. Disregarding the notices may lead to serious injury and/or damage to unplug the electrical ...
...potential personal injury situation. Make sure to the units. Prohibited. Do not attempt to remove or repair any component. 1 Do not touch with this manual for safe and efficient operation. These notices provide helpful safety and efficient operation information. Handling the cord on this ... Make sure to read the Warning statements carefully before proceeding, and work cautiously. ► In addition, please read the Warning statements carefully before proceeding, and work cautiously. Disregarding the notices may lead to serious injury and/or damage to unplug the electrical ...

Instruction Manual
Page 3
... unit is not against the electrical cord. In time of the unit. Please do not place anything on the doors of gas leakage, please open the doors and windows for ventilation before unplugging or operating the unit to the unit, please do not use flammable spray products near the unit...To minimize fire hazards, do not plug or unplug the cord with wet hands. Safety Notices To minimize shock and fire hazards, make sure that the unit is properly grounded. This could cause the unit to damage. The compressor and fan motor are temperature sensitive items, such as medical or ...
... unit is not against the electrical cord. In time of the unit. Please do not place anything on the doors of gas leakage, please open the doors and windows for ventilation before unplugging or operating the unit to the unit, please do not use flammable spray products near the unit...To minimize fire hazards, do not plug or unplug the cord with wet hands. Safety Notices To minimize shock and fire hazards, make sure that the unit is properly grounded. This could cause the unit to damage. The compressor and fan motor are temperature sensitive items, such as medical or ...

Instruction Manual
Page 4
... shelf for the unit. Make sure to clean the pins the electrical cord using soft cloth or a brush to overload the outlet. A child can be in the refrigerator if the door is to remove or repair any component. This should be sure not to minimize fire hazards. Please designate one outlet just for other purposes. This is shut with water. Use the handle...
... shelf for the unit. Make sure to clean the pins the electrical cord using soft cloth or a brush to overload the outlet. A child can be in the refrigerator if the door is to remove or repair any component. This should be sure not to minimize fire hazards. Please designate one outlet just for other purposes. This is shut with water. Use the handle...

Instruction Manual
Page 5
... and fire hazards, do not use the electrical cord and plug the unit if are intended for general porpose storage. Do not store hazardous or flammable items. DO NOT OVERLOAD THE UNIT PLEASE DO NOT LOAD OVER THE LIMITED LINE .414/ (DESIGNATE INSIDE THE UNIT) To minimize electric shock and damage to water or heavy moisture, or high...
... and fire hazards, do not use the electrical cord and plug the unit if are intended for general porpose storage. Do not store hazardous or flammable items. DO NOT OVERLOAD THE UNIT PLEASE DO NOT LOAD OVER THE LIMITED LINE .414/ (DESIGNATE INSIDE THE UNIT) To minimize electric shock and damage to water or heavy moisture, or high...
Instruction Manual
Page 6
... place glass bottle items in use for a long period of the following range. When the unit is required to be moved from the outlet to minimize shock and hazards. Safety Notices To avoid personal injury, shock, and fire hazards, please do not attempt to remove or repair any ...minimize personal injury, please do not set a desired temperature out of time. please unplug the unit from one place to the unit, please do not put your hands under the unit when the unit is not in freezers. minutes.- 4 0* 6 It could damage the compressor. CAUTION To minimize malfunction and damage ...
... place glass bottle items in use for a long period of the following range. When the unit is required to be moved from the outlet to minimize shock and hazards. Safety Notices To avoid personal injury, shock, and fire hazards, please do not attempt to remove or repair any ...minimize personal injury, please do not set a desired temperature out of time. please unplug the unit from one place to the unit, please do not put your hands under the unit when the unit is not in freezers. minutes.- 4 0* 6 It could damage the compressor. CAUTION To minimize malfunction and damage ...
Instruction Manual
Page 7
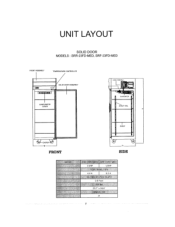
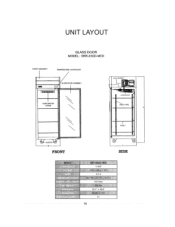
UNIT LAYOUT SOLID DOOR MODELS : SRR-23FD-MED, SRF-23FD-MED FRONT ASSEMBLY TEMPERATURE CONTROLLER SOLID DOOR ASSEMBLY EVAPORATOR COVER COND ASSEMBLY L EVAPORATOR SHELF RAIL SHELF -CASTER w FRONT MODEL SIDE S.F3F723FPMED 1/4HP 1/2HP 115V i'6017,iz:/:1Ph 4.6 A 6.5 A 29.1'W x 31.7"D x 79A'H 9.6 Feet 23.7' x 24.6 . NEMA 21 7
UNIT LAYOUT SOLID DOOR MODELS : SRR-23FD-MED, SRF-23FD-MED FRONT ASSEMBLY TEMPERATURE CONTROLLER SOLID DOOR ASSEMBLY EVAPORATOR COVER COND ASSEMBLY L EVAPORATOR SHELF RAIL SHELF -CASTER w FRONT MODEL SIDE S.F3F723FPMED 1/4HP 1/2HP 115V i'6017,iz:/:1Ph 4.6 A 6.5 A 29.1'W x 31.7"D x 79A'H 9.6 Feet 23.7' x 24.6 . NEMA 21 7
Instruction Manual
Page 9
UNIT LAYOUT SOLID DOOR MODELS : SRF-49FD-MED FRONT ASSEMBLY TEMPERATURE CONTROLLER NW/ EVAPORATOR COVER SOLID DOOR ASSEMBLY CASTER FRONT GOND ASS EIL EVAPORATOR SHELF RAIL r SHELF r SIDE 1/2HP x 2 11511 60Hz 1Ph 13.2 A 49ANV x 31.7"D x 79;4". 440 Itr.):, 22.1 x 24.2 NEMA5720p 40 9
UNIT LAYOUT SOLID DOOR MODELS : SRF-49FD-MED FRONT ASSEMBLY TEMPERATURE CONTROLLER NW/ EVAPORATOR COVER SOLID DOOR ASSEMBLY CASTER FRONT GOND ASS EIL EVAPORATOR SHELF RAIL r SHELF r SIDE 1/2HP x 2 11511 60Hz 1Ph 13.2 A 49ANV x 31.7"D x 79;4". 440 Itr.):, 22.1 x 24.2 NEMA5720p 40 9
Instruction Manual
Page 10
UNIT LAYOUT GLASS DOOR MODEL : SRR-23GD-MED FRONT ASSEMBLY TEMPERATURE CONTROLLER GLASS DOOR ASSEMBLY EVAPORATOR COVER COND ASSEMBLY L EVAPORATOR SHELF RAIL SHELF -CASTER FRONT MODEL SIDE $0-23GO-"MED, 1/ 4HP 115V 00H 4.2 A 1,7"D x 79:epH : 209 lbs 23.7 24.6' NEMA 5-150 21 10
UNIT LAYOUT GLASS DOOR MODEL : SRR-23GD-MED FRONT ASSEMBLY TEMPERATURE CONTROLLER GLASS DOOR ASSEMBLY EVAPORATOR COVER COND ASSEMBLY L EVAPORATOR SHELF RAIL SHELF -CASTER FRONT MODEL SIDE $0-23GO-"MED, 1/ 4HP 115V 00H 4.2 A 1,7"D x 79:epH : 209 lbs 23.7 24.6' NEMA 5-150 21 10
Instruction Manual
Page 11
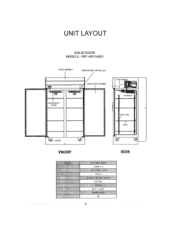
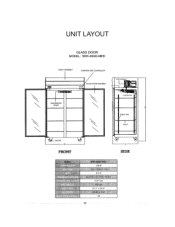
UNIT LAYOUT GLASS DOOR MODEL : SRR-49GD-MED FRONT ASSEMBLY TEMPERATURE CONTROLLER GLASS DOOR ASSEMBLY GOAD ASSEMBLY EVAPORATOR COVER EVAPORATOR r r SHELF RAIL SHELF CASTER FRONT MODEL „8.89749G07.1y1D.. ., 1/3HP 115V / 60Hz I 1Fh 6.6 A 13.6V x 31.7"D H 9.8 Feet 440 lbs 22.1' 24.6' HEMA 5-15P 40 11 D SIDE
UNIT LAYOUT GLASS DOOR MODEL : SRR-49GD-MED FRONT ASSEMBLY TEMPERATURE CONTROLLER GLASS DOOR ASSEMBLY GOAD ASSEMBLY EVAPORATOR COVER EVAPORATOR r r SHELF RAIL SHELF CASTER FRONT MODEL „8.89749G07.1y1D.. ., 1/3HP 115V / 60Hz I 1Fh 6.6 A 13.6V x 31.7"D H 9.8 Feet 440 lbs 22.1' 24.6' HEMA 5-15P 40 11 D SIDE
Instruction Manual
Page 13
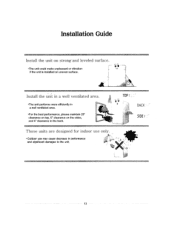
Install the unit in a well ventilated area. •The unit performs more efficiently in a well rentilated area. •For the best performance, please maintain 20" clearance on top, 6" clearance on uneven surface. TOP BACK SIDE 13 Installation Guide Install the unit on strong-and leveled surface. •The unit could make unpleasant or vibration if the unit is installed on the sides, and 4" clearance in performance and significant damages to the unit. Those units are designed for indoor use only. • Outdoor use may cause decrease in the back.
Install the unit in a well ventilated area. •The unit performs more efficiently in a well rentilated area. •For the best performance, please maintain 20" clearance on top, 6" clearance on uneven surface. TOP BACK SIDE 13 Installation Guide Install the unit on strong-and leveled surface. •The unit could make unpleasant or vibration if the unit is installed on the sides, and 4" clearance in performance and significant damages to the unit. Those units are designed for indoor use only. • Outdoor use may cause decrease in the back.
Instruction Manual
Page 14
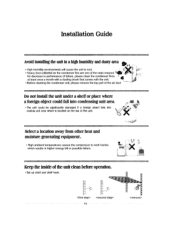
...cleaning the condenser unit, please remove the top part of the unit. Select a location away from other heat and moisture generating equipment. • High ambient temperatures causes the compressor to rost. • Heavy dust colletted-on the top of the air duct Do not install the unit under a shelf... The unit could be significantly damaged if a foreign object falls into cooling unit area which results in performance of the unit clean before operation. • Set up shelf and shelf hook. 14 Installation Guide Avoid installing the unit in a high humidity and dusty area • High ...
...cleaning the condenser unit, please remove the top part of the unit. Select a location away from other heat and moisture generating equipment. • High ambient temperatures causes the compressor to rost. • Heavy dust colletted-on the top of the air duct Do not install the unit under a shelf... The unit could be significantly damaged if a foreign object falls into cooling unit area which results in performance of the unit clean before operation. • Set up shelf and shelf hook. 14 Installation Guide Avoid installing the unit in a high humidity and dusty area • High ...
Instruction Manual
Page 15
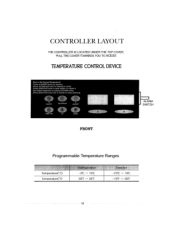
... TOP COVER. PULL THE COVER TOWARDS YOU TO ACESS TEMPERATURE CONTROL DEVICE [How to select window A or window B. D:Set desired temperature by pressing (UP/DOWN) button, E:Press (SELECTION) button over 10 seconds for temperature setting. A ON/OFF DOWN FRONT ommaaammi ALARM SWITCH Programmable Temperature Ranges Temperature(' C) Temperature(' F) Refrigerotor -3°C - C:Press (SELECTION) button to Set Desired Temperature] A:Press the(ON/OPF) button for operat€on, 8:Press tbe(TEMP.SET) button for manual defrosting, ON...
... TOP COVER. PULL THE COVER TOWARDS YOU TO ACESS TEMPERATURE CONTROL DEVICE [How to select window A or window B. D:Set desired temperature by pressing (UP/DOWN) button, E:Press (SELECTION) button over 10 seconds for temperature setting. A ON/OFF DOWN FRONT ommaaammi ALARM SWITCH Programmable Temperature Ranges Temperature(' C) Temperature(' F) Refrigerotor -3°C - C:Press (SELECTION) button to Set Desired Temperature] A:Press the(ON/OPF) button for operat€on, 8:Press tbe(TEMP.SET) button for manual defrosting, ON...
Instruction Manual
Page 16
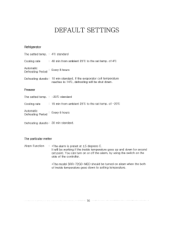
... the set temp. You can turn on or off the alarm, by using the switch on the side of inside temperature goes up and down . It will be turned on alram when the both of the controller. *The model SRR-72GD-MED should be shut down for around set point. The particular metter Alram Function : *The alarm is preset at ±5 degrees C. DEFAULT SETTINGS Refrigerator The setted temp. : 4°C standard Cooling rate : 40...
... the set temp. You can turn on or off the alarm, by using the switch on the side of inside temperature goes up and down . It will be turned on alram when the both of the controller. *The model SRR-72GD-MED should be shut down for around set point. The particular metter Alram Function : *The alarm is preset at ±5 degrees C. DEFAULT SETTINGS Refrigerator The setted temp. : 4°C standard Cooling rate : 40...
Instruction Manual
Page 17
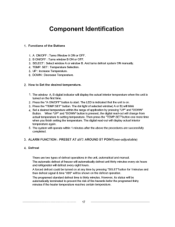
... will display the actual interior temperature when the unit is on the defrost operation. B ON/OFF : Turns window B ON or OFF. 3. How to start. Press the "TEMP.SET" button. However, its status will be automatically terminated to setting temperature. Component Identification 1. The system will change from actual temperature to prevent the risk of freezer will automatically defrost unit thirty minutes every six hours and refrigerator will blink...
... will display the actual interior temperature when the unit is on the defrost operation. B ON/OFF : Turns window B ON or OFF. 3. How to start. Press the "TEMP.SET" button. However, its status will be automatically terminated to setting temperature. Component Identification 1. The system will change from actual temperature to prevent the risk of freezer will automatically defrost unit thirty minutes every six hours and refrigerator will blink...

Instruction Manual
Page 18
...shelves.) Place stored items in two to three hours after starting the unit. • Insert and arrange stored item with the refrigerator cooled. • If possible, introduce stored items over a period of time to worsening of chiling air circulation. • Do not overload. - Maintenance Guide Do not put too much warm... product in at same time. • Too much warm product introduced ...
...shelves.) Place stored items in two to three hours after starting the unit. • Insert and arrange stored item with the refrigerator cooled. • If possible, introduce stored items over a period of time to worsening of chiling air circulation. • Do not overload. - Maintenance Guide Do not put too much warm... product in at same time. • Too much warm product introduced ...
Instruction Manual
Page 19
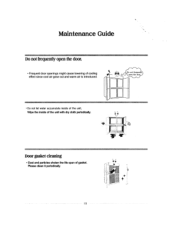
Do not frequently open the door. • Frequent door openings might cause lowering of cooling effect since cool air gose out and warm air is introduced. Wipe the inside of the unit. Please clean it periodically. 19 Door gasket cleaning • Dust and particles shoten the life span of gasket. Maintenance Guide Do not frequently open the doo • Do not let water accumulate inside of the unit with dry cloth periodically.
Do not frequently open the door. • Frequent door openings might cause lowering of cooling effect since cool air gose out and warm air is introduced. Wipe the inside of the unit. Please clean it periodically. 19 Door gasket cleaning • Dust and particles shoten the life span of gasket. Maintenance Guide Do not frequently open the doo • Do not let water accumulate inside of the unit with dry cloth periodically.
Instruction Manual
Page 20
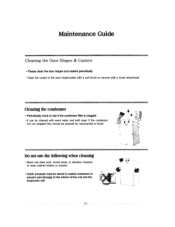
... • Clean the outsid of the door hinge/caster with a soft brush or vacuum with a brush attachment Cleaning the condenser • Periodically crook to see it the condenser filter is clogged. • It can be stored in sealed containers to prevent acid damage to clean cabinet interior or exterior. • Acidic products must be cleaned with warm water and mild...
... • Clean the outsid of the door hinge/caster with a soft brush or vacuum with a brush attachment Cleaning the condenser • Periodically crook to see it the condenser filter is clogged. • It can be stored in sealed containers to prevent acid damage to clean cabinet interior or exterior. • Acidic products must be cleaned with warm water and mild...

Instruction Manual
Page 21
... sun light. c. d. c. b. Exterior walls are fully closed. a. Unit is available. Avoid installing the unit next to minimize condensation. Avoid storing hot items. e. Check for tubing rattle. Condensation on the exterior surface of high humidity. Symptom Unit fails r to see if power is noisy Condensation e, on . Control setting too high, readjust. Check for worn fan motor bearings. e- b. b. d. Check if electrical...
... sun light. c. d. c. b. Exterior walls are fully closed. a. Unit is available. Avoid installing the unit next to minimize condensation. Avoid storing hot items. e. Check for tubing rattle. Condensation on the exterior surface of high humidity. Symptom Unit fails r to see if power is noisy Condensation e, on . Control setting too high, readjust. Check for worn fan motor bearings. e- b. b. d. Check if electrical...

