Brochure
Page 1
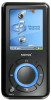
... thus is a trademark or registered trademark of Microsoft Corporation in the United States and/or other countries.TrustedFlash, gruvi, and Sansa are trademarks of SanDisk Corporation, registered in the United States and other countries. The Sansa e200 also works with battery Dimensions 1.73"(w) x 3.50"(l) x 0.51"(h)...Sansa e200 series MP3 players sound as awesome as they look! Other brand names mentioned herein are available for easy viewing • Supports Microsoft® PlaysForSure™ subscription music stores • Strong alloy metal rear casing provides excellent scratch...
... thus is a trademark or registered trademark of Microsoft Corporation in the United States and/or other countries.TrustedFlash, gruvi, and Sansa are trademarks of SanDisk Corporation, registered in the United States and other countries. The Sansa e200 also works with battery Dimensions 1.73"(w) x 3.50"(l) x 0.51"(h)...Sansa e200 series MP3 players sound as awesome as they look! Other brand names mentioned herein are available for easy viewing • Supports Microsoft® PlaysForSure™ subscription music stores • Strong alloy metal rear casing provides excellent scratch...
User Manual
Page 3
...; Add songs to Playlist 25 ƒ Remove Songs from Playlist 25 ƒ Scan Through Song 26 ƒ Rate This Song 27 Photo Mode 27 ƒ Viewing Photos 27 Slideshow 28 ƒ Slideshow Options 29 Video Mode 30 ƒ Playing Video 30 FM Radio Mode 31 ƒ FM Radio 31 ƒ FM... USB Mode 38 ƒ Reset All 39 Tips, FAQ, and Troubleshooting 39 Service and Warranty Information 42 Getting Technical Support 42 Learn More 42 1-YEAR SanDisk Limited Warranty 43 3
...; Add songs to Playlist 25 ƒ Remove Songs from Playlist 25 ƒ Scan Through Song 26 ƒ Rate This Song 27 Photo Mode 27 ƒ Viewing Photos 27 Slideshow 28 ƒ Slideshow Options 29 Video Mode 30 ƒ Playing Video 30 FM Radio Mode 31 ƒ FM Radio 31 ƒ FM... USB Mode 38 ƒ Reset All 39 Tips, FAQ, and Troubleshooting 39 Service and Warranty Information 42 Getting Technical Support 42 Learn More 42 1-YEAR SanDisk Limited Warranty 43 3
User Manual
Page 27
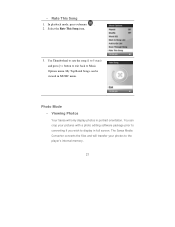
Select the Rate This Song item. 3. Use Thumbwheel to rate the song (1 to 5 stars) and press | ƒ Rate This Song 1. In playback mode, press submenu . 2.
Select the Rate This Song item. 3. Use Thumbwheel to rate the song (1 to 5 stars) and press | ƒ Rate This Song 1. In playback mode, press submenu . 2.

User Manual
Page 28
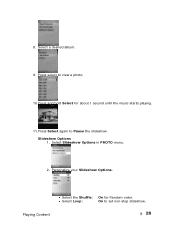
To view photos stored on your slideshow 28 Press the Select button again to another photo. If you selected Thumbnails you will see the browser screen. Scroll through the photos and select the one of interest. 4. Slideshow To play slideshow, Press Select button while viewing one of your slideshow photos. Use the |>| buttons to backup or advance to Pause the slide show, set your Sansa, select Photo in the main menu. 2. 1. Select PhotoList or Thumbnails. 3.
To view photos stored on your slideshow 28 Press the Select button again to another photo. If you selected Thumbnails you will see the browser screen. Scroll through the photos and select the one of interest. 4. Slideshow To play slideshow, Press Select button while viewing one of your slideshow photos. Use the |>| buttons to backup or advance to Pause the slide show, set your Sansa, select Photo in the main menu. 2. 1. Select PhotoList or Thumbnails. 3.

User Manual
Page 29
options below, like using the current song or your Slideshow Options. Press | z Select the Slide time each photo view time. z Select Loop: Select On to set nonstop slideshow. z Select the Shuffle: Select On for background music. ƒ Slideshow Options 1. Select Slideshow Options in the Music submenu. 3. z Select the Music for background music and select CurrentSong or GoList in PHOTO menu. 2. Personalize your GoList for random order.
options below, like using the current song or your Slideshow Options. Press | z Select the Slide time each photo view time. z Select Loop: Select On to set nonstop slideshow. z Select the Shuffle: Select On for background music. ƒ Slideshow Options 1. Select Slideshow Options in the Music submenu. 3. z Select the Music for background music and select CurrentSong or GoList in PHOTO menu. 2. Personalize your GoList for random order.

User Manual
Page 32
Recording Mode ƒ Voice Recording Use your own voice, an interview, or a speech via internal microphone. 1. z Select View All Presets to view all presets, and next time when you enter Radio Mode, Sansa e200 will replace existing presets. To set Radio options, press submenu in Record mode. 3. z ...
Recording Mode ƒ Voice Recording Use your own voice, an interview, or a speech via internal microphone. 1. z Select View All Presets to view all presets, and next time when you enter Radio Mode, Sansa e200 will replace existing presets. To set Radio options, press submenu in Record mode. 3. z ...
User Manual
Page 2
... LOADING MUSIC ...13 Drag and Drop ...13 Windows Media Player ...13 LOADING PHOTOS AND VIDEO...19 PLAYING CONTENT ...21 PLAYING MUSIC ...21 WATCHING VIDEOS ...24 VIEWING PHOTOS ...24 FM RADIO (IF APPLICABLE)...28 LISTENING TO FM RADIO ...28 PROGRAMMING FM PRESETS ...28 RECORDING ...30 VOICE RECORDING ...30 DELETING CONTENT ...31 DELETING...
... LOADING MUSIC ...13 Drag and Drop ...13 Windows Media Player ...13 LOADING PHOTOS AND VIDEO...19 PLAYING CONTENT ...21 PLAYING MUSIC ...21 WATCHING VIDEOS ...24 VIEWING PHOTOS ...24 FM RADIO (IF APPLICABLE)...28 LISTENING TO FM RADIO ...28 PROGRAMMING FM PRESETS ...28 RECORDING ...30 VOICE RECORDING ...30 DELETING CONTENT ...31 DELETING...

User Manual
Page 10
... The Hold Switch is located on the top of the device, and is used to FM radio and save presets Photo - view loaded photos Sansa® e200 Overview Settings - view or customize the Sansa player features 7 The following message will appear on the Sansa e200 will be disabled once the Hold Switch...
... The Hold Switch is located on the top of the device, and is used to FM radio and save presets Photo - view loaded photos Sansa® e200 Overview Settings - view or customize the Sansa player features 7 The following message will appear on the Sansa e200 will be disabled once the Hold Switch...

User Manual
Page 16
... transfer music from your computer to the Sansa player using the dragand-drop method or using Windows Explorer on initial connection. 3. Select Open device to view files using music managing software like Windows Media Player. Double-click on the MUSIC folder. 5. 4 This chapter shows you need to show Windows Media Player...
... transfer music from your computer to the Sansa player using the dragand-drop method or using Windows Explorer on initial connection. 3. Select Open device to view files using music managing software like Windows Media Player. Double-click on the MUSIC folder. 5. 4 This chapter shows you need to show Windows Media Player...

User Manual
Page 24
... Top Rated, and Music Options. 3. Playing Content Playing Music Follow these steps to play . 5 This chapter shows you how to play music, watch videos and view photos on your music is playing. 4. You can browse other areas of your player (music lists, settings, and photos), while your Sansa® e200 player...
... Top Rated, and Music Options. 3. Playing Content Playing Music Follow these steps to play . 5 This chapter shows you how to play music, watch videos and view photos on your music is playing. 4. You can browse other areas of your player (music lists, settings, and photos), while your Sansa® e200 player...

User Manual
Page 27
Press submenu to move to advance or rewind. 5. Viewing Photos Your Sansa will only display photos in full screen. Use the Thumbwheel to rate the song (1 to 5 stars) then press || buttons to Video list. ... Media Converter converts the photos then transfer them to display in portrait orientation. Select PhotoList or Thumbnails. Playing Content 24 To view photos, select Photo from the Main Menu. 2. To view photos, follow these steps: 1. In playback mode, press submenu. 4. You can crop your pictures with a photo editing software package prior to...
Press submenu to move to advance or rewind. 5. Viewing Photos Your Sansa will only display photos in full screen. Use the Thumbwheel to rate the song (1 to 5 stars) then press || buttons to Video list. ... Media Converter converts the photos then transfer them to display in portrait orientation. Select PhotoList or Thumbnails. Playing Content 24 To view photos, select Photo from the Main Menu. 2. To view photos, follow these steps: 1. In playback mode, press submenu. 4. You can crop your pictures with a photo editing software package prior to...

User Manual
Page 28
3. Select Photo from the Main Menu. 2. Select Music. 4. Use |>| buttons to backup or advance to set other preferences: Shuffle/Loop/Slide Time. 6. Scroll through the photos and select the one of interest. 4. Press the Back (| Select Slideshow Options. 3. Scroll down to another photo. Select an available Playlist. 5. If you selected Thumbnails you will see the browser screen. To view slideshow, follow these steps: 1.
3. Select Photo from the Main Menu. 2. Select Music. 4. Use |>| buttons to backup or advance to set other preferences: Shuffle/Loop/Slide Time. 6. Scroll through the photos and select the one of interest. 4. Press the Back (| Select Slideshow Options. 3. Scroll down to another photo. Select an available Playlist. 5. If you selected Thumbnails you will see the browser screen. To view slideshow, follow these steps: 1.
User Manual
Page 29
Personalize your Slideshow Options. • Select the Shuffle: On for about 1 second until the music starts playing. 11.Press Select again to set non-stop slideshow. 8. Slideshow Options 1. Press select to view a photo. 10.Press and hold Select for Random order. • Select Loop: On to Pause the slideshow. Select a desired album. 9. Select Slideshow Options in PHOTO menu. 2. Playing Content 26
Personalize your Slideshow Options. • Select the Shuffle: On for about 1 second until the music starts playing. 11.Press Select again to set non-stop slideshow. 8. Slideshow Options 1. Press select to view a photo. 10.Press and hold Select for Random order. • Select Loop: On to Pause the slideshow. Select a desired album. 9. Select Slideshow Options in PHOTO menu. 2. Playing Content 26

User Manual
Page 30
• Select the Slide Time for each photo view. • Select the Music for background music and select CurrentSong or GoList in the Music Submenu. 3. Press |
• Select the Slide Time for each photo view. • Select the Music for background music and select CurrentSong or GoList in the Music Submenu. 3. Press |
User Manual
Page 34
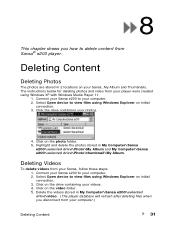
Select Open device to view files using Windows Explorer on initial connection. 3. Click on the video folder. 5. Click on the drive containing your computer. 2. Click the drive containing your player ... player. Delete the videos stored in My Computer\Sansa e200\selected drive\video. (The player database will refresh after deleting files when you how to view files using Windows Explorer on initial connection. 3. Deleting Videos To delete videos from your Sansa, follow these steps: 1. 8 This chapter shows you disconnect from your...
Select Open device to view files using Windows Explorer on initial connection. 3. Click on the video folder. 5. Click on the drive containing your computer. 2. Click the drive containing your player ... player. Delete the videos stored in My Computer\Sansa e200\selected drive\video. (The player database will refresh after deleting files when you how to view files using Windows Explorer on initial connection. 3. Deleting Videos To delete videos from your Sansa, follow these steps: 1. 8 This chapter shows you disconnect from your...
User Manual
Page 35
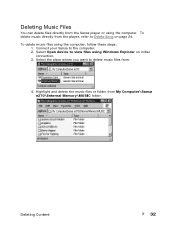
To delete music directly from . 4. Select the place where you want to delete music files from the player, refer to Delete Song on initial connection. 3. Deleting Content 32 To delete music files using Windows Explorer on page 24. Select Open device to the computer. 2. Connect your Sansa to view files using the computer, follow these steps: 1. Highlight and delete the music files or folder from the Sansa player or using the computer. Deleting Music Files You can delete files directly from My Computer\Sansa e270\Internal Memory\MUSIC folder.
To delete music directly from . 4. Select the place where you want to delete music files from the player, refer to Delete Song on initial connection. 3. Deleting Content 32 To delete music files using Windows Explorer on page 24. Select Open device to the computer. 2. Connect your Sansa to view files using the computer, follow these steps: 1. Highlight and delete the music files or folder from the Sansa player or using the computer. Deleting Music Files You can delete files directly from My Computer\Sansa e270\Internal Memory\MUSIC folder.

User Manual
Page 36
... all photos once • On - Settings You can personalize your Sansa® e200 player's settings. Turn off repeat mode • Song - View all the presets Radio channels FM Region: USA or World FM Mode: Stereo or Mono Slideshow Options Shuffle: • Off - Play music in random...8226; On - set the duration of each slide Music - Music Options Repeat: • Off - Settings 33 View photos in random order Loop: • Off - Repeat current song • All - View all songs Shuffle: • Off - 9 This chapter shows you how to customize your Sansa e200 player's settings ...
... all photos once • On - Settings You can personalize your Sansa® e200 player's settings. Turn off repeat mode • Song - View all the presets Radio channels FM Region: USA or World FM Mode: Stereo or Mono Slideshow Options Shuffle: • Off - Play music in random...8226; On - set the duration of each slide Music - Music Options Repeat: • Off - Settings 33 View photos in random order Loop: • Off - Repeat current song • All - View all songs Shuffle: • Off - 9 This chapter shows you how to customize your Sansa e200 player's settings ...