
User Guide
Page 2
...injury, burns or other hazards 10 Hold Switch 11 Minimum System Requirements 11 Connecting and Transferring 11 Connect to your computer 11 Sansa Media Converter 12 Supported IMPORT media types 13 Transfer Photos and Video 13 Transfer Music 14 Delete Files 14 Synchronize Files 14... software packages are available to the specific software package instructions 14 Safely Removing Sansa e200 from you Computer 14 Basic Usage ...15 Power On...15 Using Thumbwheel 15 Main Menu 16 Using Navigation Buttons 16 Using Submenu Button 16 Power Off 16 Music Mode 18 ƒ Music/Voice Playback...
...injury, burns or other hazards 10 Hold Switch 11 Minimum System Requirements 11 Connecting and Transferring 11 Connect to your computer 11 Sansa Media Converter 12 Supported IMPORT media types 13 Transfer Photos and Video 13 Transfer Music 14 Delete Files 14 Synchronize Files 14... software packages are available to the specific software package instructions 14 Safely Removing Sansa e200 from you Computer 14 Basic Usage ...15 Power On...15 Using Thumbwheel 15 Main Menu 16 Using Navigation Buttons 16 Using Submenu Button 16 Power Off 16 Music Mode 18 ƒ Music/Voice Playback...

User Guide
Page 4
...or operating any electronic device. 7. Follow these tips to ensure proper usage. 3. Do not use in potentially hazardous situations. 5. Keep this entire manual to keep your player away from sinks, drinks, bathtubs, showers, rain, and other activities. Hearing experts advise against... continuous loud and extended music play your computer. Keep your player working well for future reference. 4. Make sure your Sansa. 2. Read the safety instructions carefully before you . 6. This may create a traffic hazard and may be...
...or operating any electronic device. 7. Follow these tips to ensure proper usage. 3. Do not use in potentially hazardous situations. 5. Keep this entire manual to keep your player away from sinks, drinks, bathtubs, showers, rain, and other activities. Hearing experts advise against... continuous loud and extended music play your computer. Keep your player working well for future reference. 4. Make sure your Sansa. 2. Read the safety instructions carefully before you . 6. This may create a traffic hazard and may be...

User Guide
Page 5
... and supports Microsoft PlaysForSure subscription music. Features: 5 The Sansa e200 enables users to the player through the Sansa Media Converter. The Sansa e200 is a high performance portable digital audio/video player with a build-in the following capacity points: 2GB (e250...used for formatting and other functions, and thus is not available for data storage. Introduction Congratulations on 4 minute songs at 128 kbps MP3 (3,932,160 bytes/song) 1 megabyte (MB) = 1 million bytes; 1 gigabyte (GB) = 1 billion bytes. The Sansa e200 is available in voice recorder. Some of a SanDisk Sansa...
... and supports Microsoft PlaysForSure subscription music. Features: 5 The Sansa e200 enables users to the player through the Sansa Media Converter. The Sansa e200 is a high performance portable digital audio/video player with a build-in the following capacity points: 2GB (e250...used for formatting and other functions, and thus is not available for data storage. Introduction Congratulations on 4 minute songs at 128 kbps MP3 (3,932,160 bytes/song) 1 megabyte (MB) = 1 million bytes; 1 gigabyte (GB) = 1 billion bytes. The Sansa e200 is available in voice recorder. Some of a SanDisk Sansa...
User Guide
Page 9
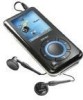
...when Repeat function is enabled. 7. To use the device for most USB ports to charge your 9 Artist Name Displays the current playback track artist name. 3. Play/Pause/Stop Displays the music or voice files playback status. 9. Li-ion Battery Charge The Sansa e200 comes with a replaceable Li-ion ... sound tracks. 2. Connect the small connector of the USB Cable to the USB port on for the very first time, remember to the Sansa e200 Dock Connector. Clock Displays current time. 6. Battery Indicates the Battery Status. Song Name Displays the current playback track song name. 4....
...when Repeat function is enabled. 7. To use the device for most USB ports to charge your 9 Artist Name Displays the current playback track artist name. 3. Play/Pause/Stop Displays the music or voice files playback status. 9. Li-ion Battery Charge The Sansa e200 comes with a replaceable Li-ion ... sound tracks. 2. Connect the small connector of the USB Cable to the USB port on for the very first time, remember to the Sansa e200 Dock Connector. Clock Displays current time. 6. Battery Indicates the Battery Status. Song Name Displays the current playback track song name. 4....

User Guide
Page 10
Follow the instructions provided with use . Battery Level Indicator Battery is Half Full Battery is Low Battery Replacement The Li-ion rechargeable battery is recommended that rechargeable batteries may eventually need ... battery will reach about 70% charge in 2.5 hours and full charge in about 3.5 hours. Also note that you fully charge your local retailer or visit SanDisk.com. To purchase a replacement battery see your Sansa e200 before first use and settings). battery. 2.
Follow the instructions provided with use . Battery Level Indicator Battery is Half Full Battery is Low Battery Replacement The Li-ion rechargeable battery is recommended that rechargeable batteries may eventually need ... battery will reach about 70% charge in 2.5 hours and full charge in about 3.5 hours. Also note that you fully charge your local retailer or visit SanDisk.com. To purchase a replacement battery see your Sansa e200 before first use and settings). battery. 2.
User Guide
Page 11
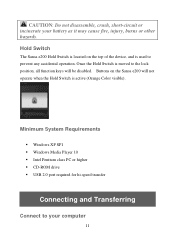
CAUTION: Do not disassemble, crush, short-circuit or incinerate your computer 11 Minimum System Requirements ƒ Windows XP SP1 ƒ Windows Media Player 10 ƒ Intel Pentium class PC or higher ƒ CD-ROM drive ƒ USB 2.0 port required for hi-speed transfer Connecting and Transferring Connect... lock position, all function keys will not operate when the Hold Switch is used to your battery as it may cause fire, injury, burns or other hazards. Hold Switch The Sansa e200 Hold Switch is located on the Sansa e200 will be disabled. Buttons on the top of the device, and is...
CAUTION: Do not disassemble, crush, short-circuit or incinerate your computer 11 Minimum System Requirements ƒ Windows XP SP1 ƒ Windows Media Player 10 ƒ Intel Pentium class PC or higher ƒ CD-ROM drive ƒ USB 2.0 port required for hi-speed transfer Connecting and Transferring Connect... lock position, all function keys will not operate when the Hold Switch is used to your battery as it may cause fire, injury, burns or other hazards. Hold Switch The Sansa e200 Hold Switch is located on the Sansa e200 will be disabled. Buttons on the top of the device, and is...
User Guide
Page 12
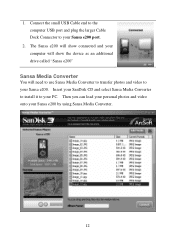
1. Connect the small USB Cable end to the computer USB port and plug the larger Cable Dock Connector to your Sansa e200 port. 2. The Sansa e200 will show connected and your computer will show the device as an additional drive called "Sansa e200" Sansa Media Converter You will need to use Sansa Media Converter to transfer photos and video to your Sansa e200. Then you can load your personal photos and video onto your PC. Insert your SanDisk CD and select Sansa Media Converter to install it to your Sansa e200 by using Sansa Media Converter. 12
1. Connect the small USB Cable end to the computer USB port and plug the larger Cable Dock Connector to your Sansa e200 port. 2. The Sansa e200 will show connected and your computer will show the device as an additional drive called "Sansa e200" Sansa Media Converter You will need to use Sansa Media Converter to transfer photos and video to your Sansa e200. Then you can load your personal photos and video onto your PC. Insert your SanDisk CD and select Sansa Media Converter to install it to your Sansa e200 by using Sansa Media Converter. 12

User Guide
Page 13
...conversion process and transcode all of the files in the selected media window and output them using the parameter setting for QuickTime MOV file. Add the media files to your PC 2. The detected Sansa e200 will appear if not installed. Supported IMPORT media types ƒ Still Image Files...: JPEG, TIFF, PNG, BMP, GIF. ƒ Video Files: AVI, MPEG-1 & MPEG-2 in AVI format, DAT, ASF, QuickTime MOV, and WMV. Please Note: QuickTime 6.5 or higher and Windows Media Player 9 or ...
...conversion process and transcode all of the files in the selected media window and output them using the parameter setting for QuickTime MOV file. Add the media files to your PC 2. The detected Sansa e200 will appear if not installed. Supported IMPORT media types ƒ Still Image Files...: JPEG, TIFF, PNG, BMP, GIF. ƒ Video Files: AVI, MPEG-1 & MPEG-2 in AVI format, DAT, ASF, QuickTime MOV, and WMV. Please Note: QuickTime 6.5 or higher and Windows Media Player 9 or ...

User Guide
Page 14
...system file browser to view all files on the player). 4. Synchronize Files Various software packages are WMA or MP3, they can now disconnect the player from your computer to Sansa e200 by using a variety of music software programs to safety remove the Sansa e200: 1. Wait until "Safe to synchronize ...songs on the MTP Media Player icon in MTP mode or the Safely Remove Hardware icon...
...system file browser to view all files on the player). 4. Synchronize Files Various software packages are WMA or MP3, they can now disconnect the player from your computer to Sansa e200 by using a variety of music software programs to safety remove the Sansa e200: 1. Wait until "Safe to synchronize ...songs on the MTP Media Player icon in MTP mode or the Safely Remove Hardware icon...

User Guide
Page 15
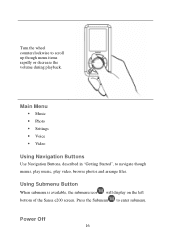
Note: when you use the wheel the blue LED under the wheel should lighten automatically. 15 Using Thumbwheel Turn the wheel clockwise to scroll down though menu items rapidly or increase the volume during playback. The Thumbwheel will light up and the main menu will appear. Basic Usage Power On Press the Power button once.
Note: when you use the wheel the blue LED under the wheel should lighten automatically. 15 Using Thumbwheel Turn the wheel clockwise to scroll down though menu items rapidly or increase the volume during playback. The Thumbwheel will light up and the main menu will appear. Basic Usage Power On Press the Power button once.
User Guide
Page 16
Press the Submenu to scroll up though menu items rapidly or decrease the volume during playback. Using Submenu Button When submenu is available, the submenu icon will display on the left bottom of the Sansa e200 screen. Turn the wheel counterclockwise to enter submenu. Power Off 16 Main Menu ƒ Music ƒ Photo ƒ Settings ƒ Voice ƒ Video Using Navigation Buttons Use Navigation Buttons, described in "Getting Started", to navigate though menus, play music, play video, browse photos and arrange files.
Press the Submenu to scroll up though menu items rapidly or decrease the volume during playback. Using Submenu Button When submenu is available, the submenu icon will display on the left bottom of the Sansa e200 screen. Turn the wheel counterclockwise to enter submenu. Power Off 16 Main Menu ƒ Music ƒ Photo ƒ Settings ƒ Voice ƒ Video Using Navigation Buttons Use Navigation Buttons, described in "Getting Started", to navigate though menus, play music, play video, browse photos and arrange files.
User Guide
Page 21
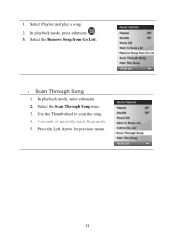
Select Playlist and play a song. 2. In playback mode, press submenu . 3. Select the Scan Through Song item. 3. In playback mode, enter submenu. 2. Press the Left Arrow for previous menu. 21 1. Use the Thumbwheel to scan the song. 4. 3 seconds of inactivity exists Scan mode. 5. Select the Remove Song from Go List. ƒ Scan Through Song 1.
Select Playlist and play a song. 2. In playback mode, press submenu . 3. Select the Scan Through Song item. 3. In playback mode, enter submenu. 2. Press the Left Arrow for previous menu. 21 1. Use the Thumbwheel to scan the song. 4. 3 seconds of inactivity exists Scan mode. 5. Select the Remove Song from Go List. ƒ Scan Through Song 1.
User Guide
Page 22
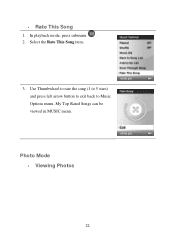
In playback mode, press submenu . 2. Photo Mode ƒ Viewing Photos 22 Use Thumbwheel to rate the song (1 to 5 stars) and press left arrow button to exit back to Music Options menu. My Top Rated Songs can be viewed in MUSIC menu. Select the Rate This Song item. 3. ƒ Rate This Song 1.
In playback mode, press submenu . 2. Photo Mode ƒ Viewing Photos 22 Use Thumbwheel to rate the song (1 to 5 stars) and press left arrow button to exit back to Music Options menu. My Top Rated Songs can be viewed in MUSIC menu. Select the Rate This Song item. 3. ƒ Rate This Song 1.
User Guide
Page 23
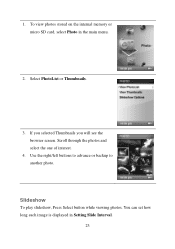
You can set how long each image is displayed in the main menu. 2. If you selected Thumbnails you will see the browser screen. Use the right/left buttons to advance or backup to another photo. Scroll through the photos and select the one of interest. 4. To view photos stored on the internal memory or micro SD card, select Photo in Setting Slide Interval. 23 1. Select PhotoList or Thumbnails. 3. Slideshow To play slideshow, Press Select button while viewing photos.
You can set how long each image is displayed in the main menu. 2. If you selected Thumbnails you will see the browser screen. Use the right/left buttons to advance or backup to another photo. Scroll through the photos and select the one of interest. 4. To view photos stored on the internal memory or micro SD card, select Photo in Setting Slide Interval. 23 1. Select PhotoList or Thumbnails. 3. Slideshow To play slideshow, Press Select button while viewing photos.

User Guide
Page 24
z Select Loop: On to control volume. 9. Use Thumbwheel to set nonstop slideshow. Select ViewPhotoList 5. Select the first picture of your Slideshow Options. Press Left Arrow to move to ViewPhotoList. 24 Select Slideshow ...
z Select Loop: On to control volume. 9. Use Thumbwheel to set nonstop slideshow. Select ViewPhotoList 5. Select the first picture of your Slideshow Options. Press Left Arrow to move to ViewPhotoList. 24 Select Slideshow ...
User Guide
Page 25
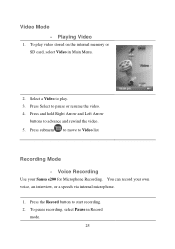
Press and hold Right Arrow and Left Arrow buttons to start recording. 2. To play . 3. You can record your Sansa e200 for Microphone Recording. Select a Video to play video stored on the internal memory or SD card, select Video in Record mode. 25 Press submenu ... pause or resume the video. 4. Press the Record button to advance and rewind the video. 5. Press Select to Video list Recording Mode ƒ Voice Recording Use your own voice, an interview, or a speech via internal microphone. 1. Video Mode ƒ Playing Video 1. To pause recording, select Pause in Main Menu...
Press and hold Right Arrow and Left Arrow buttons to start recording. 2. To play . 3. You can record your Sansa e200 for Microphone Recording. Select a Video to play video stored on the internal memory or SD card, select Video in Record mode. 25 Press submenu ... pause or resume the video. 4. Press the Record button to advance and rewind the video. 5. Press Select to Video list Recording Mode ƒ Voice Recording Use your own voice, an interview, or a speech via internal microphone. 1. Video Mode ƒ Playing Video 1. To pause recording, select Pause in Main Menu...
User Guide
Page 28
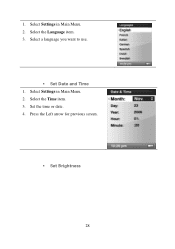
Select Settings in Main Menu. 2. Select the Language item. 3. Set the time or date. 4. Press the Left arrow for previous screen. ƒ Set Brightness 28 Select the Time item. 3. Select a language you want to use. ƒ Set Date and Time 1. 1. Select Settings in Main Menu. 2.
Select Settings in Main Menu. 2. Select the Language item. 3. Set the time or date. 4. Press the Left arrow for previous screen. ƒ Set Brightness 28 Select the Time item. 3. Select a language you want to use. ƒ Set Date and Time 1. 1. Select Settings in Main Menu. 2.

User Guide
Page 29
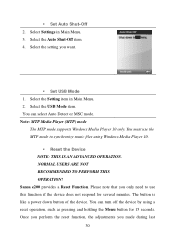
Use the wheel to adjust the brightness setting, and then press Select to confirm and exit. ƒ Reset to Original Setting 1. Select the Reset item. 3. Select the Info item. 3. You can read device information on the screen. 29 5. Select Settings in Main Menu. 2. Select Settings in Main Menu. 2. Select the Brightness item. 7. Select the Yes item. ƒ Device Information 1. Select Settings in Main Menu. 6.
Use the wheel to adjust the brightness setting, and then press Select to confirm and exit. ƒ Reset to Original Setting 1. Select the Reset item. 3. Select the Info item. 3. You can read device information on the screen. 29 5. Select Settings in Main Menu. 2. Select Settings in Main Menu. 2. Select the Brightness item. 7. Select the Yes item. ƒ Device Information 1. Select Settings in Main Menu. 6.
User Guide
Page 30
...) mode The MTP mode supports Windows Media Player 10 only. Sansa e200 provides a Reset Function. The button is like a power down button of the device. ƒ Set Auto Shut-Off 2. You can turn off the device by using Windows Media Player 10. ƒ Reset the Device NOTE: THIS IS AN ADVANCED OPERATION. NORMAL USERS...
...) mode The MTP mode supports Windows Media Player 10 only. Sansa e200 provides a Reset Function. The button is like a power down button of the device. ƒ Set Auto Shut-Off 2. You can turn off the device by using Windows Media Player 10. ƒ Reset the Device NOTE: THIS IS AN ADVANCED OPERATION. NORMAL USERS...

User Guide
Page 32
...dragged into the Data folder (these files will not appear on the player). Question: Is the player compatible with my mp3 player? Answer: As long as normal, either by copying and pasting, or transferring. Question: How do I use non-supported file types with podcasts? Otherwise, they can I drag ...files to the root directory. Answer: You should show up My Computer, and it functions correctly and has all the latest features. An alternative is to switch the player to MSC mode, then...
...dragged into the Data folder (these files will not appear on the player). Question: Is the player compatible with my mp3 player? Answer: As long as normal, either by copying and pasting, or transferring. Question: How do I use non-supported file types with podcasts? Otherwise, they can I drag ...files to the root directory. Answer: You should show up My Computer, and it functions correctly and has all the latest features. An alternative is to switch the player to MSC mode, then...
