User Manual
Page 2
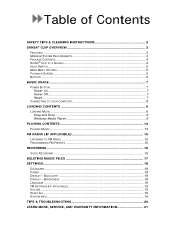
... TIPS & CLEANING INSTRUCTIONS 2 SANSA® CLIP OVERVIEW 3 FEATURES 3 MINIMUM SYSTEM REQUIREMENTS 3 PACKAGE CONTENTS 4 SANSA® CLIP AT A GLANCE 4 HOLD SWITCH 5 MAIN MENU OPTIONS 5 PLAYBACK SCREEN 5 BATTERY 6 BASIC USAGE 7 POWER BUTTON 7 Power On 7 Power Off 7 Reset 7 CONNECTING TO YOUR COMPUTER 8 LOADING CONTENTS 9 LOADING MUSIC 9 Drag and Drop 9 Windows Media Player 9 PLAYING CONTENTS 13 PLAYING MUSIC 13 FM RADIO (IF APPLICABLE 15 LISTENING TO FM RADIO 15 PROGRAMMING FM PRESETS 15 RECORDING 16 VOICE RECORDING 16 DELETING MUSIC FILES 17 SETTINGS 18 EQUALIZER...
... TIPS & CLEANING INSTRUCTIONS 2 SANSA® CLIP OVERVIEW 3 FEATURES 3 MINIMUM SYSTEM REQUIREMENTS 3 PACKAGE CONTENTS 4 SANSA® CLIP AT A GLANCE 4 HOLD SWITCH 5 MAIN MENU OPTIONS 5 PLAYBACK SCREEN 5 BATTERY 6 BASIC USAGE 7 POWER BUTTON 7 Power On 7 Power Off 7 Reset 7 CONNECTING TO YOUR COMPUTER 8 LOADING CONTENTS 9 LOADING MUSIC 9 Drag and Drop 9 Windows Media Player 9 PLAYING CONTENTS 13 PLAYING MUSIC 13 FM RADIO (IF APPLICABLE 15 LISTENING TO FM RADIO 15 PROGRAMMING FM PRESETS 15 RECORDING 16 VOICE RECORDING 16 DELETING MUSIC FILES 17 SETTINGS 18 EQUALIZER...
User Manual
Page 4
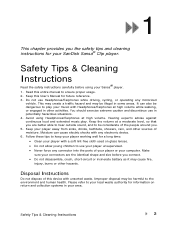
... your player working well for future reference. 3. Read this User's Manual for a long time: • Clean your player with any motorized vehicle. Do not use in your Sansa® player. 1. Avoid using your area. Disposal Instructions Do not dispose of moisture. Safety Tips & Cleaning Instructions 2 You should exercise extreme caution and discontinue use Headphones/Earphones while driving, cycling, or operating any electronic device. 6. Keep the volume at...
... your player working well for future reference. 3. Read this User's Manual for a long time: • Clean your player with any motorized vehicle. Do not use in your Sansa® player. 1. Avoid using your area. Disposal Instructions Do not dispose of moisture. Safety Tips & Cleaning Instructions 2 You should exercise extreme caution and discontinue use Headphones/Earphones while driving, cycling, or operating any electronic device. 6. Keep the volume at...

User Manual
Page 5
The Sansa® Clip comes with a removable clip. Features • Digital Audio Player - supports MP3, WAV, WMA, secure WMA, and Audiobook files. • FM Radio (if applicable) - allows users to store data on your purchase of your music experience. • Internal Memory - Sansa® Clip is a sleek and wearable MP3 player with a built-in microphone for hi-speed transfers and charging Sansa® Clip Overview 3 You can enjoy a built-in rechargeable battery will...
The Sansa® Clip comes with a removable clip. Features • Digital Audio Player - supports MP3, WAV, WMA, secure WMA, and Audiobook files. • FM Radio (if applicable) - allows users to store data on your purchase of your music experience. • Internal Memory - Sansa® Clip is a sleek and wearable MP3 player with a built-in microphone for hi-speed transfers and charging Sansa® Clip Overview 3 You can enjoy a built-in rechargeable battery will...
User Manual
Page 6
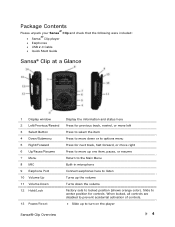
... included: • Sansa® Clip player • Earphones • USB 2.0 Cable • Quick Start Guide Sansa® Clip at a Glance 1 Display window 2 Left/Previous/Rewind 3 Select Button 4 Down/Submenu 5 Right/Forward 6 Up/Pause/Resume 7 Menu 8 MIC 9 Earphone Port 10 Volume Up 11 Volume Down 12 Hold/Lock 13 Power/Reset Display the information and status here Press for previous track, rewind, or move left Press to select the item Press to move...
... included: • Sansa® Clip player • Earphones • USB 2.0 Cable • Quick Start Guide Sansa® Clip at a Glance 1 Display window 2 Left/Previous/Rewind 3 Select Button 4 Down/Submenu 5 Right/Forward 6 Up/Pause/Resume 7 Menu 8 MIC 9 Earphone Port 10 Volume Up 11 Volume Down 12 Hold/Lock 13 Power/Reset Display the information and status here Press for previous track, rewind, or move left Press to select the item Press to move...
User Manual
Page 7
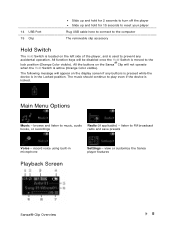
... customize the Sansa player features Sansa® Clip Overview 5 All function keys will not operate when the Hold Switch is in microphone Playback Screen Settings - The music should continue to music, audio Radio (if applicable) - record voice using built-in the Locked position. All the buttons on the Sansa® Clip will be disabled once the Hold Switch is moved to FM broadcast books, or recordings radio and save presets Voice - browse and listen to play even if the device is used...
... customize the Sansa player features Sansa® Clip Overview 5 All function keys will not operate when the Hold Switch is in microphone Playback Screen Settings - The music should continue to music, audio Radio (if applicable) - record voice using built-in the Locked position. All the buttons on the Sansa® Clip will be disabled once the Hold Switch is moved to FM broadcast books, or recordings radio and save presets Voice - browse and listen to play even if the device is used...

User Manual
Page 8
... the cable. 1 Shuffle 2 Repeat 3 Current/Total Tracks 4 Battery Indicator 5 Artist Name 6 Title/Album 7 Play Time 8 Progress Bar 9 Play/Pause Indicate that the Shuffle function is enabled Indicate that the rechargeable batteries are not replaceable. Sansa® Clip Overview 6 NOTE: Some low-power USB ports may not be on the computer. 2. To use the player for most USB ports to the computer USB. 4. You can also be charged using an AC adapter...
... the cable. 1 Shuffle 2 Repeat 3 Current/Total Tracks 4 Battery Indicator 5 Artist Name 6 Title/Album 7 Play Time 8 Progress Bar 9 Play/Pause Indicate that the Shuffle function is enabled Indicate that the rechargeable batteries are not replaceable. Sansa® Clip Overview 6 NOTE: Some low-power USB ports may not be on the computer. 2. To use the player for most USB ports to the computer USB. 4. You can also be charged using an AC adapter...
User Manual
Page 9
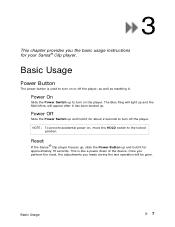
... usage instructions for about 2 seconds to turn off the player, as well as resetting it for your Sansa® Clip player. The Blue Ring will light up and the Main Menu will be gone. This is used to turn on , move the HOLD switch to the locked position. Power On Slide the Power Switch up . NOTE: To prevent accidental power on the player. Basic Usage Power Button The power button is like a power...
... usage instructions for about 2 seconds to turn off the player, as well as resetting it for your Sansa® Clip player. The Blue Ring will light up and the Main Menu will be gone. This is used to turn on , move the HOLD switch to the locked position. Power On Slide the Power Switch up . NOTE: To prevent accidental power on the player. Basic Usage Power Button The power button is like a power...
User Manual
Page 10
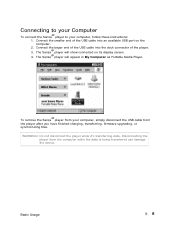
... remove the Sansa® player from your computer, follow these instructions: 1. Disconnecting the player from the player after you have finished charging, transferring, firmware upgrading, or synchronizing files. Connecting to your Computer To connect the Sansa® player to your computer, simply disconnect the USB cable from the computer while the data is being transferred can damage the device. Connect the larger end of the USB cable into the dock connector of the USB cable...
... remove the Sansa® player from your computer, follow these instructions: 1. Disconnecting the player from the player after you have finished charging, transferring, firmware upgrading, or synchronizing files. Connecting to your Computer To connect the Sansa® player to your computer, simply disconnect the USB cable from the computer while the data is being transferred can damage the device. Connect the larger end of the USB cable into the dock connector of the USB cable...
User Manual
Page 11
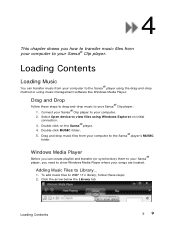
... using Windows Explorer on the Sansa® player. 4. Adding Music Files to Library... 1. Click the arrow below the Library tab Loading Contents 9 Drag and Drop Follow these steps: 2. Double-click MUSIC folder. 5. Double-click on initial connection. 3. 4 This chapter shows you need to show Windows Media Player where your songs are located. Loading Contents Loading Music You can create playlist and transfer (or synchronize) them to your Sansa® player, you how to transfer music files...
... using Windows Explorer on the Sansa® player. 4. Adding Music Files to Library... 1. Click the arrow below the Library tab Loading Contents 9 Drag and Drop Follow these steps: 2. Double-click MUSIC folder. 5. Double-click on initial connection. 3. 4 This chapter shows you need to show Windows Media Player where your songs are located. Loading Contents Loading Music You can create playlist and transfer (or synchronize) them to your Sansa® player, you how to transfer music files...
User Manual
Page 13
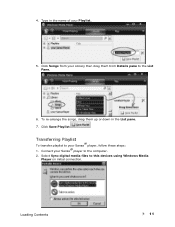
Click Save Playlist. Type in the List pane. 7. Click Songs from your Sansa® player to your Playlist. 5. Connect your Library then drag them up or down in the name of your Sansa® player, follow these steps: 1. 4. Transferring Playlist To transfer playlist to the computer. 2. Select Sync digital media files to the List Pane. 6. To re-arrange the songs, drag them from Details pane to this devices using Windows Media Player on initial connection. Loading Contents 11
Click Save Playlist. Type in the List pane. 7. Click Songs from your Sansa® player to your Playlist. 5. Connect your Library then drag them up or down in the name of your Sansa® player, follow these steps: 1. 4. Transferring Playlist To transfer playlist to the computer. 2. Select Sync digital media files to the List Pane. 6. To re-arrange the songs, drag them from Details pane to this devices using Windows Media Player on initial connection. Loading Contents 11

User Manual
Page 14
Right-click on the left pane. 5. Select Personal Playlists from the dropdown menu on Your Sansa® Player then select Set Up Sync... 4. To see the Sync progress, click on Sync Results. Synchronization will start as soon as you want transfer to your Sansa® player, click Add then Finish. 6. Loading Contents 12 Highlight the playlists you click Finish. 3.
Right-click on the left pane. 5. Select Personal Playlists from the dropdown menu on Your Sansa® Player then select Set Up Sync... 4. To see the Sync progress, click on Sync Results. Synchronization will start as soon as you want transfer to your Sansa® player, click Add then Finish. 6. Loading Contents 12 Highlight the playlists you click Finish. 3.
User Manual
Page 15
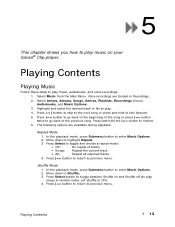
Select Artists, Albums, Songs, Genres, Playlists, Recordings (Voice), Audiobooks, and Music Options. 3. Playing Contents Playing Music Follow these steps to play music, audiobooks, and voice recordings: 1. Press >>| button to skip to the next song or press-and-hold to play music on your Sansa® Clip player. Highlight and select the desired track or file to play . 4. Voice recordings are located in Recordings. 2. 5 This chapter shows you how to fast forward. 5. Press | Select Music from the Main Menu.
Select Artists, Albums, Songs, Genres, Playlists, Recordings (Voice), Audiobooks, and Music Options. 3. Playing Contents Playing Music Follow these steps to play music, audiobooks, and voice recordings: 1. Press >>| button to skip to the next song or press-and-hold to play music on your Sansa® Clip player. Highlight and select the desired track or file to play . 4. Voice recordings are located in Recordings. 2. 5 This chapter shows you how to fast forward. 5. Press | Select Music from the Main Menu.

User Manual
Page 16
MusicEQ The Sansa® Clip player provides various EQ modes such as: Rock, Pop, Jazz, Classical, and Custom. 1. Press | In the playback mode, press Submenu button to the desired EQ mode and press Select. 4. Move down and select Music EQ. 3. Move down to enter Music Options. 2.
MusicEQ The Sansa® Clip player provides various EQ modes such as: Rock, Pop, Jazz, Classical, and Custom. 1. Press | In the playback mode, press Submenu button to the desired EQ mode and press Select. 4. Move down and select Music EQ. 3. Move down to enter Music Options. 2.
User Manual
Page 17
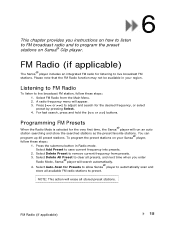
... submenu button in your Sansa® player, follow these steps: 1. Select Add Preset to remove current frequency from the Main Menu. 2. FM Radio (if applicable) 15 Select FM Radio from presets. 3. Select Delete Preset to save current frequency into presets. 2. You can program up 40 preset stations. To program the preset stations on Sansa® Clip player. 6 FM Radio (if applicable) The Sansa® player includes an integrated FM radio for the very first time, the Sansa® player...
... submenu button in your Sansa® player, follow these steps: 1. Select Add Preset to remove current frequency from the Main Menu. 2. FM Radio (if applicable) 15 Select FM Radio from presets. 3. Select Delete Preset to save current frequency into presets. 2. You can program up 40 preset stations. To program the preset stations on Sansa® Clip player. 6 FM Radio (if applicable) The Sansa® player includes an integrated FM radio for the very first time, the Sansa® player...
User Manual
Page 18
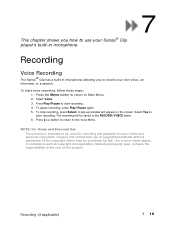
... recording. Press the Menu button to return to Main Menu. 2. A pop-up window will be saved in microphone allowing you how to use your own voice, an interview, or a speech. Press | The recording will appear on the screen. To pause recording, press Play/Pause again 5. This chapter shows you to record your Sansa® Clip player's built-in microphone. 7 Recording Voice Recording The Sansa® Clip has a built-in the RECORD/VOICE folder...
... recording. Press the Menu button to return to Main Menu. 2. A pop-up window will be saved in microphone allowing you how to use your own voice, an interview, or a speech. Press | The recording will appear on the screen. To pause recording, press Play/Pause again 5. This chapter shows you to record your Sansa® Clip player's built-in microphone. 7 Recording Voice Recording The Sansa® Clip has a built-in the RECORD/VOICE folder...
User Manual
Page 19
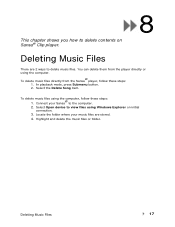
Deleting Music Files 17 Select the Delete Song item. You can delete them from the Sansa® player, follow these steps: 1. To delete music files directly from the player directly or using the computer. Connect your music files are 2 ways to the computer. 2. Deleting Music Files There are stored. 4. Highlight and delete the music files or folder. 8 This chapter shows you how to delete contents on initial connection. 3. Select Open device to view files using the computer, follow these steps: 1. Locate the folder where...
Deleting Music Files 17 Select the Delete Song item. You can delete them from the Sansa® player, follow these steps: 1. To delete music files directly from the player directly or using the computer. Connect your music files are 2 ways to the computer. 2. Deleting Music Files There are stored. 4. Highlight and delete the music files or folder. 8 This chapter shows you how to delete contents on initial connection. 3. Select Open device to view files using the computer, follow these steps: 1. Locate the folder where...
User Manual
Page 22
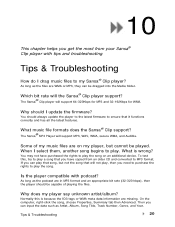
... additional device. Some of playing the files. If you have purchased the rights to play a song that song, but cannot be dragged into the Media folder. When I update the firmware? Normally this , try to play the song. The Sansa® MP3 Player will not play, then you can play . Then you need to purchase the rights to my Sansa® Clip player? Tips & Troubleshooting How do I drag music files to play the song on my player...
... additional device. Some of playing the files. If you have purchased the rights to play a song that song, but cannot be dragged into the Media folder. When I update the firmware? Normally this , try to play the song. The Sansa® MP3 Player will not play, then you can play . Then you need to purchase the rights to my Sansa® Clip player? Tips & Troubleshooting How do I drag music files to play the song on my player...
User Manual
Page 23
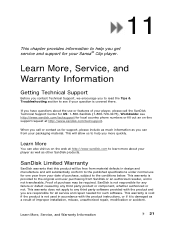
... product instructions, or if it is not responsible for any failure or defect caused by any third party software provided with the product and you are responsible for all service and repair needed for US: 1-866-SanDisk (1-866-726-3475), Worldwide: see if your player as well as other SanDisk products. Proof of your Sansa® Clip player. Learn More, Service, and...
... product instructions, or if it is not responsible for any failure or defect caused by any third party software provided with the product and you are responsible for all service and repair needed for US: 1-866-SanDisk (1-866-726-3475), Worldwide: see if your player as well as other SanDisk products. Proof of your Sansa® Clip player. Learn More, Service, and...
User Manual
Page 24
... TERMS, DO NOT DOWNLOAD, INSTALL OR USE THE SOFTWARE AND, IF APPLICABLE, PROMPTLY RETURN IT TO YOUR PLACE OF PURCHASE FOR A REFUND. The firmware, computer programs, device drivers, data or information ("Software") is provided to operate without failure. This warranty gives you specific legal rights, and you " or "your personal use the Software in any Learn More, Service, and Warranty Information 22 SanDisk will be subject...
... TERMS, DO NOT DOWNLOAD, INSTALL OR USE THE SOFTWARE AND, IF APPLICABLE, PROMPTLY RETURN IT TO YOUR PLACE OF PURCHASE FOR A REFUND. The firmware, computer programs, device drivers, data or information ("Software") is provided to operate without failure. This warranty gives you specific legal rights, and you " or "your personal use the Software in any Learn More, Service, and Warranty Information 22 SanDisk will be subject...

User Manual
Page 25
... the Software, or re-create or discover the source code of the Software. You may not modify, adapt, translate or create derivative works (new versions) of your rights under this Agreement will immediately cease. You may not separate the Software into component parts for use " when it . YOU ASSUME THE ENTIRE RISK AS TO THE QUALITY AND PERFORMANCE OF THE SOFTWARE. The Software is SanDisk...
... the Software, or re-create or discover the source code of the Software. You may not modify, adapt, translate or create derivative works (new versions) of your rights under this Agreement will immediately cease. You may not separate the Software into component parts for use " when it . YOU ASSUME THE ENTIRE RISK AS TO THE QUALITY AND PERFORMANCE OF THE SOFTWARE. The Software is SanDisk...


